- Как заменить элемент массива java
- Java: Replace Strings in Streams, Arrays, Files etc.
- The TokenReplacingReader
- A TokenReplacingReader Usage Example
- TokenReplacingReader Performance
- More Uses
- TokenReplacingReader Code
- Списочный массив ArrayList
- Добавление элемента в массив ArrayList, метод add
- Замена элемента массива ArrayList, метод set
- Удаление элемента массива ArrayList, метод remove
- Определение позиции элемента ArrayList, метод indexOf
- Проверка наличие элемента в ArrayList, метод contains
- Создание массива из элементов ArrayList, метод toArray
- Интерфейс List
- Преобразование массива в список, Arrays
Как заменить элемент массива java
Чтобы заменить элемент массива в Java , вы можете использовать обычную операцию присваивания, но в квадратных скобках указать индекс элемента, который вы хотите заменить. Например:
int[] arr = 1, 2, 3, 4>; arr[2] = 5; // заменяем третий элемент (индекс 2) на 5 System.out.println(Arrays.toString(arr)); // => [1, 2, 5, 4] Java: Replace Strings in Streams, Arrays, Files etc.
Sometimes you need to replace strings or tokens in streams, arrays, files, or large strings.
You could use the String.replace() method, but for large amounts of data, and high number of replacements, this performs badly. Why?
The String.replace() method creates a new String instance — which is a copy of the original String with the replacements applied. If the String is 1 MB large, you end up with two strings each 1 MB large. If you have to perform 5 replacements, you have to call replace() 5 times, each time on the string returned by the last replace() call, like this:
String data = "1234567890"; // imagine a large string loaded from a file data.replace("12", "ab") .replace("34", "cd") .replace("56", "ef") .replace("78", "gh") .replace("90", "ij") The result would be 5 copies of the original string and a total memory consumption of 5 times the original data. As you can imagine, this method performs badly, and doesn’t scale very well. The O notation of using the String.replace() method is:
. where N = the size of the string, and M = the number of replacements to perform.
The TokenReplacingReader
Instead of using the String.replace() method I will here present a different, more scalable solution called a TokenReplacingReader . First I will explain how it works in theory, then I’ll give you the working code at the end of this article.
The TokenReplacingReader reads character data from a standard java.io.Reader .
Your application then reads data via the TokenReplacingReader . The data your application reads from the TokenReplacingReader will be the data read from the Reader used by the TokenReplacingReader , with all tokens replaced with new values. If you need to write the data to disk or some output stream, your application will have to do so itself.
When the TokenReplacingReader finds a token in that data of the form $ it calls an ITokenResolver to obtain the value to insert into the character stream instead of the token.
The ITokenResolver is an interface which you can implement yourself. Thus your own token resolver can lookup token values from whereever it suits your application — a Map , a database, a JNDI directory, etc. The token name (without the enclosing $<> ) is passed to the ITokenResolver.resolveToken(String tokenName) method.
The TokenReplacingReader is itself a subclass of java.io.Reader , so any class that can use a Reader , can use a TokenReplacingReader .
Here is a diagram showing how the TokenReplacingReader works:
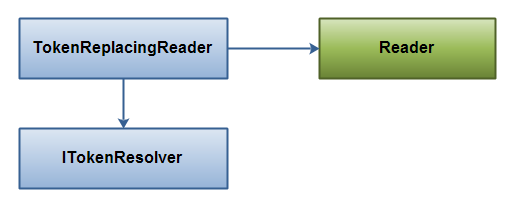 |
| TokenReplacingReader, capable of replacing string tokens in character streams. |
A TokenReplacingReader Usage Example
Here is an example of how to use the TokenReplacingReader :
public static void main(String[] args) throws IOException < Maptokens = new HashMap(); tokens.put("token1", "value1"); tokens.put("token2", "JJ ROCKS. "); MapTokenResolver resolver = new MapTokenResolver(tokens); Reader source = new StringReader("1234567890$abcdefg$XYZ$000"); Reader reader = new TokenReplacingReader(source, resolver); int data = reader.read(); while(data != -1) < System.out.print((char) data); data = reader.read(); >> The two tokens $ and $ in the input String will be replaced with the values value1 and JJ ROCKS. . These values are returned by the MapTokenResolver (an ITokenResolver implementation resolving values by looking them up in a Map ).
Here are a few additional examples showing how to use the TokenReplacingReader to replace tokens in character streams, arrays, files and large Strings.
ITokenResolver resolver = . ; // get ITokenResolver instance. Reader reader = new TokenReplacingReader( new InputStreamReader(inputStream), resolver); Reader reader = new TokenReplacingReader( new FileReader(new File("c:\\file.txt"), resolver); Reader reader = new TokenReplacingReader( new CharArrayReader(charArray), resolver); Reader reader = new TokenReplacingReader( new StringReader("biiig string. "), resolver); TokenReplacingReader Performance
The TokenReplacingReader does not use as much memory as the String.replace() method. The data is modified while read, so all the data is copied once (but no more). Since the data is copied character by character, the memory consumption is not much larger than the buffer / stream of data you are reading.
The speed of the replacement of tokens depends on your implementation of the ITokenResolver interface.
The O notation of the TokenReplacingReader is:
. where N is the size of the data to replace tokens in, and M is the number of replacements.
This is faster than the O(N * M) of the String.replace() method.
More Uses
You could create a variant of the TokenReplacingReader which can replace XML entities (e.g. & ) with single character values. Or create a small script-like language as tokens, which can take parameters in the tokens, calls reusable functions etc. Only the imagination sets the limits for what you can use this kind of token replacement mechanism for.
Additionally, since TokenReplacingReader is a java.io.Reader , and it gets its characters from a Reader itself, you can chain it with other java.io.Reader ‘s or InputStreams which does other things (like unzipping, decrypting, converting from UTF-8, UTF-16 etc.)
TokenReplacingReader Code
Here is the code for the TokenReplacingReader and it’s interface ITokenResolver . You can also access the TokenReplacingReader code on GitHub.
NOTE:
Not all methods are implemented. Only enough to show you how the TokenReplacingReader works. You can implement the rest yourself (if you ever need them).
public class TokenReplacingReader extends Reader < protected PushbackReader pushbackReader = null; protected ITokenResolver tokenResolver = null; protected StringBuilder tokenNameBuffer = new StringBuilder(); protected String tokenValue = null; protected int tokenValueIndex = 0; public TokenReplacingReader(Reader source, ITokenResolver resolver) < this.pushbackReader = new PushbackReader(source, 2); this.tokenResolver = resolver; >public int read(CharBuffer target) throws IOException < throw new RuntimeException("Operation Not Supported"); >public int read() throws IOException < if(this.tokenValue != null)< if(this.tokenValueIndex < this.tokenValue.length())< return this.tokenValue.charAt(this.tokenValueIndex++); >if(this.tokenValueIndex == this.tokenValue.length()) < this.tokenValue = null; this.tokenValueIndex = 0; >> int data = this.pushbackReader.read(); if(data != '$') return data; data = this.pushbackReader.read(); if(data != ' <')< this.pushbackReader.unread(data); return '$'; >this.tokenNameBuffer.delete(0, this.tokenNameBuffer.length()); data = this.pushbackReader.read(); while(data != '>') < this.tokenNameBuffer.append((char) data); data = this.pushbackReader.read(); >this.tokenValue = this.tokenResolver .resolveToken(this.tokenNameBuffer.toString()); if(this.tokenValue == null)< this.tokenValue = "$"; > if(this.tokenValue.length() == 0) < return read(); >return this.tokenValue.charAt(this.tokenValueIndex++); > public int read(char cbuf[]) throws IOException < return read(cbuf, 0, cbuf.length); >public int read(char cbuf[], int off, int len) throws IOException < int charsRead = 0; for(int i=0; ibreak; > charsRead = i + 1; cbuf[off + i] = (char) nextChar; > return charsRead; > public void close() throws IOException < this.pushbackReader.close(); >public long skip(long n) throws IOException < throw new RuntimeException("Operation Not Supported"); >public boolean ready() throws IOException < return this.pushbackReader.ready(); >public boolean markSupported() < return false; >public void mark(int readAheadLimit) throws IOException < throw new RuntimeException("Operation Not Supported"); >public void reset() throws IOException < throw new RuntimeException("Operation Not Supported"); >> public interface ITokenResolver
Here is an example ITokenResolver implementation which looks up token values in a Map .
public class MapTokenResolver implements ITokenResolver < protected MaptokenMap = new HashMap(); public MapTokenResolver(Map tokenMap) < this.tokenMap = tokenMap; >public String resolveToken(String tokenName) < return this.tokenMap.get(tokenName); >>
Списочный массив ArrayList
В Java массивы имеют фиксированную длину и не могут быть увеличены или уменьшены. Класс ArrayList реализует интерфейс List и может менять свой размер во время исполнения программы, при этом не обязательно указывать размерность при создании объекта. Элементы ArrayList могут быть абсолютно любых типов в том числе и null.
Пример создания объекта ArrayList
ArrayList list = new ArrayList ();
Можно инициализировать массив на этапе определения. Созданный объект list содержит свойство size. Обращение к элементам массива осуществляется с помощью метода get(). Пример :
ArrayList list; list = Arrays.asList(new String[] ); System.out.println ("Размер массива равен '" + Integer.valueOf (list.size()) + "' элементам"); Добавление элемента в массив ArrayList, метод add
Работать с ArrayList просто: необходимо создать объект и вставлять созданные объекты методом add(). Обращение к элементам массива осуществляется с помощью метода get(). Пример:
ArrayList list; list = new ArrayListЗамена элемента массива ArrayList, метод set
Чтобы заменить элемент в массиве, нужно использовать метод set() с указанием индекса и новым значением.
list.add("Яблоко"); list.add("Груша"); list.add("Слива"); list.set(1, "Персик"); System.out.println ( "2-ой элемент массива '" + list.get(1) + "'");Удаление элемента массива ArrayList, метод remove
Для удаления элемента из массива используется метод remove(). Можно удалять по индексу или по объекту:
list.remove(0); // удаляем по индексу list.remove("Слива"); // удаляем по объектуПРИМЕЧАНИЕ: элементы, следующие после удалённого элемента, перемещаются на одну позицию ближе к началу. То же самое относится и к операции вставки элемента в середину списка.
Для очистки всего массива используется метод clear():
Определение позиции элемента ArrayList, метод indexOf
В списочном массиве ArrayList существует метод indexOf(), который ищет нужный элемент и возвращает его индекс.
int index = list.indexOf("Слива"); // выводим имя элемента и его номер в массиве System.out.println (list.get(index) + " числится под номером " + index);Отсчёт в массиве начинается с 0, если индекс равен 2, значит он является третьим в массиве.
Проверка наличие элемента в ArrayList, метод contains
Чтобы узнать, есть в массиве какой-либо элемент, можно воспользоваться методом contains(), который вернёт логическое значение true или false в зависимости от присутствия элемента в наборе :
System.out.println (list.contains("Картошка") + "");Понятно, что в массиве никаких овощей быть не может, поэтому в консоле будет отображено false.
Создание массива из элементов ArrayList, метод toArray
Для конвертирования набора элементов в обычный массив необходимо использовать метод toArray().
ArrayList myArrayList = new ArrayList(); myArrayList.add("Россия"); myArrayList.add("Польша"); myArrayList.add("Греция"); myArrayList.add("Чехия"); String[] array = <>; // конвертируем ArrayList в массив array = myArrayList.toArray(new String[myArrayList.size()]);Интерфейс List
java.util.List является интерфейсом и его следует использовать вместо ArrayList следующим образом :
Или укороченный вариант для Java 7:
В примере тип ArrayList заменен на List, но в объявлении оставлен new ArrayList(). Всё остальное остаётся без изменений. Это является рекомендуемым способом.
Интерфейс List реализует более общий интерфейс коллекции Collection.
Преобразование массива в список, Arrays
Для создания массива можно не только добавлять по одному объекту через метод add(), но и сразу массив с использованием Arrays.asList(. ).
Пример создания и инициализации массива из объектов Integer.
List numlist = Arrays.asList(1, 2, 5, 9, 11); System.out.println (numlist.get(2) + ""); // выводит число 5У данного способа есть недостаток. Если вы определили списочный массив таким образом, то уже не можете вставлять или удалять элемент, хотя при этом можете изменять существующий элемент.
List numlist = Arrays.asList(1, 2, 5, 9, 11); numlist.set(2, 33); // так можно numlist.add(34); // нельзя, ошибка во время исполнения System.out.println (numlist.get(2) + "");