- Write permission php ini
- Unhide the hidden files
- Using the Command Line
- About Chmod
- The dangers of 777
- The Worst Outcome
- Find a Workaround
- Finding Secure File Permissions
- Example Permission Settings
- .htaccess permissions
- php.ini permissions
- php.cgi permissions
- php5.cgi permissions
- SELinux
- How to determine if selinux is the problem?
- See Also
- HowTo: Find, Change Permission, Edit PHP.ini in Google Cloud WordPress Bitnami
Write permission php ini
Right-click ‘index.php’ and select ‘File Permissions’
A popup screen will appear.
Don’t worry about the check boxes. Just delete the ‘Numeric value:’ and enter the number you need – in this case it’s 666. Then click OK.
You can now see that the file permissions have been changed.
Unhide the hidden files
By default, most FTP Clients, including FileZilla, keep hidden files, those files beginning with a period (.), from being displayed. But, at some point, you may need to see your hidden files so that you can change the permissions on that file. For example, you may need to make your .htaccess file, the file that controls permalinks, writeable.
To display hidden files in FileZilla, in it is necessary to select ‘View’ from the top menu, then select ‘Show hidden files’. The screen display of files will refresh and any previously hidden file should come into view.
To get FileZilla to always show hidden files – under Edit, Settings, Remote File List, check the Always show hidden files box.
In the latest version of Filezilla, the ‘Show hidden files’ option was moved to the ‘Server’ tab. Select ‘Force show hidden files.’
Using the Command Line
If you have shell/SSH access to your hosting account, you can use chmod to change file permissions, which is the preferred method for experienced users. Before you start using chmod it would be recommended to read some tutorials to make sure you understand what you can achieve with it. Setting incorrect permissions can take your site offline, so please take your time.
You can make all the files in your wp-content directory writable in two steps, but before making every single file and folder writable you should first try safer alternatives like modifying just the directory. Try each of these commands first and if they don’t work then go recursive, which will make even your themes image files writable. Replace DIR with the folder you want to write in
chmod -v 746 DIR chmod -v 747 DIR chmod -v 756 DIR chmod -v 757 DIR chmod -v 764 DIR chmod -v 765 DIR chmod -v 766 DIR chmod -v 767 DIR
If those fail to allow you to write, try them all again in order, except this time replace -v with -R, which will recursively change each file located in the folder. If after that you still cant write, you may now try 777.
About Chmod
chmod is a unix command that means “change mode” on a file. The -R flag means to apply the change to every file and directory inside of wp-content . 766 is the mode we are changing the directory to, it means that the directory is readable and writable by WordPress and any and all other users on your system. Finally, we have the name of the directory we are going to modify, wp-content . If 766 doesn’t work, you can try 777, which makes all files and folders readable, writable, and executable by all users, groups, and processes.
If you use Permalinks you should also change permissions of .htaccess to make sure that WordPress can update it when you change settings such as adding a new page, redirect, category, etc.. which requires updating the .htaccess file when mod_rewrite Permalinks are being used.
NOTE: From a security standpoint, even a small amount of protection is preferable to a world-writeable directory. Start with low permissive settings like 744, working your way up until it works. Only use 777 if necessary, and hopefully only for a temporary amount of time.
The dangers of 777
The crux of this permission issue is how your server is configured. The username you use to FTP or SSH into your server is most likely not the username used by the server application itself to serve pages.
7 7 7 user group world r+w+x r+w+x r+w+x 4+2+1 4+2+1 4+2+1 = 777
Often the Apache server is ‘owned’ by the www-data, dhapache or nobody user accounts. These accounts have a limited amount of access to files on the server, for a very good reason. By setting your personal files and folders owned by your user account to be World-Writable, you are literally making them World Writable. Now the www-data, dhapache and nobody users that run your server, serving pages, executing php interpreters, etc. will have full access to your user account files.
This provides an avenue for someone to gain access to your files by hijacking basically any process on your server, this also includes any other users on your machine. So you should think carefully about modifying permissions on your machine. I’ve never come across anything that needed more than 767, so when you see 777 ask why it’s necessary.
The Worst Outcome
The worst that can happen as a result of using 777 permissions on a folder or even a file, is that if a malicious cracker or entity is able to upload a devious file or modify a current file to execute code, they will have complete control over your blog, including having your database information and password.
Find a Workaround
It is usually pretty easy to have the enhanced features provided by the impressive WordPress plugins available, without having to put yourself at risk. Contact the Plugin author or your server support and request a workaround.
Finding Secure File Permissions
The .htaccess file is one of the files that is accessed by the owner of the process running the server. So if you set the permissions too low, then your server won’t be able to access the file and will cause an error. Therein lies the method to find the most secure settings. Start too restrictive and increase the permissions until it works.
Example Permission Settings
The following example has a custom compiled php-cgi binary and a custom php.ini file located in the cgi-bin directory for executing php scripts. To prevent the interpreter and php.ini file from being accessed directly in a web browser they are protected with a .htaccess file.
Default Permissions (umask 022)
644 -rw-r--r-- /home/user/wp-config.php 644 -rw-r--r-- /home/user/cgi-bin/.htaccess 644 -rw-r--r-- /home/user/cgi-bin/php.ini 755 -rwxr-xr-x /home/user/cgi-bin/php.cgi 755 -rwxr-xr-x /home/user/cgi-bin/php5.cgi
600 -rw------- /home/user/wp-config.php 604 -rw----r-- /home/user/cgi-bin/.htaccess 600 -rw------- /home/user/cgi-bin/php.ini 711 -rwx--x--x /home/user/cgi-bin/php.cgi 100 ---x------ /home/user/cgi-bin/php5.cgi
.htaccess permissions
644 > 604 – The bit allowing the group owner of the .htaccess file read permission was removed. 644 is normally required and recommended for .htaccess files.
php.ini permissions
644 > 600 – Previously all groups and all users with access to the server could access the php.ini, even by just requesting it from the site. The tricky thing is that because the php.ini file is only used by the php.cgi, we only needed to make sure the php.cgi process had access. The php.cgi runs as the same user that owns both files, so that single user is now the only user able to access this file.
php.cgi permissions
755 > 711 This file is a compiled php-cgi binary used instead of mod_php or the default vanilla php provided by the hosting company. The default permissions for this file are 755.
php5.cgi permissions
755 > 100 – Because of the setup where the user account is the owner of the process running the php cgi, no other user or group needs access, so we disable all access except execution access. This is interesting because it really works. You can try reading the file, writing to the file, etc. but the only access you have to this file is to run php scripts. And as the owner of the file you can always change the permission modes back again.
$ cat: php5.cgi: Permission denied ./php5.cgi: Welcome
SELinux
Security Enhanced linux is a kernel security module that provides mechanisms by which processes can be sandboxed into particular contexts. This is of particular use to limit the actions that web pages can perform on other parts of the operating system. Actions that are denied by the security policy are often hard to distinguish from regular file permission errors.
selinux is typically installed on Redhat family distributions (e.g., CentOS, Fedora, Scientific, Amazon and others).
How to determine if selinux is the problem?
If you are on a debian based distribution, you are probably fine.
Run the following command (on rpm based systems);
# rpm -qa | grep selinux selinux-policy-targeted-3.13.1-166.el7_4.7.noarch selinux-policy-3.13.1-166.el7_4.7.noarch libselinux-2.5-11.el7.x86_64 libselinux-python-2.5-11.el7.x86_64 libselinux-utils-2.5-11.el7.x86_64
and to check whether it is the cause of denials of permissions:
One issue that selinux causes is blocking the wp-admin tools from writing out the `.htaccess` file that is required for url rewriting. There are several commands for inspecting this behaviour
# audit2allow -w -a type=AVC msg=audit(1517275570.388:55362): avc: denied < write >for pid=11831 comm="httpd" path="/var/www/example.org/.htaccess" dev="vda1" ino=67137959 scontext=system_u:system_r:httpd_t:s0 tcontext=system_u:object_r:httpd_sys_content_t:s0 tclass=file Was caused by: The boolean httpd_unified was set incorrectly. Description: Allow httpd to unified Allow access by executing: # setsebool -P httpd_unified 1
# ausearch -m avc -c httpd ---- time->Tue Jan 30 01:30:31 2018 type=PROCTITLE msg=audit(1517275831.762:55364): proctitle=2F7573722F7362696E2F6874747064002D44464F524547524F554E44 type=SYSCALL msg=audit(1517275831.762:55364): arch=c000003e syscall=21 success=no exit=-13 a0=55b9c795d268 a1=2 a2=0 a3=1 items=0 ppid=11826 pid=11829 auid=4294967295 uid=48 gid=48 euid=48 suid=48 fsuid=48 egid=48 sgid=48 fsgid=48 tty=(none) ses=4294967295 comm="httpd" exe="/usr/sbin/httpd" subj=system_u:system_r:httpd_t:s0 key=(null) type=AVC msg=audit(1517275831.762:55364): avc: denied < write >for pid=11829 comm="httpd" name="bioactivator.org" dev="vda1" ino=67137958 scontext=system_u:system_r:httpd_t:s0 tcontext=unconfined_u:object_r:httpd_sys_content_t:s0 tclass=dir ----
You can temporarily disable selinux to determine if it is the cause of the problems;
# setenforce usage: setenforce [ Enforcing | Permissive | 1 | 0 ]
See Also
HowTo: Find, Change Permission, Edit PHP.ini in Google Cloud WordPress Bitnami

0 MITS App World January 27, 2021
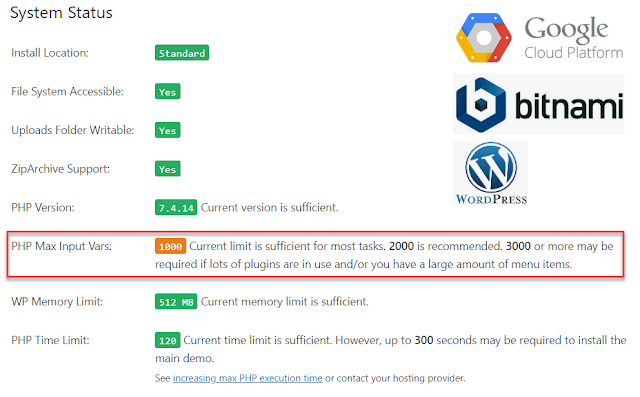
We are building a WordPress website using the Google Cloud platform. One of the recommendations is to increase the PHP Max Input Vars value. Increasing the PHP Max Input Vars value is a common recommendation when building a WordPress website to ensure that the site can handle large amounts of data and complex forms.

We will go through the steps in this tutorial on how to do this.
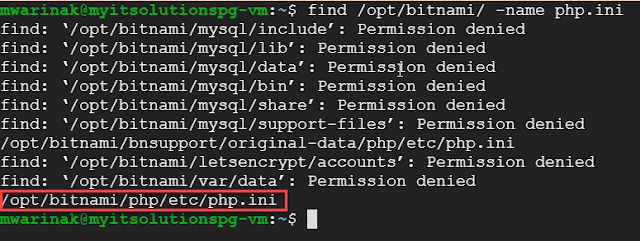
find is a command for recursively filtering objects in the file system based on a simple conditional mechanism. Use find to search for a file or directory on your file system. Using the -exec flag, files can be found and immediately processed within the same command.
Use find from the command line to locate a specific file by name or extension. The following searches for PHP.ini files:
Run find /opt/bitnami -name php.ini
2. Change PHP.ini file permission
Check the permission using the stat command.
Change directory using cd /opt/bitnami/php/etc
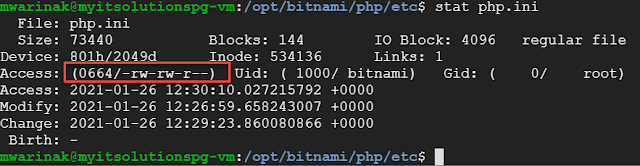
Chmod 664 (chmod a+rwx,u-x,g-x,o-wx) sets permissions so that, (U)ser / owner can read, can write and can’t execute. ( G)roup can read, can write and can’t execute. ( O)thers can read, can’t write and can’t execute.
Run chmod 777 php.ini
What does chmod 777 mean?
Setting 777 permissions to a file or directory means that it will be readable, writable and executable by all users and may pose a huge security risk. . File ownership can be changed using the chown command and permissions with the chmod command.
Remember to change it back to 664 after modifying the file by running chmod 777 php.ini
For this case, we will modify PHP.ini using SUDO.
Run sudo nano /opt/bitnami/php/etc/php.ini and add the line max_input_vars = 3000
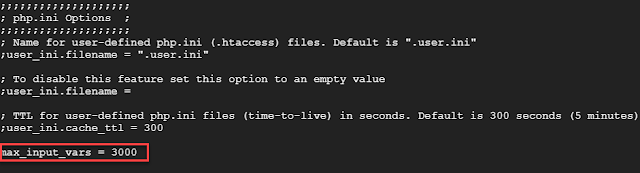
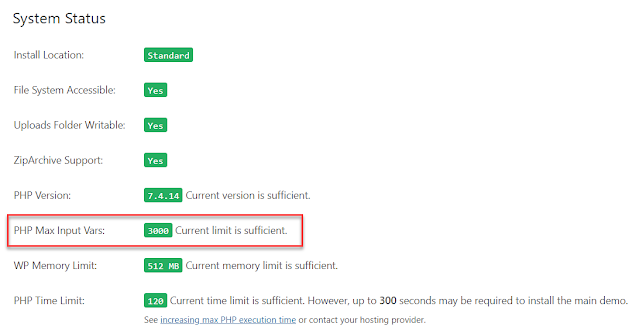
Run sudo reboot. After the VM reboots, check the System Status and it should be OK.