- HTML Styles — CSS
- CSS = Styles and Colors
- What is CSS?
- Using CSS
- Inline CSS
- Example
- A Blue Heading
- Internal CSS
- Example
- This is a heading
- External CSS
- Example
- This is a heading
- «styles.css»:
- CSS Colors, Fonts and Sizes
- Example
- This is a heading
- CSS Border
- Example
- CSS Padding
- Example
- CSS Margin
- Example
- Link to External CSS
- Example
- Example
- Example
- Chapter Summary
- HTML Exercises
- HTML Style Tags
- How to Work with CSS Style Sheets – the Basics for Beginners
- Wrapping Up
- # CSS Editing
- # The Styles Tab
- # CSS Files
- # CSS File Order
- # Visibility
- # Linking External CSS
- # Editing CSS
- # Option Menu
- # Multi Selection
- # Working with Locked Blocks
- # Duplicating and Copying Blocks
- # Rearranging Blocks
- # Writing Media Queries
- # Writing Keyframe Animations
- # CSS Variables
HTML Styles — CSS
CSS saves a lot of work. It can control the layout of multiple web pages all at once.
CSS = Styles and Colors
What is CSS?
Cascading Style Sheets (CSS) is used to format the layout of a webpage.
With CSS, you can control the color, font, the size of text, the spacing between elements, how elements are positioned and laid out, what background images or background colors are to be used, different displays for different devices and screen sizes, and much more!
Tip: The word cascading means that a style applied to a parent element will also apply to all children elements within the parent. So, if you set the color of the body text to «blue», all headings, paragraphs, and other text elements within the body will also get the same color (unless you specify something else)!
Using CSS
CSS can be added to HTML documents in 3 ways:
- Inline — by using the style attribute inside HTML elements
- Internal — by using a element in the section
- External — by using a element to link to an external CSS file
The most common way to add CSS, is to keep the styles in external CSS files. However, in this tutorial we will use inline and internal styles, because this is easier to demonstrate, and easier for you to try it yourself.
Inline CSS
An inline CSS is used to apply a unique style to a single HTML element.
An inline CSS uses the style attribute of an HTML element.
The following example sets the text color of the element to blue, and the text color of the
element to red:
Example
A Blue Heading Internal CSS
An internal CSS is used to define a style for a single HTML page.
An internal CSS is defined in the section of an HTML page, within a element.
The following example sets the text color of ALL the elements (on that page) to blue, and the text color of ALL the
elements to red. In addition, the page will be displayed with a «powderblue» background color:
Example
This is a heading
This is a paragraph.
External CSS
An external style sheet is used to define the style for many HTML pages.
To use an external style sheet, add a link to it in the section of each HTML page:
Example
This is a heading
This is a paragraph.
The external style sheet can be written in any text editor. The file must not contain any HTML code, and must be saved with a .css extension.
Here is what the «styles.css» file looks like:
«styles.css»:
Tip: With an external style sheet, you can change the look of an entire web site, by changing one file!
CSS Colors, Fonts and Sizes
Here, we will demonstrate some commonly used CSS properties. You will learn more about them later.
The CSS color property defines the text color to be used.
The CSS font-family property defines the font to be used.
The CSS font-size property defines the text size to be used.
Example
Use of CSS color, font-family and font-size properties:
This is a heading
This is a paragraph.
CSS Border
The CSS border property defines a border around an HTML element.
Tip: You can define a border for nearly all HTML elements.
Example
Use of CSS border property:
CSS Padding
The CSS padding property defines a padding (space) between the text and the border.
Example
Use of CSS border and padding properties:
CSS Margin
The CSS margin property defines a margin (space) outside the border.
Example
Use of CSS border and margin properties:
Link to External CSS
External style sheets can be referenced with a full URL or with a path relative to the current web page.
Example
This example uses a full URL to link to a style sheet:
Example
This example links to a style sheet located in the html folder on the current web site:
Example
This example links to a style sheet located in the same folder as the current page:
You can read more about file paths in the chapter HTML File Paths.
Chapter Summary
- Use the HTML style attribute for inline styling
- Use the HTML element to define internal CSS
- Use the HTML element to refer to an external CSS file
- Use the HTML element to store and elements
- Use the CSS color property for text colors
- Use the CSS font-family property for text fonts
- Use the CSS font-size property for text sizes
- Use the CSS border property for borders
- Use the CSS padding property for space inside the border
- Use the CSS margin property for space outside the border
Tip: You can learn much more about CSS in our CSS Tutorial.
HTML Exercises
HTML Style Tags
| Tag | Description |
|---|---|
| Defines style information for an HTML document | |
| Defines a link between a document and an external resource |
For a complete list of all available HTML tags, visit our HTML Tag Reference.
How to Work with CSS Style Sheets – the Basics for Beginners

David Clinton

Using HTML tags like , , and so on can help you organize your web page content nicely, but only up to a point.
HTML-only pages can be pleasant and easy to read – which is hugely important – but, after a while, they all do tend to look the same.
Cascading style sheets, known universally as CSS, aren’t really sheets, and it can take some work to figure out what «cascading» means. But the markup standard adds real power to your web development work. Let’s look at some of that CSS magic in action.
This article comes from my Complete LPI Web Development Essentials Study Guide course. If you’d like, you can follow the video version here:

Wrapping Up
We’ve successfully incorporated CSS code within our HTML and precisely applied CSS styles to our content. Now take a couple of minutes to create something similar for yourself. Make sure you play around with all the values so you completely understand how they work.
# CSS Editing
Bootstrap Studio gives you an entirely visual way of building web pages, by using the Appearance panel and component options. But, if you require extra control and customizability, you can write CSS code directly in the Editor panel.
The CSS editor that’s built into Bootstrap Studio will be familiar to anyone who’s used their browser’s developer tools. You can edit CSS code in the Styles tab, or in CSS files which you create in the Design panel.
# The Styles Tab
Styles is one of the two non-closable tabs in the Editor panel. It gives you a list of the CSS blocks in your design which match the currently selected component. This is a convenient way to discover which CSS blocks are affecting the component across all your files, and application-generated code.

Note that the app-generated styles (labeled as «Bootstrap») are locked and are not user editable. You can override them by clicking the three dot menu of the block and copying it to your own stylesheet.
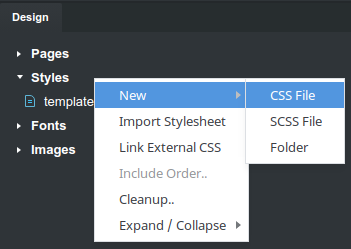
# CSS Files
Creating a new CSS file is easy. Just right click the «Styles» label and choose the New > CSS File menu.
To import an existing CSS file, just drag and drop it onto the application window. It will be parsed and added in your design.
You can create/import as many files as you wish, and organize them into folders to make them easier to manage.
# CSS File Order
When working with multiple CSS files, you will sooner or later run into a situation where you need to control the precedence of files. To change the order in which CSS files are applied, right click the Styles group and select Include Order .
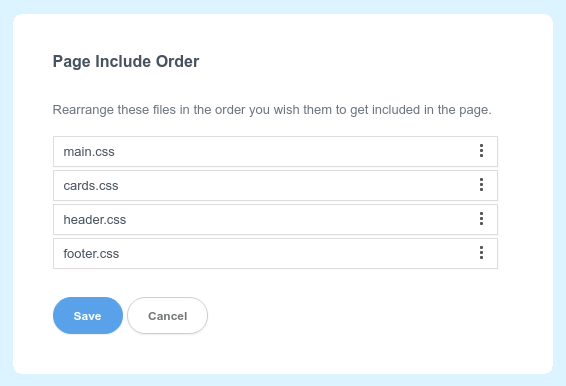
Here you can reorder the files as you need them and then click the Save button. These changes will be applied to all pages in your design.
Although it isn’t shown in the dialog, the Bootstrap framework css file is always included first in the page, before your stylesheets.
# Visibility
When right clicking a CSS file, you get a couple of options for controlling its visibility.
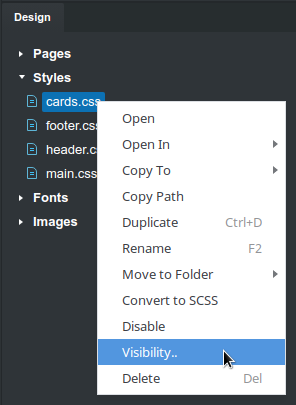
- Enable/Disable — with this option you can disable a stylesheet, so that it doesn’t apply in any of your pages.
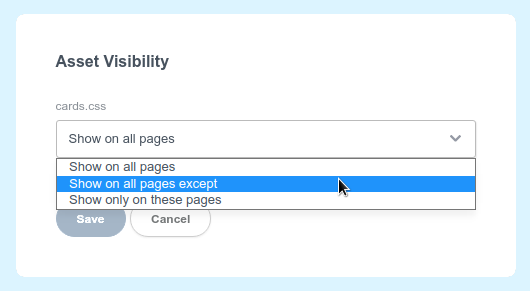
- Visibility.. — this will open a dialog which lets you choose which pages of your design should the stylesheet be added to.
# Linking External CSS
You can link externally hosted stylesheets in Bootstrap Studio. Just right click the Styles group and choose Link External CSS . In the dialog you can paste a URL to an externally hosted stylesheet and it will be added to your design.
To make sure external CSS libraries are always available and loading quickly, link them from secure and reliable CDN services like cdnjs
# Editing CSS
Double click a CSS file and it will be opened for editing in our CSS editor. Click on a selector, css property or a value to edit them. Hit Enter or Tab to move to the next rule, and Shift+Tab to the previous. You can click the space between rules to create new ones, and between css blocks to create new blocks or comments.
Images and fonts that you’ve added to the Design panel will be automatically picked up and shown as suggestions when appropriate. There is a full undo/redo history, so feel free to experiment!
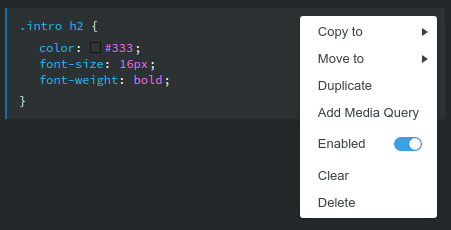
# Option Menu
When you click the three dots on the top right of each CSS block, you will see a menu with options. You have the basic operations like copy, move and delete, but also the option to add a media query and enabling/disabling the block.
# Multi Selection
Click CSS blocks while holding the Ctrl/Shift (Windows/Linux) or Cmd/Shift (Mac) keys to initiate a multi selection. This gives you quick actions to apply en masse.
# Working with Locked Blocks
The Bootstrap framework’s CSS is locked In Bootstrap Studio. This is necessary so that we can upgrade the framework when new versions are released.
However, it is straightforward to modify one of these locked blocks if you need to. Just copy them to your stylesheet and override the styles.
If you need to make more comprehensive changes to Bootstrap, we recommend that you import a Custom Theme.
# Duplicating and Copying Blocks
If you want to duplicate your CSS block, you need to click the three dots on the top right of the block and select the Duplicate option. This will make an exact copy of the block in the same file.
If you want to make a copy of the CSS block or move it to another file, use the Copy To and Move To options.
# Rearranging Blocks
You can also rearrange your CSS blocks by dragging them. This allows you to organize your code better and control the order in which your rules are applied.
# Writing Media Queries
Media Queries are an important tool for creating responsive layouts. In Bootstrap Studio, media queries are assigned on a block by block basis. To do this, choose Add Media Query from the Option menu (the three dots on the top right of the block).
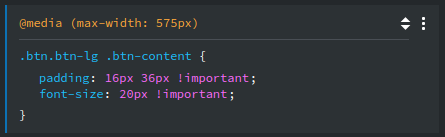
The query will be prefilled with a min-width or max-width depending on the current width of the stage.
If you find our CSS editor too restrictive, you can always switch to writing SASS code.
# Writing Keyframe Animations
Keyframe animations are a powerful way to create smooth animations on the web. You can use them in addition to the regular animation functionality in Bootstrap Studio.
To add a keyframe animation block to your CSS file, just type @keyframes as the start of a new CSS selector.
After you’ve defined it, you can apply your animation to an element with an animation css rule: animation: 2s test123 . You can learn more on the MDN animations page.
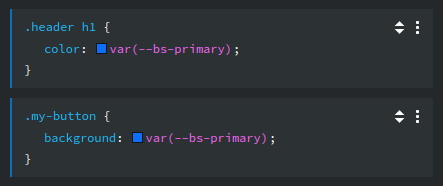
# CSS Variables
Bootstrap Studio has built-in support for CSS custom properties
(opens new window) (also known as variables). They give you an easy way to reuse a specific color throughout your design and change it from a central location.
The Bootstrap framework makes use of custom properties primarily for color and font customization. Below you can see some of the available variables for Bootstrap 5, each starting with the bs- prefix.
:root --bs-blue: #0d6efd; --bs-indigo: #6610f2; --bs-purple: #6f42c1; --bs-pink: #d63384; . --bs-danger: #dc3545; --bs-light: #f8f9fa; --bs-dark: #212529; --bs-font-sans-serif: system-ui, -apple-system, "Segoe UI", Roboto, "Helvetica Neue", Arial, "Noto Sans", "Liberation Sans", sans-serif, "Apple Color Emoji", "Segoe UI Emoji", "Segoe UI Symbol", "Noto Color Emoji"; --bs-font-monospace: SFMono-Regular, Menlo, Monaco, Consolas, "Liberation Mono", "Courier New", monospace; --bs-gradient: linear-gradient(180deg, rgba(255, 255, 255, 0.15), rgba(255, 255, 255, 0)); > Defining your own custom properties, or overriding the built-in ones is straightforward. You can do it by writing code like the following in one of your css files:
body --bs-blue: #007bff; /* Changes the blue color everywhere in the framework */ --myWonderfulColor: #654321; /* This is a new property */ > To make use of CSS variables, just include them in the places you need that value. This way if you choose to make a change in the future, it will automatically be applied everywhere.
You can also find helpful references to the defined variables under all color-related options in the Appearance panel.