Java on Windows: switching to a specific Java version/ runtime
This post show how to have multiple Java runtime environments on your PC and switch between them on Windows so that a particular program uses the version that you want it to.
Background
Due to Java SE Platform licensing changes by Oracle, developers have turned to alternatives such as OpenJDK. The AdoptOpenJDK site provides Prebuilt OpenJDK Binaries for Free (the main line on their landing page) and as you will see, there are numerous versions that you could use:
- JDK 8 Long-term Support ( LTS )
- JDK 11 LTS
- JDK 16 (the latest)
- Each of these could be 32-bit or 64-bit versions and you can choose the JVM that you run (Hotspot vs OpenJ9)
In short, there are options and there are times when you want to run something with a specific version of the JVM or you want to test something with multiple JVMs.
Installing and switching between multiple Java versions
The method that I follow is that I have a folder D:\apps where I put different applications tools that I want to use. Under this, I create a folder called jdk and use that as the main holding folder for all the different JDK / JVM that I want to use. I personally prefer not installin each JVM / JDK into my computer any more but to use them ‘without installation’.
Head on over to the releases page at AdoptOpenJDK to get the package you need. Start by changing the platform to Windows as shown below.

Next, pick the JDK (the full Java Development Kit) or the smaller JRE (Java Runtime Environment) and download the ZIP file version. Remember x86 means it’s the 32-bit version and x64 means that it’s the 64-bit version. If you have a modern (relatively new) Windows 10 PC, it’s almost certainly running the 64-bit version of Windows and will therefore support both the versions. In that case, the x64 is preferable though you may have some programs that don’t work correctly on the 64-bit version and need the 32-bit version.
Once you have downloaded the version (or versions) that you want to get, unzip the package. In my case, I unzip it to d:\apps\jdk so that I have all the JDKs/ JREs in one place. After unzipping, I change the folder names to be something like jdk-11.0.11_x64 and jdk-11.0.11_x86 so that I can easily tell which folder has the 64-bit and which one has the 32-bit.
Running a program with Java basically requires you to do: $ java . and for this to work, it needs two things to be in place:
- The Java version that you want to run must be the first Java installation on the path (so that Windows can find it)
- The environment variable JAVA_HOME must be set to the installation that you want to use
So, for switching Java versions, you need to do this:
set JAVA_HOME=d:\apps\jdk\jdk-11.0.11_x86\ path=d:\apps\jdk\jdk-11.0.11_x86\bin;%PATH% The first line sets the JAVA_HOME and the second one moves the x86 version of the JDK / JRE to the path. Note that the JAVA_HOME points to the main directory where the whole installation is, and the path must be to the /bin folder under the JAVA_HOME so that java.exe can be found. After you do this, you should see this:
$ java -version openjdk version "11.0.11" 2021-04-20 OpenJDK Runtime Environment AdoptOpenJDK-11.0.11+9 (build 11.0.11+9) OpenJDK Client VM AdoptOpenJDK-11.0.11+9 (build 11.0.11+9, mixed mode) To switch to a different version, you just need to set both those items correctly again. For example, in my case, I would do:
$ path=d:\apps\jdk\jdk-11.0.11_x64\bin;%PATH% $ set JAVA_HOME=d:\apps\jdk\jdk-11.0.11_x64\ $ java -version openjdk version "11.0.11" 2021-04-20 OpenJDK Runtime Environment AdoptOpenJDK-11.0.11+9 (build 11.0.11+9) OpenJDK 64-Bit Server VM AdoptOpenJDK-11.0.11+9 (build 11.0.11+9, mixed mode) (Notice how the last line shows 64-Bit Server VM since it’s now running the 64-bit VM)
It’s not as convenient as using pik to switch Ruby versions on Windows but I imagine it would be a good idea to write something like pik for this. Also, I did not search if there are tools that let you do this easily but there might well be something.
That’s all there is to it. I noted this down mainly for myself since I need to do this occasionally. If it helps you, that’s great! Please leave a comment if there is something else that you think we should add into the post.
Install multiple versions of Java on Windows


Sometimes, you may need to work on different projects that are written in different versions of Java. Therefore, it is beneficial to have the ability to quickly and easily switch between Java versions for compiling code or executing class files.
In this article, I will guide you on how to install multiple versions of Java simultaneously on a Windows system and demonstrate how to switch between them using the command line.
| Windows 10 | Java 8 | Java 11 |
For easy management, it’s best to install all Java versions in a single directory. This enables seamless switching between versions. In this guide, I’ll demonstrate how to install and switch between multiple Java versions on Windows, all within a single directory: D:\SATAProgramFiles\Java

Setting Environment Variables in Windows
To set the necessary environment variables in Windows, follow these steps:
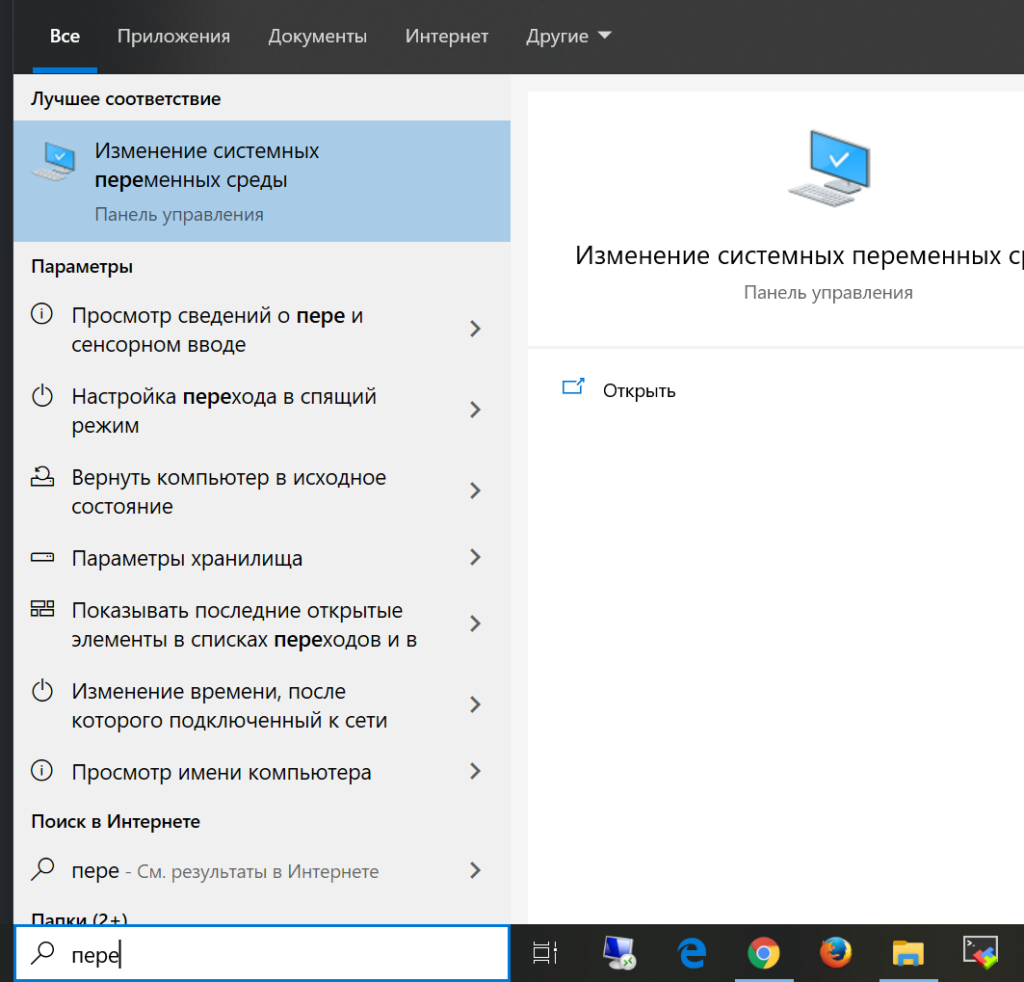
- Open the System Properties window by right-clicking on the “This PC” or “My Computer” icon, selecting “Properties,” and then clicking on “Advanced system settings.”
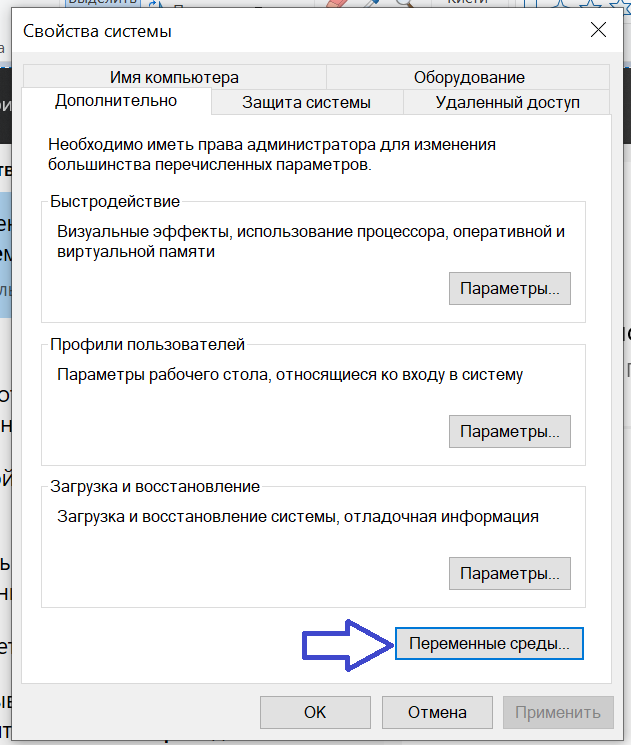
- In the System Properties window, click on the “Environment Variables” button.
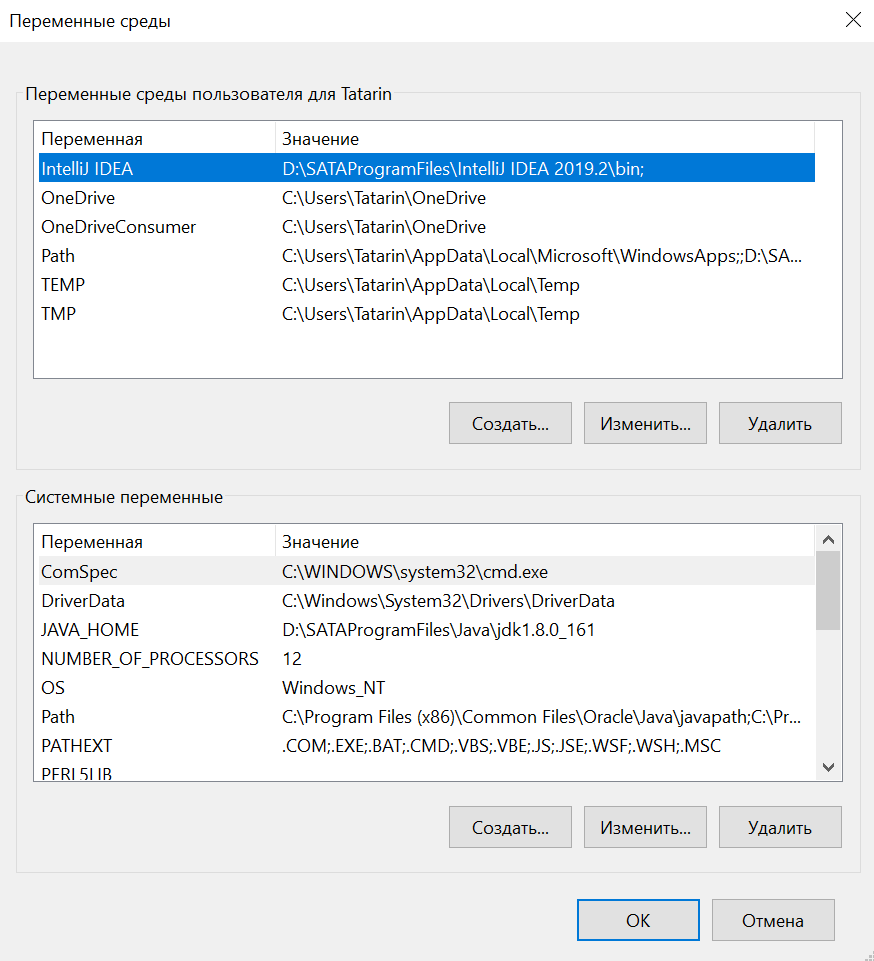
- In the “System Variables” section, click on the “New” button to create a new environment variable.
- Enter “JAVA_HOME” as the variable name.
- Set the variable value to the directory path of your default Java version. For example, “C:\Program Files\Java\jdk1.8.0_281” (replace with the appropriate path for your system).
- Click “OK” to save the variable.
- Find the “Path” variable in the “System Variables” list and select it.
- Click on the “Edit” button to modify the variable.
- In the “Edit Environment Variable” window, add the following entry at the end of the variable value: “%JAVA_HOME%\bin”.
- Click “OK” to save the changes.
- Additionally, if you want to add a directory with scripts to the Path variable, such as “D:\SATAProgramFiles\Java\scripts”, you can follow the same steps as above, but this time modify the “Path” variable and append the directory path at the end.
- Save the changes and exit the Environment Variables window.
By setting the JAVA_HOME variable and adding the appropriate directories to the Path variable, you can conveniently switch between different Java versions and access the associated scripts from the command line.
Remember to save your scripts with different Java versions in the specified directory, such as “D:\SATAProgramFiles\Java\scripts\java11.bat” for Java 11.
These environment variable settings will ensure that the correct Java version is used for compilation and execution, and the scripts will be accessible from any location in the command prompt.
@echo off set JAVA_HOME=D:\SATAProgramFiles\Java\jdk-11.0.7 set Path=%JAVA_HOME%\bin;%Path% echo Java 11 is Activated
@echo off set JAVA_HOME=D:\SATAProgramFiles\Java\jdk-11.0.7 set Path=%JAVA_HOME%\bin;%Path% echo Java 11 is Activated
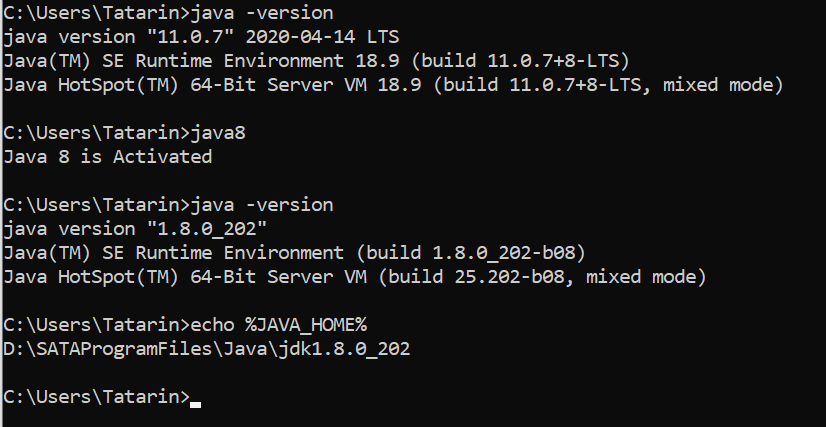
java -version java8 java11 where java echo %JAVA_HOME%
java -version java8 java11 where java echo %JAVA_HOME%
Install Multiple JDKs on Windows
It provides all the steps required to install multiple versions of JDK on the same Windows. It provides the steps to install multiple Java including Java 8, Java 11, Java 13, Java 14, and OpenJDK 14 on Windows 10 without using the installer.
Java is among the popular programming languages used for Desktop and Web application development. It’s also being used to develop mobile applications for Android. This tutorial provides the steps required to install multiple versions of Oracle JDK and OpenJDK on the same system. Oracle provides the JDK in the form of downloadable zip since Java 11, hence this tutorial provides the steps to install Oracle JDK using the zip for Java 11, Java 12, Java 13, and Java 14. It also provides the steps to install JDK 8 since it’s one of the major version of Java and Oracle have announced to support it till the year 2030. Also, Android SDK Tools requires JDK 8 since it does not work for Java 9 or higher versions.
Notes: It’s recommended to completely remove the existing versions of Java by following How To Uninstall Java From Windows. Also, make sure that you are completely aware of the installed Software dependent on the existing version of Java and knows to fix the missing Java reported by such Software.
Install Java 8
We can install Java 8 on Windows 10 using the installer provided by Oracle. How To Install Java 8 On Windows 10 provides the complete steps to install Java 8 on Windows 10.
Notes: I have installed Java 8 at C:\Java\Oracle to keep it separate from OpenJDK versions installed at C:\Java\OpenJDK. The Java 8 installations location should be similar to C:\Java\Oracle\jdk1.8.0_241 and C:\Java\Oracle\jre1.8.0_241. The bin directories should be similar to C:\Java\Oracle\jdk1.8.0_241\bin and C:\Java\Oracle\jre1.8.0_241\bin.
Install Java 11 or Higher
This section provides the steps required to install Java 11 using the zip provided by Oracle. The steps should be the same for Java 12, Java 13, and Java 14. Open the Java 11 Download Page having the options to download Java 11 for Windows 10 as shown in Fig 1.
Now download the zip for Windows as highlighted in Fig 1. It will ask to accept the License Agreement as shown in Fig 2.
Accept the License Agreement. It will enable the Download Button after accepting the License Agreement as shown in Fig 3.
Now click the Download Button to download the JDK 11. It might also ask to log in before starting the download.
To install Java 11, extract the download at C:\Java\Oracle so that the bin directory path is similar to C:\Java\Oracle\jdk-11.0.7\bin. Now test the Java version on the console as shown in Fig 4.
It shows the Java 8 installed in the previous section using the installer. Now right-click the This PC Icon on the Desktop and click the Properties Option as shown in Fig 5.
Now click the Advanced System Settings Option as shown in Fig 6.
It shows the Advanced Options as shown in Fig 7.
Now click the Environment Variables as highlighted in Fig 7. It shows all the environment variables for the currently logged in user and all the users as shown in Fig 8.
We have to update the Global Path variable as highlighted in Fig 8. Now click the Edit Button to view the values as shown in Fig 9.
I have also highlighted the Path configured by the Java 8 installer. Now click the Delete Button to delete it as shown in Fig 10.
Now click the OK Button to close the Edit Dialog. Also, select the local Path variable as highlighted in Fig 11.
Click the Edit Button to update the local Path variable to add the path to Java 11. It will show the default values as shown in Fig 12.
Now click the New Button and add the path to Java 11 bin as shown in Fig 13.
Click the OK Button thrice to close all the Advanced Settings Wizards. This is how we can configure the Java version to be accessed via the command line. Now again type java -version on the console to check the active Java. It might still show the Java 8. Now close the existing Console and open a new one and again type java -version. It should reflect Java 11 configured by us on the environment variable as shown in Fig 14.
Similarly install Java 12, Java 13, and Java 14. We can even switch back to Java 8 to develop Android applications and switch back to Java 11, Java 12, Java 13, or Java 14 to use the latest features of Java. The Java versions installed on my system are shown in Fig 15.
Install OpenJDK
Similar to Java 11 to Java 14, we can also install multiple versions of OpenJDK on the same system using the zip files available for OpenJDK. We just have to configure the environment variable to use the appropriate version of OpenJDK based on the project requirements.
I have installed OpenJDK 14 at C:\Java\OpenJDK\jdk-14 and the bin directory should be similar to C:\Java\OpenJDK\jdk-14\bin. We have to specify this bin directory on the environment variable to switch to OpenJDK 14.
Summary
This tutorial provided the steps required to install Java 8 on Windows 10 using the installer and it also provided the steps required to install multiple versions of Java without using the installer for Java 11, Java 12, Java 13, Java 14, and OpenJDK 14. You may also submit your comments to join the discussion on installing multiple versions of Java on Windows 10.