- Showing a CSS-Based Loading Animation While Your Site Loads
- Как сделать прелоадер для сайта и спиннер для кнопки?
- Как создать прелоадер страницы
- Прелоадер на чистом CSS
- Прелоадер в виде анимированной svg иконки
- Прелоадер с использованием анимированной gif картинки
- Вариант прелоадера с использованием jQuery функции fadeOut
- Кнопка отправки со спиннером
- Windows Loader Animation using HTML & CSS
Showing a CSS-Based Loading Animation While Your Site Loads
Showing a loading indicator on startup is a common pattern in native applications that is becoming more common on the web. If you need to load a lot of resources when your web application is first loaded, you should give the user a clear indication that this is occurring.
Here’s an approach I’ve used a few times to accomplish this. I start by giving the element itself a class of «loading» :
I then setup two transitions that take effect when the loading class is removed. I transition the color on the element from a predefined color to its default, transparent . To avoid seeing content during loading, I make the opaque with opacity: 0 . When loading is complete, that is transitioned to opacity: 1 to fade the content in. The full source is below:
html < -webkit-transition: background-color 1s; transition: background-color 1s; >html, body < /* For the loading indicator to be vertically centered ensure */ /* the html and body elements take up the full viewport */ min-height: 100%; >html.loading < /* Replace #333 with the background-color of your choice */ /* Replace loading.gif with the loading image of your choice */ background: #333 url('loading.gif') no-repeat 50% 50%; /* Ensures that the transition only runs in one direction */ -webkit-transition: background-color 0; transition: background-color 0; >body < -webkit-transition: opacity 1s ease-in; transition: opacity 1s ease-in; >html.loading body < /* Make the contents of the body opaque during loading */ opacity: 0; /* Ensures that the transition only runs in one direction */ -webkit-transition: opacity 0; transition: opacity 0; >The only JavaScript required is to remove the «loading» class from the element. Do this when your application is initialized and ready to go.
// IE10+ document.getElementsByTagName( "html" )[0].classList.remove( "loading" ); // All browsers document.getElementsByTagName( "html" )[0].className.replace( /loading/, "" ); // Or with jQuery $( "html" ).removeClass( "loading" ); The demo below shows this animation in action. To simulate a real load it waits 3 seconds before the «loading» class is removed.
Loading animation example Open in New Window
Как сделать прелоадер для сайта и спиннер для кнопки?
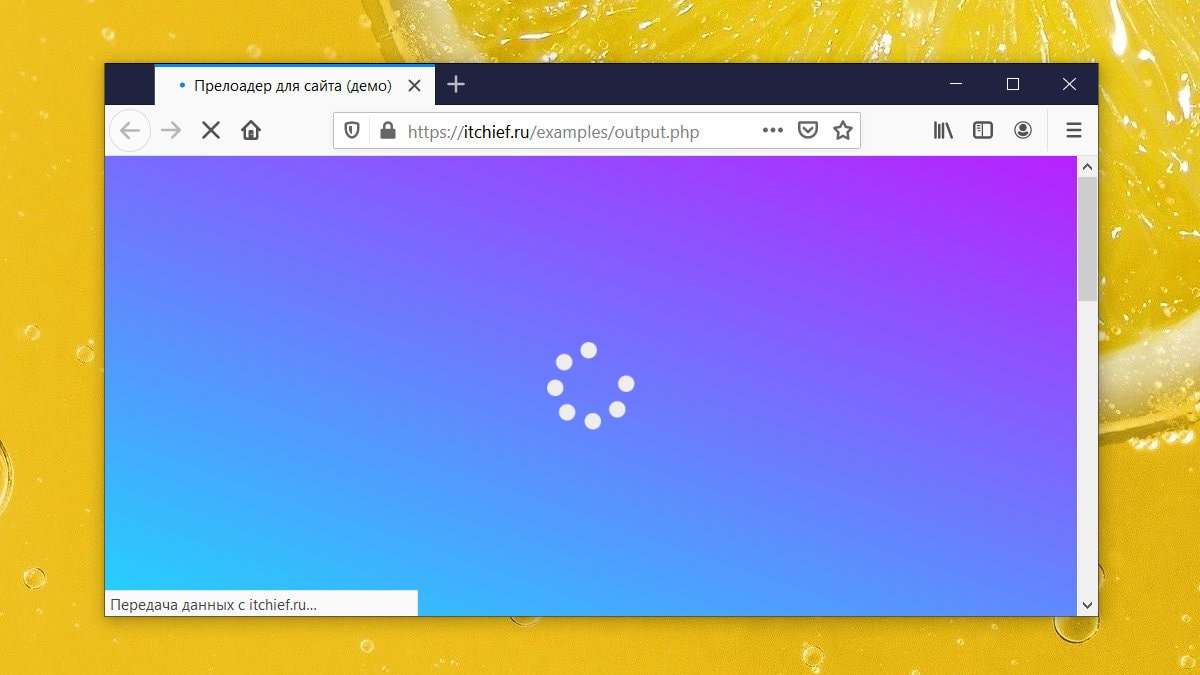
Страница любого сайта или веб-приложения не загружается мгновенно . На загрузку и отображение страницы необходимо некоторое время. При этом страница при её загрузке может видоизменяться. Обычно это происходит при загрузке стилей, шрифтов, картинок. Чтобы этот не привлекательный момент скрыть от пользователя, можно на время загрузки страницы отобразить пользователю какой-нибудь анимированный прелоадер . А после того, как страница полностью загрузится его убрать . Основная цель прелоадера — это улучшить впечатление пользователя о сайте.
Как создать прелоадер страницы
На самом деле создать прелоадер очень просто.
Для этого нужно сразу после открывающего тега body добавить код (HTML структуру прелоадера). С помощью CSS его необходимо настроить так, чтобы он занимал всю область viewport и находился над содержимым страницы. В качестве прелодера обычно используют анимированную картинку (svg, gif), или CSS-анимацию.
В процессе загрузки страницы её контент находится под прелодером. Пользователь видит только анимированную картинку.
После полной загрузки прелоадер необходимо скрыть. Чтобы это осуществить необходимо написать очень маленький скрипт. Это можно выполнить как на чистом JavaScript, так и с использованием библиотеки jQuery .
Прелоадер на чистом CSS
Этапы создания прелодера на чистом CSS:
1. Добавить после открывающего тега body следующий HTML-код:
Элемент .preloader – это контейнер, который будет занимать всю область просмотра и находится над содержимым страницы. .preloader__row и .preloader__item – необходимы для создания CSS-анимации, которую отобразим в центре viewport.
2. Создать следующие стили:
.preloader { /*фиксированное позиционирование*/ position: fixed; /* координаты положения */ left: 0; top: 0; right: 0; bottom: 0; /* фоновый цвет элемента */ background: #e0e0e0; /* размещаем блок над всеми элементами на странице (это значение должно быть больше, чем у любого другого позиционированного элемента на странице) */ z-index: 1001; } .preloader__row { position: relative; top: 50%; left: 50%; width: 70px; height: 70px; margin-top: -35px; margin-left: -35px; text-align: center; animation: preloader-rotate 2s infinite linear; } .preloader__item { position: absolute; display: inline-block; top: 0; background-color: #337ab7; border-radius: 100%; width: 35px; height: 35px; animation: preloader-bounce 2s infinite ease-in-out; } .preloader__item:last-child { top: auto; bottom: 0; animation-delay: -1s; } @keyframes preloader-rotate { 100% { transform: rotate(360deg); } } @keyframes preloader-bounce { 0%, 100% { transform: scale(0); } 50% { transform: scale(1); } } .loaded_hiding .preloader { transition: 0.3s opacity; opacity: 0; } .loaded .preloader { display: none; }Размещение прелоадера над контентом осуществляется посредством задания ему фиксированного позиционирования и CSS-свойства z-index .
3. Вставить сценарий, который будет добавлять к элементу body класс loaded после полной загрузки страницы:
Этот скрипт очень резко скрывает прелоадер. Чтобы этот процесс улучшить, а именно выполнить это с анимацией можно использовать вместо вышеприведённого сценария этот:
Прелоадер в виде анимированной svg иконки
Процесс создания прелоадера в виде анимированной svg иконки не будет сильно отличаться от примера с использованием CSS-анимации.
1. Создадим HTML-разметку прелоадера и разместим её сразу же после открывающего тега body :
В качестве svg можно использовать любое другое изображение.
.preloader { position: fixed; left: 0; top: 0; right: 0; bottom: 0; overflow: hidden; /* фоновый цвет */ background: #e0e0e0; z-index: 1001; } .preloader__image { position: relative; top: 50%; left: 50%; width: 70px; height: 70px; margin-top: -35px; margin-left: -35px; text-align: center; animation: preloader-rotate 2s infinite linear; } @keyframes preloader-rotate { 100% { transform: rotate(360deg); } } .loaded_hiding .preloader { transition: 0.3s opacity; opacity: 0; } .loaded .preloader { display: none; }3. Поместим на страницу следующий сценарий:
Этот сценарий на чистом JavaScript. Но его можно написать с использованием библиотеки jQuery.
В этом случае он будет выглядеть следующим образом:
Пример прелоадера с градиентным фоном:
Прелоадер с использованием анимированной gif картинки
В качестве изображения можно использовать не только svg, но и gif картинку.
.preloader { position: fixed; left: 0; top: 0; right: 0; bottom: 0; overflow: hidden; background: #fff; z-index: 1001; } .preloader__image { position: relative; top: 50%; left: 50%; width: 64px; height: 64px; margin-top: -32px; margin-left: -32px; background: url('preloader.gif') no-repeat 50% 50%; /*расположение (url) изображения gif и др. параметры*/ } .loaded_hiding .preloader { transition: 0.3s opacity; opacity: 0; } .loaded .preloader { display: none; }Небольшая коллекция анимированных gif-изображений имеется в этом архиве.
Вариант прелоадера с использованием jQuery функции fadeOut
Пример скрипта нв jQuery для скрытия прелоадере с использованием функции fadeOut:
$(window).on('load', function() { $('.preloader').fadeOut().end().delay(400).fadeOut('slow'); });Кнопка отправки со спиннером
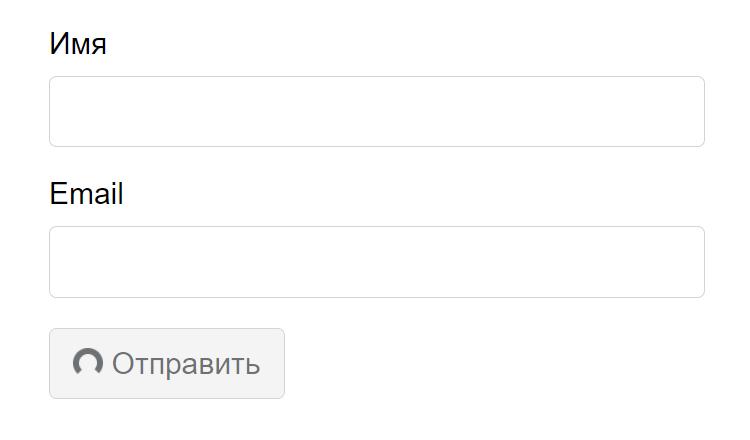
Рассмотрим создание формы, работающей через AJAX. При её отправке будем переводить кнопку type=»submit» в состояние disabled и показывать спиннер. Спиннер будем отображать до тех пор пока не прийдет ответ от сервера. Тем самым спиннер будет указывать что действие все ещё выполняется и оно не завершено.
1. Отправка формы с использованием XMLHttpRequest:
2. Отправка формы с использованием Fetch:
async function sendForm() { try { document.forms.user.querySelector('[type="submit"]').disabled = true; document.forms.user.querySelector('.submit-spinner').classList.remove('submit-spinner_hide'); let response = await fetch(document.forms.user.action, { method: 'post', body: new FormData(document.forms.user) }); document.forms.user.querySelector('[type="submit"]').disabled = false; document.forms.user.querySelector('.submit-spinner').classList.add('submit-spinner_hide'); if (response.ok) { let result = await response.json(); } } catch (error) { document.forms.user.querySelector('[type="submit"]').disabled = false; document.forms.user.querySelector('.submit-spinner').classList.add('submit-spinner_hide'); console.log(error); } } // при отправке формы document.forms.user.addEventListener('submit', (e) => { e.preventDefault(); sendForm(); });Windows Loader Animation using HTML & CSS
Hello developers, today in this blog, you’ll learn to create a Windows Loader Animation using HTML & CSS.
Loaders are also called preloaders, are what you see on the screen while the page’s content is still loading. Loaders are simple and complex animations that are used to keep your visitors and content viewers entertained while the page’s content is still loading.
In this blog (Windows Loader Animation) on the webpage, some dots rotate continuously, which is clockwise infinitely. While the loader is rotating after a few seconds, these dots are disappeared and again these dots appear. The CSS @keyframe property is used to rotate the loader.
The source code of this Windows Loader Animation is given below, if you want the source code of this program, you can copy it. You can use this Windows Loader Animation with your creativity and can take this project to the next level.
Windows Loader Animation [Source Code]
To make this website, you would like to make two files: an HTML file & a CSS file. First, create an HTML file with the name of index.html and remember, you have to create a file with a .html extension.
CSS provides style to an HTML page. To make the page attractive, create a CSS file with the name style.css, and remember that you have to make a file with a .css extension.
@import url('https://fonts.googleapis.com/css?family=Poppins:400,500,600,700&display=swap'); * < margin: 0; padding: 0; box-sizing: border-box; >body < display: flex; align-items: center; justify-content: center; min-height: 100vh; text-align: center; background-color: #12192c; >.container < position: relative; width: 100%; display: flex; justify-content: center; >.wrapper < position: absolute; top: -35px; transform: scale(1.5); >.loader < height: 25px; width: 1px; position: absolute; animation: rotate 3.5s linear infinite; >.loader .dot < top: 30px; height: 7px; width: 7px; background: #E44D26; border-radius: 50%; position: relative; >.text < position: absolute; bottom: -85px; font-size: 25px; font-weight: 400; font-family: 'Poppins',sans-serif; color: #E44D26; >@keyframes rotate < 30%< transform: rotate(220deg); >40% < transform: rotate(450deg); opacity: 1; >75% < transform: rotate(720deg); opacity: 1; >76% < opacity: 0; >100% < opacity: 0; transform: rotate(0deg); >> .loader:nth-child(1) < animation-delay: 0.15s; >.loader:nth-child(2) < animation-delay: 0.3s; >.loader:nth-child(3) < animation-delay: 0.45s; >.loader:nth-child(4) < animation-delay: 0.6s; >.loader:nth-child(5) < animation-delay: 0.75s; >.loader:nth-child(6) < animation-delay: 0.9s; >.credit a < text-decoration: none; font-weight: 800; color: #E44D26; >.credit We hope you would like this Windows Loader Animation using HTML & CSS.
Thank you for reading our blog. If you face any problem creating this Windows Loader Animation using HTML & CSS, then contact us or comment us. We’ll try to provide the solution to your problem as soon as possible.