- How to set JAVA_HOME in Windows 11/10
- Setting JAVA_HOME in Windows 11/10
- Set JAVA_HOME environment variable & update the system path
- Check JAVA_HOME configuration setup using CMD
- How to Set JAVA_HOME for JDK & JRE: A Step-by-Step Guide
- Windows
- macOS
- Linux
- Expert Q&A
- You Might Also Like
- About This Article
- Is this article up to date?
- Quizzes
- You Might Also Like
- How to Set JAVA_HOME Variable on Windows 11
- A step-by-step guide to setting up and verifying the JAVA_HOME variable on the Windows operating system to run and execute Java files.
- How to Setup JAVA_HOME Variable on Windows 10
- How to Verify JAVA_HOME Variable
- Conclusion
How to set JAVA_HOME in Windows 11/10
In Unix terminology, an Environment variable is a string that holds information such as drive name, pathname, filename, etc. JAVA_HOME is an environment variable which addresses to the directory where Java Runtime Environment or Java Development Kit is installed in the system. To be precise, say if you have installed Java in the path C:\Program Files\Java\jdk1.8.0_121 on your computer, then your Java_Home is C:\Program Files\Java\jdk1.8.0_121. Basically, JAVA_Home is simply an exemplary used by Java-based programs like Apache Tomcat and other app server tools to find where Java is placed in the system.
These third-party programs make use of the environment variables that point to the directory of JDK or JRE. In simple words, it makes easy for the programs to locate the directory executable like javac in the computer. If you are not using these third-party programs, then it may not be mandatory for users to set up JAVA_Home in your system. In this article, we will explain in detail how to set JAVA_HOME as the environment variable in Windows 10.
Setting JAVA_HOME in Windows 11/10
Set JAVA_HOME environment variable & update the system path
Download and install Java from the official site – java.com.
After installation, Go to Start menu and type Advanced system settings.
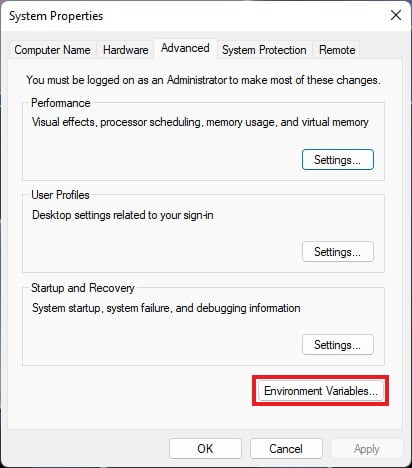
Click on View advanced system settings from the list to open System Properties.
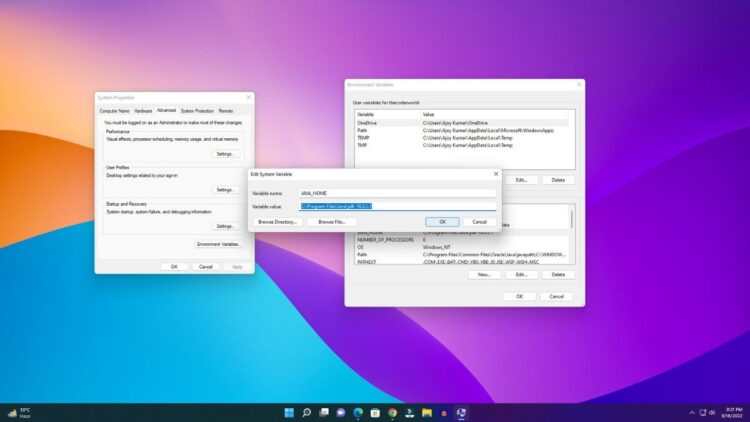
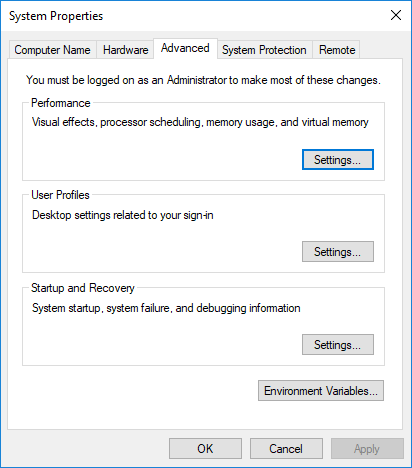
Go to Advanced tab and click on Environment Variables button.
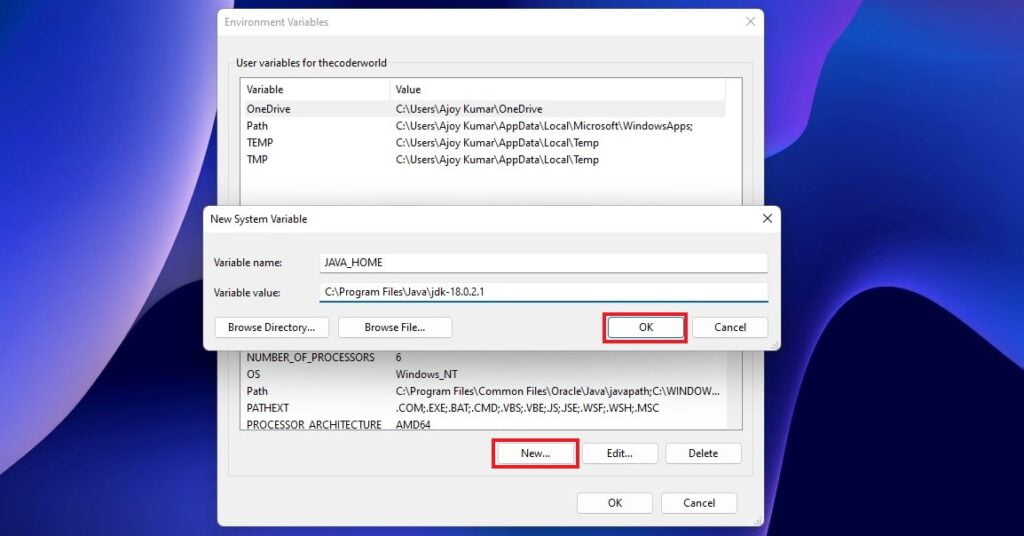
In the Environment Variable window, click on New button under the System variable.
In the Edit System Variable, give the Variable name as JAVA_HOME and Variable value as the path to your JDK directory.
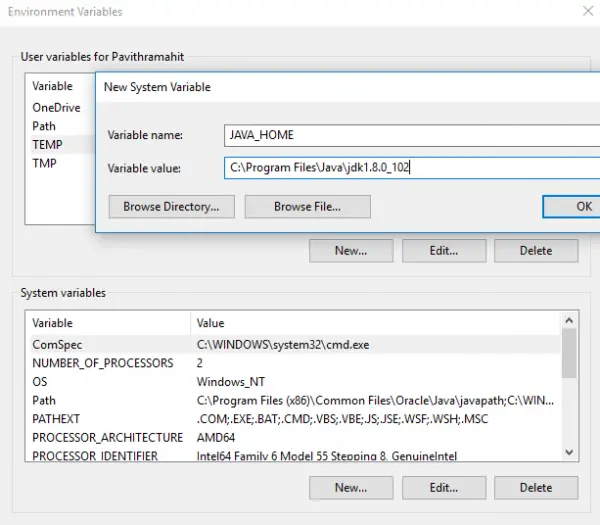
Click on OK.
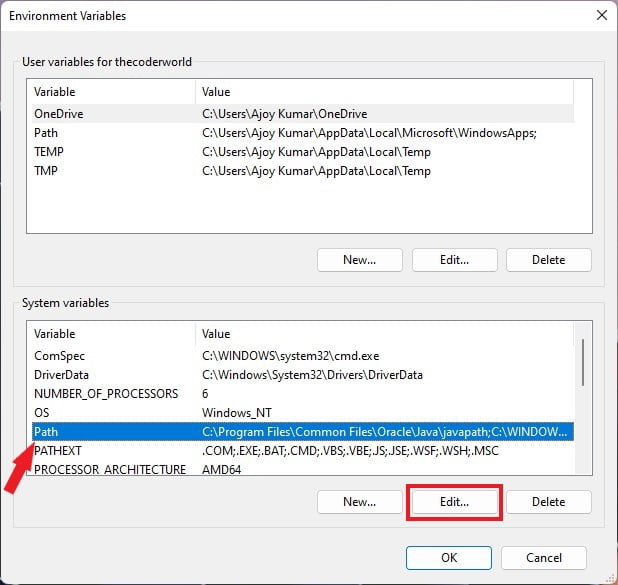
Now go back to the Environment Variable window and select Path under the System variable.
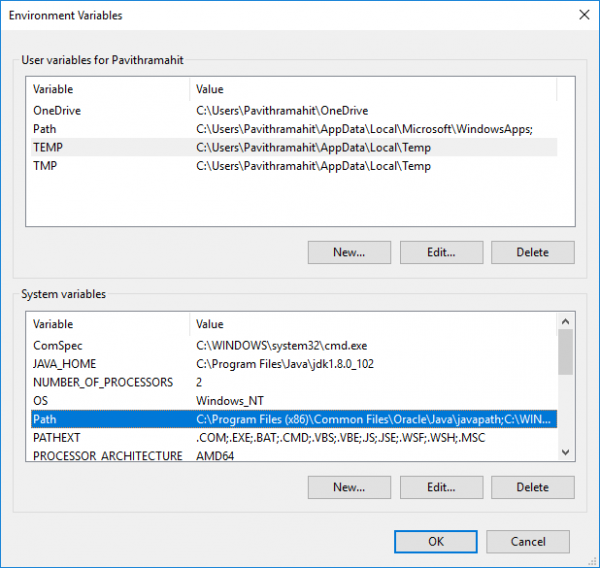
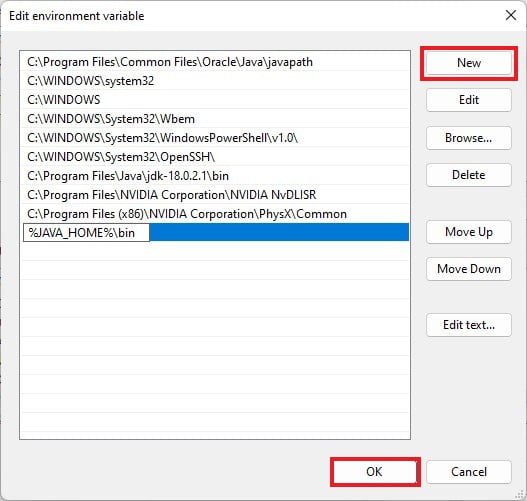
Click on Edit button to open Edit environment variable window.
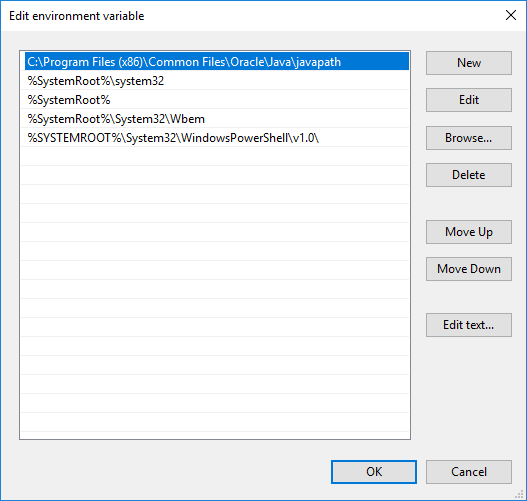
Click on New button and type %JAVA_HOME%\bin.
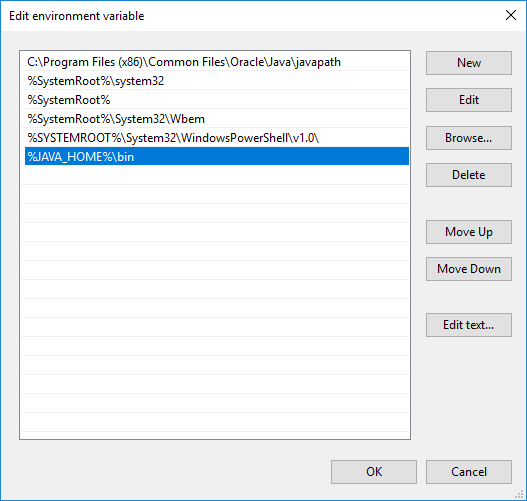
Click OK to apply the changes.
Check JAVA_HOME configuration setup using CMD
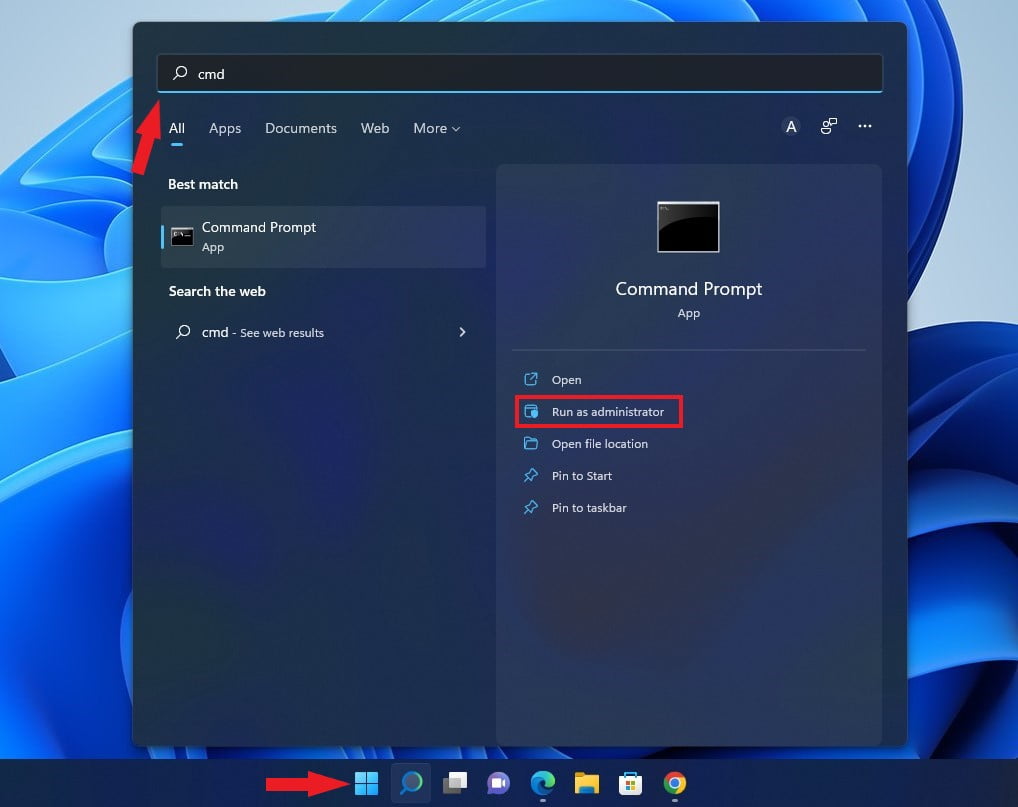
To test your configuration, open Command prompt.
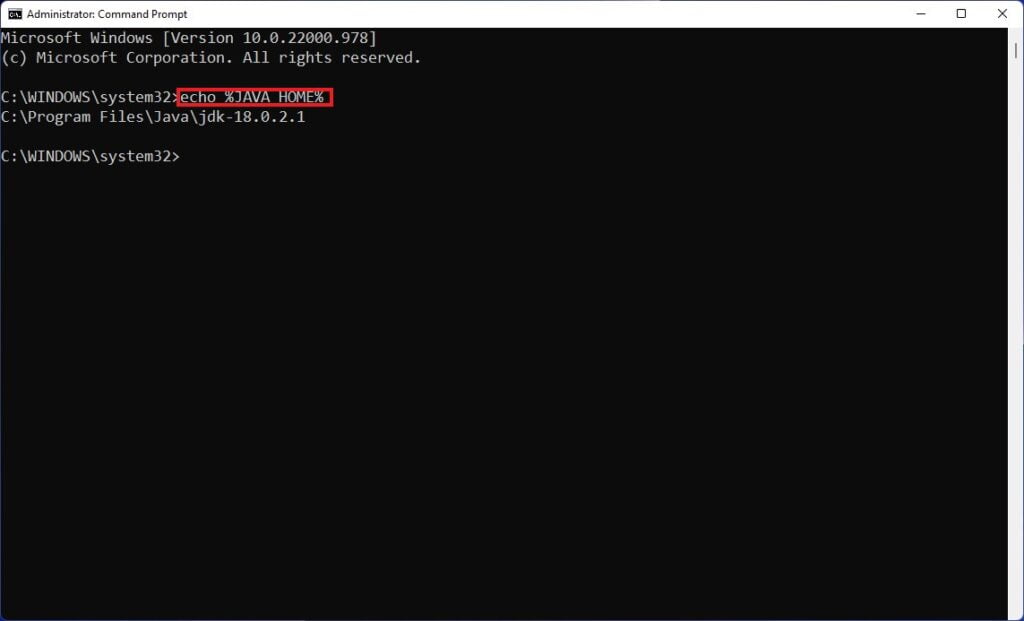
Type echo %JAVA_HOME% and hit Enter. This should print the directory of the JDK which the JAVA_HOME is pointing. Instead, if you see a space, it means you have failed in setting up environment variable.

Next Type javac -version which should print the version of Java compiler.
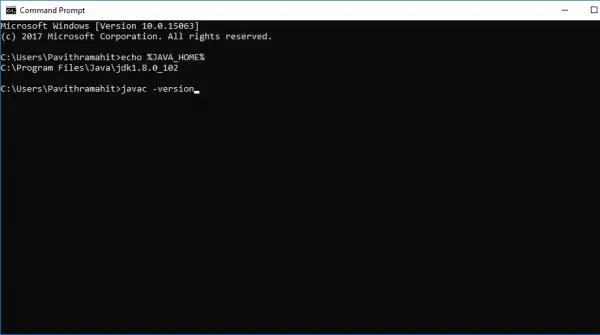
If not it will print a message that the javac is not recognized as an internal or external command. This means the path variable is not set correctly.
How to Set JAVA_HOME for JDK & JRE: A Step-by-Step Guide
This article was co-authored by wikiHow staff writer, Nicole Levine, MFA. Nicole Levine is a Technology Writer and Editor for wikiHow. She has more than 20 years of experience creating technical documentation and leading support teams at major web hosting and software companies. Nicole also holds an MFA in Creative Writing from Portland State University and teaches composition, fiction-writing, and zine-making at various institutions.
This article has been viewed 324,079 times.
Are you seeing Java errors like «JAVA_HOME is not defined correctly?» or «JAVA_HOME is set to an invalid directory?» If you’ve recently installed the Java Development Kit (JDK) or the Java Runtime Environment (JRE), you’ll need to set your JAVA_HOME variables and configure the path so applications know where to find Java. This wikiHow article will show you the easiest ways to change or set the Java home path on Windows, macOS, and Linux.
- Before you can set JAVA_HOME, you’ll need the full path to your JDK or JRE installation.
- Once you set the JAVA_HOME environment variable, you can run the command echo $JAVA_HOME to see the new path.
- To set the Java home and path on Linux or macOS permanently (even after a reboot), add the environment variables to your .bashrc or .zshrc file.
Windows

- Open File Explorer, click This PC in the left panel, then navigate to C:\Program Files\Java. The directory you’re looking for should have the name of the JDK version, such as C:\Program Files\Java\jdk-19.
- If you installed the JRE instead of the JDK, you’ll have something like C:\Program Files\Java\jre1.8.0_351 instead.
- You can also open the command prompt and run the command wmic product where «Name like ‘%%Java%%'» get installlocation,Name . This will tell you the full path of the JDK, even if you haven’t yet set JAVA_HOME.

- Press the Windows key on your keyboard and type advanced system .
- Click View advanced system settings in the search results.

Click the Environment Variables button. You’ll see it at the bottom-right corner of the System Properties window.

- If you have multiple installations of the JDK and want to change JAVA_HOME to your new installation, select the current JAVA_HOME user variable and click Edit… instead.

- If you’re editing the current JAVA_HOME path, you’ll already have JAVA_HOME here. So, you can skip this step.

- If you’re adding a second path to JAVA_HOME, just type a semicolon (;) after the first path, then enter the second path.
- If you’re replacing an old JAVA_HOME path, just delete the current path and enter the new one.


- If you want other users on this PC to be able to access Java binaries from the command line, repeat this step for the «Path» variable under «System variables» as well.

- Click the New button at the top.
- Enter the full path to the JRE or JDK with \bin at the end. For example, C:\Program Files\Java\jdk-19\bin or C:\Program Files\Java\jre1.8.0_351\bin.
- Click OK.

- You won’t need to restart your computer for the changes to take effect, but you will need to relaunch any apps that were trying to access Java.
- Open a new command prompt window and run the command echo %JAVA_HOME% to display the new path to JAVA_HOME.
- Make sure this is a new command prompt window. If you still have the same window open, the command will fail because it doesn’t have the new environment variables.
macOS

Open a Terminal window. To open Terminal, search for Terminal in Spotlight. Or, you can open Finder, click the Go menu, select Utilities, and choose the Terminal app.
- If you have more than one Java installation and want to see the paths to all of them, use /usr/libexec/java_home -V instead.
Copy the path and paste it somewhere handy. Highlight the path to the Java installation you want to use as JAVA_HOME, press Cmd + V to copy it, then paste it into a sticky note or text file.
- Type cd ~ and press Return.
- Type open .zshrc and press Return. This should open the file in a text editor.
- If the file is not found, type echo > .zshrc and press Return. Then, run open .zshrc again.
- export JAVA_HOME=/Library/Java/JavaVirtualMachines/jdk-17.0.1.jdk/Contents/Home
- Replace /Library/Java/JavaVirtualMachines/jdk-17.0.1.jdk/Contents/Home with the full path to the /Contents/Home directory of your Java installation if it’s different.
Type source .zshrc and press ⏎ Return . Once you’ve edited your profile, this command ensures that your environment variables will be updated for the current terminal window (and any other windows you open from now on).
- If you had any other windows open that were attempting to find Java binaries, close and reopen them.
- Shopping for PC accessories or office supplies? Check out our coupon site for Staples discounts or our coupon site for Office Depot.
Linux
- readlink -f `which javac`
- If that doesn’t work, try running update-alternatives —list java .
- If neither of these commands works, run whereis java , which will usually result in a symbolic link like /usr/bin/java.
- Once you get the directory, find out where it links using ls -la /bin/java .
- If that points you to another directory, e.g., /etc/alternatives/java, run ls -la /etc/alternatives/java .
- At that point, you should see a much longer directory, which is actually the home to the Java binaries. For example, usr/lib/jvm/java-11-openjdk-arm64/bin/java . This is the directory you want.
- echo «export JAVA_HOME=/usr/lib/jvm/java-11-openjdk-arm64» >> ~/.bashrc
- echo «export PATH=$PATH:$JAVA_HOME/bin» >> ~/.bashrc

Expert Q&A
In Linux, you can set JAVA__HOME for all users by editing the global .bashrc, which is located at /etc/bash.bashrc. Just use echo and replace ~/.bashrc with /etc/bash.bashrc .

You Might Also Like

Use Easy Windows CMD Commands to Check Your Java Version
How to Do Division in Java (Integer and Floating Point)
How to Compile and Run Java Programs Using Notepad++
Simple Steps to Type a Bunny with Your Keyboard
About This Article
This article was co-authored by wikiHow staff writer, Nicole Levine, MFA. Nicole Levine is a Technology Writer and Editor for wikiHow. She has more than 20 years of experience creating technical documentation and leading support teams at major web hosting and software companies. Nicole also holds an MFA in Creative Writing from Portland State University and teaches composition, fiction-writing, and zine-making at various institutions. This article has been viewed 324,079 times.
Is this article up to date?
Quizzes
You Might Also Like
Use Easy Windows CMD Commands to Check Your Java Version
How to Do Division in Java (Integer and Floating Point)
How to Compile and Run Java Programs Using Notepad++
How to Set JAVA_HOME Variable on Windows 11
A step-by-step guide to setting up and verifying the JAVA_HOME variable on the Windows operating system to run and execute Java files.

While running your Java program/application, if you are getting a JAVA_HOME error. Then this may be because you have not set up the JAVA_HOME environment variable on your Windows 11. Here is a detailed guide on; how to set the JAVA_HOME variable on Windows.
JAVA_HOME is the name of an environment variable on the operating system that points to the installation directory of Java Runtime Environment or Java Development Kit. You can also check out our guide on; how to install and set up Java JDK on Windows 11.
How to Setup JAVA_HOME Variable on Windows 10
By just downloading and installing Java, Java files will not work. You have to; set up the java environment variable and JAVA_HOME variable on your Windows 11. So, the system can execute the Java code on your Windows 11 system.
To set up the JAVA_HOME variable, follow the steps mentioned below. Or, if you prefer a video tutorial, you can watch the video mentioned below.
Step 3: It will open the “System Properties“ window. Click on the “Advanced” tab and click the “Environment Variable” option.
Step 4: Under the “System variables“section, click the “New” button. Here, enter JAVA_HOME as a variable name and the installation directory of Java JDK under variable value. Then click on “OK” to save the changes.
Step 5: Now, go back to the “Environment Variable” window and select “Path” under the System variable. Then click on the “Edit” button.
Step 6: Here, you need to add the JAVA_HOME variable to the Path. For that, click on “New” and type %JAVA_HOME%\bin to add the new environment variable. After that, click on “OK” to save the changes.
How to Verify JAVA_HOME Variable
By following; the above steps, you can set the JAVA_HOME variable on your system. Now, to verify the JAVA_HOME environment variable, follow the below steps:
Step 1: Click the “Start” button, search for “cmd,” and open the command prompt as administrator.
Step 2: Now run the following command:
This command should print the directory of the Java JDK to which the JAVA_HOME is pointing. Or else, you will get an empty line if the JAVA_HOME variable is not configured correctly.
Step 3: Next, run the javac —version command; to check the version of the Java compiler.
If everything went fine, that means; you have successfully set the JAVA_HOME on Windows 11. Now, you are ready to run Java files on your Windows operating system.
Conclusion
That’s it; this is how you can set the JAVA_HOME variable on Windows 11. If you want to run and write Java code, you can also check out our detailed guide on; how to install and set up Eclipse IDE on Windows 11 for Java programming.
I hope this article was helpful to you. If you liked the article, share it with your friends and family. If you have some suggestions, do not hesitate to leave them in the comments section below.