- How to create a website with fullscreen sections using CSS and HTML
- Defining our sections in HTML
- Making sections become full-screen
- Using viewport units
- Using percentage units
- Centering content vertically and horizontally
- Styling sections individually
- Conclusion
- Related articles
- Блок на весь экран | CSS
- Блок шириной на весь экран монитора выровнять по центру окна браузера
- Картинка на весь экран CSS
- 7 комментариев:
- How to Make Images 100% Full Screen With Only CSS
- Has this been helpful to you?
How to create a website with fullscreen sections using CSS and HTML
Large full-screen sections are quite a common element on nowadays websites, especially on landing pages acting as a hero slider. They take the full height and full width of the viewport with the intent of bringing the focus in a single portion of the page. Here we will be explaining how to achieve just that.
Defining our sections in HTML
Let’s start by adding a couple of section elements inside a the wrapper:
 main>
section>
h1>Hello!h1>
section>
section>
h1>Toodles~h1>
section>
main>
Making sections become full-screen
Making sections full-height and full-width can be done in two ways:
- Using viewport units ( vh and vw ) — May feel the most intuitive out of the two. In fact, the viewport units were introduced to do just these kinds of things.
- Using implicit units like percentages. ( % ). They used to be used more in the past when viewport units were not a thing or were not widely supported.
Using viewport units
First, we will style our sections so that they scale to the height of the viewable area. We will use the vh unit, which stands for «viewport height». The vh unit is roughly 1% of the viewport’s height. And what is the «viewport»? It is the visible area of your website in the browser. To make it take 100% of the vertical space, we will set min-height to 100vh , meaning, the section will take a minimum height of 100% of the viewport height.
We set min-height instead of height because this way each section can, if required, have a bigger height, while if you used just height any content that scales beyond the viewport height would be overflowing the container.
body
margin: 0;
>
section
font-family: sans-serif;
min-height: 100vh;
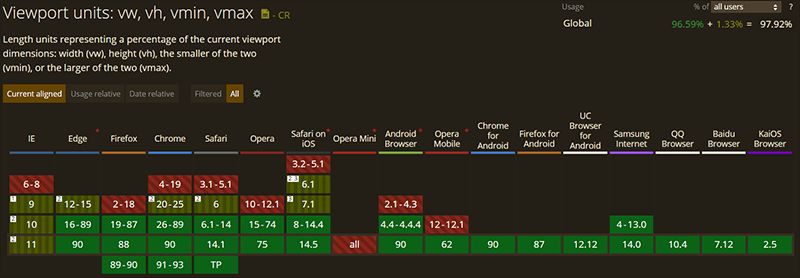
>It is important to note that if you intend to support legacy browsers, then you might want to use percentage units instead. Take a look at the following chart to verify if the browsers you intend to support are listed in green:
Using percentage units
The main difference between the percentage unit and the viewport units is that the percentage units rely on the height and width values of the parent. This means that all the parent elements must also scale to the full height and width if the children underneath wish to. This is why the html , body and main tags have height and width set to 100% . This will force each parent in the hierarchy to take up the full available height and width of the viewport.
html,
body
margin: 0;
height: 100%;
width: 100%;
>

main
height: 100%;
width: 100%;
>

section
font-family: sans-serif;
height: 100%;
width: 100%;
>
Centering content vertically and horizontally
You will very probably want to have some centered content on your section. If not text or images, probably a container element.
We will be using the align-items property to vertically center whatever content we have. Then, to center them horizontally we’ll be using justify-content: center .
And to make those two properties work, we’ll display: flex in order to turn each section into a flex container.
section
font-size: 120px;
display: flex;
justify-content: center;
align-items: center;
>
Styling sections individually
To make each section distinguishable from the other, we will use the nth-child selector to set a background and a color. You can achieve the same thing by using a class for each section too if you prefer so.
section:nth-child(1)
background: orange;
color: white;
>

section:nth-child(2)
background: cyan;
color: white;
>
With that, you should now be able to confidently create fullscreen sections with HTML and CSS. If you want to see how it looks like, take a look at the following CodePen and while you’re at it play around with it:
And here we have the same but using a percentage instead of vh units.
Conclusion
If you’re interested in creating fullscreen websites, then you can take a look at fullPage.js. As the name suggests, fullPage.js revolves around the idea of using full-screen sections, but on top of that, it allows you to add some nifty effects like snap scrolling or horizontal scrolling with little to no effort on your part. Easy to configure and with tends of options that will make your page look quite unique.
And if you want to keep on improving your fullscreen website, adding a sticky or fixed navbar is definetely the way to go. And if you want to consider adding videos, check out how to create a fullscreen video with CSS and HTML or how to add Youtube videos as a background with CSS.
Related articles
Блок на весь экран | CSS
If the height of the containing block is not specified explicitly (i.e., it depends on content height), and this element is not absolutely positioned, the percentage value is treated as ‘0’ (for ‘min-height’) or ‘none’ (for ‘max-height’). [w3.org]
html, body < height: 100%; margin: 0; padding: 0; overflow: hidden; >body < overflow: auto; /* добавить полосу прокрутки */ > main
Блок шириной на весь экран монитора выровнять по центру окна браузера
У многих сайтов, в том числе у «Шпаргалки блоггера» содержание ограничено определённой шириной и горизонтально выравнивается по середине экрана.
Для того, чтобы контент выходил за пределы этих 1200px , но был ограничен шириной окна браузера, достаточно такого кода:
Картинка на весь экран CSS
Особенно здорово смотрятся изображения. Они занимают необходимое им пространство, но не более ширины окна браузера.

Код немного доработан, опираясь на статью «Размер изображения меняется при изменении экрана браузера». Там же написан соответствующий вариант для видео.

7 комментариев:
Agent_Smith Полезная штука, спасибо Вам) NMitra Для себя делала :)) Другие прописывают max-width для каждого отдельного тега (p, pre и т.п.), а не для всей колонки main. Анонимный С высотой блока не работает. просто по ширине экрана, ниже обрезается и никуда не скролится NMitra Ничего не поняла 🙂 Приведите пример, пожалуйста. Анонимный о Иван Сафронов не работает данный метод NMitra Так не может быть: на данной странице ведь работает. Покажите URL, где внедрён код и поясните что именно хотите сделать. Например, блок с заголовком «Популярное».
How to Make Images 100% Full Screen With Only CSS
Learn how to use CSS to make images full-screen width (full-bleed) even when the rest of your content has a constrained layout width.
The following CSS code is a “trick” to make images expand to the full width of your screen (from edge to edge) regardless of the width of the rest of your page layout.
First, here’s a CSS class with the required style properties:
.full-screen-width position: relative; left: 50%; right: 50%; margin-left: -50vw; margin-right: -50vw; max-width: 100vw; width: 100vw; >How the full-screen image-width code above works in practice:
You may be able to immediately use the CSS class above in your projects. It depends on how your specific project is structured and styled already.
Read on to learn how to recreate the video example from above, and that will give you more perspective on how to use it in a practical sense.
Full-screen image width in an article layout
In the video illustration above, we have a simple article layout for a page with one image an a few paragraphs. Let’s put it together!
article> p> Lorem ipsum dolor sit amet consectetur adipisicing elit. Corrupti, officiis. Nesciunt, odio enim ipsam repellat iusto maxime nihil, iure cumque quis pariatur obcaecati libero harum ea officiis. Corrupti, itaque vitae? p> img class="full-screen-width" src="https://images.unsplash.com/photo-1450096315186-13dc369ab43e?ixlib=rb-1.2.1&ixid=eyJhcHBfaWQiOjEyMDd9&auto=format&fit=crop&w=1650&q=80" alt="A happy dog looking out a door window" /> p> Lorem ipsum dolor sit amet consectetur, adipisicing elit. Cumque ducimus incidunt sint sequi, voluptates neque nulla ratione, aliquam aut tempora explicabo consectetur beatae eum commodi quibusdam ad soluta labore tenetur! p> p> Lorem, ipsum dolor sit amet consectetur adipisicing elit. Culpa deleniti, blanditiis tempore ab nam dolores ratione accusantium labore pariatur quasi! Numquam quod corporis, necessitatibus ipsum sequi vel. Suscipit, aliquam dolorem? p> article>To make the full-screen image width code work in practice, you need to do two other things besides styling the image element:
Here‘s all the CSS code for a working example:
body overflow-x: hidden; > article max-width: 700px; margin: 3rem auto; padding: 0 2rem; > .full-screen-width position: relative; left: 50%; right: 50%; margin-left: -50vw; margin-right: -50vw; max-width: 100vw; width: 100vw; >Now you can apply the .full-screen-width class to any image element in your project (inside a constrained layout width) and its width will span from edge to edge of the screen.
Has this been helpful to you?
You can support my work by sharing this article with others, or perhaps buy me a cup of coffee 😊