- Всплывающая подсказка на CSS
- CSS по теме
- Css style title hover
- # Table of Contents
- # How to change the Style of the title Attribute using CSS
- # Styling the element’s hover and ::after separately
- # Using a different style for the custom title
- # Showing an element on hover to simulate a custom title
- # Additional Resources
Всплывающая подсказка на CSS
В HTML уже есть глобальный атрибут title , который можно добавить к любому элементу веб-страницы. Наличие этого атрибута добавляет всплывающую подсказку, которая появляется при наведении курсора мыши на элемент. Шрифт текста, размер подсказки и её вид в целом зависит от операционной системы и не может быть изменён с помощью стилей. К тому же многих разработчиков не устраивает, что такая подсказка довольно быстро исчезает. Это заставляет искать способы сделать свою всплывающую подсказку, которая была бы оформлена желаемым образом. Конечно, самый универсальный способ заключается в использовании JavaScript, но в некоторых случаях вполне достаточно обойтись и одним CSS.
В качестве примера я выбрал фотографии, при наведении на них курсора мыши показывается название фотографии. Сам вывод текста будем делать при помощи свойства content и брать значение текста из какого-либо атрибута через attr() . К сожалению, content не будет работать желаемым образом в сочетании с img , поэтому фотографии вставляются в элемент , к которому добавляем атрибут data-title с текстом всплывающей подсказки. Есть соблазн вставить атрибут title и задействовать его, но в таком случае будет выводиться одновременно две подсказки: одна «родная», а вторая наша. Так что мы используем свой собственный атрибут data-title , благо HTML5 позволяет это делать. Таким образом получим следующий код (пример 1).


Переходим к стилю нашей подсказки. Вначале надо сделать, чтобы она вообще появлялась. Для этого воспользуемся псевдоэлементом ::after , к которому добавляем content: attr(data-title) .
Получится, что после содержимого элемента с классом photo будет выводиться текст из атрибута data-title , что нам и требовалось. Но поскольку всплывающая подсказка должна появляться только при наведении на фотографию курсора мыши, добавим ещё псевдокласс :hover .
Остаётся только задать желаемый стиль нашей подсказки, в частности, положение, цвет фона, текста, рамку и др. (пример 2).
HTML5 CSS3 IE Cr Op Sa Fx
Результат данного примера показан на рис. 1.
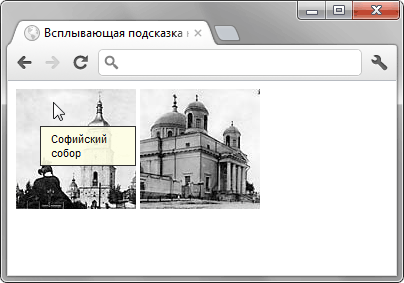
Рис. 1. Вид всплывающей подсказки
Положение подсказки не зависит от позиции курсора, она появляется в одном и том же месте при наведении курсора на изображение. Можно сделать, чтобы подсказка выводилась в нижней части фотографии, так она не будет закрывать большую часть картинки. Стиль при этом поменяется незначительно (пример 3).
Пример 3. Вывод подсказки внизу фотографии
HTML5 CSS3 IE Cr Op Sa Fx
Результат данного примера показан на рис. 2.
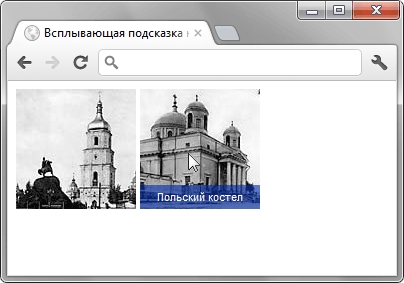
Рис. 2. Вид всплывающей подсказки
К сожалению, свойство transition , с помощью которого можно сделать анимацию подсказки, не работает с псевдоэлементами. Поэтому придётся довольствоваться резким появлением нашей всплывающей подсказки. Также не будет никакого эффекта в браузере IE8 и младше, эта версия не поддерживает ::after . Впрочем, если заменить этот псевдоэлемент на :after , то можно получить более-менее работающий вариант.
CSS по теме
Css style title hover
Last updated: May 16, 2023
Reading time · 6 min

# Table of Contents
# How to change the Style of the title Attribute using CSS
To change the style of the title attribute using CSS:
- Set the data-title attribute on the element to the value of the title attribute.
- When the user hovers over the element, use ::after to create a pseudo-element that shows the custom title.
Copied!DOCTYPE html> html lang="en"> head> meta charset="UTF-8" /> style> body margin: 100px; > a position: relative; display: inline-block; margin-top: 50px; font-size: 1.5em; > a[data-title]:hover::after content: attr(data-title); position: absolute; top: -100%; left: 0; z-index: 100; background-color: aquamarine; width: 250px; > style> head> body> h2>bobbyhadz.comh2> a href="https://bobbyhadz.com" data-title="Example title" >bobbyhadz.coma > body> html>
We first set the data-title attribute on the element to the value of the title we want to show when the user hovers over the element.
Copied!a href="https://bobbyhadz.com" data-title="Example title" >bobbyhadz.com a>
We set the position of the a element to relative , so we can set the position of the tooltip to absolute .
Copied!a position: relative; display: inline-block; margin-top: 50px; font-size: 1.5em; >
The next step is to use the attr() CSS function to get the value of the data-title attribute directly in the stylesheet.
Copied!a[data-title]:hover::after content: attr(data-title); position: absolute; top: -100%; left: 0; z-index: 100; background-color: aquamarine; width: 250px; >
You can also set the color of the title text.
Copied!a[data-title]:hover::after content: attr(data-title); position: absolute; top: -100%; left: 0; z-index: 100; background-color: aquamarine; width: 250px; /* 👇️ set color of title text */ color: black; >
::after is used to create a pseudo-element that is the last child of the selected element.
The content of the pseudo-element is the text of the data-title attribute.
Copied!a href="https://bobbyhadz.com" data-title="Example title" >bobbyhadz.com a>
The next step is to set the position of the element to absolute , so we can use the top and left properties.
If the width of your title text exceeds the width of your element, you might have to increase the value of the width property on hover.
Copied!a[data-title]:hover::after content: attr(data-title); position: absolute; top: -100%; left: 0; z-index: 100; background-color: aquamarine; /* increase width */ width: 250px; >
You can also increase the width directly on the element.
Copied!a position: relative; display: inline-block; margin-top: 50px; font-size: 1.5em; width: 250px; >
We used the custom data-title attribute so that the native title won’t display eventually and interfere with the custom title.
The native title attribute can’t be styled directly using CSS.
However, you can create a custom title that you can style.
The style of the native title attribute is defined by each browser and might slightly vary between browsers.
# Styling the element’s hover and ::after separately
In some cases, you might want to style the element’s :hover and ::after separately.
Here is an example that and uses a box-shadow when styling the custom title.
Copied!DOCTYPE html> html lang="en"> head> meta charset="UTF-8" /> style> body margin: 100px; > a position: relative; display: inline-block; margin-top: 50px; font-size: 1.5em; > a[data-title]::after content: attr(data-title); background-color: pink; color: black; font-size: 1.2em; position: absolute; padding: 1px 5px 2px 5px; bottom: 1.1em; left: 50%; white-space: nowrap; box-shadow: 1px 1px 4px #242424; opacity: 0; border: 1px solid #1b1b1b; z-index: 9999999; visibility: hidden; > a[data-title]:hover::after visibility: visible; opacity: 1; transition: all 0.1s ease 0.4s; > style> head> body> h2>bobbyhadz.comh2> a href="https://bobbyhadz.com" data-title="Example title" >bobbyhadz.coma > body> html>
The ::after pseudo-element is styled separately.
Copied!a[data-title]::after content: attr(data-title); background-color: pink; color: black; font-size: 1.2em; position: absolute; padding: 1px 5px 2px 5px; bottom: 1.1em; left: 50%; white-space: nowrap; box-shadow: 1px 1px 4px #242424; opacity: 0; border: 1px solid #1b1b1b; z-index: 9999999; visibility: hidden; >
We used the attr() function to get the value of the data-title attribute just like in the previous example.
This time we also used the box-shadow CSS property to display a shadow.
We initially set the element’s opacity to 0 and its visibility to hidden .
When the user hovers over the element, the pseudo-element’s visibility is set to visible and its opacity is set to 1 .
Copied!a[data-title]:hover::after visibility: visible; opacity: 1; transition: all 0.1s ease 0.4s; >
We also set up a transition to make the tooltip visible with a quick animation.
You can play around with the values of the bottom and left CSS properties if you need to position the custom title somewhere else.
Copied!a[data-title]::after content: attr(data-title); background-color: pink; color: black; font-size: 1.2em; position: absolute; padding: 1px 5px 2px 5px; bottom: -1.6em; left: 70%; white-space: nowrap; box-shadow: 1px 1px 4px #242424; opacity: 0; border: 1px solid #1b1b1b; z-index: 9999999; visibility: hidden; >
Here is an example that shows the difference between the custom title and using the native title attribute.
Copied!DOCTYPE html> html lang="en"> head> meta charset="UTF-8" /> style> body margin: 100px; > a position: relative; display: inline-block; margin-top: 50px; font-size: 1.5em; > a[data-title]::after content: attr(data-title); background-color: pink; color: black; font-size: 1.2em; position: absolute; padding: 1px 5px 2px 5px; bottom: -1.6em; left: 70%; white-space: nowrap; box-shadow: 1px 1px 4px #242424; opacity: 0; border: 1px solid #1b1b1b; z-index: 9999999; visibility: hidden; > a[data-title]:hover::after visibility: visible; opacity: 1; transition: all 0.1s ease 0.4s; > style> head> body> h2>bobbyhadz.comh2> a href="https://bobbyhadz.com" data-title="Example title" >bobbyhadz.coma > br /> br /> a href="https://bobbyhadz.com" title="Example title" >google.coma > body> html>
# Using a different style for the custom title
Here is an example that uses a style that more closely resembles the style of a native title attribute.
Copied!DOCTYPE html> html lang="en"> head> meta charset="UTF-8" /> style> body margin: 100px; > a position: relative; display: inline-block; margin-top: 50px; font-size: 1.5em; > a[data-title]::after content: attr(data-title); background-color: rgb(255, 226, 231); color: black; font-size: 1.1em; position: absolute; padding: 2px 6px 2px 5px; bottom: -1.6em; left: 70%; white-space: nowrap; box-shadow: 1px 1px 4px #242424; opacity: 0; border: 1px solid #1b1b1b; border-radius: 6px; z-index: 9999999; visibility: hidden; background-image: -moz-linear-gradient( top, #f8f8f8, #bebebe ); background-image: -webkit-gradient( linear, left top, left bottom, color-stop(0, #f8f8f8), color-stop(1, #bebebe) ); background-image: -webkit-linear-gradient( top, #f8f8f8, #bebebe ); background-image: -moz-linear-gradient( top, #f8f8f8, #bebebe ); background-image: -ms-linear-gradient( top, #f8f8f8, #bebebe ); background-image: -o-linear-gradient( top, #f8f8f8, #bebebe ); > a[data-title]:hover::after visibility: visible; opacity: 1; transition: all 0.1s ease 0.4s; > style> head> body> h2>bobbyhadz.comh2> a href="https://bobbyhadz.com" data-title="Example title" >bobbyhadz.coma > br /> br /> a href="https://bobbyhadz.com" title="Example title" >google.coma > body> html>
The code sample uses the background-image CSS property to set the background of the custom title to a gradient.
# Showing an element on hover to simulate a custom title
You can also show an element on hover to simulate a custom title.
Copied!DOCTYPE html> html lang="en"> head> meta charset="UTF-8" /> style> body margin: 100px; > a position: relative; display: inline-block; margin-top: 50px; font-size: 1.5em; > a span display: none; > a:hover span position: absolute; top: 30px; padding: 5px 10px 5px 5px; display: block; z-index: 999999; left: 60%; margin: 8px; width: 200px; text-decoration: none; background-color: #f5f5f5; color: black; border: 1px solid gray; > style> head> body> h2>bobbyhadz.comh2> a href="https://bobbyhadz.com" data-title="Example title" >bobbyhadz.com span>Example title textspan>a > br /> br /> a href="https://bobbyhadz.com" title="Example title" >google.coma > body> html>
Notice that we didn’t create a pseudo-element using ::after this time.
Instead, we have a hidden span element nested within the a tag.
Copied!a href="https://bobbyhadz.com" data-title="Example title" > bobbyhadz.com span>Example title textspan> a>
We set the position of the a element to relative .
Copied!a position: relative; display: inline-block; margin-top: 50px; font-size: 1.5em; >
The next step is to hide the span element by setting its display attribute to none .
Copied!a span display: none; >
When the user hovers over the a element, the display property of the span is set to block to show the custom title.
Copied!a:hover span position: absolute; top: 30px; left: 60%; padding: 5px 10px 5px 5px; display: block; z-index: 999999; margin: 8px; width: 200px; text-decoration: none; background-color: #f5f5f5; color: black; border: 1px solid gray; >
You can use the top and left CSS properties if you need to position the title text somewhere else.
You might also have to adjust the value of the width property depending on the width of your title text.
# Additional Resources
You can learn more about the related topics by checking out the following tutorials:
I wrote a book in which I share everything I know about how to become a better, more efficient programmer.