- Основные возможности библиотеки Python Imaging Library / Pillow / PIL
- Что такое Pillow?
- Загрузка и установка Pillow
- Убедитесь, что Pillow установлена
- Форматы файлов
- Как использовать Pillow для работы с изображениями
- Использование Pillow
- Python Pillow Install
- Overview of Python Pillow Install
- How to Install Python Pillow? (MacOS, Windows, FreeBSD)
- a. Install python pillow on windows
- b. Install python pillow on MacOS
- c. Install python pillow on FreeBSD
- Conclusion
- Recommended Articles
Основные возможности библиотеки Python Imaging Library / Pillow / PIL
PIL, известная как библиотека Python Imaging Library, может быть использована для работы с изображениями достаточно легким способом. У PIL не было никаких изменений и развития с 2009. Поэтому, добрые пользователи этого сайта предложили взглянуть на Pillow еще раз. Эта статья поможет вам узнать как пользоваться Pillow.
Что такое Pillow?
Pillow это форк PIL (Python Image Library), которая появилась благодаря поддержке Алекса Кларка и других участников. Основана на коде PIL, а затем преобразилась в улучшенную, современную версию. Предоставляет поддержку при открытии, управлении и сохранении многих форматов изображения. Многое работает так же, как и в оригинальной PIL.
Загрузка и установка Pillow
Перед началом использования Pillow, нужно загрузить и установить ее. Pillow доступна для Windows, Mac OS X и Linux. Самая “свежая” версия — это версия “8.1.0”, она поддерживается на python 3.6 и выше. Для установки Pillow на компьютеры Windows используйте conda или pip :
conda install -c anaconda pillow pip install PillowДля установки Pillow на компьютерах Linux просто используйте:
А установки Pillow на MacOS X нужно для начала установить XCode, а затем Homebrew. После того как Homebrew установлен, используйте:
$ brew install libtiff libjpeg webp littlecms $ sudo pip install PillowУбедитесь, что Pillow установлена
Убедитесь, что Pillow установлена, откройте терминал и наберите следующее в текущей строке:
$ python Python 3.7.0 (v3.7.0:1bf9cc5093, Jun 27 2018, 04:06:47) [MSC v.1914 32 bit (Intel)] on win32 Type "help", "copyright", "credits" or "license" for more information. >>> from PIL import ImageЕсли система показывает снова >>> , значит модули Pillow правильно установлены.
Форматы файлов
Перед началом использования модуля Pillow, давайте укажем некоторые поддерживаемые типы файлов: BMP, EPS, GIF, IM, JPEG, MSP, PCX PNG, PPM, TIFF, WebP, ICO, PSD, PDF . Некоторые типы файлов возможны только для чтения, в то время как другие доступны только для написания. Чтобы увидеть полный список поддерживаемых типов файла и больше информации о них, ознакомьтесь с руководством к Pillow.
Как использовать Pillow для работы с изображениями
Поскольку мы собираемся работать с изображениями, для начала, скачаем одно. Если у вас уже есть изображение, которое хотите использовать, пропустите этот шаг, описанный ниже.
В нашем примере будем использовать стандартное тестовое изображение под названием «Lenna» или «Lena». Это изображение используется во многих экспериментах по обработке изображений. Просто зайдите сюда и загрузите изображение. Если вы нажмете на изображение, оно сохранится как изображение с количеством пикселей 512×512.
Использование Pillow
Давайте посмотрим на возможные варианты использования этой библиотеки. Основные функции находятся в модуле Image . Вы можете создавать экземпляры этого класса несколькими способами. Путем загрузки изображений из файлов, обработки других изображений, либо создания изображений с нуля. Импортируйте модули Pillow, которые вы хотите использовать.
Python Pillow Install

Python pillow install is available in both the 64 and 32 bits format. Raqm support necessitates the installation of FreeBSD separately. PIL library supports many file formats and has an efficient internal representation. We can install a pillow on the windows system using the pip command; we can also install the pillow on Linux and other operating systems. The process of an image via an algorithm is called digital image processing.
Web development, programming languages, Software testing & others
Overview of Python Pillow Install
Alex Clark and Contributors found a pillow. It started with the PIL code and evolved into a better, more modern, and user-friendly version of PIL. It supports many image file formats for opening, manipulating, and saving. Using image acquisition software, import the image. The image is being examined and manipulated. PIL that adds image opening, manipulation, and saving support to python. The current version can recognize and read a wide variety of file formats. To install a pillow on any operating system, first, we need to install python in our system.
In the below example, we have already installed python in our system, so we do not need to install python again on our system.
The below example shows to check that python is installed in our system. We are checking the same by checking the version and login into the python shell.
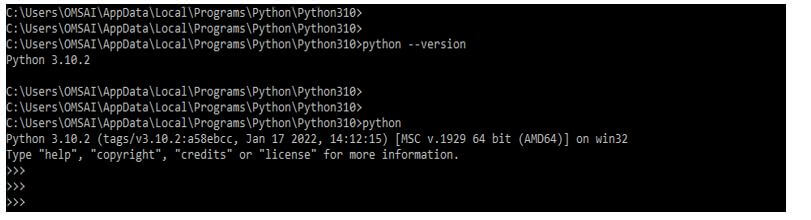
- In the above example, we can see that we have already installed the python version as 3.10.2 on our system, so we do not need to install it again to use the pillow module.
- After installing python, the second prerequisite to install a pillow on our operating system is to install pip. We must install pip before installing the pillow module in our operating system. Python allows us to work faster and more efficiently with systems.
- PIP is nothing but a package management system for installing and managing Python-based software packages and libraries.
- These files are kept in the Python Package Index, an extensive online repository. Pip’s default package and dependency source are PyPI.
- To install the pillow module using the pip command, we need to install pip in our system.
To verify the pip installation, we need to check the version of a pip by executing the below command as follows.
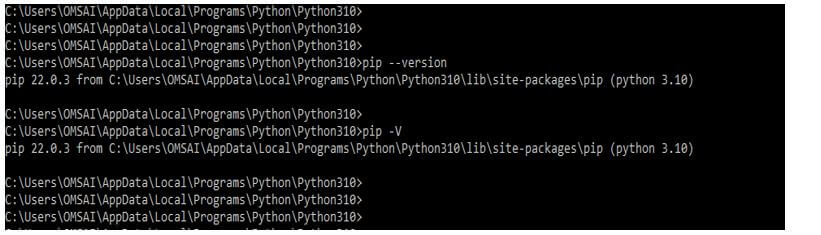
- In the above example, we can see that we have already installed the pip version as 22.0.3 on our system, so we do not need to install it again to install the pillow module. Also, we can see that this pip version is compatible with the python version of 3.10.
- The pip –version and pip –V command will work the same; it will show the installed version of pip we have installed on our system.
How to Install Python Pillow? (MacOS, Windows, FreeBSD)
As we know, that pillow module is not coming with the python package by default; we need to install the same using the pip command. To use the python pillow, we need to install the pillow module using the pip command on windows operating systems.
a. Install python pillow on windows
The steps below show how to install the pillow module on the windows operating system.
1. In the first step, we install the pillow module using the pip command. We can install a pillow module in the windows operating system. In the below example, we are installing a pillow module on windows operating systems.

In the above example, we can see that pip will first download the latest pillow software before installing the pillow on our system. Then, after downloading the package, it will be installed the same on our system.
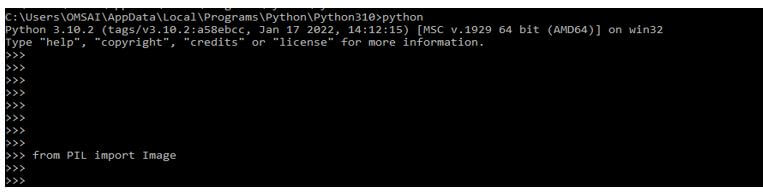
2. After installing the pillow modules, we open the python shell by using the python3 command to verify the installation.

3. After login into the python shell, in this step, we are checking pillow package is installed in our windows operating system.
b. Install python pillow on MacOS
In the below example, we are installing the pillow module on the macOS system. We need to use the following command to install the pillow module on the MacOS system.
python3 -m pip install --upgrade Pillow
In the above example, we can see that we will first collect all the packages related to the pillow module before installing the pillow on our system pip. Then, after collecting all the details, it will install the pillow module on the MacOS system.
Suppose we have already installed a pillow module on our system and are running the command to install the pillow again. Again, it will show that the requirement is already satisfied because we have installed the pillow module on the MacOS operating system.

The above example shows that the requirement is already satisfied after executing the pip command on the pillow module. So we do not need to install it again to use the pillow module in our python code.
c. Install python pillow on FreeBSD
We are installing the pillow module on the FreeBSD system in the example below. We need to use the following command to install the pillow module on the MacOS system.
We install the pillow module using the pkg command in the FreeBSD operating system.

The above example shows that before installing the pillow on our system, pkg will first collect all the packages related to the pillow module. Then, after collecting all the details, it will install the pillow module on the FreeBSD system.
Conclusion
PIL that adds image opening, manipulation, and saving support to python. The current version can recognize and read a wide variety of file formats. Python pillow install is available in both the 64 and 32 bits format. Raqm support necessitates the installation of FreeBSD separately.
Recommended Articles
This is a guide to Python Pillow Install. Here we discuss the introduction, overview, and how to install the python pillow? For better understanding. You may also have a look at the following articles to learn more –