- Установка Jupyter Notebook для Python 3
- Требования
- 1: Установка Jupyter Notebook
- 2: Подключение к серверу через SSH-туннель (опционально)
- SSH-туннелирование в Mac или Linux
- SSH-туннелирование в Windows и Putty
- 3: Запуск Jupyter Notebook
- 4: Использование Jupyter Notebook
- Заключение
- How to install Jupyter Notebook on Windows?
- Installing Jupyter Notebook using Anaconda:
- Installing Jupyter Notebook using pip:
- Installing the classic Jupyter Notebook interface#
- Prerequisite: Python#
- Installing Jupyter using Anaconda and conda#
- Alternative for experienced Python users: Installing Jupyter with pip#
Установка Jupyter Notebook для Python 3
Jupyter Notebook предлагает командную оболочку для интерактивных вычислений. Приложение Jupyter Notebook может взаимодействовать со многими языками программирования (Python, Julia, R, Haskell и Ruby) и часто используется для работы с данными, статистического моделирования и машинного обучения.
Jupyter позволяет создавать документы, объединяющие код и текст (абзацы, уравнения, цифры, ссылки и т.д.), которые помогают в представлении воспроизводимых исследований.
Данное руководство поможет установить Jupyter Notebook локально или на виртуальный сервер Ubuntu 16.04, а также ознакомит вас с основами работы данного приложения. В результате вы сможете запустить код Python 3 с помощью Jupyter Notebook на локальной машине или удалённом сервере.
Требования
- Среда разработки Python 3 на локальной машине (инструкции по настройке локальной среды ищите здесь) или удалённом сервере Ubuntu 16.04.
- Пользователь с доступом sudo; все команды данного руководства нужно запускать в сессии этого пользователя. Больше информации вы найдёте здесь.
1: Установка Jupyter Notebook
Jupyter Notebook можно установить с помощью пакетного менеджера pip.
Разверните среду разработки Python 3, в которую вы хотите установить Jupyter Notebook (в данном руководстве среда условно называется my_env).
cd ~/environments
. my_env/bin/activate
Чтобы установить Jupyter Notebook, запустите:
Приложение Jupyter Notebook установлено и готово к работе.
2: Подключение к серверу через SSH-туннель (опционально)
Если вы установили Jupyter Notebook на удалённый сервер, вам нужно подключиться к веб-интерфейсу с помощью SSH-туннеля. Jupyter Notebook использует конкретный порт (:8888, :8889), а SSH-туннель позволит защитить данные, передаваемые на этот порт сервера.
SSH-туннелирование в Mac или Linux
Если вы работаете с системами Mac или Linux, вы можете создать SSH-туннель, выполнив следующую команду SSH в новом локальном окне терминала:
ssh -L 8888:localhost:8888 your_server_username@your_server_ip
Команда ssh создает SSH-подключение, а флаг –L перенаправляет данный порт локального (клиентского) хоста на хост и порт на удаленной (серверной) стороне. То есть всё, что работает на этом порте на серверной стороне, будет передаваться на тот же порт на локальной машине.
Примечание: При необходимости укажите другой номер порта вместо 8888. Вместо server_username укажите имя текущего пользователя (например, 8host), а вместо your_server_ip – IP-адрес сервера. Например:
ssh -L 8888:localhost:8888 8host@203.0.113.0
Если команда не вернула ошибок, вернитесь в среду разработки и запустите Jupyter Notebook:
В выводе команды вы найдёте URL. Откройте в браузере на локальной машине ссылку:
По запросу предоставьте токен.
SSH-туннелирование в Windows и Putty
Если вы используете Windows, вы можете создать SSH-туннель с помощью Putty.
В поле Host Name (or IP address) укажите IP-адрес сервера, в Port укажите порт 22, в поле Saved Session укажите сессию удалённого сервера. В Connection type выберите SSH и нажмите Tunnels. Введите номер локального порта для доступа к Jupyter (выберите 8000 или выше, чтобы избежать конфликтов с другими приложениями). Укажите направление localhost:8888, где :8888 – номер порта, который использует Jupyter Notebook.
Нажмите Add, после чего порты появятся в списке Forwarded ports.
Нажмите Open, чтобы подключиться к серверу по SSH и создать туннель между указанными портами.
Откройте в браузере ссылку http://localhost:8000 (если вы указали другой номер порта, откорректируйте его), чтобы подключиться к Jupyter Notebook.
По запросу предоставьте токен.
3: Запуск Jupyter Notebook
Теперь можно запустить приложение Jupyter Notebook в терминале.
В терминале появится лог Jupyter Notebook. Как правило, при первом запуске Jupyter Notebook использует порт 8888. Чтобы узнать, какой порт использует приложение, ознакомьтесь с выводом предыдущей команды:
[I NotebookApp] Serving notebooks from local directory: /home/8host[I NotebookApp] 0 active kernels
[I NotebookApp] The Jupyter Notebook is running at: http://localhost:8888/
[I NotebookApp] Use Control-C to stop this server and shut down all kernels (twice to skip confirmation).
.
Если вы работаете с Jupyter Notebook на локальной машине, веб-приложение Jupyter Notebook откроется в браузере по умолчанию. Если этого не произошло (или вы случайно закрыли окно), найдите в логе URL или откройте localhost:8888, чтобы подключиться.
Чтобы остановить приложение Jupyter Notebook, нажмите CTRL+C, затем Y и Enter для подтверждения.
Вы получите следующий вывод:
[C 12:32:23.792 NotebookApp] Shutdown confirmed[I 12:32:23.794 NotebookApp] Shutting down kernels
Приложение Jupyter Notebook остановлено.
4: Использование Jupyter Notebook
Данный раздел охватывает основы работы с Jupyter Notebook.
Примечание: Если вы ещё не запустили приложение, сделайте это с помощью команды:
Вы должны подключиться к приложению Jupyter Notebook в браузере.
Jupyter Notebook – очень производительное приложение с большим количеством полезных функций.
Чтобы создать документ, выберите в выпадающем меню справа New → Python 3 в правом верхнем выпадающем меню.
Это откроет новый документ. Теперь можно запустить код Python в ячейке или настроить markdown. Настройте первую ячейку для поддержки markdown; для этого нажмите Cell → Cell Type → Markdown в верхнем меню. Теперь можно использовать Markdown для создания записей и даже добавлять уравнения, написанные в LaTeX, помещая их между символами $$. Для примера введите следующую команду в ячейку после настройки markdown:
# Simple Equation
Let us now implement the following equation:
$$ y = x^2$$
where $x = 2$
Чтобы превратить Markdown в форматированный текст, нажмите клавиши Ctrl + Enter, и вы получите:
Simple Equation
Let us now implement the following equation in Pyton:
y=x 2
and print the result where x = 2
Вы можете использовать ячейки markdown для записей и создания кода. Попробуйте решить простое уравнение и получить результат на экране. Кликните по верхней ячейке, нажмите Alt+Enter, чтобы добавить новую ячейку ниже, и введите в неё следующий код:
Чтобы запустить код, нажмите Ctrl+Enter. Вы получите такой результат:
Simple Equation
Let us now implement the following equation in Pyton:
y=x 2
and print the result where x = 2
In [2]: x = 2
y = x*x
print (y)
4
Заключение
Теперь вы можете использовать Jupyter, чтобы писать воспроизводимый код Python и заметки в markdown. Чтобы получить быструю справку по Jupyter Notebook, выберите Help → User Interface Tour в верхнем меню навигации.
How to install Jupyter Notebook on Windows?
Jupyter Notebook is an open-source web application that allows you to create and share documents that contain live code, equations, visualizations, and narrative text. Uses include data cleaning and transformation, numerical simulation, statistical modeling, data visualization, machine learning, and much more.
Jupyter has support for over 40 different programming languages and Python is one of them. Python is a requirement (Python 3.3 or greater, or Python 2.7) for installing the Jupyter Notebook itself.
Jupyter Notebook can be installed by using either of the two ways described below:
- Using Anaconda:
Install Python and Jupyter using the Anaconda Distribution, which includes Python, the Jupyter Notebook, and other commonly used packages for scientific computing and data science. To install Anaconda, go through How to install Anaconda on windows? and follow the instructions provided. - Using PIP:
Install Jupyter using the PIP package manager used to install and manage software packages/libraries written in Python. To install pip, go through How to install PIP on Windows? and follow the instructions provided.
Installing Jupyter Notebook using Anaconda:
Anaconda is an open-source software that contains Jupyter, spyder, etc that are used for large data processing, data analytics, heavy scientific computing. Anaconda works for R and python programming language. Spyder(sub-application of Anaconda) is used for python. Opencv for python will work in spyder. Package versions are managed by the package management system called conda.
To install Jupyter using Anaconda, just go through the following instructions:
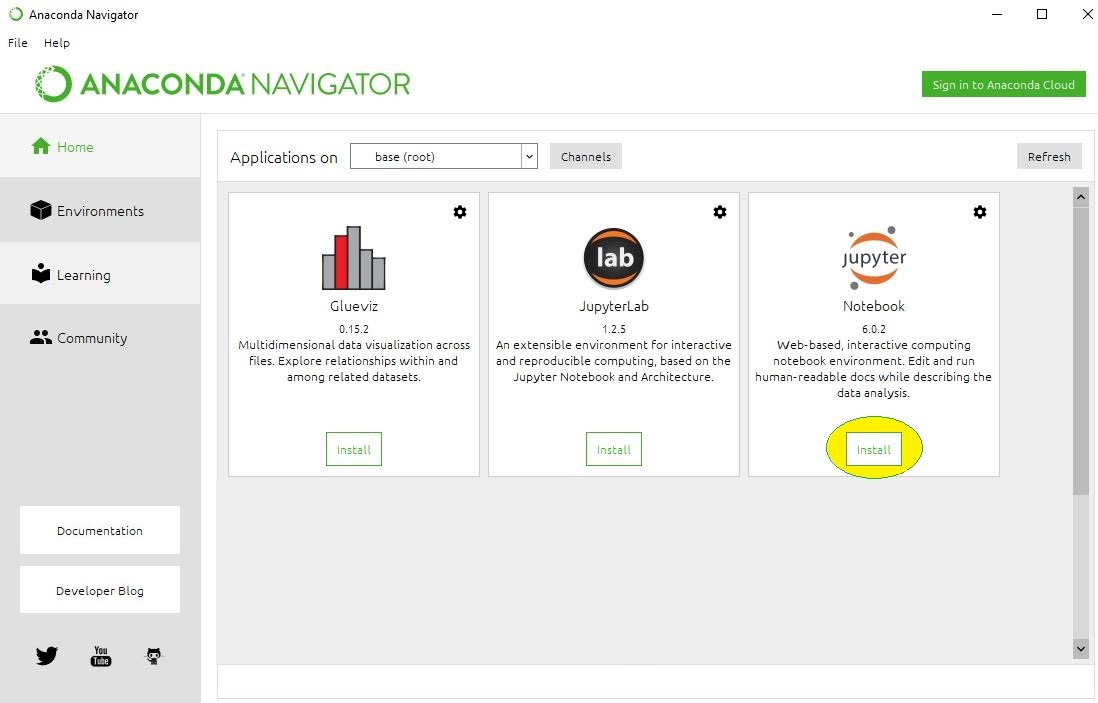
- Launch Anaconda Navigator:

- Click on the Install Jupyter Notebook Button:
- Beginning the Installation:
- Loading Packages:
- Finished Installation:


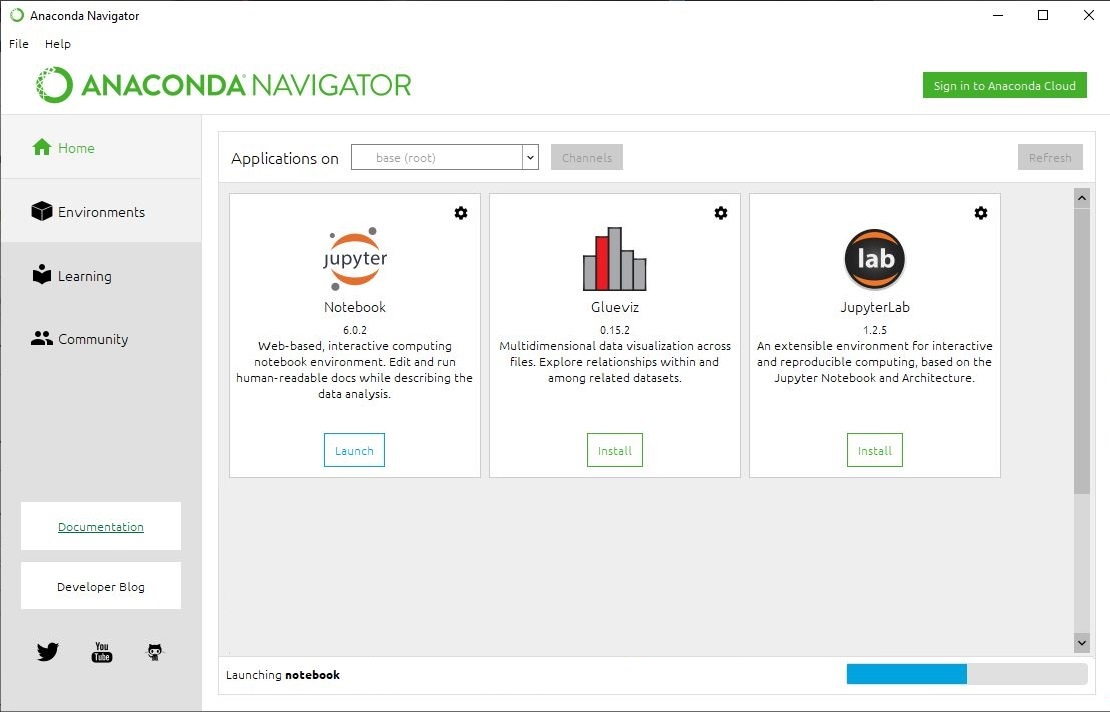
Launching Jupyter:

Installing Jupyter Notebook using pip:
PIP is a package management system used to install and manage software packages/libraries written in Python. These files are stored in a large “on-line repository” termed as Python Package Index (PyPI).
pip uses PyPI as the default source for packages and their dependencies.
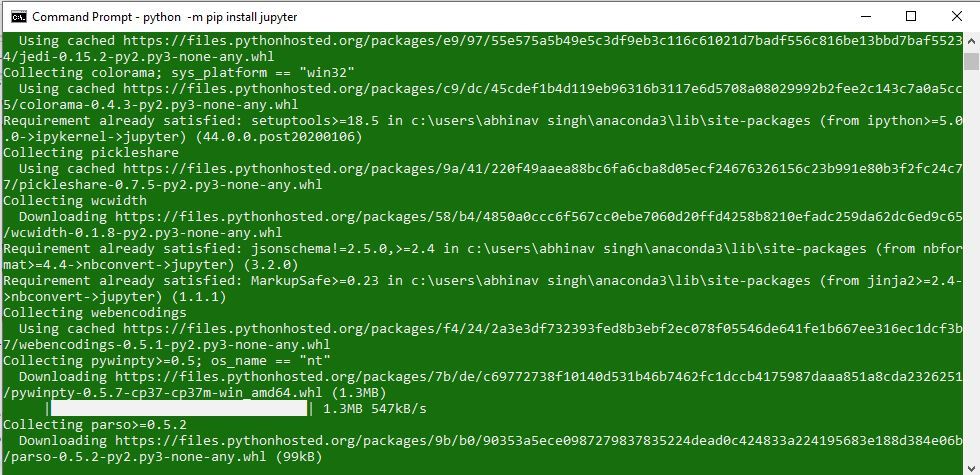
To install Jupyter using pip, we need to first check if pip is updated in our system. Use the following command to update pip:
python -m pip install --upgrade pip

After updating the pip version, follow the instructions provided below to install Jupyter:
python -m pip install jupyter


Launching Jupyter:
Use the following command to launch Jupyter using command-line:
Installing the classic Jupyter Notebook interface#
This section includes instructions on how to get started with Jupyter Notebook. But there are multiple Jupyter user interfaces one can use, based on their needs. Please checkout the list and links below for additional information and instructions about how to get started with each of them.
This information explains how to install the Jupyter Notebook and the IPython kernel.
Prerequisite: Python#
While Jupyter runs code in many programming languages, Python is a requirement for installing the Jupyter Notebook. The Python version required differs between Jupyter Notebook releases (e.g. Python 3.6+ for Notebook v6.3, and Python 3.7+ for Notebook v7) .
We recommend using the Anaconda distribution to install Python and Jupyter. We’ll go through its installation in the next section.
Installing Jupyter using Anaconda and conda#
For new users, we highly recommend installing Anaconda. Anaconda conveniently installs Python, the Jupyter Notebook, and other commonly used packages for scientific computing and data science.
Use the following installation steps:
- Download Anaconda. We recommend downloading Anaconda’s latest Python 3 version (currently Python 3.9).
- Install the version of Anaconda which you downloaded, following the instructions on the download page.
- Congratulations, you have installed Jupyter Notebook. To run the notebook:
Alternative for experienced Python users: Installing Jupyter with pip#
Jupyter installation requires Python 3.3 or greater, or Python 2.7. IPython 1.x, which included the parts that later became Jupyter, was the last version to support Python 3.2 and 2.6.
As an existing Python user, you may wish to install Jupyter using Python’s package manager, pip , instead of Anaconda.
First, ensure that you have the latest pip; older versions may have trouble with some dependencies:
Then install the Jupyter Notebook using:
(Use pip if using legacy Python 2.)
Congratulations. You have installed Jupyter Notebook. See Running the Notebook for more details.
Upgrading Jupyter Notebook