- PHP File Upload
- Configure The «php.ini» File
- Create The HTML Form
- Create The Upload File PHP Script
- Check if File Already Exists
- Limit File Size
- Limit File Type
- Complete Upload File PHP Script
- Complete PHP Filesystem Reference
- Uploading and downloading files in php
- File Upload, View and Download using PHP and MySQL
- How to Upload, View & Download File in PHP & MySQL?
- Create MySQL Database:
- dbconnect.php
- index.php
- uploads.php
PHP File Upload
However, with ease comes danger, so always be careful when allowing file uploads!
Configure The «php.ini» File
First, ensure that PHP is configured to allow file uploads.
In your «php.ini» file, search for the file_uploads directive, and set it to On:
Create The HTML Form
Next, create an HTML form that allow users to choose the image file they want to upload:
Some rules to follow for the HTML form above:
- Make sure that the form uses method=»post»
- The form also needs the following attribute: enctype=»multipart/form-data». It specifies which content-type to use when submitting the form
Without the requirements above, the file upload will not work.
- The type=»file» attribute of the tag shows the input field as a file-select control, with a «Browse» button next to the input control
The form above sends data to a file called «upload.php», which we will create next.
Create The Upload File PHP Script
The «upload.php» file contains the code for uploading a file:
$target_dir = «uploads/»;
$target_file = $target_dir . basename($_FILES[«fileToUpload»][«name»]);
$uploadOk = 1;
$imageFileType = strtolower(pathinfo($target_file,PATHINFO_EXTENSION));
// Check if image file is a actual image or fake image
if(isset($_POST[«submit»])) $check = getimagesize($_FILES[«fileToUpload»][«tmp_name»]);
if($check !== false) echo «File is an image — » . $check[«mime»] . «.»;
$uploadOk = 1;
> else echo «File is not an image.»;
$uploadOk = 0;
>
>
?>
- $target_dir = «uploads/» — specifies the directory where the file is going to be placed
- $target_file specifies the path of the file to be uploaded
- $uploadOk=1 is not used yet (will be used later)
- $imageFileType holds the file extension of the file (in lower case)
- Next, check if the image file is an actual image or a fake image
Note: You will need to create a new directory called «uploads» in the directory where «upload.php» file resides. The uploaded files will be saved there.
Check if File Already Exists
Now we can add some restrictions.
First, we will check if the file already exists in the «uploads» folder. If it does, an error message is displayed, and $uploadOk is set to 0:
// Check if file already exists
if (file_exists($target_file)) echo «Sorry, file already exists.»;
$uploadOk = 0;
>
Limit File Size
The file input field in our HTML form above is named «fileToUpload».
Now, we want to check the size of the file. If the file is larger than 500KB, an error message is displayed, and $uploadOk is set to 0:
// Check file size
if ($_FILES[«fileToUpload»][«size»] > 500000) echo «Sorry, your file is too large.»;
$uploadOk = 0;
>
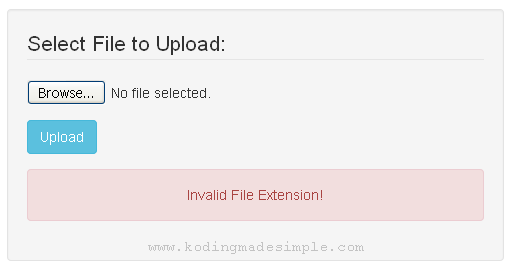
Limit File Type
The code below only allows users to upload JPG, JPEG, PNG, and GIF files. All other file types gives an error message before setting $uploadOk to 0:
Complete Upload File PHP Script
The complete «upload.php» file now looks like this:
$target_dir = «uploads/»;
$target_file = $target_dir . basename($_FILES[«fileToUpload»][«name»]);
$uploadOk = 1;
$imageFileType = strtolower(pathinfo($target_file,PATHINFO_EXTENSION));
// Check if image file is a actual image or fake image
if(isset($_POST[«submit»])) $check = getimagesize($_FILES[«fileToUpload»][«tmp_name»]);
if($check !== false) echo «File is an image — » . $check[«mime»] . «.»;
$uploadOk = 1;
> else echo «File is not an image.»;
$uploadOk = 0;
>
>
// Check if file already exists
if (file_exists($target_file)) echo «Sorry, file already exists.»;
$uploadOk = 0;
>
// Check file size
if ($_FILES[«fileToUpload»][«size»] > 500000) echo «Sorry, your file is too large.»;
$uploadOk = 0;
>
// Check if $uploadOk is set to 0 by an error
if ($uploadOk == 0) echo «Sorry, your file was not uploaded.»;
// if everything is ok, try to upload file
> else if (move_uploaded_file($_FILES[«fileToUpload»][«tmp_name»], $target_file)) echo «The file «. htmlspecialchars( basename( $_FILES[«fileToUpload»][«name»])). » has been uploaded.»;
> else echo «Sorry, there was an error uploading your file.»;
>
>
?>
Complete PHP Filesystem Reference
For a complete reference of filesystem functions, go to our complete PHP Filesystem Reference.
Uploading and downloading files in php
I think the way an array of attachments works is kind of cumbersome. Usually the PHP guys are right on the money, but this is just counter-intuitive. It should have been more like:
Array
(
[0] => Array
(
[name] => facepalm.jpg
[type] => image/jpeg
[tmp_name] => /tmp/phpn3FmFr
[error] => 0
[size] => 15476
)
Anyways, here is a fuller example than the sparce one in the documentation above:
foreach ( $_FILES [ «attachment» ][ «error» ] as $key => $error )
$tmp_name = $_FILES [ «attachment» ][ «tmp_name» ][ $key ];
if (! $tmp_name ) continue;
$name = basename ( $_FILES [ «attachment» ][ «name» ][ $key ]);
if ( $error == UPLOAD_ERR_OK )
if ( move_uploaded_file ( $tmp_name , «/tmp/» . $name ) )
$uploaded_array [] .= «Uploaded file ‘» . $name . «‘.
\n» ;
else
$errormsg .= «Could not move uploaded file ‘» . $tmp_name . «‘ to ‘» . $name . «‘
\n» ;
>
else $errormsg .= «Upload error. [» . $error . «] on file ‘» . $name . «‘
\n» ;
>
?>
Do not use Coreywelch or Daevid’s way, because their methods can handle only within two-dimensional structure. $_FILES can consist of any hierarchy, such as 3d or 4d structure.
The following example form breaks their codes:
As the solution, you should use PSR-7 based zendframework/zend-diactoros.
use Psr \ Http \ Message \ UploadedFileInterface ;
use Zend \ Diactoros \ ServerRequestFactory ;
$request = ServerRequestFactory :: fromGlobals ();
if ( $request -> getMethod () !== ‘POST’ ) http_response_code ( 405 );
exit( ‘Use POST method.’ );
>
$uploaded_files = $request -> getUploadedFiles ();
if (
!isset( $uploaded_files [ ‘files’ ][ ‘x’ ][ ‘y’ ][ ‘z’ ]) ||
! $uploaded_files [ ‘files’ ][ ‘x’ ][ ‘y’ ][ ‘z’ ] instanceof UploadedFileInterface
) http_response_code ( 400 );
exit( ‘Invalid request body.’ );
>
$file = $uploaded_files [ ‘files’ ][ ‘x’ ][ ‘y’ ][ ‘z’ ];
if ( $file -> getError () !== UPLOAD_ERR_OK ) http_response_code ( 400 );
exit( ‘File uploading failed.’ );
>
$file -> moveTo ( ‘/path/to/new/file’ );
The documentation doesn’t have any details about how the HTML array feature formats the $_FILES array.
Array
(
[document] => Array
(
[name] => sample-file.doc
[type] => application/msword
[tmp_name] => /tmp/path/phpVGCDAJ
[error] => 0
[size] => 0
)
)
Multi-files with HTML array feature —
Array
(
[documents] => Array
(
[name] => Array
(
[0] => sample-file.doc
[1] => sample-file.doc
)
(
[0] => application/msword
[1] => application/msword
) [tmp_name] => Array
(
[0] => /tmp/path/phpVGCDAJ
[1] => /tmp/path/phpVGCDAJ
)
The problem occurs when you have a form that uses both single file and HTML array feature. The array isn’t normalized and tends to make coding for it really sloppy. I have included a nice method to normalize the $_FILES array.
function normalize_files_array ( $files = [])
foreach( $files as $index => $file )
if (! is_array ( $file [ ‘name’ ])) $normalized_array [ $index ][] = $file ;
continue;
>
foreach( $file [ ‘name’ ] as $idx => $name ) $normalized_array [ $index ][ $idx ] = [
‘name’ => $name ,
‘type’ => $file [ ‘type’ ][ $idx ],
‘tmp_name’ => $file [ ‘tmp_name’ ][ $idx ],
‘error’ => $file [ ‘error’ ][ $idx ],
‘size’ => $file [ ‘size’ ][ $idx ]
];
>
?>
The following is the output from the above method.
Array
(
[document] => Array
(
[0] => Array
(
[name] => sample-file.doc
[type] => application/msword
[tmp_name] => /tmp/path/phpVGCDAJ
[error] => 0
[size] => 0
)
(
[0] => Array
(
[name] => sample-file.doc
[type] => application/msword
[tmp_name] => /tmp/path/phpVGCDAJ
[error] => 0
[size] => 0
) [1] => Array
(
[name] => sample-file.doc
[type] => application/msword
[tmp_name] => /tmp/path/phpVGCDAJ
[error] => 0
[size] => 0
)
File Upload, View and Download using PHP and MySQL
Hi! In this tutorial let me show you about upload, view and download file in php and mysql. The file uploading process is similar to what we have discussed here, but this php script not only uploads file to the server but also stores the file path and its created date in mysql database. Apart from uploading file, it also gives you the option to view file on browser and download it from server.
With PHP you can practically upload any type of files and the file uploading script I have shared below will work for all file types like PDF, Document, Images, MP3, Videos, Zip archives etc. Just include those file extensions in the filtering process ( $allowed array) and you will be able to upload them.
How to Upload, View & Download File in PHP & MySQL?
Let’s move on to the coding part. First you should create mysql database to store file details.
Create MySQL Database:
CREATE DATABASE `demo` ; Use `demo`; CREATE TABLE IF NOT EXISTS `tbl_files` ( `id` int(9) NOT NULL AUTO_INCREMENT, `filename` varchar(255) NOT NULL, `created` datetime NOT NULL, PRIMARY KEY (`id`) ) ENGINE=MyISAM DEFAULT CHARSET=latin1 AUTO_INCREMENT=1;
Next is the database connectivity script that establishes connection to mysql database from php.
dbconnect.php
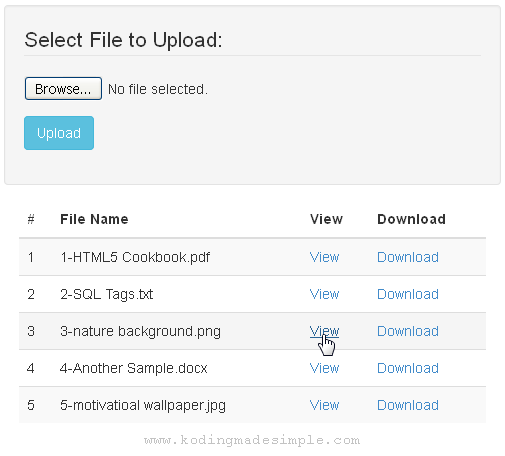
Then create index.php — this is the main file containing user interface. It has an upload form and a html table to display the list of uploaded files from database along with ‘View’ & ‘Download’ links for them.
index.php
# File Name View Download ?> " target="_blank">View " download>Download
Note: This demo uses twitter bootstrap for css stylesheet.
Running index.php will generate a page with upload form and table with files details similar to this. Users can either click on ‘View’ link to view the files on browser or on ‘Download’ to download the files from server.
Finally there is ‘uploads.php’ file which will be executed when the form is submitted to upload the selected file. Here is where we actually upload the file to the server from the client machine and save its name and uploaded date into the database.
uploads.php
0) < $row = mysqli_fetch_array($result); $filename = ($row['id']+1) . '-' . $filename; >else $filename = '1' . '-' . $filename; //set target directory $path = 'uploads/'; $created = @date('Y-m-d H:i:s'); move_uploaded_file($_FILES['file1']['tmp_name'],($path . $filename)); // insert file details into database $sql = "INSERT INTO tbl_files(filename, created) VALUES('$filename', '$created')"; mysqli_query($con, $sql); header("Location: index.php?st=success"); > else < header("Location: index.php?st=error"); >> else header("Location: index.php"); > ?> This script upload file from local machine to server and stores its details into database and redirects to index.php. If everything goes right you will be able to see success message on completion.

If there’s any error you will be notified about it.
So we have seen about file upload and to view and download them using php and mysql database. If you want you can set the file size limit or restrict users to upload only pdf or images etc.