- Node.js with TypeScript, Debug inside VSCode and Nodemon
- 📦 Dependencies and Configurations
- 💻 Writing our server and some routes
- 📊 Attaching Debug configuration to our project
- 🌐 Extra: It also works in Google Chrome DevTools
- ☕️ I want it all and more!
- Debugging Node.js project with Typescript
- Table of contents
- Create Node.js project
- Some packages that need to install
- Setting debug mode in Visual studio code
- Wrapping up
- Debugging TypeScript
- JavaScript source map support
- Mapping the output location
- Client-side debugging
- Common questions
- Cannot launch program because corresponding JavaScript cannot be found
Node.js with TypeScript, Debug inside VSCode and Nodemon
Setup Node.js and TypeScript can be straightforward. Our daily work sometimes involves a lot of debugging and we also need to reload our server. Let’s walk through how we can setup Node.js with TypeScript + Nodemon + Debug inside VSCode (as an extra, you can debug it inside Chrome DevTools). Less talk, more code! 🤓
📦 Dependencies and Configurations
$ mkdir devto-node-typescript $ cd $_ $ yarn init -y $ yarn add @types/express@^4.16.1 express@^4.16.4 nodemon@^1.18.10 ts-node@^8.0.3 typescript@^3.3.4000 - @types/express@^4.16.1
- express@^4.16.4
- nodemon@^1.18.10
- ts-node@^8.0.3
- typescript@^3.3.4000
Now, let’s create our nodemon.json file:
"restartable": "rs", "ignore": [".git", "node_modules/**/node_modules"], "verbose": true, "execMap": // [A] "ts": "node --require ts-node/register" >, "watch": ["src/"], "env": "NODE_ENV": "development" >, "ext": "js,json,ts" > - // [A]: Here we’re saying to nodemon: «Hey nodemon, if we run «nodemon» with a «.ts» file, please, use this line to execute the file». Because of that, now we can do nodemon server.ts and it will use ts-node to compile our file.
To learn more about Nodemon config, you can check the sample in their repository
Now, let’s create our tsconfig.json file:
$ touch tsconfig.json $ vim $_ "compilerOptions": "target": "es5", "module": "commonjs", "outDir": "./dist", "strict": true, "noUnusedLocals": true, "noUnusedParameters": true, "noImplicitReturns": true, "noFallthroughCasesInSwitch": true, "esModuleInterop": true >, "include": ["src/**/*"], "exclude": ["node_modules", "**/*.test.ts"] > There’s no much difference from the default config (e.g. when you run tsc —init )
We are almost there, let’s create a npm script to start our future server:
// . "scripts": "dev": "nodemon src/entry.ts" > // . Now, it’s time to create our server.
💻 Writing our server and some routes
As we saw in our nodemon and npm scripts configuration, we need to create a folder called src and file called entry.ts :
$ mkdir src $ cd $_ $ touch entry.ts $ vim $_ import express from 'express'; const server = express(); server.use('/_healthcheck', (_req, res) => res.status(200).json( uptime: process.uptime() >); >); server.listen(4004, () => console.log('Running at localhost:4004') >) And see our Node.js with TypeScript + Nodemon server running:

But wait. one important part is missing, how I can debug this thing? 😱
📊 Attaching Debug configuration to our project
Using nodemon we simply pass the —inspect flag to make our Node process debuggable. Let’s create a new npm script for that:
// . "scripts": // . "dev:debug": "nodemon --inspect src/entry.ts" > // . We can see the debug option in our logs:

Great! Let’s create our VSCode configuration:
$ mkdir .vscode $ cd $_ $ touch launch.json $ vim $_ "version": "0.2.0", "configurations": [ "type": "node", "request": "attach", "name": "Node: Nodemon", "processId": "$ ", "restart": true, "protocol": "inspector" > ] > This configuration is based in one of Microsoft Recipes for VSCode.
Let’s open our VSCode editor and do go the «Debug» panel:

With our yarn dev:debug running, let’s press the green arrow shown in the screenshot above.
First, we need to select the process pointing to our server:

After we select it, we can see a floating debug panel and some UI changes:

Now you can add a breakpoint in your code and have fun inside your editor with server reload by nodemon:

🌐 Extra: It also works in Google Chrome DevTools
Yep. We can use the following steps:

- Click inspect inside Remote Target section pointing to your server and have fund debugging your server using Chrome DevTools:

NOTE: I tried to use «Open dedicated DevTools for Node» option, but it doesn’t work well 🙁 If you know how to make it work, share with us!
☕️ I want it all and more!
What about tests? Folder structure? There’s a default project?
Say no more! For my personal use, I’ve a small non-opinionated default project in:
Feel free to fork, contribute and use!
Debugging Node.js project with Typescript
In this article, we will find something out about how to debuggin Node.js with typescript, no using webpack, babel, or ts-node, ts-node-dev to deploy in a server. It is useful when we want to demo some small functionalities for our project.
Table of contents
Create Node.js project
We will use npm to initialize our project:
It will create package.json file in our project. Then, we can install some necessary packages that we want.
Some packages that need to install
- Use typescript package Node.js is an engine that runs Javascript and not Typescript. The node Typescript package allows us to transpile our .ts file to .js scripts. Babel can also be used to transpile Typescript, however the market standard is to use the official Microsoft package.
npm install typescript --save-dev This modification allows us to call typescript functions from the command line in the project’s folder. So, we can use the following command:
- Typescript handles all of the ES6 and a lot of the ES7 syntax but the runtime operations. So things like Object.assign() , Symbol() , etc. are not polyfilled by TypeScript .
npm install @types/node --save-dev npm install tslint typescript --save-dev // then, create tslint.json tslint --init So, in our package.json file will include information:
"devDependencies": "@types/node": "^12.7.12", "typescript": "^3.6.4" > Setting debug mode in Visual studio code
- Settings in tsconfig.json file The presence of a tsconfig.json file in a directory indicates that the directory is the root of a TypeScript project. The tsconfig.json file specifies the root files and the compiler options required to compile the project. A project is compiled in one of the following ways:
- By invoking tsc with no input files, in which case the compiler searches for the tsconfig.json file starting in the current directory and continuing up the parent directory chain.
- By invoking tsc with no input files and a –project (or just -p) command line option that specifies the path of a directory containing a tsconfig.json file, or a path to a valid .json file containing the configurations.
When input files are specified on the command line, tsconfig.json files are ignored.
"compilerOptions": "target": "es5", "module": "commonjs", "outDir": "dist", "strict": true, "sourceMap": true >, "files": [ "core.ts", "sys.ts", "types.ts", "scanner.ts", "parser.ts", "utilities.ts", "binder.ts", "checker.ts", "emitter.ts", "program.ts", "commandLineParser.ts", "tsc.ts", "diagnosticInformationMap.generated.ts" ], "include": [ "scr/**/*.ts" ], "exclude": [ "node_modules", "**/*.spec.ts" ] > The meaning of some above settings:
- target — specify ECMAScript target version: ES3 (default), ES5 , ES2015 , ES2016 , ES2017 , ES2018 , ES2019 or ESNEXT .
- sourceMap — generates corresponding .map file to help us easily debug our project.
- strict — we should include this option into our tsconfig.json file because project that use typescript means we want to get the benefits of static type checking. The most important one is the strict flag, which covers four other flags that you can add independently:
- —noImplicitThis : Complains if the type of this isn’t clear.
- —noImplicitAny : With this setting, we have to define every single type in our application. This mainly applies to parameters of functions and methods. const fn = ( worker ) => worker.name; If you don’t turn on noImplicit , any worker will implicitly be of any type.
- —strictNullChecks : null is not part of any type (other than its own type, null) and must be explicitly mentioned if it is an acceptable value.
interface Worker name: string; > const getName = (worker?: Worker) => worker.name"version": "0.2.0", "configurations": [ "type": "node", "request": "launch", "name": "Launch Program", "program": "$/src/index.ts", // our main file "sourceMaps": true, "preLaunchTask": "npm: debug", "outFiles": [ "$/build/index.js" ] > ] >"scripts": "tsc": "tsc", "prod": "tsc && node ./build/index.js", "debug": "tsc --sourcemap" >Wrapping up
- Understand some important options in tsconfig.json file.
- Understand how to install some typescript packages for our project.
Debugging TypeScript
Visual Studio Code supports TypeScript debugging through its built-in Node.js debugger and Edge and Chrome debugger.
JavaScript source map support
TypeScript debugging supports JavaScript source maps. To generate source maps for your TypeScript files, compile with the —sourcemap option or set the sourceMap property in the tsconfig.json file to true .
In-lined source maps (a source map where the content is stored as a data URL instead of a separate file) are also supported, although in-lined source is not yet supported.
For a simple example of source maps in action, see the TypeScript tutorial, which shows debugging a simple «Hello World» Node.js application using the following tsconfig.json and VS Code default Node.js debugging configuration.
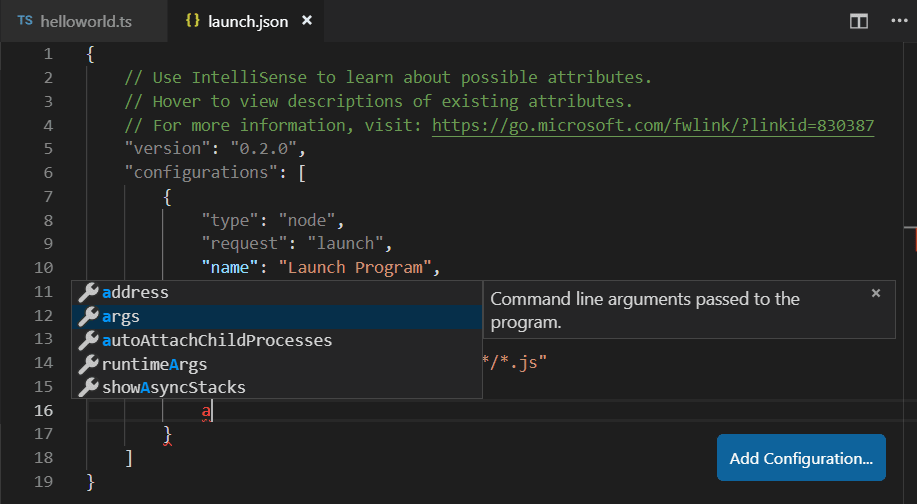
"compilerOptions": "target": "es5", "module": "commonjs", "outDir": "out", "sourceMap": true > >For more advanced debugging scenarios, you can create your own debug configuration launch.json file. To see the default configuration, go to the Run and Debug view ( ⇧⌘D (Windows, Linux Ctrl+Shift+D ) ) and select the create a launch.json file link.
This will create a launch.json file in a .vscode folder with default values detected in your project.
// Use IntelliSense to learn about possible attributes. // Hover to view descriptions of existing attributes. // For more information, visit: https://go.microsoft.com/fwlink/?linkid=830387 "version": "0.2.0", "configurations": [ "type": "node", "request": "launch", "name": "Launch Program", "program": "$/helloworld.ts", "preLaunchTask": "tsc: build - tsconfig.json", "outFiles": ["$/out/**/*.js"] > ] >VS Code has determined the program to launch, helloworld.ts , included the build as a preLaunchTask , and told the debugger where to find the generated JavaScript files.
There is full IntelliSense with suggestions and information for launch.json to help you learn about other debug configuration options. You can also add new debug configurations to launch.json with the Add Configuration button in the lower right.

Also see Node.js Debugging for examples and further explanations.
Mapping the output location
If generated (transpiled) JavaScript files do not live next to their source, you can help the VS Code debugger locate them by setting the outFiles attribute in the launch configuration. Whenever you set a breakpoint in the original source, VS Code tries to find the generated source by searching the files specified by glob patterns in outFiles .
Client-side debugging
TypeScript is great for writing client-side code as well as Node.js applications and you can debug client-side source code with the built-in Edge and Chrome debugger.
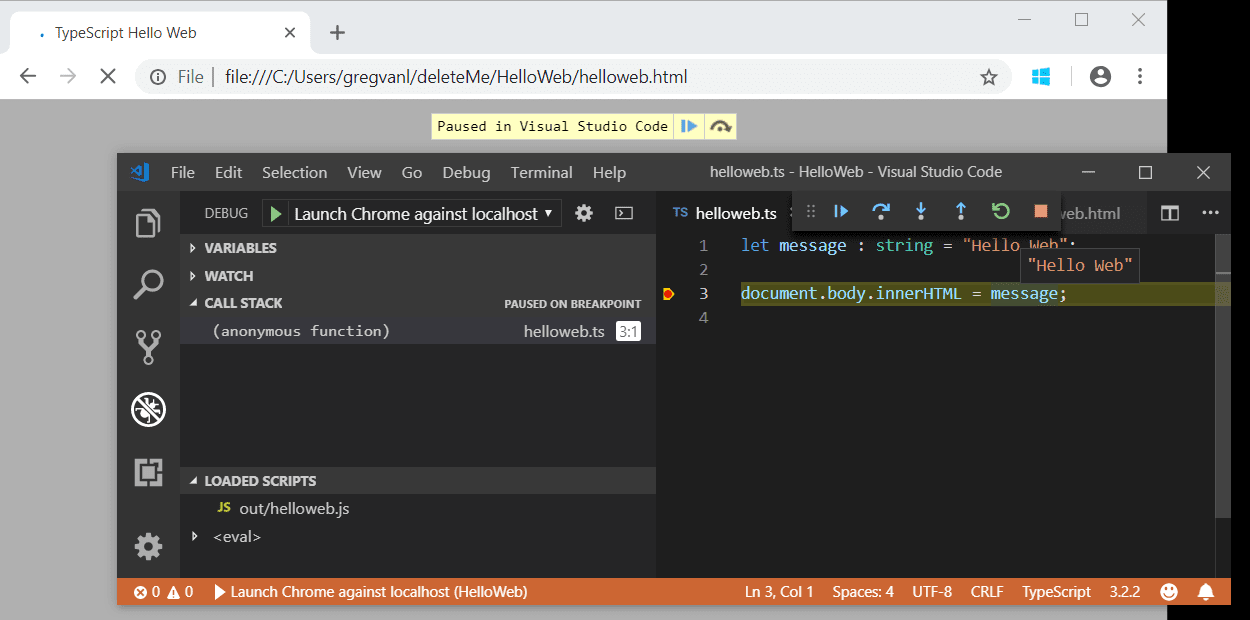
We’ll create a tiny web application to show client-side debugging in action.
Create a new folder HelloWeb and add three files: helloweb.ts , helloweb.html , and tsconfig.json with the following content»
let message: string = 'Hello Web'; document.body.innerHTML = message;html> TypeScript Hello Web src="out/helloweb.js">"compilerOptions": "target": "es5", "module": "commonjs", "outDir": "out", "sourceMap": true > >Run tsc to build the app and then test by opening helloweb.html in your browser (you can right-click helloweb.html in the File Explorer and select Copy Path to paste into your browser).
In the Run and Debug view ( ⇧⌘D (Windows, Linux Ctrl+Shift+D ) ), select create a launch.json file to create a launch.json file selecting Web App (Edge) as the debugger, or Web App (Chrome) if you prefer.
Update the launch.json to specify the local file URL to helloweb.html :
"version": "0.2.0", "configurations": [ "type": "msedge", "request": "launch", "name": "Launch Edge against localhost", "url": "file:///C:/Users/username/HelloWeb/helloweb.html", "webRoot": "$" > ] >The Run and Debug view configuration dropdown will now show the new configuration Launch Edge against localhost. If you run that configuration, your browser will launch with your web page. Open helloweb.ts in the editor and click the left gutter to add a breakpoint (it will be displayed as a red circle). Press F5 to start the debug session, which launches the browser and hits your breakpoint in helloweb.ts .
Common questions
Cannot launch program because corresponding JavaScript cannot be found
You’ve likely not set «sourceMap»: true in your tsconfig.json or outFiles in your launch.json and the VS Code Node.js debugger can’t map your TypeScript source code to the running JavaScript. Turn on source maps and rebuild your project.