- CSS Tooltip
- Basic Tooltip
- Example
- Example Explained
- Positioning Tooltips
- 39 CSS Tooltips
- Author
- Links
- Made with
- About a code
- Simple Tooltips with No Extra Pseudo-Element
- Author
- Links
- Made with
- About a code
- Custom Tooltip
- Author
- Links
- Made with
- About a code
- Rounded Tooltip CSS Only
- Author
- Links
- Made with
- About a code
- Tooltip Appear
- Author
- Links
- Made with
- About a code
- Emerging Tooltip
- Author
- Links
- Made with
- About a code
- Pure CSS 1 Element Gradient Tooltip
- Author
- Links
- Made with
- About a code
- The abbr element
- Author
- Links
- Made with
- About a code
- Cooltipz.css — Cool Tooltips Made from Pure CSS
- Author
- Links
- Made with
- About a code
- Animate Tooltip
- Author
- Links
- Made with
- About a code
- Tooltip Animation
- Author
- Links
- Made with
- About a code
- Tooltip Only CSS
- Author
- Links
- Made with
- About the code
- Adaptive Tooltips
- Author
- Links
- Made with
- About the code
- Fancy & Animated Tooltip — CSS Only
- Author
- Links
- Made with
- About the code
- Tooltip Idea
- Author
- Links
- Made with
- About the code
- Tooltip
- Author
- Links
- Made with
- About the code
- Flyout Tooltip
- Author
- Guide to creating CSS only tooltip with an arrow
- Creating a tooltip
- Styling the tooltip
- Tooltip arrow
- Animating the tooltip
- Positioning the tooltip
- End result
- Тултипы на CSS3 и HTML5
- Дисклеймер
- Простой способ
- Способ для более сложных тултипов
CSS Tooltip
A tooltip is often used to specify extra information about something when the user moves the mouse pointer over an element:
Basic Tooltip
Create a tooltip that appears when the user moves the mouse over an element:
Example
/* Tooltip text */
.tooltip .tooltiptext visibility: hidden;
width: 120px;
background-color: black;
color: #fff;
text-align: center;
padding: 5px 0;
border-radius: 6px;
/* Position the tooltip text — see examples below! */
position: absolute;
z-index: 1;
>
/* Show the tooltip text when you mouse over the tooltip container */
.tooltip:hover .tooltiptext visibility: visible;
>
Example Explained
HTML: Use a container element (like ) and add the «tooltip» class to it. When the user mouse over this , it will show the tooltip text.
The tooltip text is placed inside an inline element (like ) with class=»tooltiptext» .
CSS: The tooltip class use position:relative , which is needed to position the tooltip text ( position:absolute ). Note: See examples below on how to position the tooltip.
The tooltiptext class holds the actual tooltip text. It is hidden by default, and will be visible on hover (see below). We have also added some basic styles to it: 120px width, black background color, white text color, centered text, and 5px top and bottom padding.
The CSS border-radius property is used to add rounded corners to the tooltip text.
The :hover selector is used to show the tooltip text when the user moves the mouse over the with class=»tooltip» .
Positioning Tooltips
In this example, the tooltip is placed to the right ( left:105% ) of the «hoverable» text (). Also note that top:-5px is used to place it in the middle of its container element. We use the number 5 because the tooltip text has a top and bottom padding of 5px. If you increase its padding, also increase the value of the top property to ensure that it stays in the middle (if this is something you want). The same applies if you want the tooltip placed to the left.
39 CSS Tooltips
Collection of HTML and CSS tooltip code examples (animated, with arrows, with hover effects, etc.) from CodePen, GitHub, and other resources. Update of May 2021 collection. Five new examples.

Author
Links
Made with
About a code
Simple Tooltips with No Extra Pseudo-Element
Compatible browsers: Chrome, Edge, Firefox, Opera, Safari
Author
Links
Made with
About a code
Custom Tooltip
Compatible browsers: Chrome, Edge, Firefox, Opera, Safari

Author
Links
Made with
About a code
Rounded Tooltip CSS Only
Compatible browsers: Chrome, Edge, Firefox, Opera, Safari
Author
Links
Made with
About a code
Tooltip Appear
Using clip-path: path(. ) to create an appear effect consisting of repeated shapes. Here the effect is used for tooltips.
Compatible browsers: Chrome, Edge, Firefox, Opera, Safari
Author
Links
Made with
About a code
Emerging Tooltip
Emerging tooltip popup example. A demo using a couple of different CSS techniques. SVG line animation, Multiple filter: drop-shadow, Material UI easing, …
Compatible browsers: Chrome, Edge, Firefox, Opera, Safari

Author
Links
Made with
About a code
Pure CSS 1 Element Gradient Tooltip
Compatible browsers: Chrome, Edge, Firefox, Opera, Safari
Author
Links
Made with
About a code
The abbr element
The HTML abbr element represents an abbreviation or acronym; the optional title attribute can provide an expansion or description for the abbreviation. If present, title must contain this full description and nothing else. We can use CSS to style it and make it look a little nicer. This text is often presented by browsers as a tooltip when the mouse cursor is hovered over the element.
Compatible browsers: Chrome, Edge, Firefox, Opera, Safari
Author
Links
Made with
About a code
Cooltipz.css — Cool Tooltips Made from Pure CSS
A pure CSS tooltip library that is lightweight, modern, accessible, customisable and easy to use.
Compatible browsers: Chrome, Edge, Firefox, Opera, Safari
Author
Links
Made with
About a code
Animate Tooltip
Compatible browsers: Chrome, Edge, Firefox, Opera, Safari
Author
Links
Made with
About a code
Tooltip Animation
Simple tooltip animation in HTML and CSS.
Compatible browsers: Chrome, Edge, Firefox, Opera, Safari
Author
Links
Made with
About a code
Tooltip Only CSS
Compatible browsers: Chrome, Edge, Firefox, Opera, Safari
Author
Links
Made with
About the code
Adaptive Tooltips
HTML and CSS adaptive tooltips.
Compatible browsers: Chrome, Edge, Firefox, Opera, Safari
Author
Links
Made with
About the code
Fancy & Animated Tooltip — CSS Only
Simply a tooltip with a shiny/modern opening animation. Easy-to-use: only the custom attribute data-tooltip has to be added to the respective element. Elements that can’t contain other elements, such as input , can’t use the tooltip. A simple solution would be to wrap the element in a div and then attach the tooltip to the div .
Compatible browsers: Chrome, Edge, Firefox, Opera, Safari
Author
Links
Made with
About the code
Tooltip Idea
Playful little tooltip ideas.
Compatible browsers: Chrome, Edge, Firefox, Opera, Safari
Author
Links
Made with
About the code
Tooltip
Pure CSS laser line tooltip.
Compatible browsers: Chrome, Edge, Firefox, Opera, Safari
Author
Links
Made with
About the code
Flyout Tooltip
Simple CSS only flyout tooltip.
Author
Guide to creating CSS only tooltip with an arrow
Tooltip is a nice way to display additional information when there isn’t much space for it. You can create beautiful tooltips using only CSS.
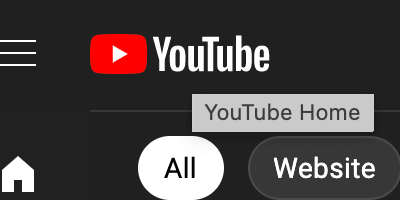
Usually, tooltips are shown on hover state. Below you can see tooltip examples from some of the most popular apps and websites:
NOTE: By default, HTML provides a way to show native tooltip using the title attribute. The tooltip will appear with a slight delay when the user hovers over an element with the title attribute.
Creating a tooltip
Say we have an abbr element and we want to display a nice looking tooltip for it, to let users know what it means:
Before we move any further, we need to tweak the existing HTML a bit.
We’ll add a tooltip class to select it and apply styles via CSS and add the data-tooltip attribute that holds the actual tooltip value, so it looks as follows:
class="tooltip" data-tooltip="HyperText Markup Language">HTML To create a tooltip with only CSS, we’ll need to use the pseudo-element. The pseudo-element has a content attribute that can store its value. We can pass a text, that will be used to display tooltip info.
content: "HyperText Markup Language"; To reuse the tooltip component for multiple elements, the pseudo-element content attribute can have an attr() value linked to the element’s HTML attribute.
Styling the tooltip
First, we need to set the position rule for the tooltip class . That way we can properly position our tooltip later. Also, we can add a dotted underline ( abbr tag already has it by default in some browsers) and a help cursor , to indicate that additional information is available.
.tooltip position: relative; text-decoration: underline dotted; cursor: help; > The pseudo-element will look as follows:
.tooltip::before content: attr(data-tooltip); position: absolute; bottom: 100%; left: 50%; transform: translate(-50%); margin-bottom: 15px; color: #fff; background: rgba(0,0,0, .7); border-radius: 5px; padding: 5px; > Tooltip arrow
To create the tooltip arrow, we can use the triangle shape made out of the second pseudo-element border.
.tooltip::after position: absolute; content: ""; width: 0; height: 0; border-left: 5px solid transparent; border-right: 5px solid transparent; border-top: 7px solid rgba(0,0,0, .7); > Animating the tooltip
For more appealing interaction we can animate the tooltip by adding a small transition. By adding a zero opacity and a transition property for both pseudo-elements, on hover, we can fade-in tooltip by setting opacity to 0.
.tooltip::before, .tooltip::after opacity: 0; visibility: hidden; transition: opacity .3s ease-in-out; > .tooltip:hover::before, .tooltip:hover::after opacity: 1; visibility: visible; > Positioning the tooltip
The provided example will create a tooltip above the element. However, that’s not always the case. You may want to display your tooltip below, left, or right of an element.
For that reason, we can create modification classes (using BEM principle). So in total, we’ll have four additional classes to set tooltip position:
.tooltip--top::before, .tooltip--top::after bottom: 100%; left: 50%; transform: translate(-50%); margin-bottom: 15px; > .tooltip--top::after margin-bottom: 8px; border-left: 5px solid transparent; border-right: 5px solid transparent; border-top: 7px solid rgba(0,0,0, .7); > .tooltip--bottom::before, .tooltip--bottom::after top: 100%; left: 50%; transform: translate(-50%); margin-top: 15px; > .tooltip--bottom::after margin-top: 8px; border-left: 5px solid transparent; border-right: 5px solid transparent; border-bottom: 7px solid rgba(0,0,0, .7); > .tooltip--right::before, .tooltip--right::after top: 50%; left: 100%; transform: translate(0, -50%); margin-left: 15px; > .tooltip--right::after margin-left: 8px; border-top: 5px solid transparent; border-right: 7px solid rgba(0,0,0, .7); border-bottom: 5px solid transparent; > .tooltip--left::before, .tooltip--left::after top: 50%; right: 100%; transform: translate(0, -50%); margin-right: 15px; > .tooltip--left::after margin-right: 8px; border-top: 5px solid transparent; border-left: 7px solid rgba(0,0,0, .7); border-bottom: 5px solid transparent; > End result
You will find the resulting tooltips and the complete code example on CodePen:
See the Pen Untitled by Tippingpoint Dev (@tippingpointdev) on CodePen.
Тултипы на CSS3 и HTML5
В связи с тем, что на Хабрахабре не нашёл я описания данного простого и в то же время удобного способа создания простых «тултипов» — всплывающих подсказок, я решил о нём написать.
В данном методе не будет использоваться JS, мы довольствуемся лишь CSS3 и HTML5.
Дисклеймер
На самом деле, css attr() для свойства псевдоэлемента content появился в CSS2 и в данном способе, в общем-то, нет ничего нового.
Простой способ

Этот способ сгодится там, где нужны небольшие «тултипчики» — всплывающие подсказки.
.tooltip < border-bottom: 1px dotted #0077AA; cursor: help; >.tooltip::after < background: rgba(0, 0, 0, 0.8); border-radius: 8px 8px 8px 0px; box-shadow: 1px 1px 10px rgba(0, 0, 0, 0.5); color: #FFF; content: attr(data-tooltip); /* Главная часть кода, определяющая содержимое всплывающей подсказки */ margin-top: -24px; opacity: 0; /* Наш элемент прозрачен. */ padding: 3px 7px; position: absolute; visibility: hidden; /* . и скрыт. */ transition: all 0.4s ease-in-out; /* Добавить плавности по вкусу */ >.tooltip:hover::after < opacity: 1; /* Показываем его */ visibility: visible; >Мы берём некий элемент (В нашем случае span), добавляем к нему атрибут с текстом, который будет показан и берём псевдоэлемент ::after. В content этого псевдоэлемента мы, пользуясь замечательнейшим свойством attr(), присваиваем нашей всплывающей подсказке текст и потом по :hover показываем его.
Думаю, остальные свойства понятны по комментариям в коде.
Отдельно хочу отметить, как ведёт себя анимация в Chrome и Opera (Возможно и в IE, за его отсутствием проверить я не имею никакой возможности).
Её нет. Связано это с тем, что WebKit и Opera не применяют transitions и animation к псевдоэлементам ::before и ::after.
По этому поводу в багтрекере WebKit зарегистрирован баг.
Способ для более сложных тултипов
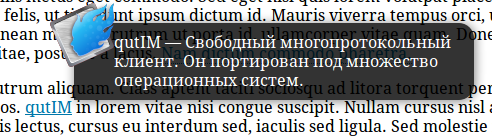
Иногда в тултипе должен быть не просто текст, но и некое форматирование или изображение, которое в предыдущий способ не вставишь.
Далее я рассмотрю лишь пример того, что можно сделать этим способом.
.htooltip span < /* Внешний вид нашего тултипа */ background-color: rgba(0,0,0, 0.8); border-radius: 15px 15px 15px 0px; box-shadow: 1px 1px 10px rgba(0, 0, 0, 0.5); color: #fff; margin-left: 2px; margin-top: -75px; opacity: 0; /* Делаем его прозрачным */ padding: 10px 10px 10px 40px; position: absolute; text-decoration: none; visibility: hidden; /* И прячем */ width: 350px; z-index: 10; >.htooltip:hover span < /* По hover отображаем тултип */ opacity: 1; visibility: visible; >.htooltip span img < /* Изображение для примера */ border: 0 none; float: left; margin: -71px 0 0 -234px; opacity: 0; position: absolute; visibility: hidden; z-index: -1; >.htooltip:hover span img < /* Показываем изображение */ opacity: 1; visibility: visible; >Всё просто. Данные примеры можно лицезреть на этой страничке.
P.S. Некоторые спросят: А где же HTML5? В статье упомянуты data-* атрибуты, являющиеся частью спецификации HTML5.