- How to Install and Use Thonny Python IDE on Linux
- Why Thonny IDE
- Setting Up Thonny Python IDE on Linux
- Install Thonny IDE Using Pip
- Install Thonny IDE Using Installer Script
- Install Thonny IDE Using Package Manager
- How to Use Thonny IDE in Linux
- Thonny Package Manager
- Thonny Debugging
- Thonny Configuration
- How to Uninstall Thonny IDE in Linux
- Среда разработки Thony Python IDE
- Подключение и настройка
- Тестирование среды
- Первая программа
- Сохранения программы
- Установка библиотек
- Ресурсы
- Инструменты страницы
- Thonny
- Demo
- Credits
- Instructions & downloads
- Plug-ins
- Contact & News
- Papers
How to Install and Use Thonny Python IDE on Linux
Thonny is an Integrated Development Environment (IDE) for Python beginners. It is created with Python and released under MIT License. It is cross-platform and can run in Linux, macOS, Windows.
Why Thonny IDE
If you are new to programming or someone switching from a different language I suggest using thonny. The interface is clean and distraction-free. Newbies can concentrate on language instead of focusing on setting up the environment.
Some of the key features of thonny include
- Python 3.7 is installed by default with Thonny setup.
- Built-in Debugger and Step through evaluation.
- Variable Explorer.
- Heap, Stack, Assistant, Object Inspector.
- Built-in Python shell (Python 3.7).
- Simple PIP GUI Interface to install 3rd party packages.
- Support code completion.
- Highlights syntax errors and explain scopes.
In this article, you will learn how to install and use Thonny Python IDE in a Linux environment and exploring the features of thonny.
Setting Up Thonny Python IDE on Linux
The latest version of Thonny is 3.3.0 and there are three ways you can install thonny in Linux.
- Use Python package manager – PIP
- Download and run the install script
- Use default package manager to install it
Install Thonny IDE Using Pip
Install Thonny IDE Using Installer Script
Install Thonny IDE Using Package Manager
$ sudo apt install python3-tk thonny [On Debian/Ubuntu] $ sudo dnf install thonny [On CentOS/RHEL & Fedora]
For demonstration purposes, I am using Ubuntu 20.04 and running the installer script with wget command as shown above to install thonny. At the end of the installation, you will come to know where is thonny installed. In my case, it is installed in my home directory.

To launch thonny, go to the installed directory and type “./thonny” or absolute path to thonny. Thonny will ask you to set up Language and Initial settings.
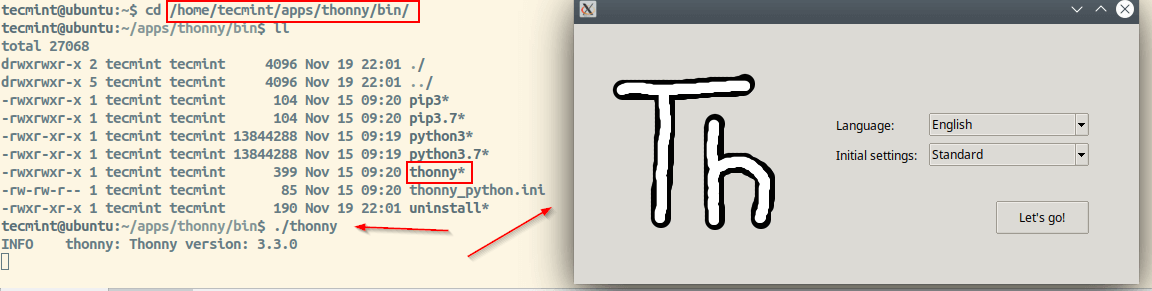
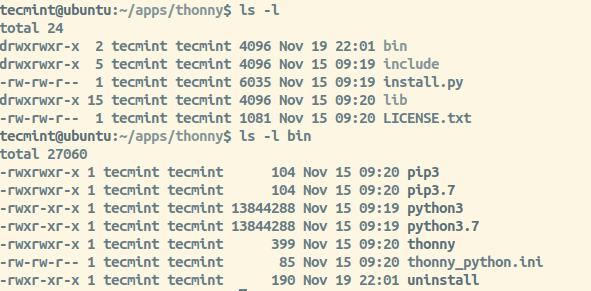
As shown in the installation section, Thonny is installed in the home directory. If you look at the thonny folder it has install script, necessary python libraries for thonny to work, binaries. Inside the bin directory, there is python 3.7 and PIP 3 that comes with thonny and thonny launch binary.
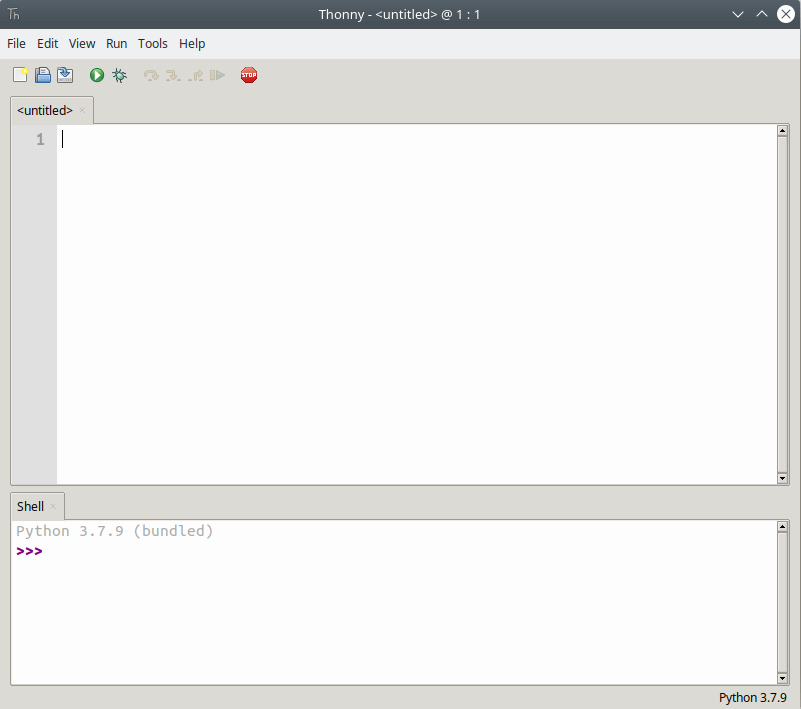
How to Use Thonny IDE in Linux
When you launch Thonny you will get a distraction-free GUI interface. You will have an editor area where you can code and shell to run the script or test codes interactively.
Linux distributions by default ships with python. Older version ships with Python2* and the latest versions ship with Python3*. We have already seen Python 3.7 is installed by default and thonny sets 3.7 as the default interpreter.
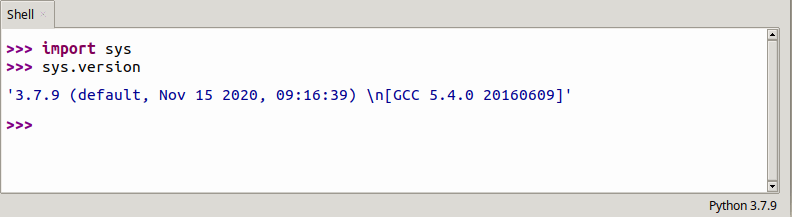
You can stick with the default interpreter (Python 3.7) or choose different interpreters available on the system. Go to “Menu Bar → Tools → Options → Interpreter → Set the path” or “Menu Bar → Run → Select Interpreter → Set the path”.
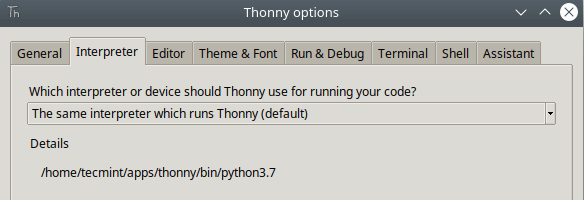
I suggest sticking with the default python installation unless you know how to fix it if something breaks when switching the interpreter.
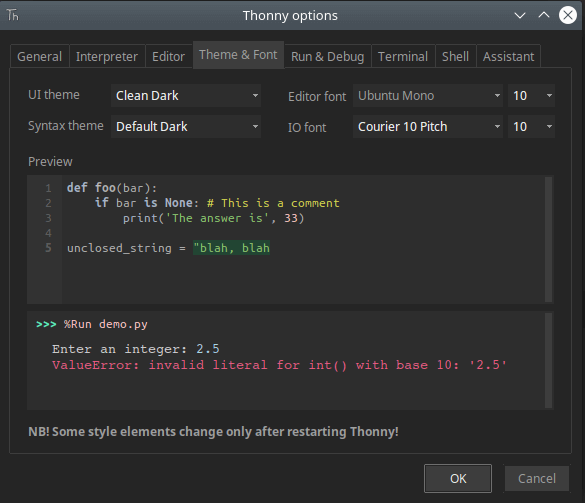
Thonny comes with Light and Dark themes. You can change themes for Editor as well as UI theme. To change Theme and Fonts Go to “Menu Bar → Tools → Options → Theme & Font”.
There are 3 ways you can run the code you created. First, your code should be saved to a file for Thonny to execute.
- Press F5 or Execute Icon as shown in Image.
- Go to “Menu Bar → Press Run → Run Current Script”.
- Press “CTRL+T” or Go to “Run → Press Run current script in terminal”.
The first two methods will switch the directory to wherever your code is and invoke the program file in the Built-in terminal.
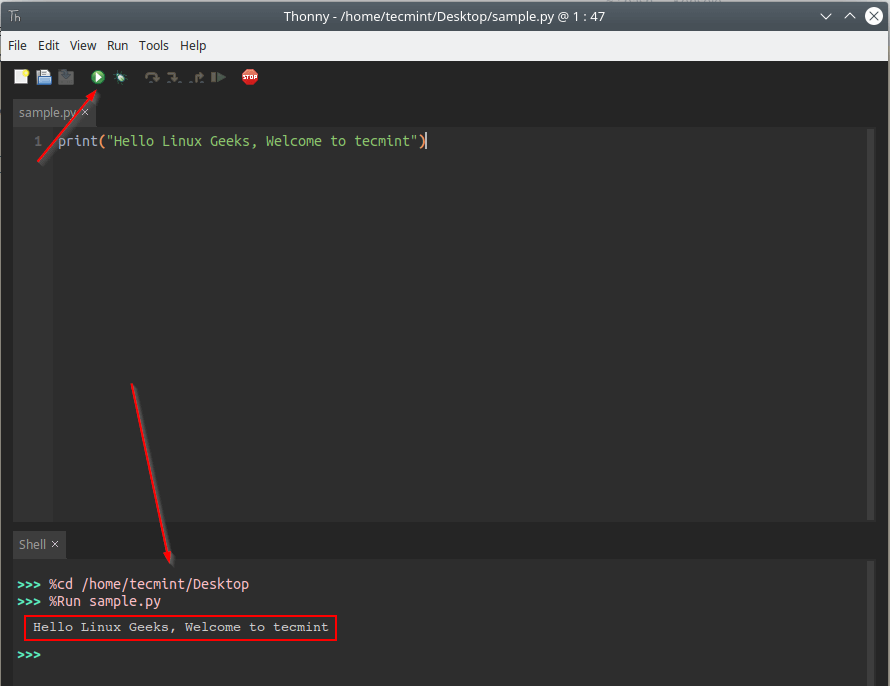
The third option allows you to run your code in an external terminal.

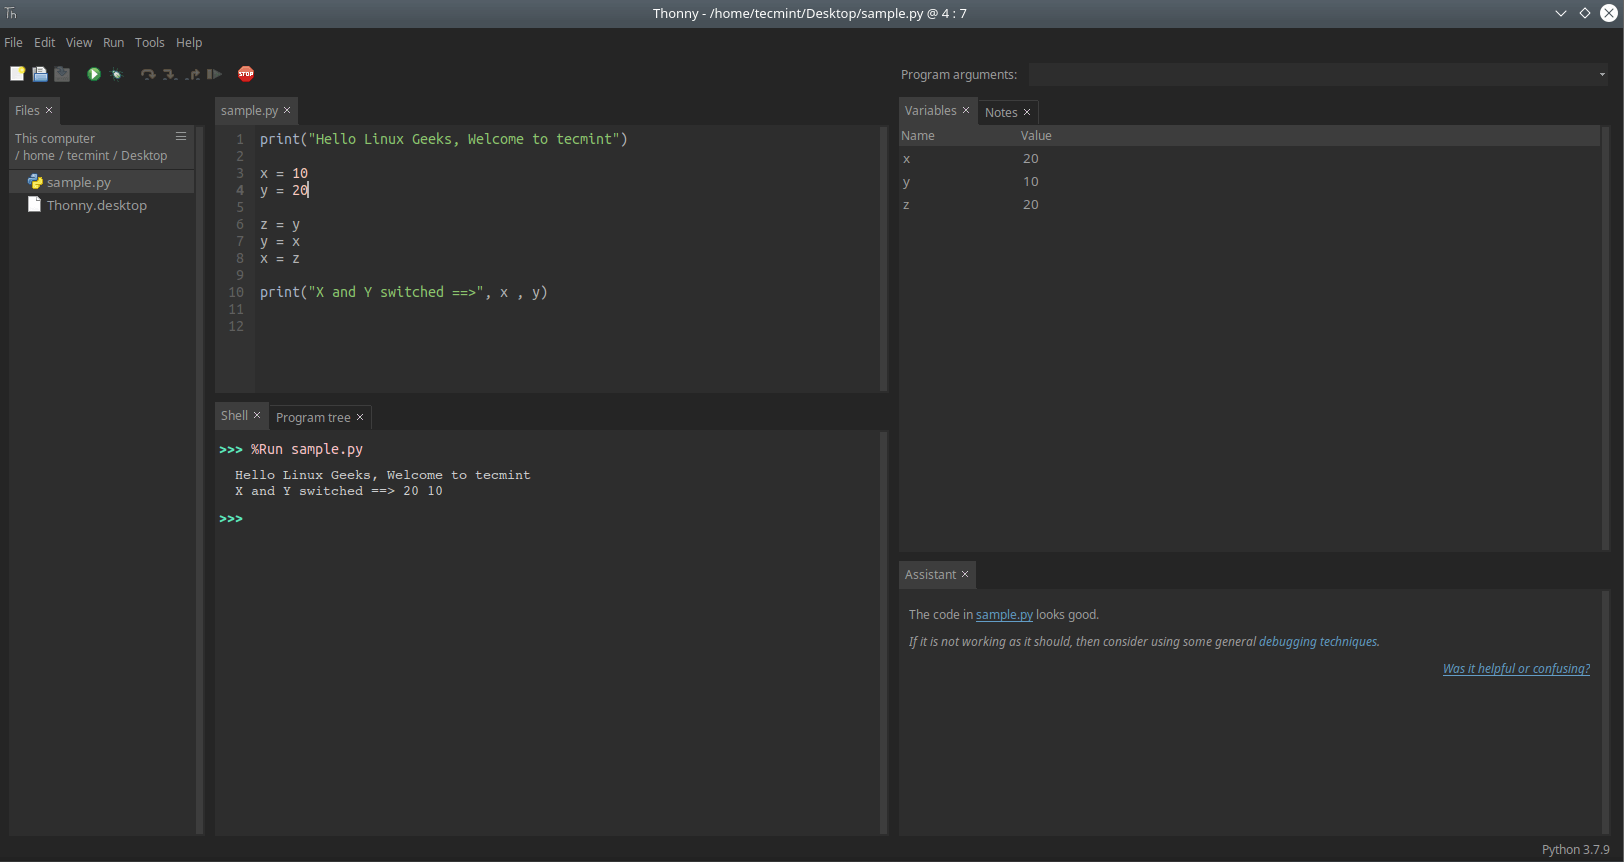
The real power of thonny comes with built-in features like File Explorer, Variable Explorer, Shell, Assistant, Notes, Heap, Outline, Stack. To Toggle on-off these features Go to “View → toggle Feature ON/OFF”.
Thonny Package Manager
It is known that all the python packages are hosted at PyPI. We will normally use PIP (Python Package Manager) to install desired packages from PyPI. But with Thonny, a GUI interface is available to manage packages.
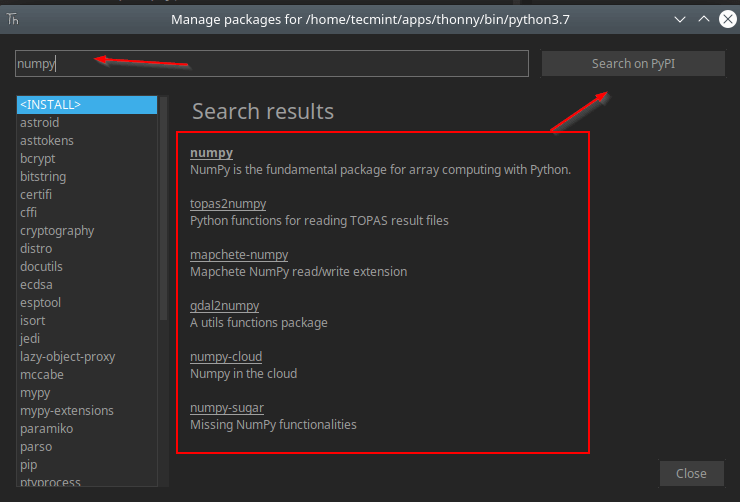
Go to “Menu Bar → Tools → Packages”. In the search bar, you can type a package name and press search. It will search the PyPI index and displays the list of package matching the name.
In my case, I am trying to install a package call numpy.
When you select the package from the list, It will take you to the installation page. You can install the latest version or choose different versions as shown in the image. Dependencies are automatically installed.
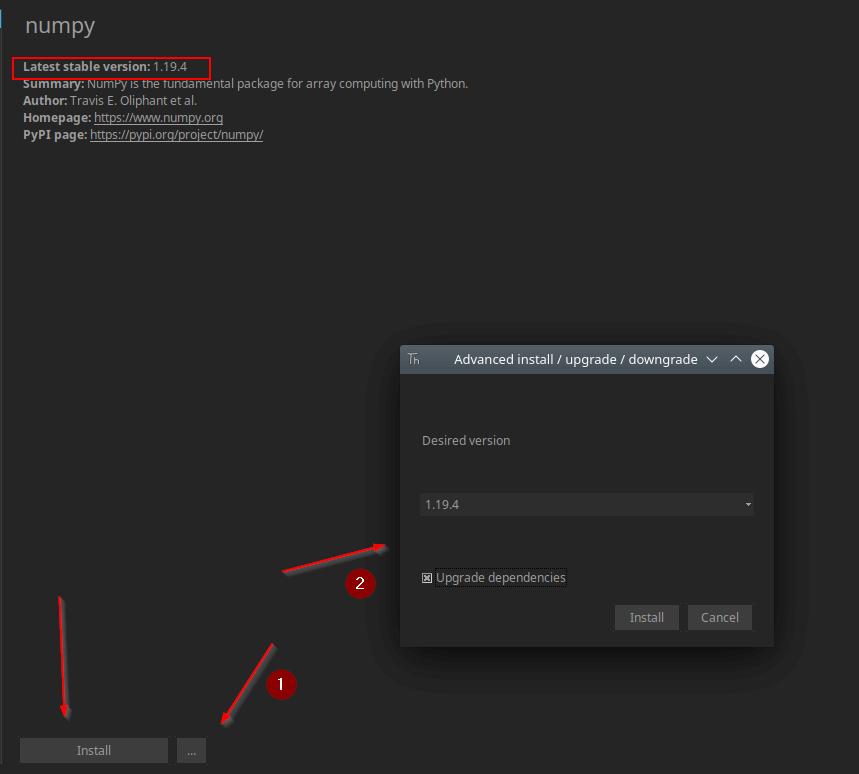
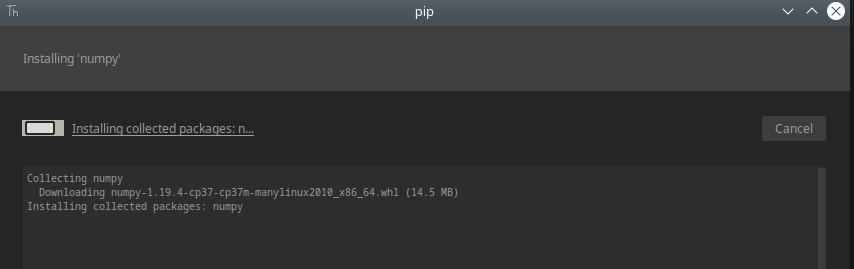
Once you press Install, it will install the package.
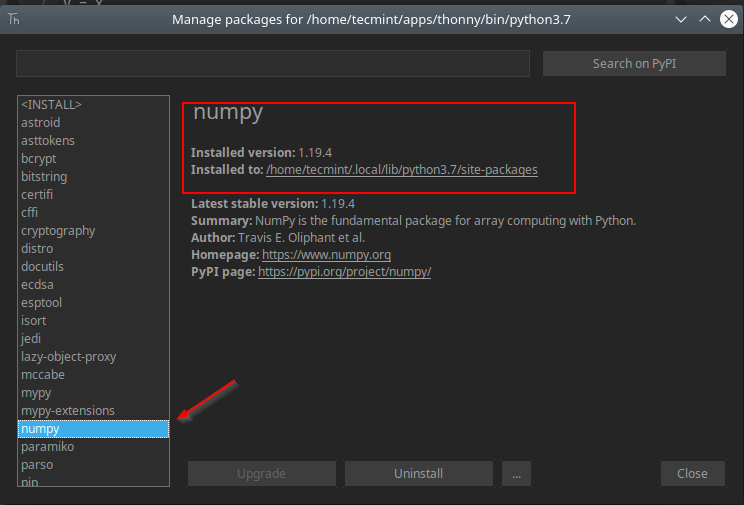
You can get the details like package version, library location once the package is installed. In case if you wish to uninstall the package, it is simple, go ahead and click the “uninstall” button at the bottom of the package as shown in the image.
Thonny Debugging
Thonny comes with a built-in debugger. Press Ctrl+F5 to run your program step-by-step, no breakpoints needed. Press F7 for a small step and F6 for a bigger step. You can also access these option from “Menu Bar → Run → Debugging options”.

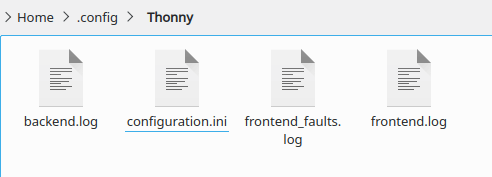
Thonny Configuration
All the configurations are stored in the “configuration.ini” file. Any changes you make with your thonny session is written to this file. You can also manually edit this file to set different parameters.
To open the file go to “Menu Bar → Tools → Open Thonny data folder”.
How to Uninstall Thonny IDE in Linux
If you wish to uninstall thonny, there is an uninstall script available under the thonny installation directory.
$ /home/tecmint/apps/thonny/bin/uninstall [Installed using Script] $ pip3 uninstall thonny [If Installed using PIP] $ sudo apt purge thonny [On Debian/Ubuntu] $ sudo dnf remove thonny [On CentOS/RHEL & Fedora]
That’s it for this article. There is a lot more to explore in Thonny than what we discussed here. Thonny is great for beginners but it is always a personal choice of programmers to choose which IDE or Text editor to work with. Install Thonny play with it, share your feedback with us.
Среда разработки Thony Python IDE
Все примеры коммуникации в рамках данной статьи будут с платформой Raspberry Pi Pico.
Подключение и настройка
Запишите загрузчик MycroPython в подключаемую плату. Как записать загрузчик конкретно в ваш контроллер, читайте в технической документации конкретно на интересующую плату.
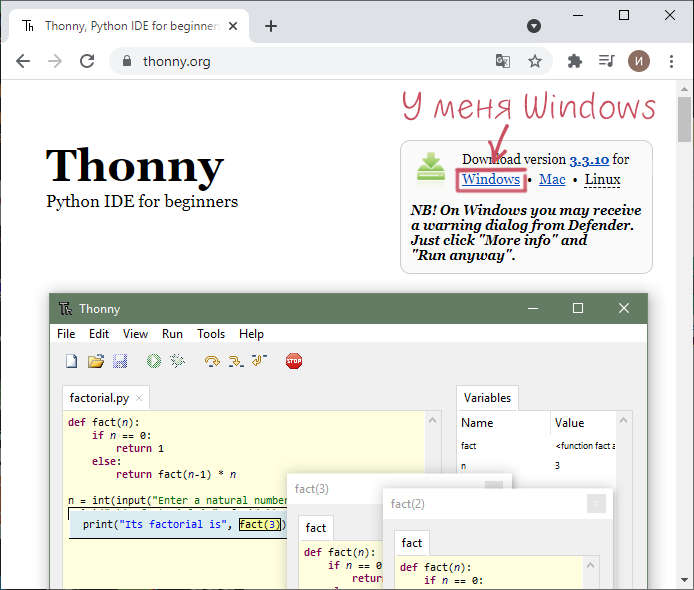
Скачайте и установите Thonny Python IDE.
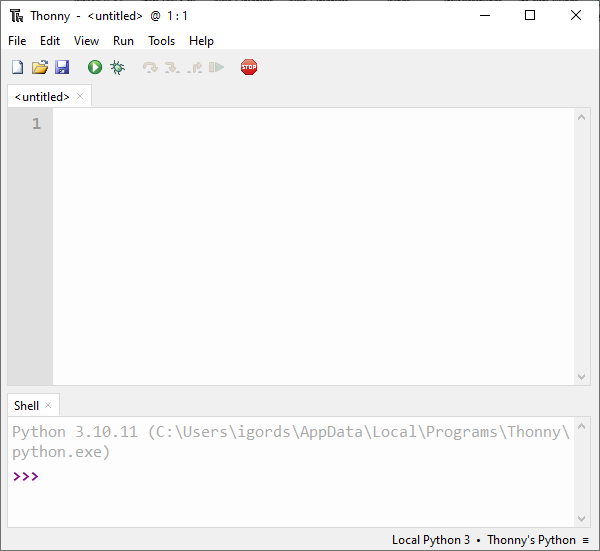
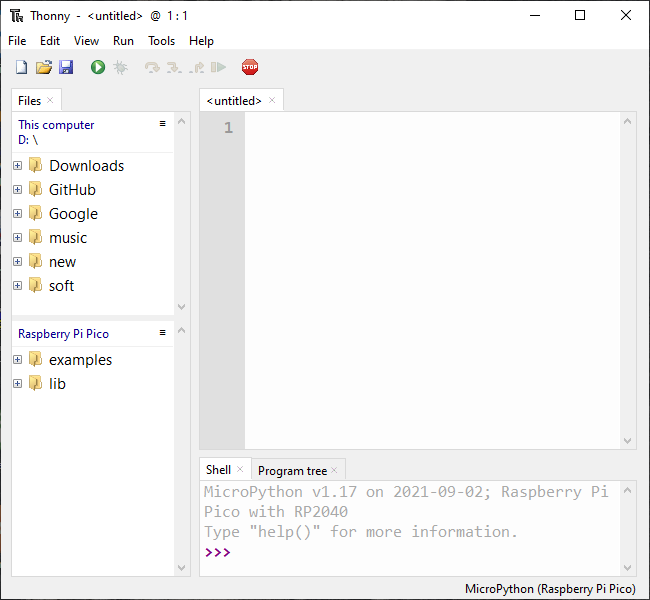
Запустите Thonny Python IDE.

Переключите текущий интерпретатор Python на MicroPython с платой Raspberry Pi Pico на интересующем COM-порте.
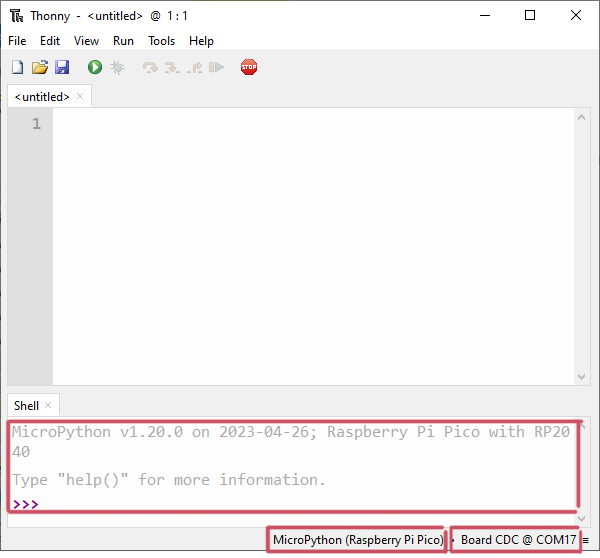
После смены интерпретатора, в консоли появится текущая версия прошивки, имя контроллера и другие данные про плату.
Тестирование среды
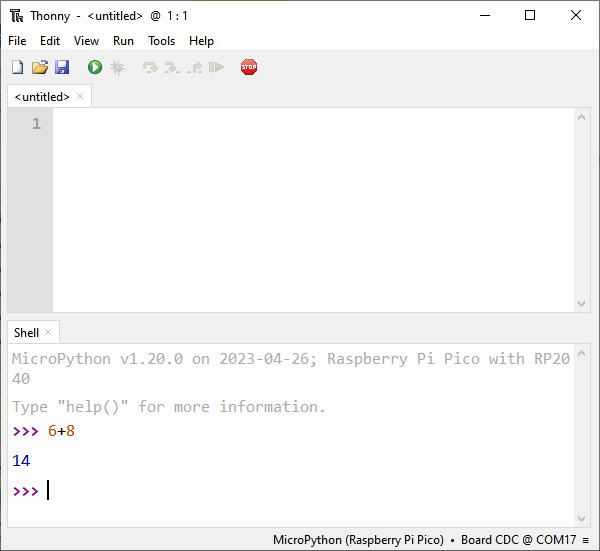
Интерпретатор Python позволяет работать с подключённой платой «налету»: исполнять выражения, вызывать функции, просматривать значения переменных и т.д. Попробуйте, например, ввести в консоль 6 + 8 и нажать Enter . Плата выполнит команду и вернёт результат 14 .
Первая программа
Среда настроена, плата подключена. Пришло время запустить первую программу. Мигнём на плате Rapberry Pi Pico встроенным светодиодом LED на 25 пине.
# Библиотека для работы с пинами ввода-вывода from machine import Pin # Библиотека для работы с временем import time # Светодиод в режим выхода на 25 пине led = Pin(25, Pin.OUT) while True: # Зажигаем светодиод led.value(1) # Ждём 1 секунду time.sleep(1) # Гасим светодиод led.value(0) # Ждём 1 секунду time.sleep(1)
После запуска скрипта, светодиод начнёт мигать раз в секунду.
Сохранения программы
Среда настроена, плата прошивается, код работает. Но после переподключения питания программа не сохраняется в памяти контроллера, как будто её и не было. Для решения проблемы сделайте ряд действий.
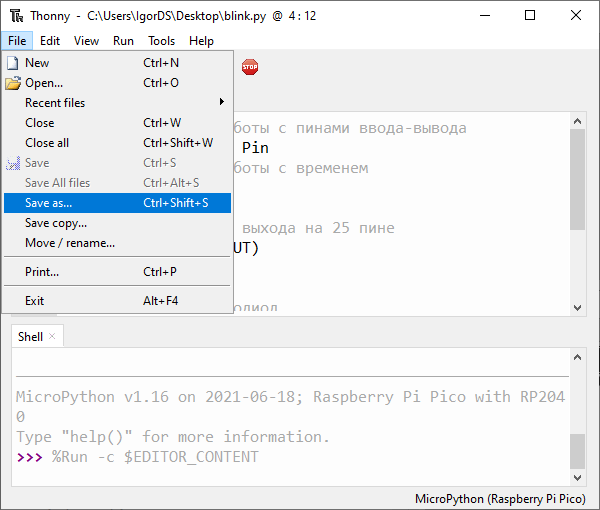
В Thonny Python IDE выберите пункт меню: File Save as…
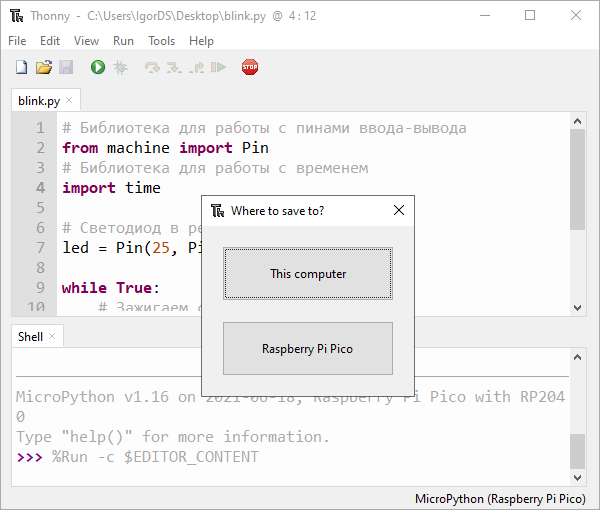
Откроется всплывающее окно с выбором носителя для сохранения: This Computer или Raspberry Pi Pico.
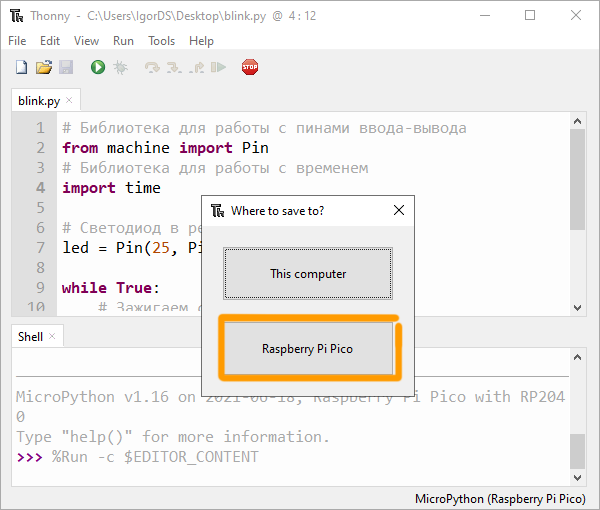
Выберите Raspberry Pi Pico.
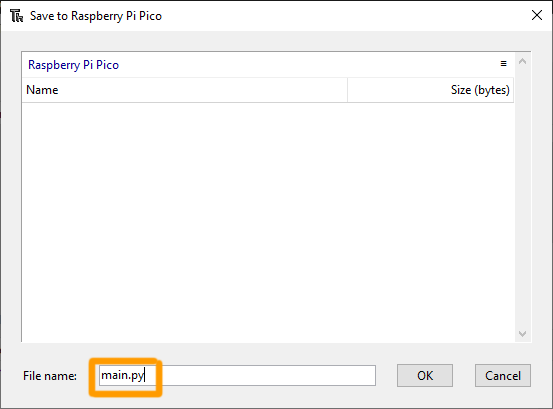
Назовите файл main.py и нажмите кнопку OK .
После этого программа должна сохранятся в памяти контроллера после переподключения питания.
Установка библиотек
Скачайте и распакуйте интересующую библиотеку. В качестве примера рассмотрим библиотеку amperka_pico_lcd_1n14in, которая служит для работы с цветным дисплеем для Raspberry Pi Pico.
Запустите Thonny Python IDE.
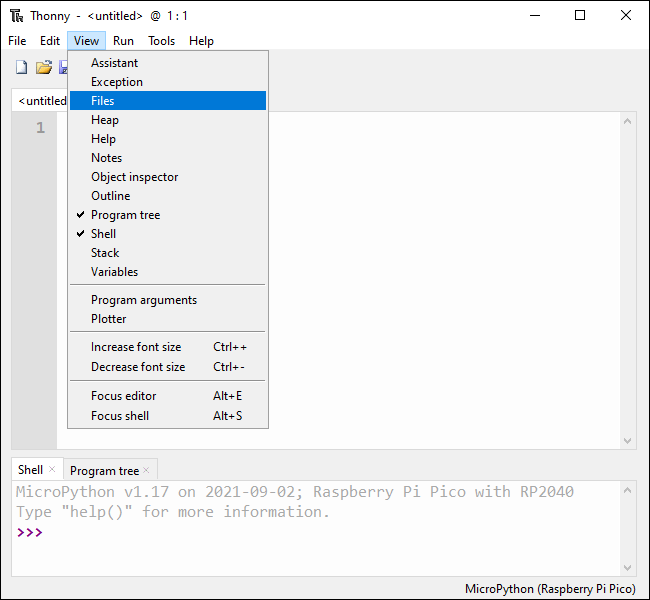
Откройте в Thonny IDE отображения дерева файлов: View Files
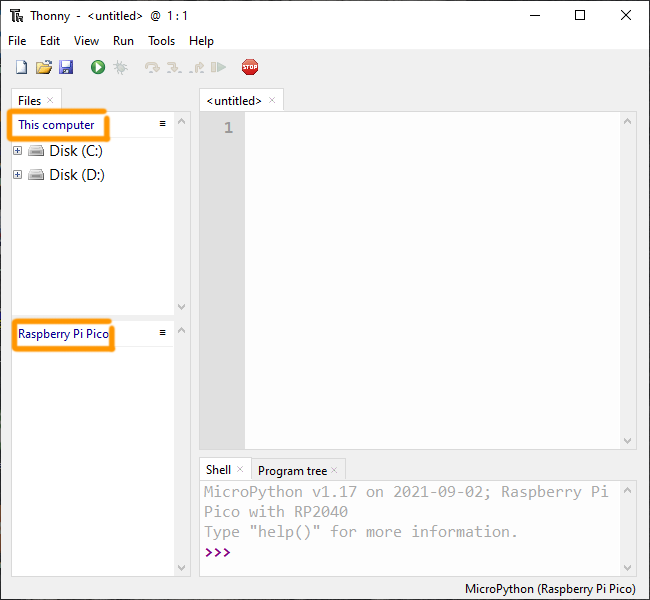
Raspberry Pi Pico : файлы, которые хранятся на Raspberry Pi Pico.
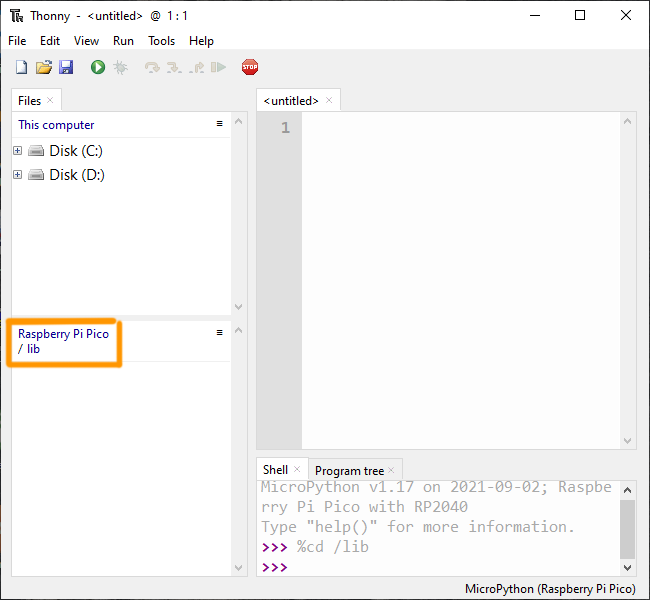
В окне Raspberry Pi Pico создайте новую папку с именем lib и перейдите в новоиспеченную директорию.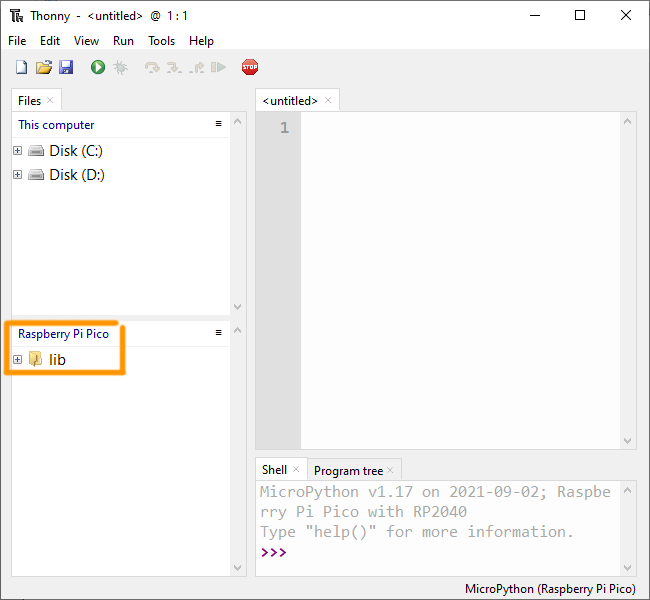
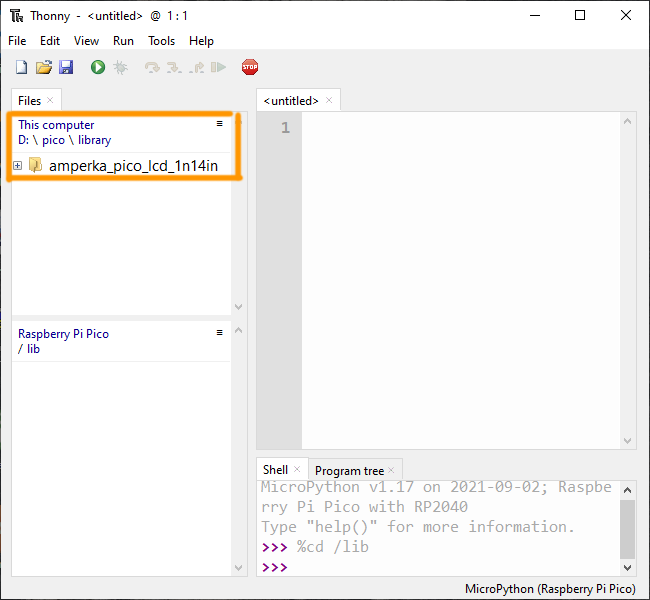
В окне This computer перейдите в директорию с распакованной библиотекой.
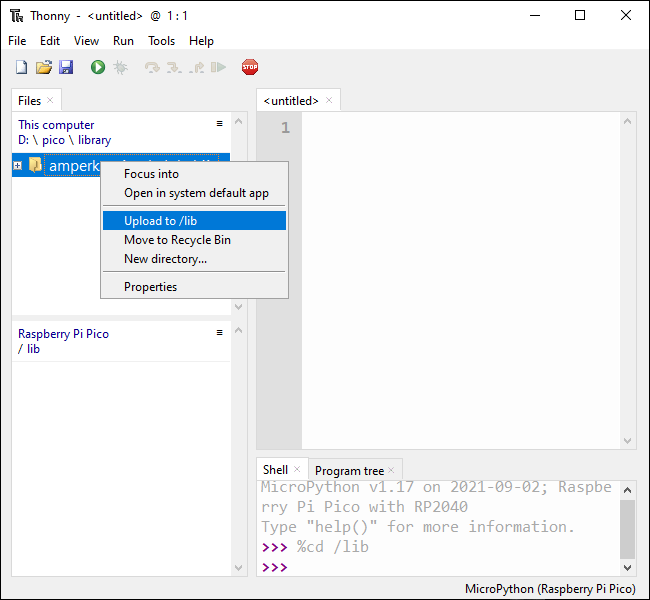
Выберите пункт Upload to /lib .
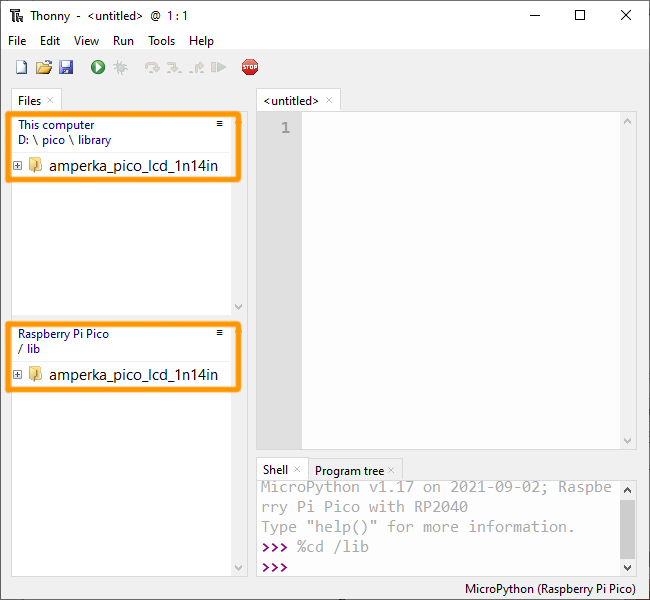
В итоге библиотека должна оказаться в памяти Raspbeery Pi Pico.
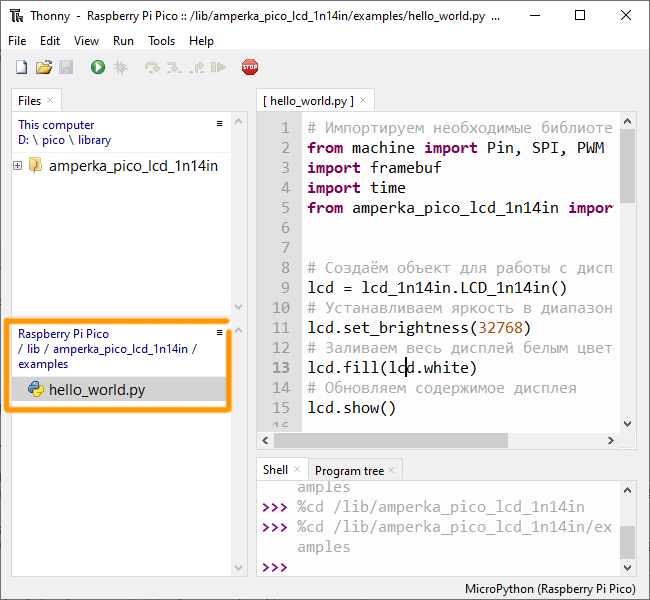
В библиотеках обычно есть папка Examples , в которой в вы найдете готовые примеры для использования.
Ресурсы
Если не указано иное, содержимое этой вики предоставляется на условиях следующей лицензии: CC Attribution-Noncommercial-Share Alike 4.0 International
Производные работы должны содержать ссылку на http://wiki.amperka.ru, как на первоисточник, непосредственно перед содержимым работы.
Вики работает на суперском движке DokuWiki.
Инструменты страницы
Thonny
Easy to get started. Thonny comes with Python 3.10 built in, so just one simple installer is needed and you’re ready to learn programming. (You can also use a separate Python installation, if necessary.) The initial user interface is stripped of all features that may distract beginners.
No-hassle variables. Once you’re done with hello-worlds, select View → Variables and see how your programs and shell commands affect Python variables.
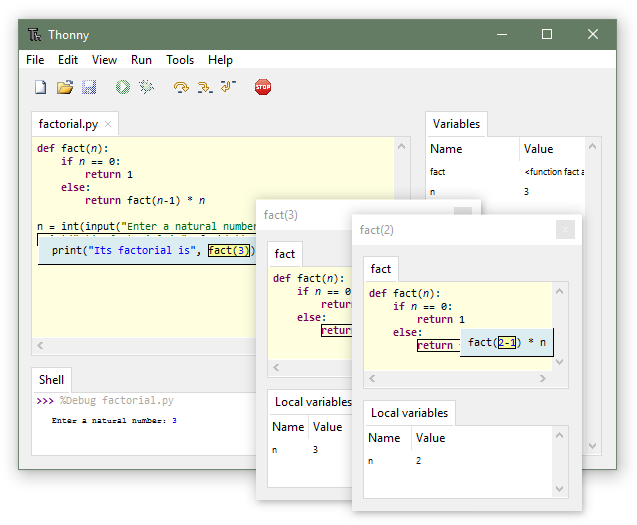
Simple debugger. Just press Ctrl+F5 instead of F5 and you can run your programs step-by-step, no breakpoints needed. Press F6 for a big step and F7 for a small step. Steps follow program structure, not just code lines.
Step through expression evaluation. If you use small steps, then you can even see how Python evaluates your expressions. You can think of this light-blue box as a piece of paper where Python replaces subexpressions with their values, piece-by-piece.
Faithful representation of function calls. Stepping into a function call opens a new window with separate local variables table and code pointer. Good understanding of how function calls work is especially important for understanding recursion.
Highlights syntax errors. Unclosed quotes and parentheses are the most common beginners’ syntax errors. Thonny’s editor makes these easy to spot.
Explains scopes. Highlighting variable occurrences reminds you that the same name doesn’t always mean the same variable and helps spotting typos. Local variables are visually distinguished from globals.
Mode for explaining references. Variables are initially presented according to simplified model (name → value) but you can switch to more realistic model (name → address/id → value).
Code completion. Students can explore APIs with the help of code completion.
Beginner friendly system shell. Select Tools → Open system shell to install extra packages or learn handling Python on command line. PATH and conflicts with other Python interpreters are taken care of by Thonny.
Simple and clean pip GUI. Select Tools → Manage packages for even easier installation of 3rd party packages.
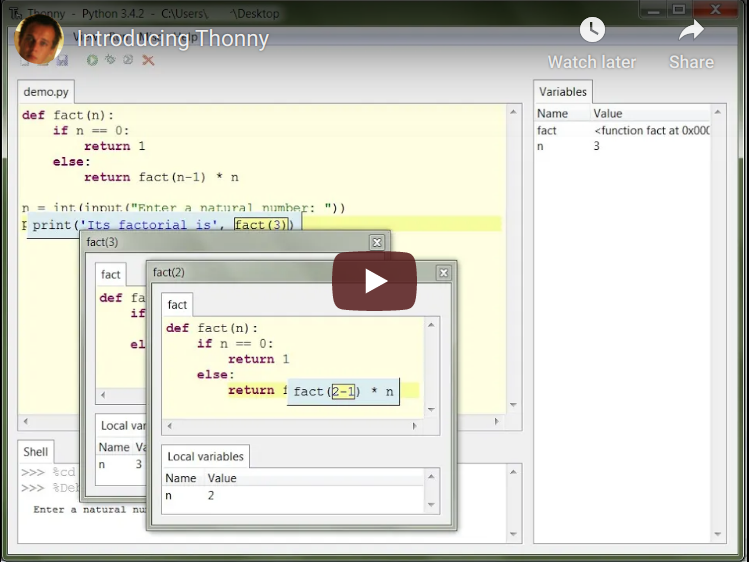
Demo
Credits

From 2014 to 2018 the main development of Thonny took place in Institute of Computer Science of University of Tartu, Estonia.
Since September 2018 development of Thonny is partially supported by Cybernetica AS.

Development of several features in Thonny 3.0 and 3.3 was proposed and supported by Raspberry Pi Foundation.
Instructions & downloads
Latest stable releases are linked in the download box at the top of this page. Older releases and prereleases can be found at https://github.com/thonny/thonny/releases
Plug-ins
These are some known Thonny plug-ins:
- thonny-gitonic adds a command for opening gitonic
thonny-black-format(abandoned)- thonny-black-formatter adds a command for formatting current file with Black
- thonny-ev3dev allows uploading code to EV3 (and much more)
- thonny-error-explainer extends Assistant with new error checkers
- thonny-lahendus allows loading exercises from lahendus.ut.ee and submitting solutions for automatic assessment.
- thonny-edison allows uploading Python code to Edison educational robot
- thonny-dracula adds Dracula syntax theme.
- thonny-onedark adds One Dark syntax theme.
- thonny-crosshair adds commands for invoking CrossHair analyzer.
- thonny-icontract-hypothesis adds commands for invoking icontract-hypothesis analyzer.
- thonny-py5mode adds py5 support for a Processing-like creative coding environment.
- ThonnyFlake8 adds warnings from flake8.
- thonny-autosave adds the option for auto-saving your script in every 10 seconds.