- Html add value to select
- Синтаксис
- Атрибуты
- Закрывающий тег
- Manipulation of HTML Select Element with Javascript
- Important Properties and Methods of Select Element
- Important Properties of Option Element
- Setting Value of Select Element
- Getting the Value and Text/Label of the Selected Options
- Adding an Option
- Deleting an Option
- HTML Select Tag – How to Make a Dropdown Menu or Combo List
- Here’s an Interactive Scrim about How to Make a Dropdown Menu or Combo List in HTML
- Attributes of the Select Tag
- How to Create a Dropdown Menu with the Select Tag
- How to Style the Select Element
- Conclusion
- HTMLSelectElement: add() method
- Syntax
- Parameters
- Return value
- Exceptions
- Examples
- Creating Elements from Scratch
- Append to an Existing Collection
- Inserting to an Existing Collection
- Specifications
- Browser compatibility
- Found a content problem with this page?
Html add value to select
Тег позволяет создать элемент интерфейса в виде раскрывающегося списка, а также список с одним или множественным выбором, как показано далее. Конечный вид зависит от использования атрибута size тега , который устанавливает высоту списка. Ширина списка определяется самым широким текстом, указанным в теге , а также может изменяться с помощью стилей. Каждый пункт создается с помощью тега , который должен быть вложен в контейнер . Если планируется отправлять данные списка на сервер, то требуется поместить элемент внутрь формы. Это также необходимо, когда к данным списка идет обращение через скрипты.
| Список множественного выбора | Раскрывающийся список |
Синтаксис
Атрибуты
accesskey Позволяет перейти к списку с помощью некоторого сочетания клавиш. autofocus Устанавливает, что список получает фокус после загрузки страницы. disabled Блокирует доступ и изменение элемента. form Связывает список с формой. multiple Позволяет одновременно выбирать сразу несколько элементов списка. name Имя элемента для отправки на сервер или обращения через скрипты. required Список обязателен для выбора перед отправкой формы. size Количество отображаемых строк списка. tabindex Определяет последовательность перехода между элементами при нажатии на клавишу Tab
Также для этого тега доступны универсальные атрибуты и события.
Закрывающий тег
Manipulation of HTML Select Element with Javascript

Manipulation of the element with Javascript is quite commonly required in web applications. This tutorial explains how you can perform common operations on select element with vanilla Javascript — adding/deleting options or getting/setting the selected options.
Important Properties and Methods of Select Element
- value : It gives the value of the first selected option (a multi-valued select may have multiple selected options)
- options : It gives the list of all option elements in the select
- selectedOptions : It gives the list of option elements that are currently selected
- selectedIndex : It is an integer that gives the index of first selected option. In case no option is selected, it gives -1
- add() : This method adds a new option to the list of options
- remove() : This method removes an option from the select element
Important Properties of Option Element
- value : It gives the value of the option
- text : It gives the text inside the option
- selected : It tells whether the option is selected or not
Setting Value of Select Element
For a single valued select, setting its value can be done with the value or the selectedIndex property.
// Set option with value 'Orange' as selected document.querySelector('#choose-fruit').value = 'Orange'; // Set the option with index 2 as selected => Sets the 'Banana' option as selected document.querySelector('#choose-fruit').selectedIndex = 2; For a multiple valued select, setting multiple selected options can be done by setting the selected attribute of the required option.
// choose the first option document.querySelector('#choose-fruit-multiple').options[0].selected = true; // also choose the third option document.querySelector('#choose-fruit-multiple').options[2].selected = true; This will obviously work for single valued select also, but using the value property is much direct for them.
Getting the Value and Text/Label of the Selected Options
The selectedOptions property of the select element gives the list of options that are currently selected. Each element in this list is a DOM element — so you can use the value and text property to get the value and inside text of the option.
// For a normal select (and not multi-select) the list would contain only a single element var text = document.querySelector('#choose-fruit').selectedOptions[0].text; var value = document.querySelector('#choose-fruit').selectedOptions[0].value; For a multiple select element, you can loop over the list to get all selected options.
var selected_options = document.querySelector('#choose-fruit-multiple').selectedOptions; for(var i=0; i // output Orange 2 Grapes 5 Adding an Option
The add method can be used to add a new option in the select. You can also specify the exact positon where the option needs to be inserted.
var option = document.createElement('option'); option.text = 'BMW'; // append option at the end // new options will be Volvo, Audi, Mercedes & BMW document.querySelector('#choose-car').add(option, null); var option = document.createElement('option'); option.text = 'BMW'; // append option before index 0 // new options will be BMW, Volvo, Audi & Mercedes document.querySelector('#choose-car').add(option, 0); var option = document.createElement('option'); option.text = 'BMW'; // append option before index 2 // new options will be Volvo, Audi, BMW & Mercedes document.querySelector('#choose-car').add(option, 2); Deleting an Option
The remove method can be used to delete an option at a specified index.
// remove the option at index 1 // new options will be Volvo & Mercedes document.querySelector('#choose-car').remove(1); HTML Select Tag – How to Make a Dropdown Menu or Combo List

Kolade Chris
You use the HTML select tag to create drop-down menus so that users can select the value they want. It is an instrumental feature in collecting data to be sent to a server.
The select tag normally goes within a form element, with the items to choose from coded within another tag, . It can also be a standalone element, which would still be associated with a form with one of its special attributes, form .
In this tutorial, I will walk you through how to create a dropdown menu with the select tag so you can start using it to collect data in your coding projects. I will also touch on how to style the select tag because it is notoriously difficult to style.
Here’s an Interactive Scrim about How to Make a Dropdown Menu or Combo List in HTML
Attributes of the Select Tag
Before I dive deep into whot to create a dropdown menu with the select tag, we need to discuss the attributes the select tag takes.
- name: You need to attach the name to every form control as it is used to reference the data after it’s submitted to the server.
- multiple: This attribute lets the user select multiple options from the dropdown menu.
- required: This is typically used for validation. With it, the form won’t submit unless a user selects at least one option from the dropdown.
- disabled: This attribute stops the user from interacting with the options.
- size: Expressed in numbers, the size attribute is used to specify how many options will be visible at a time.
- autofocus: This attribute is used on all form inputs, select inclusive, to specify that the input should be on focus when the page loads.
How to Create a Dropdown Menu with the Select Tag
To create a dropdown menu with the select tag, you firstly need a form element. This is because you will also have a submit button within it (the form element) in order to submit the data to the server.
I’ve added some simple CSS to center the dropdown and button, and give the body a light-grey background:
To make it more elaborate and accessible, you can also attach the select box to a label element, so it gets focused when the label text is clicked. You can do that with this code:
I put a number symbol (#) as a the value of the action attribute so you don’t get a 404 when you click on the submit button.
But now we have to make a little change in the CSS:
In the end, this is the result:
It doesn’t end there. One of the dropdown items appears by default and will be selected if the user clicks on the submit button immediately when they land on the page.
But this isn’t a good user experience. You can get rid of it by coding in “select a language” as the first item of the dropdown.
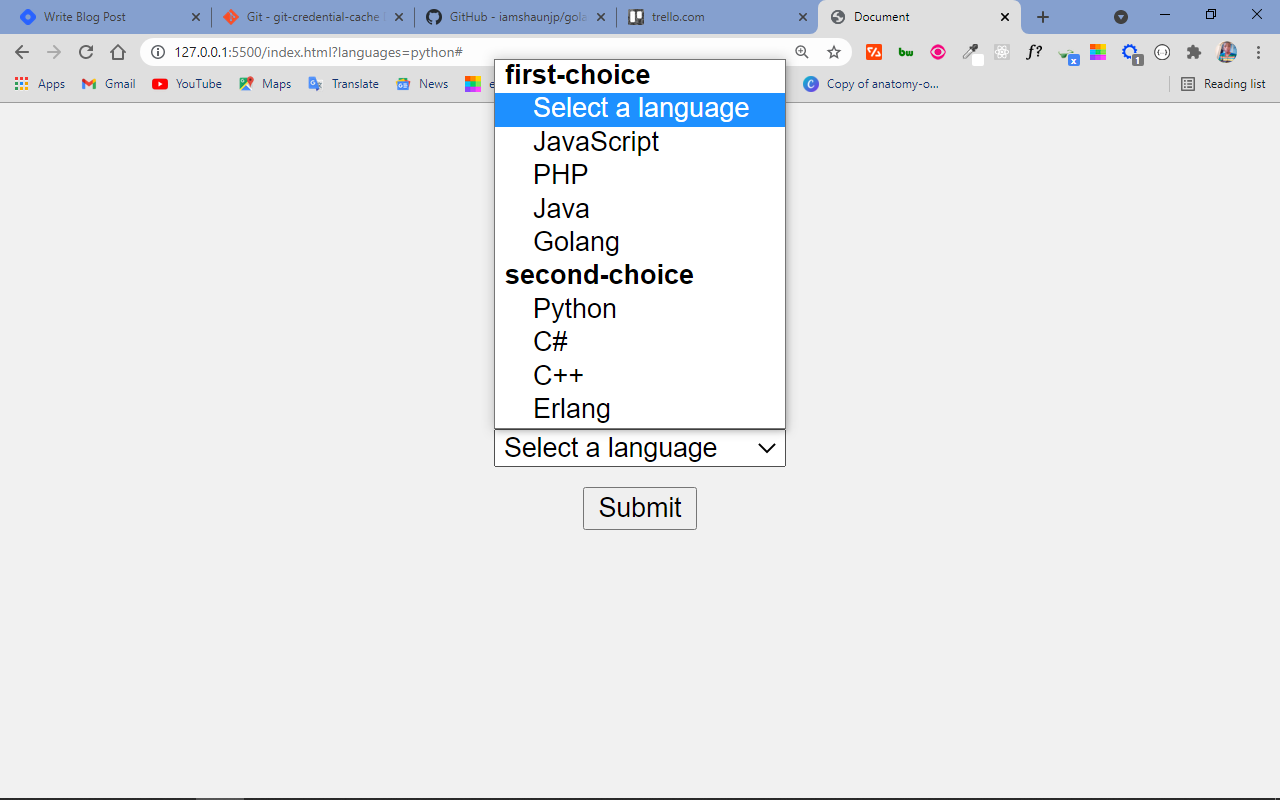
When the user clicks the select box to select an item, the dropdown is also covering the submit button – another thing that negatively affects good user experience.
You can change this with the size attribute, which will show a certain number of items by default and show a scroll for other items in the dropdown.
This also lets you get rid of the dummy first item, because some of the items will be visible to the user automatically.
With the multiple attribute, you can allow the user to select multiple items from the dropdown.
This makes 4 items visible by default. To select multiple items, the user has to hold down the shift or ctrl key, then select with the mouse.
That’s not all you can do with the select and tags. You can also make a multi-layer select box with the element inside a tag.
You can convert the already made dropdown to a multi-layer select box like this:
How to Style the Select Element
Styling the select element is often confusing and renders inconsistently within browsers. But you can always try the following:
In the CSS code snippet above, I gave the text in the select box the following appearance:
- a font family of cursive and a color of white,
- an outline of 0 to remove the ugly outline when it is on focus,
- a greenish background,
- a 1-pixel tick crimson-colored border,
- a border-radius of 4 pixels to get a slightly rounded border on all sides,
- and a padding of 4 pixels to space things out a little bit.
The select box now looks better:
Conclusion
The select tag is very useful when you’re making dropdowns and combo lists in HTML. It is like a radio button and checkbox in one package.
Remember that with radio buttons, you only get to select one item from a list – but with a checkbox, you can select multiple items. Select is more flexible, as you can configure it to accept only a single item or multiple items.
One issue with the select tag is that it is very difficult to style. A reasonable solution is to use a CSS library that offers great utility classes to style a form along with the select element.
I hope this tutorial has made you more familiar with the select tag so you can start using it in your projects.
Thank you for reading and keep coding.
HTMLSelectElement: add() method
The HTMLSelectElement.add() method adds an element to the collection of option elements for this select element.
Syntax
Parameters
An element of the collection, or an index of type long, representing the item should be inserted before. If this parameter is null (or the index does not exist), the new element is appended to the end of the collection.
Return value
Exceptions
Thrown if the item passed to the method is an ancestor of the HTMLSelectElement .
Examples
Creating Elements from Scratch
const sel = document.createElement("select"); const opt1 = document.createElement("option"); const opt2 = document.createElement("option"); opt1.value = "1"; opt1.text = "Option: Value 1"; opt2.value = "2"; opt2.text = "Option: Value 2"; sel.add(opt1, null); sel.add(opt2, null); /* Produces the following, conceptually: */
The before parameter is optional. So the following is accepted.
Append to an Existing Collection
const sel = document.getElementById("existingList"); const opt = document.createElement("option"); opt.value = "3"; opt.text = "Option: Value 3"; sel.add(opt, null); /* Takes the existing following select object: And changes it to: */
The before parameter is optional. So the following is accepted.
Inserting to an Existing Collection
const sel = document.getElementById("existingList"); const opt = document.createElement("option"); opt.value = "3"; opt.text = "Option: Value 3"; sel.add(opt, sel.options[1]); /* Takes the existing following select object: And changes it to: */
Specifications
Browser compatibility
BCD tables only load in the browser
Found a content problem with this page?
This page was last modified on Apr 7, 2023 by MDN contributors.
Your blueprint for a better internet.