- How to center an input field using CSS?
- Method 1: Center an Input Field Using text-align Property
- Method 2: Center an Input Field Using margin: auto
- Method 3: Center an input field using CSS Grids
- Method 4: Center Input Fields using CSS Flexbox(Modern Way)
- Conclusion
- Related posts:
- Атрибут align
- Синтаксис
- Значения
- Значение по умолчанию
- Примечание
- Типы тегов
- Выравнивание элементов форм
- Поля ввода одинаковой ширины
- Адаптивные поля ввода одинаковой ширины
- См. также
How to center an input field using CSS?
In HTML, input fields are used inside forms to collect user data. The input fields are actually the most commonly used form elements which can be used to collect various types of user information such as name, email, phone, password, address, etc.
When we are working with these input fields, one common problem that we all face is their centering inside their form or their parent element.
Method 1: Center an Input Field Using text-align Property
Originally, the text-align property is used to align the text of an element to the left, right or center. But, we can also use this property to center our input fields.
Now, you might be thinking if the text-align property aligns only the text of an element, how can it align the inputs?
Well, this works because the input elements( ) are by default inline-block type elements. If an element is of type inline-block, it does not take the full with of its parent. Instead, it takes only as much width as it requires. This is the reason, the text-align property works on inputs.
Let’s say, we have a div element, which contains an input text-box:
To center align the input field inside the div element, we can simply set its text-align property to center in our CSS file:

Below is the outcome of the above code:
When using this approach, you have to keep in mind that this will also center other elements of the div such as the texts, images, links, etc. if any. So use it wisely.
Method 2: Center an Input Field Using margin: auto
The margin property basically specifies a space around the boundaries(outside borders) of an element. But it can also be used to center align things within their container.
All you need to do is apply margin: auto; on the element that you want to center. But there is one important thing that is to be kept in mind, if the element is not a block-level element, applying margin: auto; will not center it.
In that case, you have to explicitly make the element a block-level element by explicitly setting its display property to block .
Let’s take the same example again:
To center align the input field, set its margin to auto along with display: block;
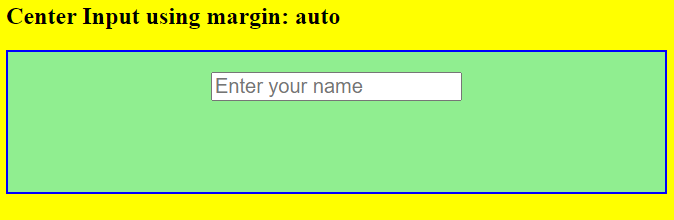
Below is the outcome of the above code:
As you can see, the input is centered inside the div. The main advantage of this method over the previous one is that it only centers those elements on which we apply the margin: auto; . The remaining elements remain untouched.
Method 3: Center an input field using CSS Grids
CSS Grids are a layout system that allows developers to create two-dimensional layouts with rows and columns. We can also use them for alignment purposes.
Let’s say we have a div element which contains an input field. We have also assigned a grid-container class to the div.
To center the input element inside the div, we have to first make the div a grid container which can be done by applying display: grid; property on it.
When you set the display property of an element to grid , the element starts behaving like a grid container. This means that we can now use any grid property on this element.
Now, to horizontally center the input element inside this grid container, you can set the justify-content property to center .
But there is one problem with this method, by default, the grid items take up the full height of the grid container. To stop this, you have to set the align-items property to start . The align-items property is used to align items vertically inside the container.
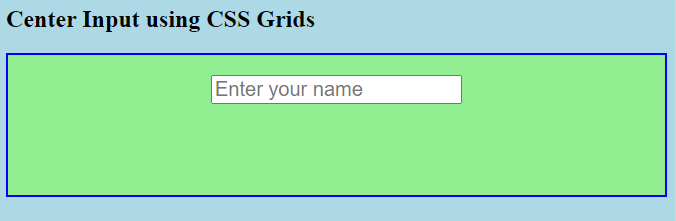
… And here is the result:
Method 4: Center Input Fields using CSS Flexbox(Modern Way)
Now a days, CSS flexbox has become the most preffered method when it comes to centering things. CSS flexbox is basically a flexible box layout module that lets you create flexible and responsive layouts without using the float and position properties.
You can also use this method to center input elements with ease. Centering is almost similar to the grids.
If you want to use CSS flexbox, you have to simply set the display property of the element to flex . Aftering applying the display: flex; property, the element starts behaving like a flex container.
Let’s say we have a div element with a class flex-container , which contains an input element:
Now, if we want to center align the input element inside the flex container, we can set the justify-content property to center just like the grids.
Here also, we have to set the align-items property to start or flex-start , so that the flex items do not take the full height of the flex container.
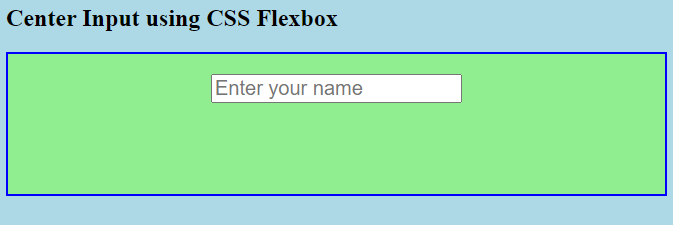
Here is the result of the above code:
If you also want to center the input box vertically, you can set the align-items property to center :
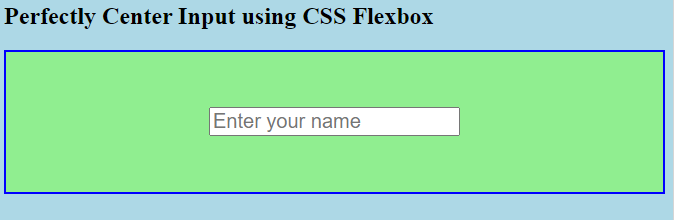
Here is the outcome of the above CSS:
Conclusion
In this article, we learned four different ways to center align input fields, the text-align: center; , the margin: auto , the grids module and the flexbox module of CSS.
You can use any method based on your requirements. However, the modern and simplest way to center things is the flexbox module.
Related posts:
Атрибут align
Определяет, как выравнивать поле с изображением относительно текста или других элементов формы.
Синтаксис
Значения
В табл. 1 перечислены возможные значение атрибута align и результат его использования.
| Код HTML | Описание | Пример |
|---|---|---|
| Выравнивание нижней границы изображения по окружающему тексту.. | Lorem ipsum dolor sit amet, consectetuer adipiscing elit. | |
| Выравнивает изображение по левому краю окна. | Lorem ipsum dolor sit amet, consectetuer adipiscing elit. | |
| Выравнивание середины изображения по базовой линии текущей строки. | Lorem ipsum dolor sit amet, consectetuer adipiscing elit. | |
| Выравнивает изображение по правому краю окна. | Lorem ipsum dolor sit amet, consectetuer adipiscing elit. | |
| Верхняя граница изображения выравнивается по самому высокому элементу текущей строки. | Lorem ipsum dolor sit amet, consectetuer adipiscing elit. |
Значение по умолчанию
Примечание
Браузеры также поддерживают значения absbottom , absmiddle , baseline и texttop , которые не включены в спецификацию HTML 4.01.
Не выкладывайте свой код напрямую в комментариях, он отображается некорректно. Воспользуйтесь сервисом cssdeck.com или jsfiddle.net, сохраните код и в комментариях дайте на него ссылку. Так и результат сразу увидят.
Типы тегов

HTML5

Блочные элементы

Строчные элементы

Универсальные элементы

Нестандартные теги

Осуждаемые теги

Видео

Документ

Звук

Изображения

Объекты

Скрипты

Списки

Ссылки

Таблицы

Текст

Форматирование

Формы

Фреймы
Выравнивание элементов форм
До появления флексбоксов выравнивание элементов формы порой вызывало множество труднойстей. Но флексбоксы существенно упрощают этот процесс. Давайте начнём с простого примера.
Вот форма без флексбоксов.

Данная форма использует небольшое форматирование, но ширина всех полей ввода одинакова. Это приводит к тому, что правый край выглядит немного неровным, поскольку поля формы не располагаются прямо друг под другом. Если вас подобное устраивает, то хорошо, и нет необходимости что-либо делать дальше.
Но что если мы хотим растянуть поля ввода до правого края? Без флексбоксов получить такой результат было бы несколько болезненно. Особенно, если сама форма гибкая (то есть она расширяется и сжимается в зависимости от ширины родительского элемента или области просмотра). Если форма гибкая, то каждое поле ввода тоже должно расширяться и сжиматься по мере необходимости. В этом случае вы не можете использовать фиксированную ширину для полей ввода, потому что как только ширина формы изменится, ширина полей станет некорректной. Так что потребуется схитрить, чтобы всё работало правильно.
Тем не менее, флексбоксы позволяют сделать это без каких-либо магических трюков.

Сперва для каждого класса .form-row устанавливаем отображение display: flex .
Обратите внимание, что мы также использовали justify-content: flex-end , но это не обязательно. В этом случае кнопка просто перемещается вправо.
Теперь, когда каждая строка формы является флекс-контейнером, мы применяем следующий код к полям ввода.
Таким образом, применяя flex: 1 к полям ввода, мы заставляем эти поля использовать всё доступное свободное пространство после меток . При этом метки сохраняют свою обычную ширину с учётом padding . Поля ввода начинаются сразу после них и растягиваются до самого конца.
Поля ввода одинаковой ширины
Вы можете изменить приведённый выше пример так, чтобы левый край полей формы также был в линию (как и правый край).

Всё, что мы здесь сделали, это добавили flex: 1 к меткам, а для полей ввода изменили на flex: 2 .
.form-row > label < padding: .5em 1em .5em 0; flex: 1; >.form-row > input
Это задаёт ширину полей формы как удвоенная ширина меток. Вы можете настроить это соотношение в зависимости от ширины формы или ожидаемой ширины. К примеру, можно использовать соотношение 1 к 3 или 1 к 4 для широких форм.
Если вы используете форму с фиксированной шириной, то можете установить одно соотношение, которое лучше всего подходит для формы. Если это гибкая форма, которая меняет ширину в зависимости от ширины области просмотра, то можете использовать медиа-запросы, чтобы установить разное соотношение для каждой точки останова.
Адаптивные поля ввода одинаковой ширины
Вот пример с медиа-запросами, которые меняют соотношение при изменении размера области просмотра.
Посмотрите эту форму на большом экране, затем уменьшите размер браузера. Вы должны увидеть как регулируется ширина полей ввода, когда вы уменьшаете окно браузера.
См. также
- flex
- justify-content
- place-content
- Выравнивание с помощью флексбоксов
- Загрузка файлов
- Кнопки
- Кнопки
- Отправка данных формы
- Переключатели
- Переключатели
- Поле для ввода пароля
- Поле для пароля
- Пользовательские формы
- Построение форм
- Свойства flex-контейнера
- Скрытое поле
- Стилизация переключателей
- Стилизация флажков
- Сумасшедшие формы
- Текстовое поле
- Текстовое поле
- Флажки
- Флажки
- Формы в Bootstrap 4
- Формы в HTML