Using HTML File Input for Uploading Native iOS/Android Files

In the last tutorial, we covered how to handle file uploads in Ionic using the element. This included using the file input element to grab a reference to a file and then upload that file to a Node/Express server (there is also an extension to the tutorial available where we build the backend with NestJS instead).
Those tutorials focused on a desktop/web environment, but what do we do to handle file uploads when our applications are deployed natively to iOS or Android? Can we still use ?
The answer to that question is mostly yes, but there are a few things to keep in mind.
Outline
Before we get started
If you have not already read (or watched) the previous tutorial, it would be a good idea to complete it before reading this one. The previous tutorial provides a lot of important context around how the HTML elements works when specifying the file type, and also around how those files can be uploaded to a backend server with multipart/form-data and the FormData API.
What is the difference between web and native for file uploads?
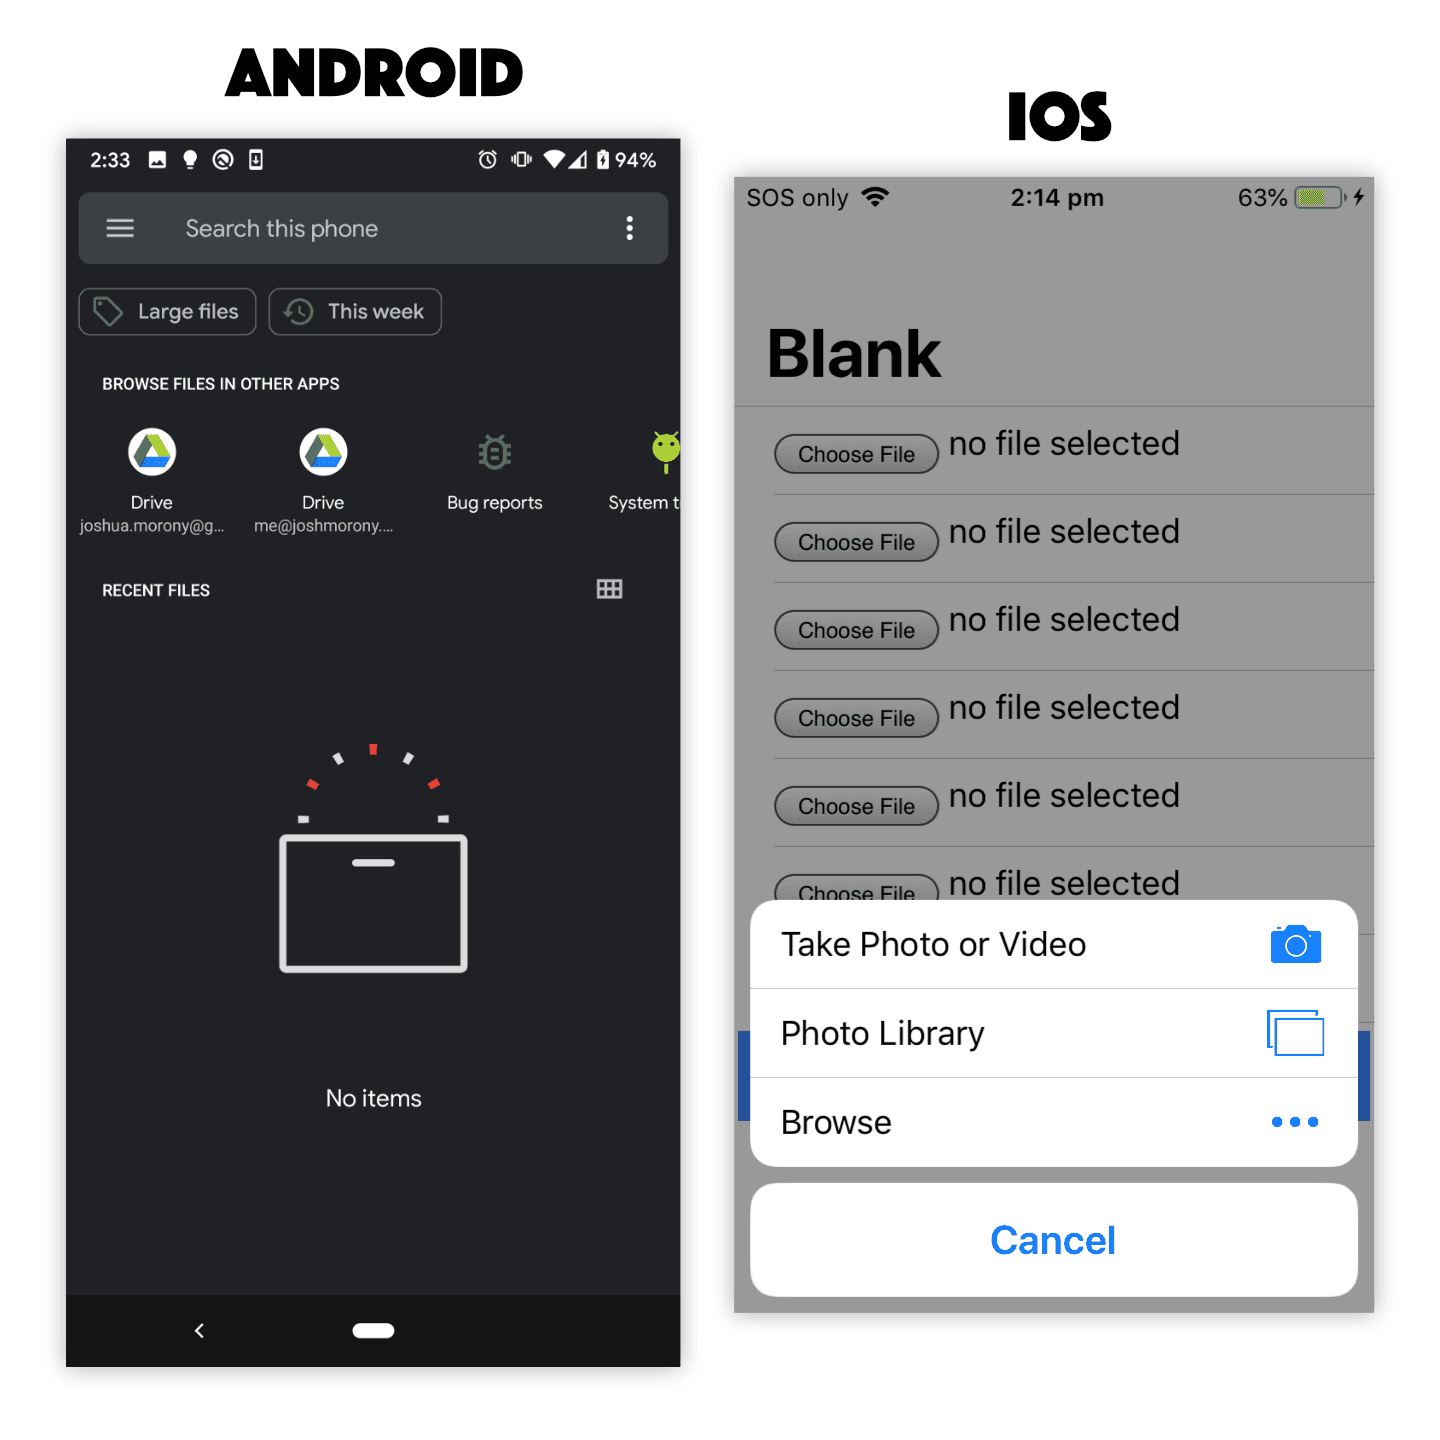
When we use the element in a standard desktop/web environment, we can be quite certain of its behaviour. We click the Choose file button and a file explorer window is launched where we can select any file on our computer.
When we try to do this on mobile the behaviour is quite different and exactly how it behaves will depend on the platform. Generally speaking, the process is still more or less the same — the user clicks the button, selects a file, and then we are able to get a reference to that file. However, we don’t have a standard «file explorer» window that pops up and allows the user to select any file on their device. Depending on the context, the camera might be launched directly, or the user might be prompted to choose a file directly from the file system, or the user might be offered a choice between browsing files, taking a photo, taking a video, and so on.
Let’s take a look at different ways to set up the file input.
Differences in file input behaviour between iOS and Android
Although the following is not an exhaustive list of ways to set up the file input element, these are a pretty good set of examples that we could default to.
NOTE: The examples below use Angular event bindings to handle the change event, but otherwise the implementation will be the same with vanilla JavaScript, StencilJS, React, Vue, or whatever else you are using.
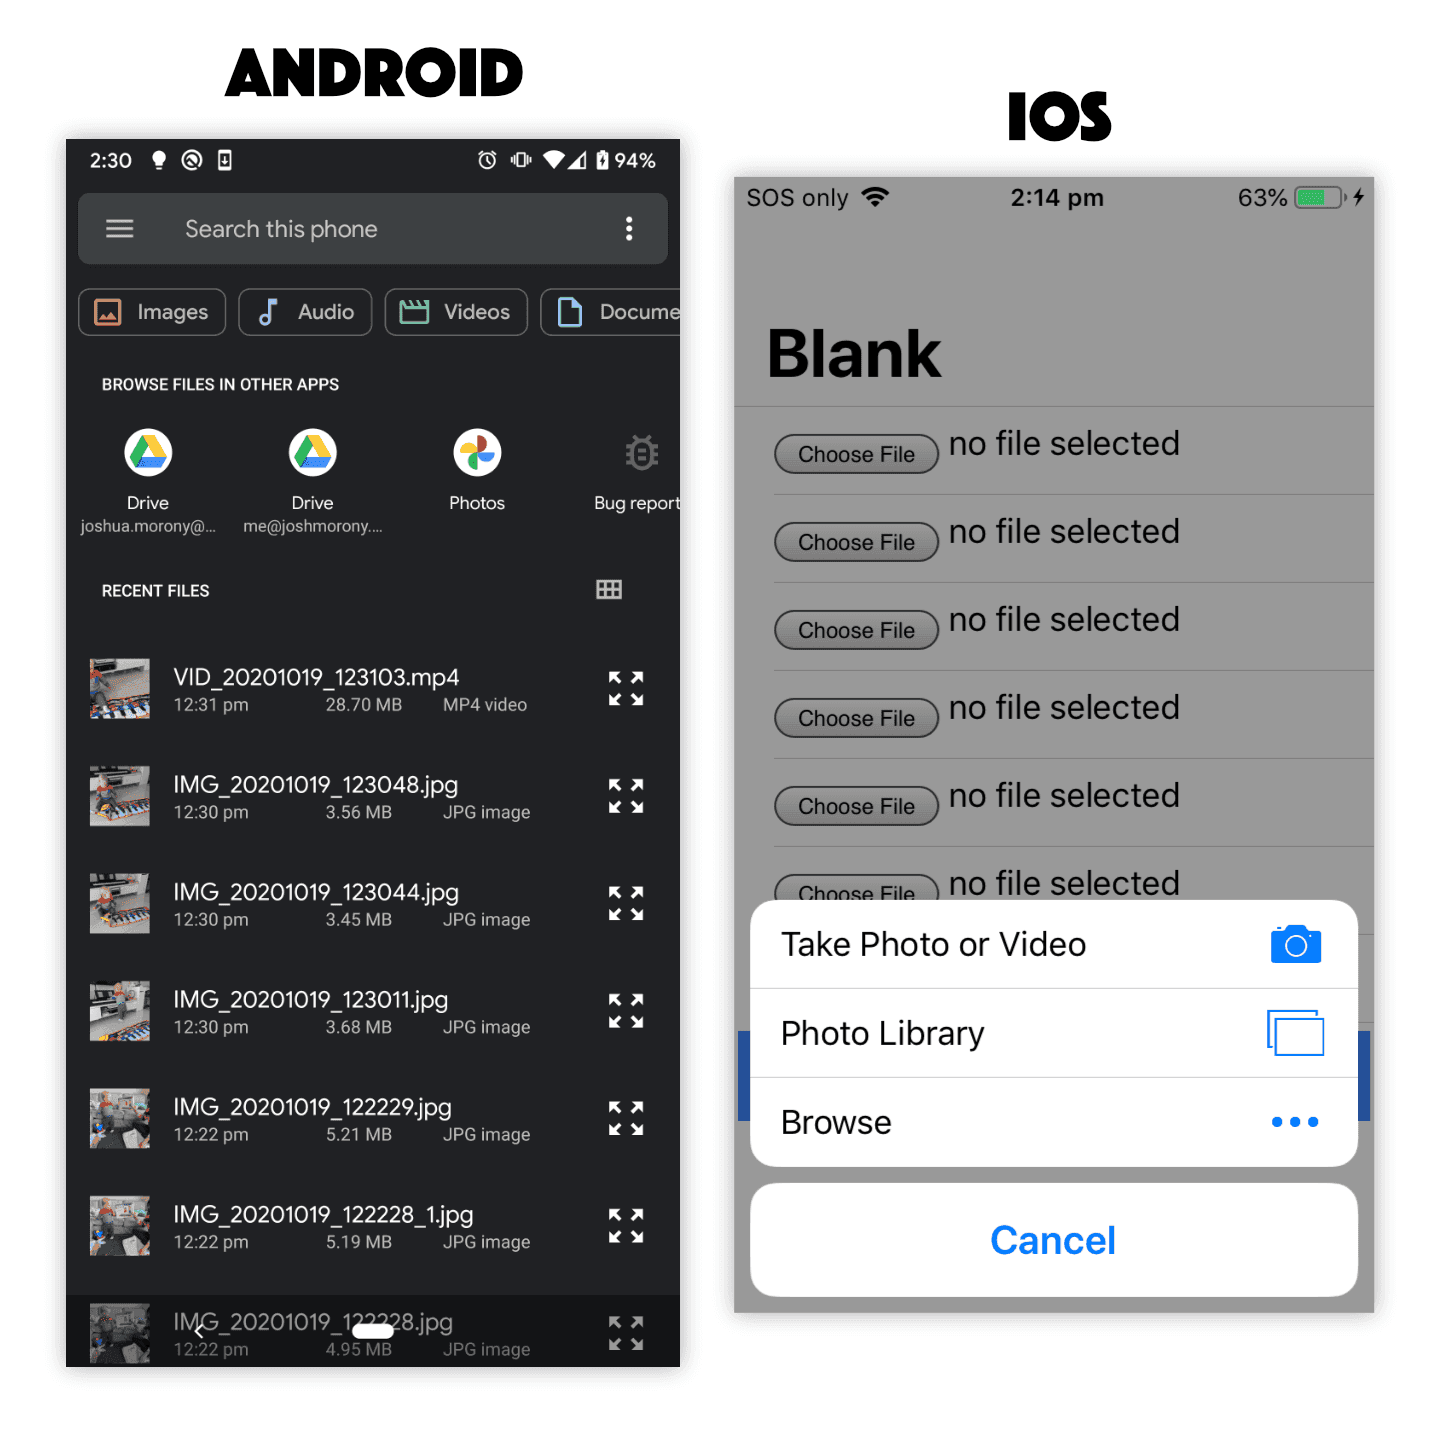
Standard File Input
input type="file" (change)="getFile($event)" />On iOS, this will prompt the user to choose between Take Photo or Video , Photo Library , or Browse in order to return the desired file.
On Android, this will directly launch the native file selection screen to select any file on the device.
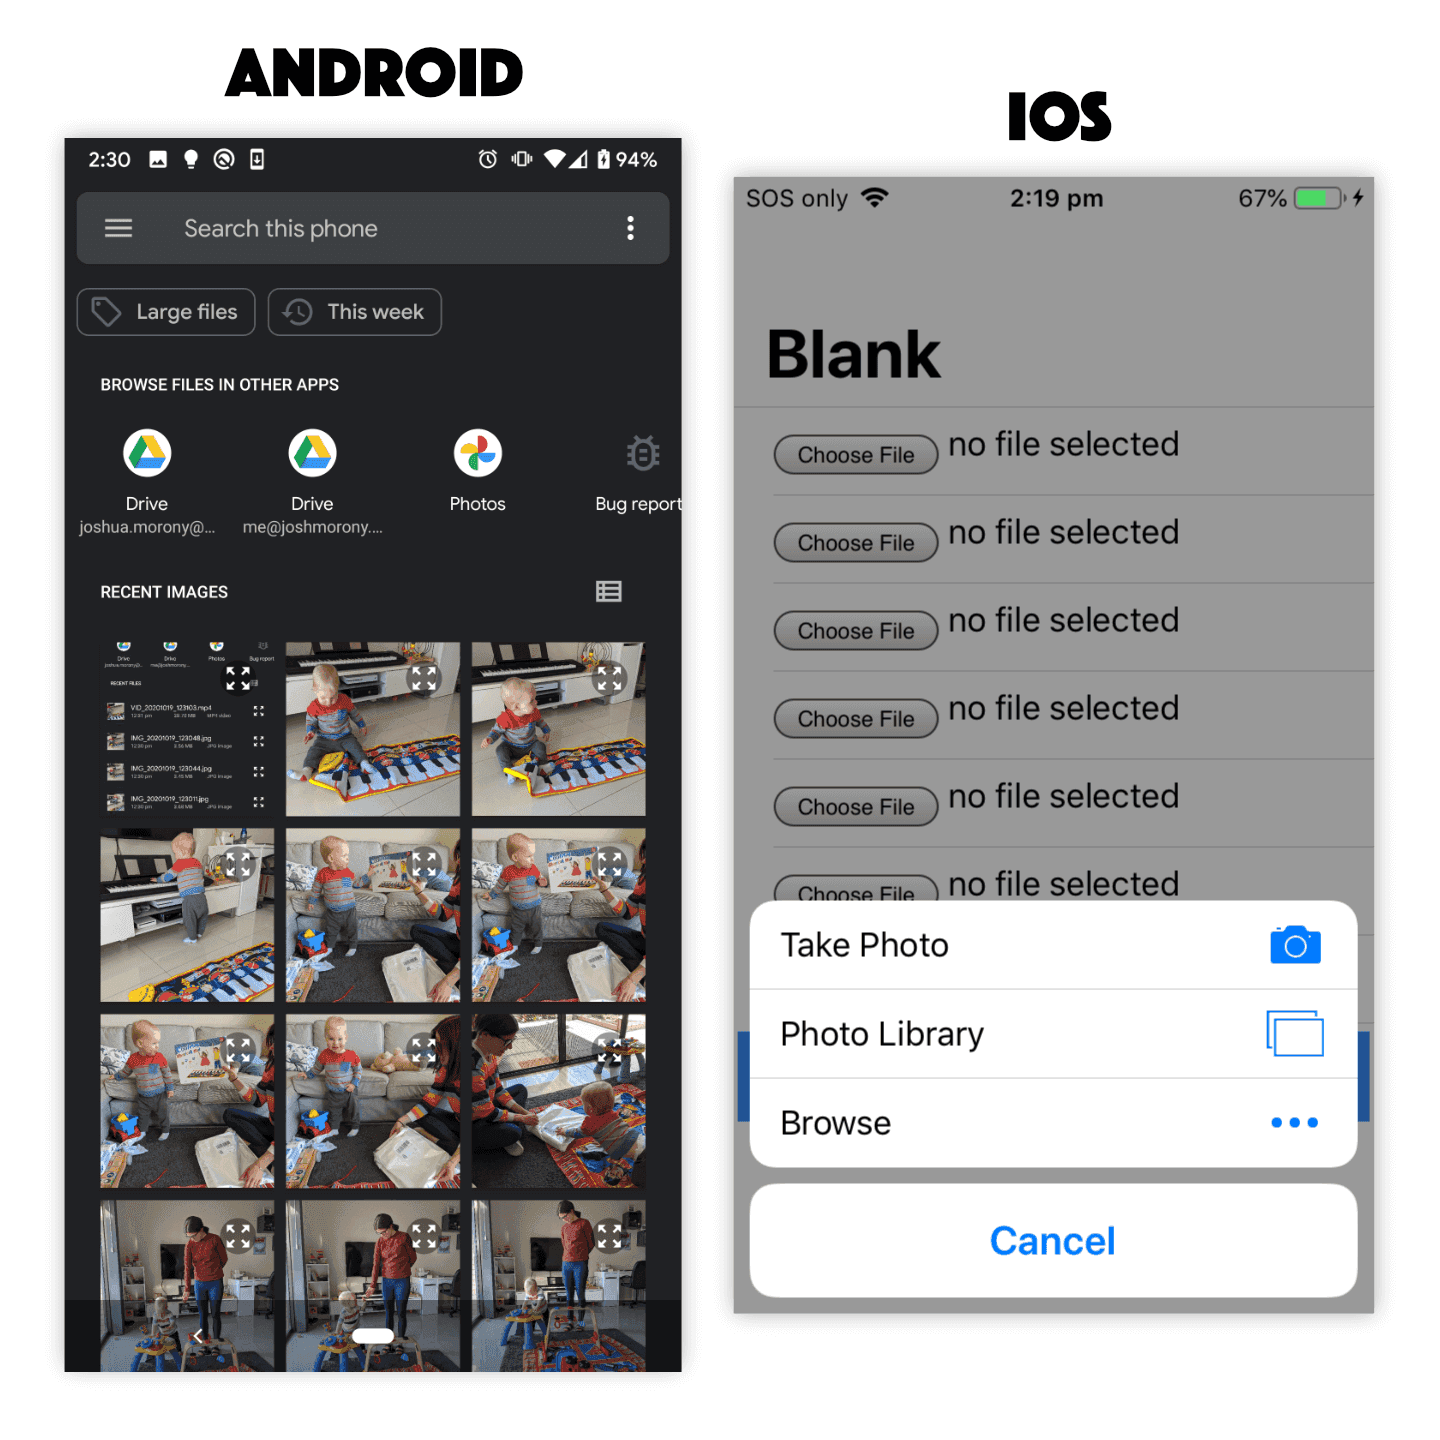
Limiting File Input to Images
input type="file" accept="image/*" (change)="getFile($event)" />On iOS, this will prompt the user to choose between Take Photo , Photo Library , or Browse in order to return the desired file. Note that Video is no longer a choice in the first option and videos (and other files) will also be excluded from being listed if the user chooses to select an existing photo.
On Android, this will launch the same native file selection screen again, but this time it will be filtered to only show images.
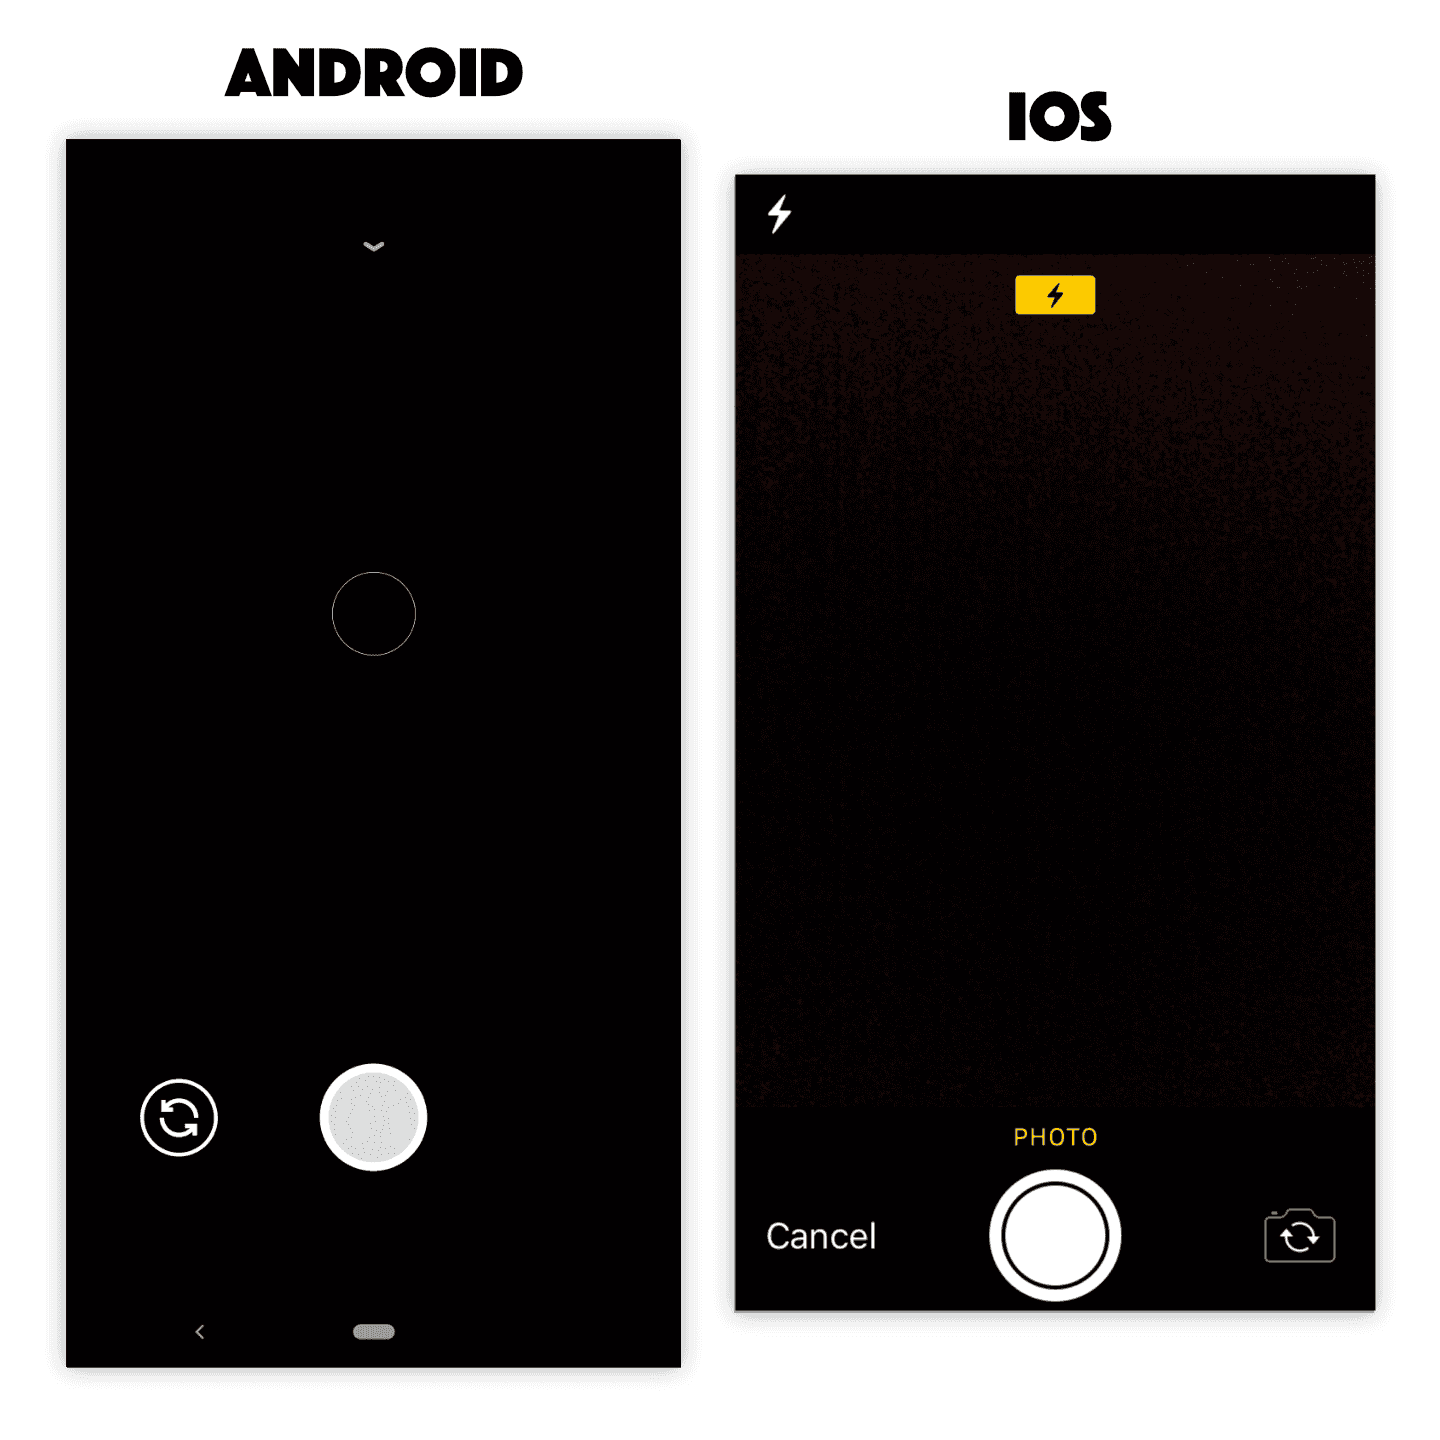
Using Camera for File Input
input type="file" accept="image/*" capture (change)="getFile($event)" />On iOS, this will directly launch the camera in Photo mode and allow the user to take a photo. Once the user takes a photo they will be able to choose whether to use that photo or if they want to retake the photo. Once the user chooses Use Photo the file will be supplied to the application.
On Android, this will directly launch the camera allowing the user to take a photo (not a video). The user can then accept the taken photo or take another.
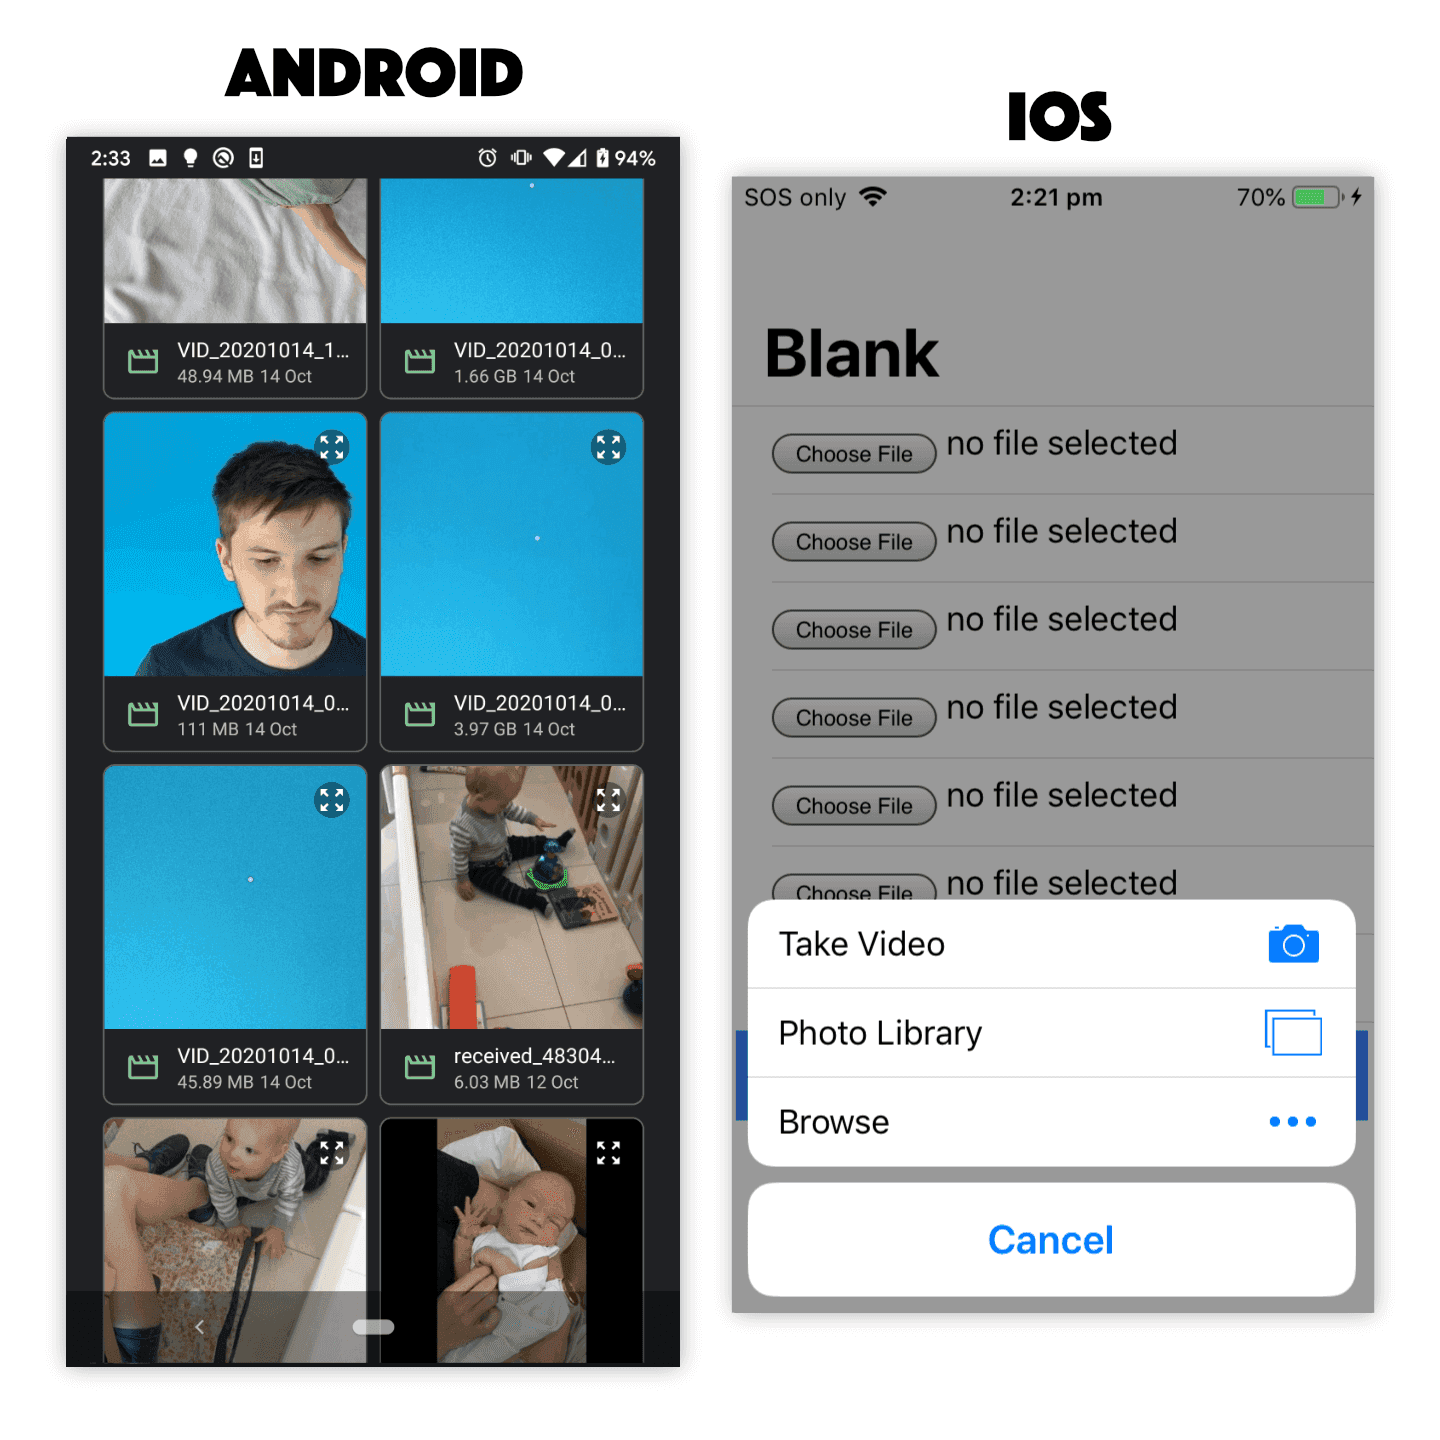
Limiting File Input to Videos
input type="file" accept="video/*" (change)="getFile($event)" />On iOS, this will prompt the user to choose between Take Video , Photo Library , or Browse in order to return the desired file. Note that Photo is no longer a choice in the first option and photos (and other files) will also be excluded from being listed if the user chooses to select an existing video.
On Android, this will launch the native file selection screen again, but this time it will be filtered to only show videos.
Limiting File Input to Audio
input type="file" accept="audio/*" (change)="getFile($event)"On iOS, this will prompt the user to choose between Take Photo or Video , Photo Library , or Browse in order to return the desired file. Note that there is no restriction to audio files only in this case.
On Android, this will launch the native file selection screen again, but this time it will be filtered to only show audio files.
Keep in mind that the specification for the file input element has changed over the years, so you might find many different examples of ways to set up this element and force certain behaviours. In general, my advice would be not to try to «game the system». Use the simplest options and focus on telling the browser what you want, then let the platform decide how best to fulfill that request. If you try to get too tricky and take over this process to enforce what you want, you will leave yourself vulnerable to different behaviours on different platforms/versions and also your solution will be more prone to breaking in the future.
If you do need more control over this process, in ways that using the file input element does not allow (or at least it does not allow it consistently across platforms), you can look into using native plugins/APIs instead. The Camera API, for example, will give you much greater control over the process of selecting/capturing a photo than the element will.
How do we upload these files to a server?
Fortunately, the resulting file reference can be uploaded in the same way as a file retrieved from a normal desktop/web file input element. You will just need to make a POST request that includes multipart/form-data that contains the file(s) you want to upload. For more details on doing that, check out the previous tutorial: Handling File Uploads in Ionic.
Summary
The standard element provides a surprisingly smooth file selection experience on native iOS and Android platforms, and these files can be easily sent as standard multipart/form-data to your backend server. This will probably be all you need a lot of the time, but for certain specialised circumstances or use cases you might need to look into using native plugins or APIs to fulfil your file selection and transferring needs.
Получение фото с android-смартфона прямо в html форму

Возникла задача для интернет-магазина сфотографировать большое количество товаров. Специфика товара такова, что не столько важна красивая картинка, сколько особенности конструкции товара (с какой стороны находится шлейф, есть ли петли крепления и т.п.)
Фотографировать обычным фотоаппаратом, потом заливать фото на компьютер, искать каждый товар в админке, потом искать соответствующее фото, показалось очень долго. Гораздо проще открыть товар в админке и навести телефон на товар. Тем более, что при хорошо выставленном освещении, современные смартфоны выдают вполне качественную картинку.
Теория
В андроид-маркете лежит замечательная программа IpWebCam, которая позволяет превратить свой телефон в полноценную веб-камеру. Кроме того у нее есть api для получения фотографий с автофокусом. При запуске IpWebCam, на телефоне поднимается web-сервер, который позволяет с локальной машины по wi-fi получать текущий кадр с телефона по адресу вида 192.168.0.14:8080/shot.jpg
Идея была следующая:
- Вставить в форму
с адресом фотографии со смартфона
- Создать canvas и в него скопировать содержимое
- Сохранить данные при помощи canvas.toDataURL()
- Отправить данные на сервер при помощи ajax
К сожалению, из-за кросс-доменных политик метод toDataURL() сохраняет только черный квадрат вместо изображения. Поэтому canvas надо создавать на том же домене, из которого берется изображение. Сходив на сайт программы, я узнал, что IpWebCam позволяет создавать собственные html-страницы на своем внутреннем сервере. Для этого их достаточно залить на sd-карту и указать программе, в какой папке их искать.
- На смартфоне создаем специальную страницу (например my.html)
- В форме на нашем сайте создаем , в который грузим html-страницу со смартфона.
- На телефоне в html странице создаем canvas, в который грузим изображение с камеры.
- Сохраняем данные при помощи canvas.toDataURL() в переменную
- Передаем данные в родительскую страницу при помощи window.postMessage()
- В родительской странице получаем изображение и отправляем данные на сервер при помощи ajax
- На сервере сохраняем изображение в файл.
Решение
Во-первых, ставим на смартфон программу IpWebCam из маркета.
Создаем на смартфоне папку webcam, а в ней создаем файл my.html со следующим содержимым:
Content-Type: text/html * Click to take a shot.. 


Обратите внимание, что в начале файла идут HTTP заголовки и пустая строка перед основным содержимым страницы. За основу был взят javascript видео-проигрыватель из самой программы.
Теперь надо указать, где искать файлы для веб-сервера приложения. Для этого откройте программу на телефоне, нажмите хардварную кнопку меню и выберите единственный пункт Cheats. Теперь введите в открывшемся диалоговом окне команду set(HtmlPath,/sdcard/webcam). Обратите внимание, что после запятой не допускаются пробелы.
Теперь на нашем сервере создаем файл jquery плагина jquery.ipwebcam.js:
(function($) < $.fn.ipWebCam = function(options) < var settings = $.extend( < ip: '', width: 640, height: 480, action: '?', callback: function()<>>, options); function ipWebCam_listener(event)< $('#ipWebCam_wnd').prev().remove(); $('#ipWebCam_wnd').remove(); $.post(settings.action, , settings.callback); > if (window.addEventListener) < window.addEventListener('message', ipWebCam_listener,false); >else < window.attachEvent('onmessage', ipWebCam_listener); >return this.each(function() < $(this).click(function()< if(settings.ip=='') settings.ip = prompt('IP Webcam address:'); $('').css(< position: 'fixed', width: settings.width + 'px', marginLeft: '-' + (settings.width/2) + 'px', left: '50%', height: settings.height + 'px', marginTop: '-' + (settings.height/2) + 'px', top: '50%', border: 0, overflow: 'hidden', backgroundColor: '#777777' >) .attr('width', settings.width) .attr('height', settings.height) .attr('src', 'http://' + settings.ip + ':8080/my.html') .attr('id', 'ipWebCam_wnd') .prependTo('body'); $('').css(< position:'fixed', left: 0, top: 0, right:0, bottom:0, backgroundColor: '#000000', opacity: 0.5 >).click(function()< $('#ipWebCam_wnd').prev().remove(); $('#ipWebCam_wnd').remove(); >).prependTo('body'); >); >); >; >)( jQuery ) $('#camera_button').ipWebCam(< ip: '', //ip адрес камеры, если не задан, то попросит ввести через prompt action: 'save_img.php', //адрес скрипта сохранения картинки, по умолчанию та же страница callback: function(rep)< // будет вызвана после отправки данных на сервер window.location.reload(); >, width: 640, // размеры iframe height: 480 >); На этом все, если кому-нибудь пригодится, буду рад.
upd Идея была в том, что администратор работает в админке за большим компом, так удобнее (он ведь не только фотки делает). А смартфон кладется на штатив и не трогается. Непосредственно фотографирование (предпросмотр и нажатие спуска) происходит на большом компе, чтобы лишний раз к телефону не бегать. Поэтому саму фотографию придется передавать непосредственно в html форму на большом компе. Это можно сделать только подняв веб-сервер на смарте. Можно было бы написать программу самому, но зачем если уже есть готовое решение — IpWebCam.
Take a Photo and Upload it on Mobile Phones with HTML5
In my daily life, I enjoy taking photos with my smartphone and uploading them to various websites. So I started thinking, “Is it possible to implement these functions in web browser?” Although Dynamsoft ImageCapture Suite allows us to capture images from webcam , it is designed for a desktop App development on windows and Mac, not for mobile platforms. Fortunately, the new HTML5 SDK is capable of uploading local images or captured images to web servers. Everything becomes easier if we have a mobile web browser, like Chrome, which is fully compatible to HTML5.
Take Photos in Browsers of Android and iOS
Using HTML5 to invoke the camera is very simple.
For more information, you can reference HTML Media Capture. Due to the platform-dependency, you need to read Mobile HTML5 and search HTML Media Capture for relevant information. Referring to the article Html5 File Upload with Progress, I have made some improvements. The source code has been tested on Android 4.1 and iOS 7.0.6. You can see the following figures.


Source Code
    function fileSelected() < var count = document.getElementById('fileToUpload').files.length; document.getElementById('details').innerHTML = ""; for (var index = 0; index < count; index ++) < var file = document.getElementById('fileToUpload').files[index]; var fileSize = 0; if (file.size >1024 * 1024) fileSize = (Math.round(file.size * 100 / (1024 * 1024)) / 100).toString() + 'MB'; else fileSize = (Math.round(file.size * 100 / 1024) / 100).toString() + 'KB'; document.getElementById('details').innerHTML += 'Name: ' + file.name + '
Size: ' + fileSize + '
Type: ' + file.type; document.getElementById('details').innerHTML += ''; > > function uploadFile() < var fd = new FormData(); var count = document.getElementById('fileToUpload').files.length; for (var index = 0; index < count; index ++) < var file = document.getElementById('fileToUpload').files[index]; fd.append(file.name, file); >var xhr = new XMLHttpRequest(); xhr.upload.addEventListener("progress", uploadProgress, false); xhr.addEventListener("load", uploadComplete, false); xhr.addEventListener("error", uploadFailed, false); xhr.addEventListener("abort", uploadCanceled, false); xhr.open("POST", "savetofile.aspx"); xhr.send(fd); > function uploadProgress(evt) < if (evt.lengthComputable) < var percentComplete = Math.round(evt.loaded * 100 / evt.total); document.getElementById('progress').innerHTML = percentComplete.toString() + '%'; >else < document.getElementById('progress').innerHTML = 'unable to compute'; >> function uploadComplete(evt) < /* This event is raised when the server send back a response */ alert(evt.target.responseText); >function uploadFailed(evt) < alert("There was an error attempting to upload the file."); >function uploadCanceled(evt)
HttpContext.Current.Response.Write("Upload successfully!"); %> For PHP
Modify the client: