- Таблицы и стили
- Цвет фона ячеек
- Поля внутри ячеек
- Расстояние между ячейками
- Границы и рамки
- Использование атрибута cellspacing
- Применение свойства border
- Выравнивание содержимого ячеек
- Пустые ячейки
- How to Add Border to HTML Table
- Example of creating an HTML table with the border attribute:
- Result
- Example of creating borders for the HTML table:
- How to change the HTML table border style with CSS
- Example of changing the HTML table border style with CSS:
- Example of adding bottom borders to the HTML table:
- How to have rounded borders
- Example of adding rounded borders to the HTML table:
- How to add border to the , or elements In the same way you can add a border to other HTML elements. Let’s see an example of adding borders to the , and elements. Example of adding borders to the , and elements: html> html> head> title>Title of the document title> style> h2, div, p < padding: 10px; > h2 < border: 3px double #1c87c9; background-color: #d9d9d9; > div < border-left: 5px solid #1c87c9; background-color: #cccccc > p < border: 10px groove #8ebf42; > style> head> body> h2>Border Example h2> div> Div example for the border property. div> p>Some paragraph with border. p> body> html> If you want to have a rounded border on paragraphs, follow the example below to learn how to do it. Use the border-radius property to have your preferred outcome. Example of creating rounded borders on paragraphs: html> html> head> title>Title of the document title> style> p < padding: 10px; > p.normal < border: 2px solid #1c87c9; > p.round1 < border: 2px solid #1c87c9; border-radius: 5px; > p.round2 < border: 2px solid #1c87c9; border-radius: 8px; > p.round3 < border: 2px solid #1c87c9; border-radius: 12px; > style> head> body> h2>Rounded borders h2> p class="normal">Normal border p> p class="round1">Round border p> p class="round2">Rounder border p> p class="round3">Roundest border p> body> html> Источник HTML Table Borders HTML tables can have borders of different styles and shapes. How To Add a Border To add a border, use the CSS border property on table , th , and td elements: Example Collapsed Table Borders To avoid having double borders like in the example above, set the CSS border-collapse property to collapse . This will make the borders collapse into a single border: Example Style Table Borders If you set a background color of each cell, and give the border a white color (the same as the document background), you get the impression of an invisible border: Example table, th, td <
border: 1px solid white; border-collapse: collapse; > th, td <
background-color: #96D4D4; > - or elements
- Example of adding borders to the , and elements:
- Example of creating rounded borders on paragraphs:
- HTML Table Borders
- How To Add a Border
- Example
- Collapsed Table Borders
- Example
- Style Table Borders
- Example
- Round Table Borders
- Example
- Example
- Dotted Table Borders
- Example
- Border Color
- Example
- COLOR PICKER
- Report Error
- Thank You For Helping Us!
Таблицы и стили
Сами по себе таблицы выглядят довольно «бедно», к тому же браузеры по-своему отображают некоторые характеристики таблиц, в частности, рамки. Вместе с тем эти недостатки легко исправить воспользовавшись мощью стилей. При этом весьма расширяются средства по оформлению таблиц, что позволяет удачно вписать таблицы в дизайн сайта и нагляднее представить табличные данные.
Цвет фона ячеек
Цвет фона одновременно всех ячеек таблицы устанавливается через свойство background , которое применяется к селектору TABLE . При этом следует помнить о правилах использования стилей, в частности, наследовании свойств элементов. Хотя свойство background не наследуется, для ячеек значением фона по умолчанию выступает transparent , т.е. прозрачность, поэтому эффект заливки фона получается и у ячеек. Если одновременно с TABLE задать цвет у селектора TD или TH , то этот цвет будет установлен в качестве фона ячейки (пример 2.3).
XHTML 1.0 CSS 2.1 IE Cr Op Sa Fx
Заголовок 1 Заголовок 2 Ячейка 3 Ячейка 4
Результат данного примера показан на рис. 2.4.
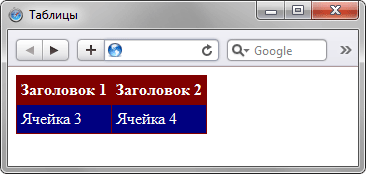
Рис. 2.4. Изменение цвета фона
Поля внутри ячеек
Пример 2.4. Поля в таблицах
XHTML 1.0 CSS 2.1 IE Cr Op Sa Fx
Заголовок 1 Заголовок 2 Ячейка 3 Ячейка 4
В данном примере с помощью группирования селекторов поля установлены одновременно для селектора TD и TH . Результат примера показан на рис. 2.5.

Расстояние между ячейками
Свойство border-spacing действует только в том случае, если для селектора TABLE не задано свойство border-collapse со значением collapse (пример 2.5).
Пример 2.5. Расстояние между границами ячеек
XHTML 1.0 CSS 2.1 IE 7 IE 8+ Cr Op Sa Fx
Леонардо 5 8 Рафаэль 4 11 Микеланджело 24 9 Донателло 2 13
Результат данного примера показан на рис. 2.6.

Рис. 2.6. Вид таблицы при использовании border-spacing
Браузер Internet Explorer до седьмой версии включительно не поддерживает свойство border-spacing , поэтому в этом браузере для таблиц будет применяться значение cellspacing заданное по умолчанию (обычно оно равно 2px).
При добавлении к селектору TABLE свойства border-collapse со значением collapse , атрибут cellspacing игнорируется, а значение border-spacing обнуляется.
Границы и рамки
Использование атрибута cellspacing
Заметим, что это не совсем удобный способ создания границ, поскольку он имеет ограниченную область применения. Так можно получить только одноцветную сетку, а не вертикальные или горизонтальные линии в нужных местах.
Применение свойства border
Стилевое свойство border одновременно устанавливает цвет границы, её стиль и толщину вокруг элемента. Когда требуется создать отдельные линии на разных сторонах, лучше использовать производные — border-left , border-right , border-top и border-bottom , эти свойства соответственно определяют границу слева, справа, сверху и снизу.
Применяя свойство border к селектору TABLE , мы добавляем рамку вокруг таблицы в целом, а к селектору TD или TH — рамку вокруг ячеек (пример 2.6).
Пример 2.6. Добавление двойной рамки
XHTML 1.0 CSS 2.1 IE Cr Op Sa Fx
Заголовок 1 Заголовок 2 Ячейка 3 Ячейка 4
В данном примере используется двойная рамка черного цвета вокруг самой таблицы и сплошная рамка белого цвета вокруг каждой ячейки. Результат примера показан на рис. 2.7.
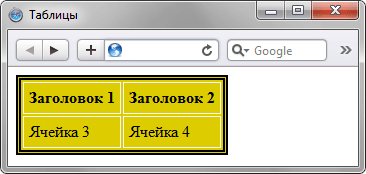
Рис. 2.7. Граница вокруг таблицы и ячеек
Пример 2.7. Создание одинарной рамки
XHTML 1.0 CSS 2.1 IE Cr Op Sa Fx
Заголовок 1 Заголовок 2 Ячейка 3 Ячейка 4
В данном примере создается сплошная линия зеленого цвета между ячейками и черная вокруг таблицы. Все границы внутри таблицы имеют одинаковую толщину. Результат примера показан на рис. 2.8.

Рис. 2.8. Граница вокруг таблицы
Выравнивание содержимого ячеек
По умолчанию текст в ячейке таблицы выравнивается по левому краю. Исключением из этого правила служит тег , он определяет заголовок, в котором выравнивание происходит по центру. Чтобы изменить способ выравнивания применяется стилевое свойство text-align (пример 2.8).
Пример 2.8. Выравнивание содержимого ячеек по горизонтали
XHTML 1.0 CSS 2.1 IE Cr Op Sa Fx
Заголовок 1 Ячейка 1 Ячейка 2 Заголовок 2 Ячейка 3 Ячейка 4
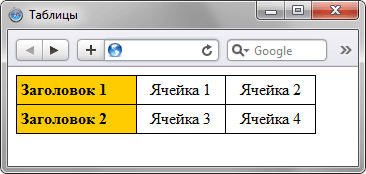
Рис. 2.9. Выравнивание текста в ячейках
Выравнивание по вертикали в ячейке всегда происходит по её центру, если это не оговорено особо. Это не всегда удобно, особенно для таблиц, у которых содержимое ячеек различается по высоте. В таком случае выравнивание устанавливают по верхнему краю ячейки с помощью свойства vertical-align , как показано в примере 2.9.
Пример 2.9. Выравнивание содержимого ячеек по вертикали
XHTML 1.0 CSS 2.1 IE Cr Op Sa Fx
Заголовок 1 Заголовок 2 Ячейка 1 Ячейка 2
В данном примере устанавливается высота заголовка как 40 пикселов и выравнивание текста происходит по нижнему краю. Результат примера показан на рис. 2.10.

Рис. 2.10. Выравнивание текста в ячейках
Пустые ячейки
Браузеры иначе отображают ячейку, внутри которой ничего нет. «Ничего» в данном случае означает, что внутрь ячейки не добавили ни рисунок, ни текст, причём пробел в расчёт не принимается. Естественно, вид ячеек различается только в том случае, если вокруг них установлена граница. При использовании невидимой рамки, вид ячеек, независимо от того, есть в них что-нибудь или нет, совпадает.
Старые браузеры не отображали цвет фона пустых ячеек вида , поэтому в том случае, когда требовалось оставить ячейку без содержимого, но отобразить цвет фона, внутрь ячейки добавляли неразделяемый пробел ( ). Пробел не всегда подходит, особенно когда нужно установить высоту ячейки 1–2 пиксела, из-за чего широкое распространение получил однопиксельный прозрачный рисунок. Действительно, такой рисунок можно масштабировать на свое усмотрение, но он на веб-странице никак не отображается.
К счастью эпоха однопиксельных рисунков и всяческих распорок на их основе прошла. Браузеры достаточно корректно работают с таблицами и без присутствия содержимого ячеек.
Для управления видом пустых ячеек используется свойство empty-cells , при значении hide граница и фон в пустых ячейках не отображается. Если все ячейки в строке пустые, то строка прячется целиком. Ячейка считается пустой в следующих случаях:
- нет вообще никаких символов;
- в ячейке содержится только перевод строки, символ табуляции или пробел;
- значение visibility установлено как hidden .
Добавление неразрывного пробела воспринимается как видимое содержание, т.е. ячейка уже будет не пустой (пример 2.10).
XHTML 1.0 CSS 2.1 IE Cr Op Sa Fx
Леонардо 5 8 Рафаэль 11 Микеланджело 24 Донателло 13
Вид таблицы в браузере Safari показан на рис. 2.11а. Та же таблица в браузере IE7 продемонстрирована на рис. 2.11б.
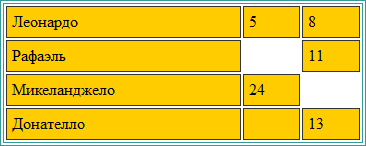
а. В браузере Safari, Firefox, Opera, IE8, IE9
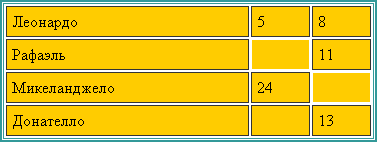
Рис. 2.11. Вид таблицы с пустыми ячейками
How to Add Border to HTML Table
After creating an HTML table, you should add a border to it, as borders are not added by default. First, let’s see an example, where we use the HTML border attribute.
Example of creating an HTML table with the border attribute:
html> html> head> title>Title of the document title> head> body> table border="1"> tr> th>Person th> th>Age th> tr> tr> td>Ann td> td>19 td> tr> tr> td>Susie td> td>22 td> tr> table> body> html>Result
Anyway, we recommend using the CSS border property for adding a border to your tables. To add a border to your table, you need to define the of your table.
Remember to add borders also for and tags to have a complete table. Set the border-collapse property as well (if you don’t define the border-collapse, it will use border-collapse: separate by default).
Example of creating borders for the HTML table:
html> html> head> title>Title of the document title> style> table, th, td < padding: 10px; border: 1px solid black; border-collapse: collapse; > style> head> body> table> tr> th>Person th> th>Age th> tr> tr> td>Ann td> td>19 td> tr> tr> td>Susie td> td>22 td> tr> table> body> html>How to change the HTML table border style with CSS
You can give styling to your table using the CSS border shorthand property, or the border-width, border-style, border-color properties, separately. See the example below to have a visible result of these properties.
Example of changing the HTML table border style with CSS:
html> html> head> title>Title of the document title> style> table < border-style: ridge; border-width: 150px; border-color: #8ebf42; background-color: #d9d9d9; > th < border: 5px solid #095484; > td < border: 20px groove #1c87c9; > style> head> body> table> tr> th>Person th> th>Age th> tr> tr> td>Ann td> td>19 td> tr> tr> td>Susie td> td>22 td> tr> table> body> html>If you don’t want the border to go all around the table (or if you need different borders on each side of the table), you can use any of the following properties: border-top, border-right, border-bottom and border-left.
Example of adding bottom borders to the HTML table:
html> html> head> title>Title of the document title> style> table < border-collapse: collapse; > td, th < padding: 10px; border-bottom: 2px solid #8ebf42; text-align: center; > style> head> body> table> tr> th>Person th> th>Age th> tr> tr> td>Ann td> td>19 td> tr> tr> td>Susie td> td>22 td> tr> table> body> html>How to have rounded borders
You can also have rounded borders by using the CSS border-radius property. Remember that in this case, you should remove the border-collapse property to work properly. Let’s see an example where all the table elements are rounded.
Example of adding rounded borders to the HTML table:
html> html> head> title>Title of the document title> style> table, td, th < padding: 10px; border: 2px solid #1c87c9; border-radius: 5px; background-color: #e5e5e5; text-align: center; > style> head> body> table> tr> th>Person th> th>Age th> tr> tr> td>Ann td> td>19 td> tr> tr> td>Susie td> td>22 td> tr> table> body> html>How to add border to the
,
or elements
In the same way you can add a border to other HTML elements. Let’s see an example of adding borders to the , and elements.
Example of adding borders to the
, and elements:
html> html> head> title>Title of the document title> style> h2, div, p < padding: 10px; > h2 < border: 3px double #1c87c9; background-color: #d9d9d9; > div < border-left: 5px solid #1c87c9; background-color: #cccccc > p < border: 10px groove #8ebf42; > style> head> body> h2>Border Example h2> div> Div example for the border property. div> p>Some paragraph with border. p> body> html>If you want to have a rounded border on paragraphs, follow the example below to learn how to do it. Use the border-radius property to have your preferred outcome.
Example of creating rounded borders on paragraphs:
html> html> head> title>Title of the document title> style> p < padding: 10px; > p.normal < border: 2px solid #1c87c9; > p.round1 < border: 2px solid #1c87c9; border-radius: 5px; > p.round2 < border: 2px solid #1c87c9; border-radius: 8px; > p.round3 < border: 2px solid #1c87c9; border-radius: 12px; > style> head> body> h2>Rounded borders h2> p class="normal">Normal border p> p class="round1">Round border p> p class="round2">Rounder border p> p class="round3">Roundest border p> body> html>HTML Table Borders
HTML tables can have borders of different styles and shapes.
How To Add a Border
To add a border, use the CSS border property on table , th , and td elements:
Example
Collapsed Table Borders
To avoid having double borders like in the example above, set the CSS border-collapse property to collapse .
This will make the borders collapse into a single border:
Example
Style Table Borders
If you set a background color of each cell, and give the border a white color (the same as the document background), you get the impression of an invisible border:
Example
table, th, td <
border: 1px solid white;
border-collapse: collapse;
>
th, td <
background-color: #96D4D4;
>
Round Table Borders
With the border-radius property, the borders get rounded corners:
Example
Skip the border around the table by leaving out table from the css selector:
Example
Dotted Table Borders
With the border-style property, you can set the appearance of the border.
The following values are allowed:
Example
Border Color
With the border-color property, you can set the color of the border.
Example

COLOR PICKER


Report Error
If you want to report an error, or if you want to make a suggestion, do not hesitate to send us an e-mail:
Thank You For Helping Us!
Your message has been sent to W3Schools.
Top Tutorials
Top References
Top Examples
Get Certified
W3Schools is optimized for learning and training. Examples might be simplified to improve reading and learning. Tutorials, references, and examples are constantly reviewed to avoid errors, but we cannot warrant full correctness of all content. While using W3Schools, you agree to have read and accepted our terms of use, cookie and privacy policy.