- Таблицы и стили
- Цвет фона ячеек
- Поля внутри ячеек
- Границы и рамки
- Использование атрибута cellspacing
- Применение свойства border
- Выравнивание содержимого ячеек
- CSS Tables
- Table Borders
- Example
- Full-Width Table
- Example
- Double Borders
- Collapse Table Borders
- Example
- How to Add Border to HTML Table
- Example of creating an HTML table with the border attribute:
- Result
- Example of creating borders for the HTML table:
- How to change the HTML table border style with CSS
- Example of changing the HTML table border style with CSS:
- Example of adding bottom borders to the HTML table:
- How to have rounded borders
- Example of adding rounded borders to the HTML table:
- How to add border to the , or elements In the same way you can add a border to other HTML elements. Let’s see an example of adding borders to the , and elements. Example of adding borders to the , and elements: html> html> head> title>Title of the document title> style> h2, div, p < padding: 10px; > h2 < border: 3px double #1c87c9; background-color: #d9d9d9; > div < border-left: 5px solid #1c87c9; background-color: #cccccc > p < border: 10px groove #8ebf42; > style> head> body> h2>Border Example h2> div> Div example for the border property. div> p>Some paragraph with border. p> body> html> If you want to have a rounded border on paragraphs, follow the example below to learn how to do it. Use the border-radius property to have your preferred outcome. Example of creating rounded borders on paragraphs: html> html> head> title>Title of the document title> style> p < padding: 10px; > p.normal < border: 2px solid #1c87c9; > p.round1 < border: 2px solid #1c87c9; border-radius: 5px; > p.round2 < border: 2px solid #1c87c9; border-radius: 8px; > p.round3 < border: 2px solid #1c87c9; border-radius: 12px; > style> head> body> h2>Rounded borders h2> p class="normal">Normal border p> p class="round1">Round border p> p class="round2">Rounder border p> p class="round3">Roundest border p> body> html> Источник
- or elements
- Example of adding borders to the , and elements:
- Example of creating rounded borders on paragraphs:
Таблицы и стили
Таблицы являются широко используемым элементом для представления различных данных на презентациях, лекциях, в рекламных листовках и не только. Благодаря своей наглядности, универсальности и простоте таблицы также повсеместно применяют на сайтах, чтобы лучше донести до читателя нужный материал. Однако в большинстве случаев на веб-страницах используют весьма убогие средства по представлению табличных данных. Вместе с тем воспользовавшись мощью стилей, можно весьма расширить средства по оформлению таблиц, удачно вписать их в дизайн сайта и нагляднее представить табличные данные.
Далее речь пойдет об оформлении таблиц с помощью стилей. Но в начале обговорим некоторые моменты, которые помогут лучше понять, что же мы делаем.
Цвет фона ячеек
Цвет фона одновременно всех ячеек таблицы устанавливается через свойство background , которое применяется к селектору TABLE . При этом следует помнить о правилах использования стилей, в частности, наследовании свойств элементов. Если одновременно с TABLE задать цвет у селектора TD или TH , то он и будет установлен в качестве фона (пример 1).
Заголовок 1 Заголовок 2 Ячейка 3 Ячейка 4
То же самое происходит и с цветом текста. Для всех элементов таблицы в примере он установлен белым.
Результат данного примера показан на рис. 1.
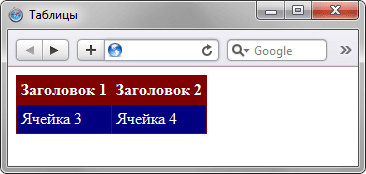
Рис. 1. Изменение цвета фона
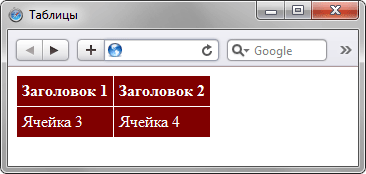
Поля внутри ячеек
Заголовок 1 Заголовок 2 Ячейка 3 Ячейка 4
В данном примере с помощью группирования селектором поля установлены одновременно для селектора TD и TH .
Результат данного примера показан на рис. 2.
Границы и рамки
Линии между ячейками можно установить несколькими методами, при этом рассмотрим два из них, которые непосредственно связаны со стилями.
Использование атрибута cellspacing
Заметим, что это не совсем удобный способ создания границ, поскольку он имеет ограниченную область применения. Так можно получить только одноцветную сетку, а не вертикальные или горизонтальные линии в нужных местах.
Применение свойства border
Стилевое свойство border одновременно задает цвет границы, ее стиль и толщину вокруг элемента. Когда требуется создать отдельные линии на разных сторонах, лучше использовать его производные — border-left , border-right , border-top и border-bottom , они соответственно определяют границу слева, справа, сверху и снизу.
Применяя свойство border к селектору TABLE , мы добавляем рамку вокруг таблицы в целом, а к селектору TD или TH — рамку вокруг ячеек (пример 3).
Пример 3. Добавление двойной рамки
Заголовок 1 Заголовок 2 Ячейка 3 Ячейка 4
В данном примере используется двойная рамка черного цвета вокруг самой таблицы и сплошная рамка белого цвета вокруг каждой ячейки.
Результат примера показан на рис. 3.

Рис. 3. Граница вокруг таблицы и ячеек
Пример 4. Создание одинарной рамки
Заголовок 1 Заголовок 2 Ячейка 3 Ячейка 4
В данном примере создается сплошная линия зеленого цвета между ячейками и черная вокруг таблицы. Все границы внутри таблицы имеют одинаковую толщину.
Результат примера показан на рис. 4.
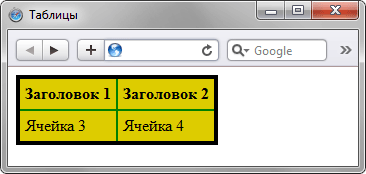
Рис. 4. Граница вокруг таблицы
Выравнивание содержимого ячеек
По умолчанию текст в ячейке таблицы выравнивается по левому краю. Исключением из этого правила служит тег , он определяет заголовок, в котором выравнивание происходит по центру. Чтобы изменить способ выравнивания применяется стилевое свойство text-align (пример 5).
Пример 5. Выравнивание содержимого ячеек по горизонтали
Заголовок 1 Ячейка 1 Ячейка 2 Заголовок 2 Ячейка 3 Ячейка 4
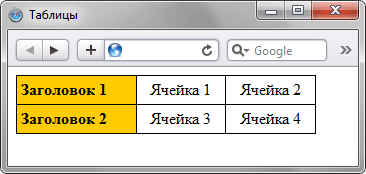
Рис. 5. Выравнивание текста в ячейках
Выравнивание по вертикали в ячейке всегда происходит по ее центру, если это не оговорено особо. Это не всегда удобно, особенно для таблиц, у которых содержимое ячеек различается по высоте. В таком случае выравнивание устанавливают по верхнему краю ячейки с помощью свойства vertical-align , как показано в примере 6.
Пример 6. Выравнивание содержимого ячеек по вертикали
Заголовок 1 Заголовок 2 Ячейка 1 Ячейка 2
В данном примере устанавливается высота заголовка как 40 пикселов и выравнивание текста происходит по нижнему краю. Результат примера показан на рис. 6.
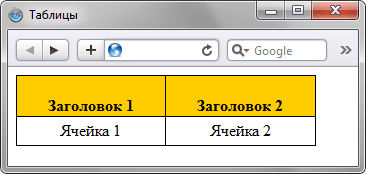
Рис. 6. Выравнивание текста в ячейках
CSS Tables
The look of an HTML table can be greatly improved with CSS:
| Company | Contact | Country |
|---|---|---|
| Alfreds Futterkiste | Maria Anders | Germany |
| Berglunds snabbköp | Christina Berglund | Sweden |
| Centro comercial Moctezuma | Francisco Chang | Mexico |
| Ernst Handel | Roland Mendel | Austria |
| Island Trading | Helen Bennett | UK |
| Königlich Essen | Philip Cramer | Germany |
| Laughing Bacchus Winecellars | Yoshi Tannamuri | Canada |
| Magazzini Alimentari Riuniti | Giovanni Rovelli | Italy |
Try it Yourself »
Table Borders
To specify table borders in CSS, use the border property.
| Firstname | Lastname |
|---|---|
| Peter | Griffin |
| Lois | Griffin |
Example
Full-Width Table
| Firstname | Lastname |
|---|---|
| Peter | Griffin |
| Lois | Griffin |
Example
Double Borders
To remove double borders, take a look at the example below.
Collapse Table Borders
The border-collapse property sets whether the table borders should be collapsed into a single border:
| Firstname | Lastname |
|---|---|
| Peter | Griffin |
| Lois | Griffin |
Example
| Firstname | Lastname |
|---|---|
| Peter | Griffin |
| Lois | Griffin |
How to Add Border to HTML Table
After creating an HTML table, you should add a border to it, as borders are not added by default. First, let’s see an example, where we use the HTML border attribute.
Example of creating an HTML table with the border attribute:
html> html> head> title>Title of the document title> head> body> table border="1"> tr> th>Person th> th>Age th> tr> tr> td>Ann td> td>19 td> tr> tr> td>Susie td> td>22 td> tr> table> body> html>Result
Anyway, we recommend using the CSS border property for adding a border to your tables. To add a border to your table, you need to define the of your table.
Remember to add borders also for and tags to have a complete table. Set the border-collapse property as well (if you don’t define the border-collapse, it will use border-collapse: separate by default).
Example of creating borders for the HTML table:
html> html> head> title>Title of the document title> style> table, th, td < padding: 10px; border: 1px solid black; border-collapse: collapse; > style> head> body> table> tr> th>Person th> th>Age th> tr> tr> td>Ann td> td>19 td> tr> tr> td>Susie td> td>22 td> tr> table> body> html>How to change the HTML table border style with CSS
You can give styling to your table using the CSS border shorthand property, or the border-width, border-style, border-color properties, separately. See the example below to have a visible result of these properties.
Example of changing the HTML table border style with CSS:
html> html> head> title>Title of the document title> style> table < border-style: ridge; border-width: 150px; border-color: #8ebf42; background-color: #d9d9d9; > th < border: 5px solid #095484; > td < border: 20px groove #1c87c9; > style> head> body> table> tr> th>Person th> th>Age th> tr> tr> td>Ann td> td>19 td> tr> tr> td>Susie td> td>22 td> tr> table> body> html>If you don’t want the border to go all around the table (or if you need different borders on each side of the table), you can use any of the following properties: border-top, border-right, border-bottom and border-left.
Example of adding bottom borders to the HTML table:
html> html> head> title>Title of the document title> style> table < border-collapse: collapse; > td, th < padding: 10px; border-bottom: 2px solid #8ebf42; text-align: center; > style> head> body> table> tr> th>Person th> th>Age th> tr> tr> td>Ann td> td>19 td> tr> tr> td>Susie td> td>22 td> tr> table> body> html>How to have rounded borders
You can also have rounded borders by using the CSS border-radius property. Remember that in this case, you should remove the border-collapse property to work properly. Let’s see an example where all the table elements are rounded.
Example of adding rounded borders to the HTML table:
html> html> head> title>Title of the document title> style> table, td, th < padding: 10px; border: 2px solid #1c87c9; border-radius: 5px; background-color: #e5e5e5; text-align: center; > style> head> body> table> tr> th>Person th> th>Age th> tr> tr> td>Ann td> td>19 td> tr> tr> td>Susie td> td>22 td> tr> table> body> html>How to add border to the
,
or elements
In the same way you can add a border to other HTML elements. Let’s see an example of adding borders to the , and elements.
Example of adding borders to the
, and elements:
html> html> head> title>Title of the document title> style> h2, div, p < padding: 10px; > h2 < border: 3px double #1c87c9; background-color: #d9d9d9; > div < border-left: 5px solid #1c87c9; background-color: #cccccc > p < border: 10px groove #8ebf42; > style> head> body> h2>Border Example h2> div> Div example for the border property. div> p>Some paragraph with border. p> body> html>If you want to have a rounded border on paragraphs, follow the example below to learn how to do it. Use the border-radius property to have your preferred outcome.
Example of creating rounded borders on paragraphs:
html> html> head> title>Title of the document title> style> p < padding: 10px; > p.normal < border: 2px solid #1c87c9; > p.round1 < border: 2px solid #1c87c9; border-radius: 5px; > p.round2 < border: 2px solid #1c87c9; border-radius: 8px; > p.round3 < border: 2px solid #1c87c9; border-radius: 12px; > style> head> body> h2>Rounded borders h2> p class="normal">Normal border p> p class="round1">Round border p> p class="round2">Rounder border p> p class="round3">Roundest border p> body> html>