- HTML Table Border
- Typical Table Border
- Without Collapsing the Border
- Bottom Border
- Border and Alternating Background Colors
- No Border on Table Headers
- Rounded Corners
- The Border Properties
- Related
- HTML Table Borders
- How To Add a Border
- Example
- Collapsed Table Borders
- Example
- Style Table Borders
- Example
- Round Table Borders
- Example
- Example
- Dotted Table Borders
- Example
- Border Color
- Example
- COLOR PICKER
- Report Error
- Thank You For Helping Us!
- Таблицы и стили
- Цвет фона ячеек
- Поля внутри ячеек
- Границы и рамки
- Использование атрибута cellspacing
- Применение свойства border
- Выравнивание содержимого ячеек
- How To Style HTML Table Borders (Simple Examples)
- QUICK SLIDES
- TABLE OF CONTENTS
- DOWNLOAD & NOTES
- QUICK NOTES
- EXAMPLE CODE DOWNLOAD
- STYLING TABLE BORDERS
- 1) BORDERS ONLY APPLY TO TABLE & CELLS
- 2) BORDER COLLAPSE
- 3) BORDER STYLES
- 4) ROUNDED BORDERS
- 5) DIFFERENT BORDERS ON EACH SIDE
- USEFUL BITS & LINKS
- SUMMARY
- INFOGRAPHIC CHEAT SHEET
- THE END
- Leave a Comment Cancel Reply
- Search
- Breakthrough Javascript
- Socials
- About Me
HTML Table Border
This page contains HTML table border code — HTML codes for specifying or changing the border of your tables within your blog or web page.
HTML table borders are specified using Cascading Style Sheets (CSS). To set the border of an HTML table, use the CSS border property.
Typical Table Border
Here’s a common way to set borders on a table:
This provides that «grid» like effect, where the border surrounds each cell as well as the whole table.
Notice that I used border-collapse: collapse; against the table element. This collapses the border so that you don’t see any space between the cells and the outside of the table.
Without Collapsing the Border
Here it is without collapsing the border. I’ve also applied the border against the table element in order to demonstrate the effect:
You can see that I’ve also added padding to the th and td selectors but not to the table itself. If we include the padding against the table, we’d end up with extra padding between the outer cells and the outside of the table.
There’s nothing wrong with that if that’s what you want. However, if you don’t want padding between the table and its cells, you’ll need to apply the padding to just the cells.
Bottom Border
The above examples use the CSS border property to set the borders. This is a shorthand property to set border width, style, and color on all sides of the table.
If you don’t want the border to go all around the table (or if you want a different border on each side of the table), you can use any of the following properties: border-top , border-right , border-bottom , and border-left .
Here’s an example of setting the border to only appear at the bottom of each table cell.
Border and Alternating Background Colors
A common usage of tables is for each row to have alternating background colors.
You can apply borders against these tables just like any other table:
No Border on Table Headers
You can also remove the border from the th element.
You can either remove the border from the styles by using border: none; against the th selector (but it has to follow the border declaration), or just not apply the border in the first place.
Here’s an example of the later:
Rounded Corners
Here’s an example of adding a border with curved/rounded corners to the table. In the CSS3 specification, rounded corners are specified using the border-radius property.
Note that we need to remove the border-collapse property for this work.
I also set the border-spacing property to zero, so that the cell borders continue smoothly without being interrupted by a space. Remove this property and click Run to see what I mean.
The Border Properties
CSS provides quite a number of border related properties to assist you in creating borders. These properties can be applied to any HTML element, not just tables.
For a full list of border properties, go to CSS Properties and filter by «border».
Related
HTML Table Borders
HTML tables can have borders of different styles and shapes.
How To Add a Border
To add a border, use the CSS border property on table , th , and td elements:
Example
Collapsed Table Borders
To avoid having double borders like in the example above, set the CSS border-collapse property to collapse .
This will make the borders collapse into a single border:
Example
Style Table Borders
If you set a background color of each cell, and give the border a white color (the same as the document background), you get the impression of an invisible border:
Example
table, th, td <
border: 1px solid white;
border-collapse: collapse;
>
th, td <
background-color: #96D4D4;
>
Round Table Borders
With the border-radius property, the borders get rounded corners:
Example
Skip the border around the table by leaving out table from the css selector:
Example
Dotted Table Borders
With the border-style property, you can set the appearance of the border.
The following values are allowed:
Example
Border Color
With the border-color property, you can set the color of the border.
Example

COLOR PICKER


Report Error
If you want to report an error, or if you want to make a suggestion, do not hesitate to send us an e-mail:
Thank You For Helping Us!
Your message has been sent to W3Schools.
Top Tutorials
Top References
Top Examples
Get Certified
W3Schools is optimized for learning and training. Examples might be simplified to improve reading and learning. Tutorials, references, and examples are constantly reviewed to avoid errors, but we cannot warrant full correctness of all content. While using W3Schools, you agree to have read and accepted our terms of use, cookie and privacy policy.
Таблицы и стили
Таблицы являются широко используемым элементом для представления различных данных на презентациях, лекциях, в рекламных листовках и не только. Благодаря своей наглядности, универсальности и простоте таблицы также повсеместно применяют на сайтах, чтобы лучше донести до читателя нужный материал. Однако в большинстве случаев на веб-страницах используют весьма убогие средства по представлению табличных данных. Вместе с тем воспользовавшись мощью стилей, можно весьма расширить средства по оформлению таблиц, удачно вписать их в дизайн сайта и нагляднее представить табличные данные.
Далее речь пойдет об оформлении таблиц с помощью стилей. Но в начале обговорим некоторые моменты, которые помогут лучше понять, что же мы делаем.
Цвет фона ячеек
Цвет фона одновременно всех ячеек таблицы устанавливается через свойство background , которое применяется к селектору TABLE . При этом следует помнить о правилах использования стилей, в частности, наследовании свойств элементов. Если одновременно с TABLE задать цвет у селектора TD или TH , то он и будет установлен в качестве фона (пример 1).
Заголовок 1 Заголовок 2 Ячейка 3 Ячейка 4
То же самое происходит и с цветом текста. Для всех элементов таблицы в примере он установлен белым.
Результат данного примера показан на рис. 1.
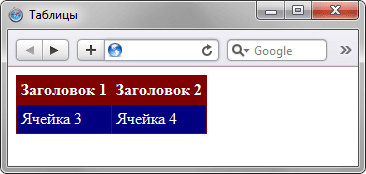
Рис. 1. Изменение цвета фона
Поля внутри ячеек
Заголовок 1 Заголовок 2 Ячейка 3 Ячейка 4
В данном примере с помощью группирования селектором поля установлены одновременно для селектора TD и TH .
Результат данного примера показан на рис. 2.
Границы и рамки
Линии между ячейками можно установить несколькими методами, при этом рассмотрим два из них, которые непосредственно связаны со стилями.
Использование атрибута cellspacing
Заметим, что это не совсем удобный способ создания границ, поскольку он имеет ограниченную область применения. Так можно получить только одноцветную сетку, а не вертикальные или горизонтальные линии в нужных местах.
Применение свойства border
Стилевое свойство border одновременно задает цвет границы, ее стиль и толщину вокруг элемента. Когда требуется создать отдельные линии на разных сторонах, лучше использовать его производные — border-left , border-right , border-top и border-bottom , они соответственно определяют границу слева, справа, сверху и снизу.
Применяя свойство border к селектору TABLE , мы добавляем рамку вокруг таблицы в целом, а к селектору TD или TH — рамку вокруг ячеек (пример 3).
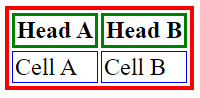
Пример 3. Добавление двойной рамки
Заголовок 1 Заголовок 2 Ячейка 3 Ячейка 4
В данном примере используется двойная рамка черного цвета вокруг самой таблицы и сплошная рамка белого цвета вокруг каждой ячейки.
Результат примера показан на рис. 3.

Рис. 3. Граница вокруг таблицы и ячеек
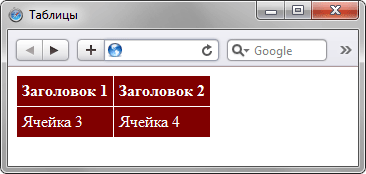
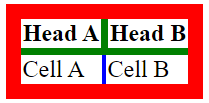
Пример 4. Создание одинарной рамки
Заголовок 1 Заголовок 2 Ячейка 3 Ячейка 4
В данном примере создается сплошная линия зеленого цвета между ячейками и черная вокруг таблицы. Все границы внутри таблицы имеют одинаковую толщину.
Результат примера показан на рис. 4.
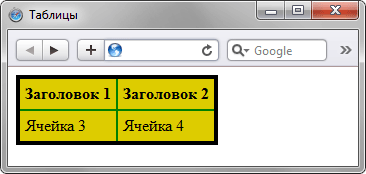
Рис. 4. Граница вокруг таблицы
Выравнивание содержимого ячеек
По умолчанию текст в ячейке таблицы выравнивается по левому краю. Исключением из этого правила служит тег , он определяет заголовок, в котором выравнивание происходит по центру. Чтобы изменить способ выравнивания применяется стилевое свойство text-align (пример 5).
Пример 5. Выравнивание содержимого ячеек по горизонтали
Заголовок 1 Ячейка 1 Ячейка 2 Заголовок 2 Ячейка 3 Ячейка 4
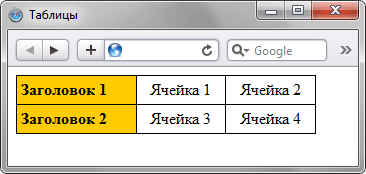
Рис. 5. Выравнивание текста в ячейках
Выравнивание по вертикали в ячейке всегда происходит по ее центру, если это не оговорено особо. Это не всегда удобно, особенно для таблиц, у которых содержимое ячеек различается по высоте. В таком случае выравнивание устанавливают по верхнему краю ячейки с помощью свойства vertical-align , как показано в примере 6.
Пример 6. Выравнивание содержимого ячеек по вертикали
Заголовок 1 Заголовок 2 Ячейка 1 Ячейка 2
В данном примере устанавливается высота заголовка как 40 пикселов и выравнивание текста происходит по нижнему краю. Результат примера показан на рис. 6.
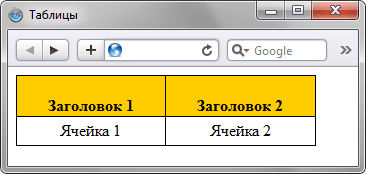
Рис. 6. Выравнивание текста в ячейках
How To Style HTML Table Borders (Simple Examples)
Welcome to a quick tutorial on how to style the table borders in HTML and CSS. Just started with HTML and struggling with the table borders?
- Collapse the borders – table < border-collapse: collapse >
- Add borders to the cells and table itself – table, table th, table td
That covers the quick basics, but table borders are not really the most straightforward to style. Read on for more examples!
ⓘ I have included a zip file with all the example source code at the start of this tutorial, so you don’t have to copy-paste everything… Or if you just want to dive straight in.
QUICK SLIDES

TABLE OF CONTENTS
DOWNLOAD & NOTES
Firstly, here is the download link to the example code as promised.
QUICK NOTES
If you spot a bug, feel free to comment below. I try to answer short questions too, but it is one person versus the entire world… If you need answers urgently, please check out my list of websites to get help with programming.
EXAMPLE CODE DOWNLOAD
Click here to download the source code, I have released it under the MIT license, so feel free to build on top of it or use it in your own project.
STYLING TABLE BORDERS
All right, let us now get into the examples of how to style the HTML table borders.
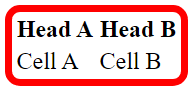
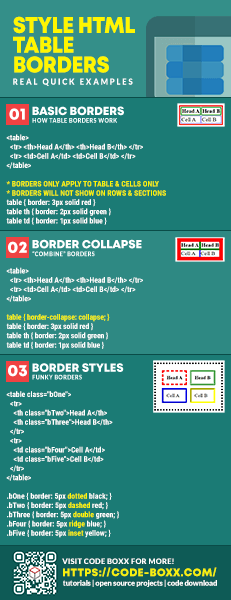
1) BORDERS ONLY APPLY TO TABLE & CELLS
table < border: 3px solid red >table th < border: 2px solid green >table td Head A Head B Cell A Cell B
Go ahead and test it for yourself, border will not apply on the rows and sections ( tr thead tbody tfoot ).
2) BORDER COLLAPSE
/* (A1) COLLAPSE BORDER */ table < border-collapse: collapse; >/* (A2) BORDER STYLES */ table < border: 10px solid red; >table th < border: 5px solid green; >table td Head A Head B Cell A Cell B
Don’t want separate borders? Simply add a border-collapse: collapse to the table. But take extra note of the behavior after the collapse – The web browsers will use whichever border is thicker .
That is, notice that the outside green borders of the header cells are overridden with red from the table? Yep, test it out for yourself. Change the red border of the table to border: 1px solid red , and the header cells should return to green.
3) BORDER STYLES
/* (A1) TABLE PADDING + SPACING */ table, table th, table td < padding: 10px; >table < border-spacing: 10px; >/* (A2) BORDER STYLES */ .bOne < border: 5px dotted black; >.bTwo < border: 5px dashed red; >.bThree < border: 5px double green; >.bFour < border: 5px ridge blue; >.bFive
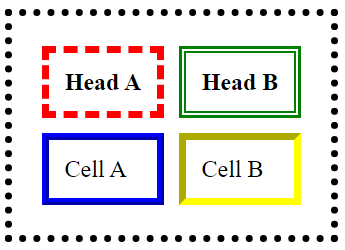
Some of you sharp code ninjas may have already noticed that solid border-style above. Yes, there are many other border styles that we can apply. I will leave a link to the complete reference in the extras section below.
4) ROUNDED BORDERS
.rounded Head A Head B Cell A Cell B
Don’t like sharp corners? 😆 Simply add a border-radius to round it off.
5) DIFFERENT BORDERS ON EACH SIDE
table.chimera Head A Head B Cell A Cell B
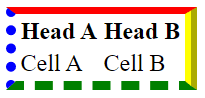
For this final bit – Yes, we can also specify a different border on each side of the table.
USEFUL BITS & LINKS
That’s all for the tutorial, and here is a small section on some extras and links that may be useful to you.
SUMMARY
INFOGRAPHIC CHEAT SHEET
THE END
Thank you for reading, and we have come to the end. I hope that it has helped you to better understand, and if you want to share anything with this guide, please feel free to comment below. Good luck and happy coding!
Leave a Comment Cancel Reply
Search
Breakthrough Javascript

Take pictures with the webcam, voice commands, video calls, GPS, NFC. Yes, all possible with Javascript — Check out Breakthrough Javascript!
Socials
About Me

W.S. Toh is a senior web developer and SEO practitioner with over 20 years of experience. Graduated from the University of London. When not secretly being an evil tech ninja, he enjoys photography and working on DIY projects.
Code Boxx participates in the eBay Partner Network, an affiliate program designed for sites to earn commission fees by linking to ebay.com. We also participate in affiliate programs with Bluehost, ShareASale, Clickbank, and other sites. We are compensated for referring traffic.