- CSS Forms
- Styling Input Fields
- Example
- Padded Inputs
- Example
- Bordered Inputs
- Example
- Example
- Colored Inputs
- Example
- Focused Inputs
- Example
- Example
- Input with icon/image
- Example
- Animated Search Input
- Example
- Styling Textareas
- Example
- Styling Select Menus
- Example
- Styling Input Buttons
- Example
- Responsive Form
- Aligned Form
- How to Style Input and Submit Buttons
- Example of styling the input and submit buttons:
- Result
- Example of styling a submit button in a form:
- How to Style Input and Submit Button With CSS
- How to Style Input Fields With CSS?
- How to Style Submit Button With CSS?
- Conclusion
- About the author
- Sharqa Hameed
CSS Forms
The look of an HTML form can be greatly improved with CSS:
Styling Input Fields
Use the width property to determine the width of the input field:
Example
The example above applies to all elements. If you only want to style a specific input type, you can use attribute selectors:
- input[type=text] — will only select text fields
- input[type=password] — will only select password fields
- input[type=number] — will only select number fields
- etc..
Padded Inputs
Use the padding property to add space inside the text field.
Tip: When you have many inputs after each other, you might also want to add some margin , to add more space outside of them:
Example
Note that we have set the box-sizing property to border-box . This makes sure that the padding and eventually borders are included in the total width and height of the elements.
Read more about the box-sizing property in our CSS Box Sizing chapter.
Bordered Inputs
Use the border property to change the border size and color, and use the border-radius property to add rounded corners:
Example
If you only want a bottom border, use the border-bottom property:
Example
Colored Inputs
Use the background-color property to add a background color to the input, and the color property to change the text color:
Example
Focused Inputs
By default, some browsers will add a blue outline around the input when it gets focus (clicked on). You can remove this behavior by adding outline: none; to the input.
Use the :focus selector to do something with the input field when it gets focus:
Example
Example
Input with icon/image
If you want an icon inside the input, use the background-image property and position it with the background-position property. Also notice that we add a large left padding to reserve the space of the icon:
Example
input[type=text] <
background-color: white;
background-image: url(‘searchicon.png’);
background-position: 10px 10px;
background-repeat: no-repeat;
padding-left: 40px;
>
Animated Search Input
In this example we use the CSS transition property to animate the width of the search input when it gets focus. You will learn more about the transition property later, in our CSS Transitions chapter.
Example
input[type=text] <
transition: width 0.4s ease-in-out;
>
input[type=text]:focus width: 100%;
>
Styling Textareas
Tip: Use the resize property to prevent textareas from being resized (disable the «grabber» in the bottom right corner):
Example
textarea <
width: 100%;
height: 150px;
padding: 12px 20px;
box-sizing: border-box;
border: 2px solid #ccc;
border-radius: 4px;
background-color: #f8f8f8;
resize: none;
>
Styling Select Menus
Example
select <
width: 100%;
padding: 16px 20px;
border: none;
border-radius: 4px;
background-color: #f1f1f1;
>
Styling Input Buttons
Example
input[type=button], input[type=submit], input[type=reset] <
background-color: #04AA6D;
border: none;
color: white;
padding: 16px 32px;
text-decoration: none;
margin: 4px 2px;
cursor: pointer;
>
/* Tip: use width: 100% for full-width buttons */
For more information about how to style buttons with CSS, read our CSS Buttons Tutorial.
Responsive Form
Resize the browser window to see the effect. When the screen is less than 600px wide, make the two columns stack on top of each other instead of next to each other.
Advanced: The following example uses media queries to create a responsive form. You will learn more about this in a later chapter.
Aligned Form
An example of how to style labels together with inputs to create a horizontal aligned form:
How to Style Input and Submit Buttons
In the example below, we have elements with type=»button» and type=»submit» , which we style with CSS properties. To style them, we use the background-color and color properties, set the border and text-decoration properties to «none». Then, we add padding and margin, after which we specify the cursor as «pointer».
Example of styling the input and submit buttons:
html> html> head> title>Title of the document title> style> input[type=button], input[type=submit] < background-color: #62529c; border: none; color: #fff; padding: 15px 30px; text-decoration: none; margin: 4px 2px; cursor: pointer; > style> head> body> p>Styled input buttons. p> input type="button" value="Button"> input type="submit" value="Submit"> body> html>Result
Example of styling a submit button in a form:
html> html> head> title>Title of the document title> style> div < margin-bottom: 10px; > input[type=text] < padding: 5px; border: 2px solid #cccccc; -webkit-border-radius: 5px; border-radius: 5px; > input[type=text]:focus < border-color: #33333; > input[type=submit] < padding: 5px 15px; background: #99e0b2; border: 0 none; cursor: pointer; -webkit-border-radius: 5px; border-radius: 5px; > style> head> body> h2>Form example h2> form action="/form/submit" method="POST"> div> label for="surname">Surname label> input type="text" name="surname" id="surname" placeholder="surname" /> div> div> label for="lastname">Last name label> input type="text" name="lastname" id="lastname" placeholder="lastname" /> div> div> label for="email">Email label> input type="email" name="email" id="email" placeholder="email" /> div> input type="submit" value="Submit" /> form> body> html>How to Style Input and Submit Button With CSS
![]()
CSS is a language for creating style sheets that describe how a document is presented in a markup language, such as HTML or XML. Along with HTML and JavaScript, CSS is a key component of the World Wide Web. Using CSS, users can style all HTML elements, including tables, buttons, input fields, forms, and many more.
How to Style Input Fields With CSS?
To style the input field with CSS, try out the mentioned procedure.
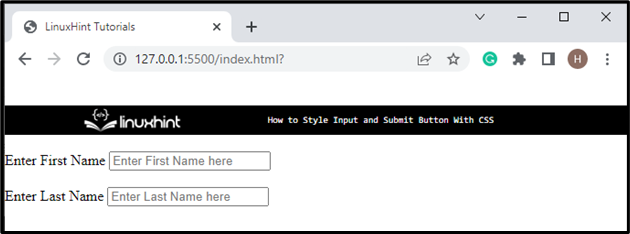
Step 1: Create Input Form
First of all, create a form in HTML. To do so, follow the instructions listed below:
- First, create a form with the help of the “ ” tag.
- Inside the form, the “ ” element is defined to specify captions for the “input” elements. The label’s “for” attribute is used to attach the label element with element through “id”.
- The “type” attribute determines the input type, such as text or number.
- The “class” attribute is assigned the “Input” name, “placeholder” attribute allocates the placeholder text in the input field:
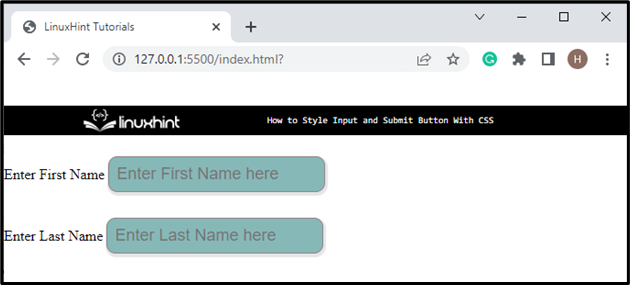
Step 2: Style Input Button in CSS
To style the input button in CSS, check out the given properties:
input {
padding: 8px;
border-radius: 10px;
margin: 5px auto;
border: 1px solid #918383;
background-color: #87b8b8;
box-shadow: 1px 2px 1px 2px rgb ( 230 , 229 , 229 ) ;
color: #c9c2c2;
outline: none;
font-size: 18px;
}
Access the “input” class and then apply below-mentioned properties:
- Set “padding” that specifies the space around the element’s content.
- “border-radius” property sets the element’s edges round.
- “margin” property with the value “5px auto” adds space “5px” on top and bottom, and “auto” is used to set equal space around the element on the left and right.
- “border” property specifies the border around the table.
- “background-color” property is utilized to specify the color of the background.
- “box-shadow” adds a shadow around the element. It is a shorthand property that specifies the x-offset, y-offset, blur effect, spread effect, and color for the shadow.
- “color” property refers to the element’s font color.
- “outline” adjusts the line around the elements to make it dominant.
- “font-size” property is utilized to set the element’s font size.
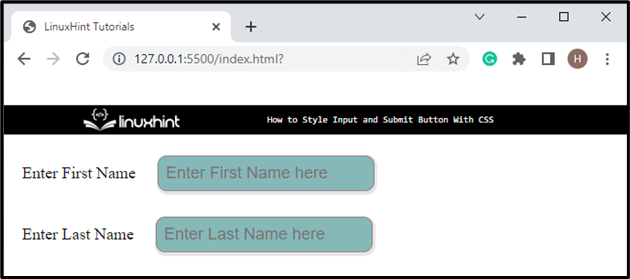
Next, access the “label” element for styling it:
After accessing the label element, apply the styling of your choice. For instance, we have applied “font-size”, “color”, and “margin” properties.
Let’s move toward the next section to style the submit button using CSS.
How to Style Submit Button With CSS?
To style the submit button with CSS, examine the example below, which demonstrates a step-wise guide on how to create and style the HTML button.
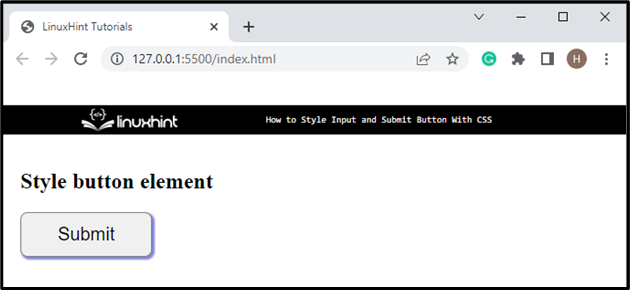
Step 1: Create Submit Button
Initially, add heading text inside the heading tag “ ”. Then, create a button by utilizing the “ ” element and set the button type as “submit”:

Step 2: Style “button” Element
To style the button in CSS, check out the properties described below:
button {
padding: 12px 40px;
border-radius: 8px;
box-shadow: 2px 2px 2px 1px rgb ( 131 , 131 , 219 ) ;
border: 1px solid gray;
font-size: 20px;
}
Access the button element by tag name and apply the properties on the button according to your preference. For instance, we have applied “padding”, “border-radius”, “box-shadow”, “border”, and “font-size” properties.
Let’s add the hover effect on the button element:
The “button:hover” selector is utilized to apply the effect of hover on the button. With the help of the “hover” selector, users can generate the CSS effect in real-time. For instance, we have set the “background-color” and “color” properties as described above:
We have discussed to style the input field and submit button with CSS.
Conclusion
To style the input element and submit button with CSS, different properties of CSS are used, including “padding”, “border-radius”, “box-shadow”, “margin”, “border”, “background-color”, “font-size” and many more. Users can apply the specified properties by accessing the elements through the tag name. This post has demonstrated the method for styling the input text fields and submit buttons with CSS.
About the author
Sharqa Hameed
I am a Linux enthusiast, I love to read Every Linux blog on the internet. I hold masters degree in computer science and am passionate about learning and teaching.