- JavaScript in Practice: Create dynamic buttons with JavaScript, HTML, and CSS 12 min read
- Templates and visualized codes
- Basic Format
- HTML Buttons
- JavaScript Buttons
- Styling Buttons with CSS
- 1. Using an ID Selector
- 2. Using a Class Selector
- Combining HTML and JavaScript
- Click Events
- Using onclick
- Using addEventListener
- Conclusion
- Styling buttons in javascript
- # Table of Contents
- # Change a Button's color onClick in JavaScript
- # Change a Button's color every time it's clicked
- # Additional Resources
JavaScript in Practice: Create dynamic buttons with JavaScript, HTML, and CSS 12 min read
Typically, we just need a few lines of code to create a button in HTML, pretty easy, huh? However, the fun part when working with front-end is actual applying JavaScript to make things become “dynamic”.
In this article, we will practice writing JavaScript along with HTML and CSS to create a dynamic button. The concept is rather straightforward, but just with this small problem, I want to demonstrate some essential concepts of the DOM, creating and styling a button with HTML and CSS, how to handle events and make things dynamic with JavaScript. Note that you should have basic HTML knowledge before going further. Here are some useful resources to learn HTML and CSS in case you didn’t do it:
Templates and visualized codes
Basic Format
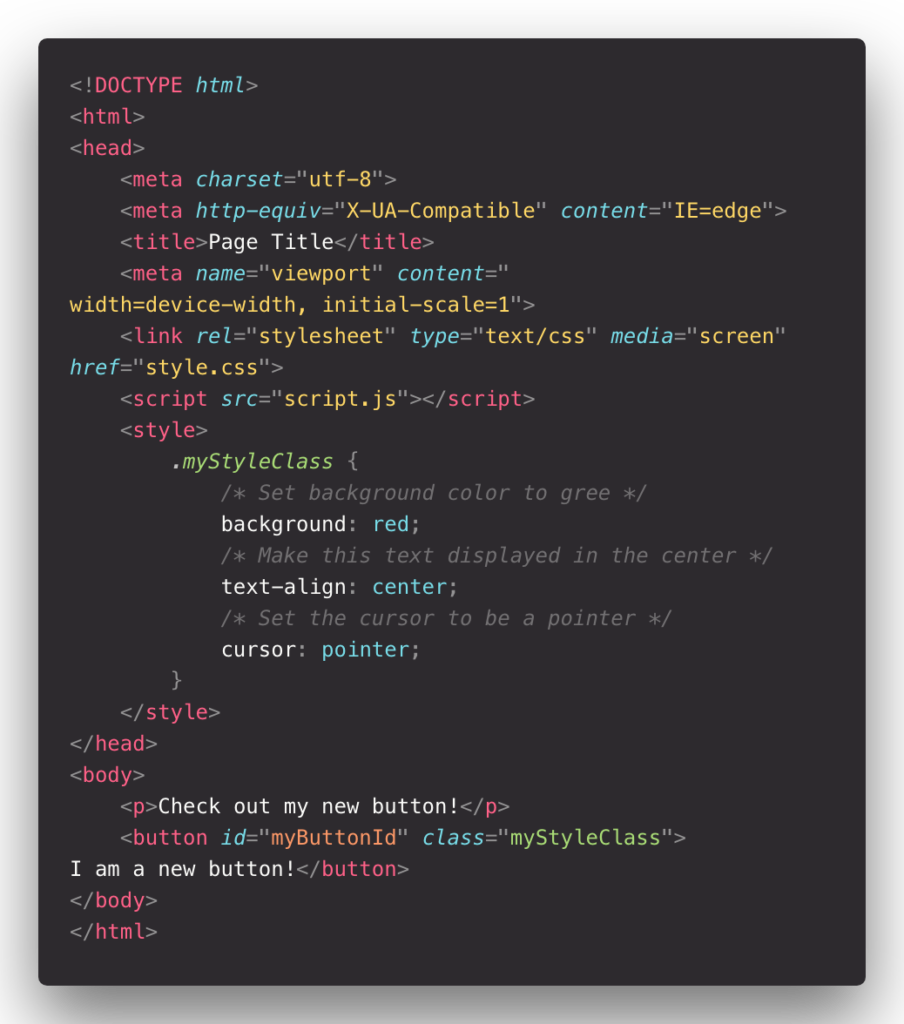
If you’ve never worked with JavaScript, HTML, and CSS at the same time before, here is the template that helps you visualize how to write JavaScript and CSS code in HTML file:
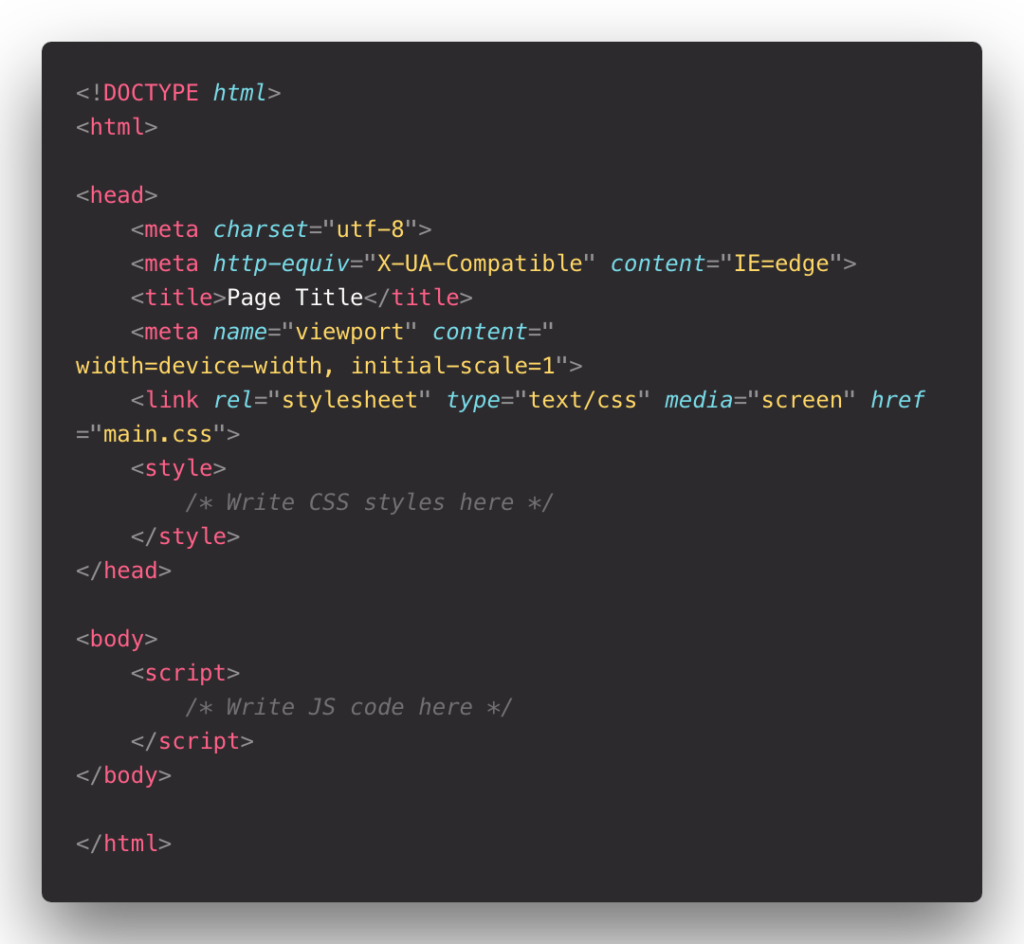
Like the template above, you can write CSS inside the
tags on the and JavaScript code in

- By putting , where style.css is the path of the .css file, in the head section (i.e., between the and tags), we’re telling the document to use the style sheet at the location referenced by the href attribute.
- By putting , where script.js is the path of the .js file, in the body section (i.e., between the and tags), we’re saying that we want to run a script using the JS code at the location referenced by the src attribute.
HTML Buttons
We use button tag on HTML file to create a button, following with some of these optional attributes:
- id : the button’s unique identifier within the page
- class : the CSS class(es) used to style the button
The text enclosed between the button’s opening ( ) tags are the label that will display on the button. We can also access this text using the innerHTML property of the JS button object. (Each HTML element has an innerHTML property that defines both the HTML code and the text that occurs between that element’s opening and closing tag. By changing an element’s innerHTML after some user interaction, you can make much more interactive pages).
The basic syntax for an HTML button looks like this:
The image below shows few files of HTML code and the content they produce:
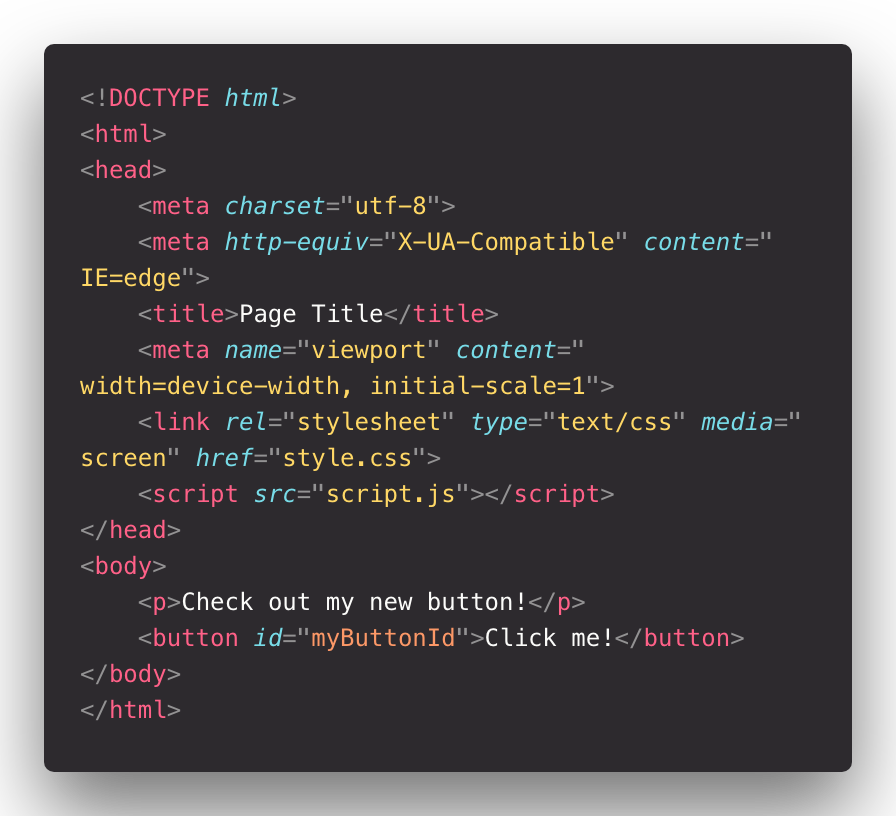

You’ve just created a button by using HTML! Now move on the main part!
JavaScript Buttons
First, let’s consider the following code:
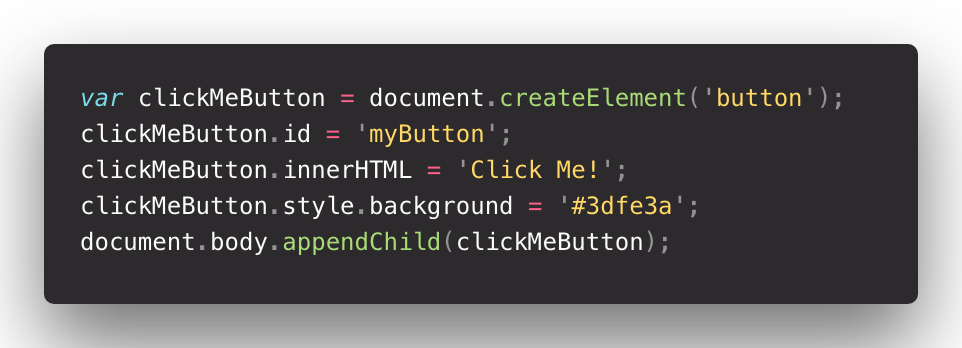
Now, let’s walk through what it does (in case you haven’t get accustomed to DOM and event handler, do some research to have the taste first):
- document.createElement('Button') creates a clickable button object (createElement(‘Button’)) referenced by the variable name .
- clickMeButton.id = 'myButton' sets the button’s id to be myButton .
- clickMeButton.innerHTML = 'Click Me!' sets the button’s inner HTML (i.e., the label we normally see between the HTML button tags) to say “Click Me”.
- clickMeButton.style.background = '#3dfe3a' sets the button’s background color to green. To style multiple attributes of our button using a style class, we would write clickMeButton.className = 'myStyleClassName' instead.
- document.body.appendChild(clickMeButton) appends to the body of the document as a child.
Let’s say we want to modify the label on an HTML button element with the id myButton . We simply use the getElementById method and pass the desired element’s id as an argument:

This is another example of JavaScript code to create a button, what it will produce is some of the images below:
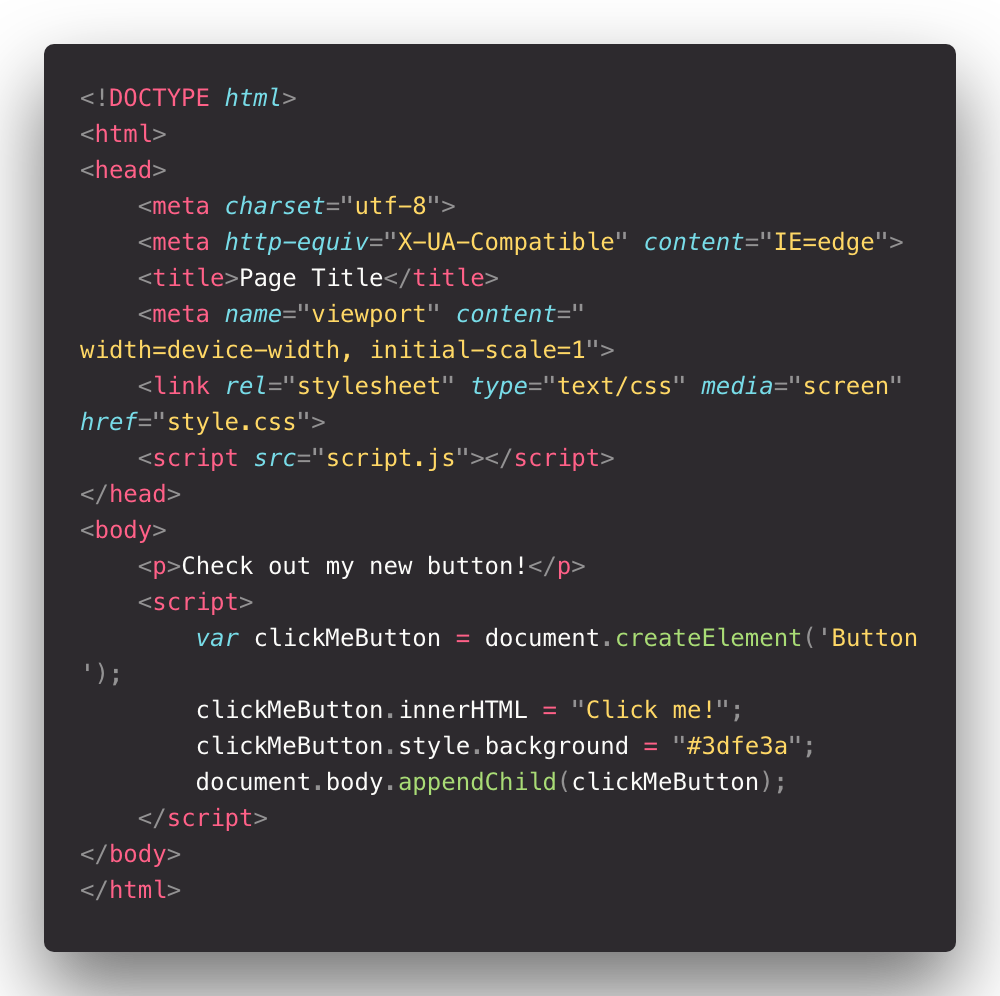

See, with JavaScript code, we completely replace the work of HTML code and also we can manipulate the color of the button through style.background attribute.
Styling Buttons with CSS
First, we want to define the style constraints for our button. We can do this in either of the two ways below.
1. Using an ID Selector
For instances where we want to apply a style to a single element within an HTML page, we use a CSS id selector using the syntax #identifier (where is the id of the element to style within the page). We then follow it with a pair of curly braces that contain the desired style constraints for all elements within the container that has that identifier. For example:

Note that we must put our CSS inside the style tags in the head section.
Let’s look at what happens when we style the element with the id :


We can access HTML id to manipulate inside CSS code by #yourId , thus the button is green because of this. And you also can see the pointer of you trigger on this button.
2. Using a Class Selector
Another way to apply the same styling to multiple elements is CSS class syntax .className (where is the name of our class). We then follow it with a pair of curly braces that contain the desired style constraints for all elements of that class. For example:

Let’s look at what happens when we style any element with the class :

You can see we can do the same thing when we access the CSS class element to manipulate the style of items. To access the CSS class, you use .className and instead of green color like before, I changed it to red. With literally ‘red’ color. You can change CSS color by 3 ways: Color Name such as Red, Blue, Green, etc…(which I just used), Hex Code #RRGGBB such as #FF6347 (which I used in few examples above), and Decimal Code (R,G,B) such as rgb(255,99,71). And also you can put id and class in the same place.
Combining HTML and JavaScript
We already know how to create a button in HTML and CSS. Now let’s combine them together:
Take some time to read through the following code:
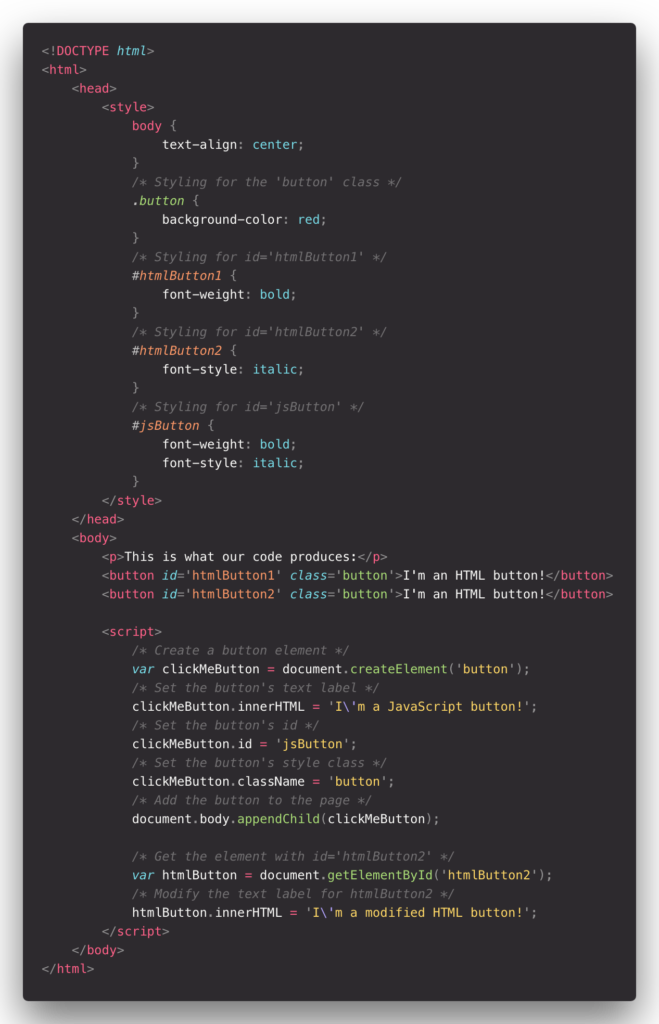
When you are done with this, render this code above and see the result:

- All three buttons have the background color styling from the button class, but each button has additional font styling specific to its distinct id.
- The initial text label for htmlButton2 was I'm an HTML button! , but we used JavaScript to modify it to say I'm a modified HTML button! instead.
Click Events
When a user clicks a button, we call it a click event. Let’s look at using onclick and addEventListener to prompt an action in response to a click event.
Using onclick
The onclick event occurs when the user clicks on an element.
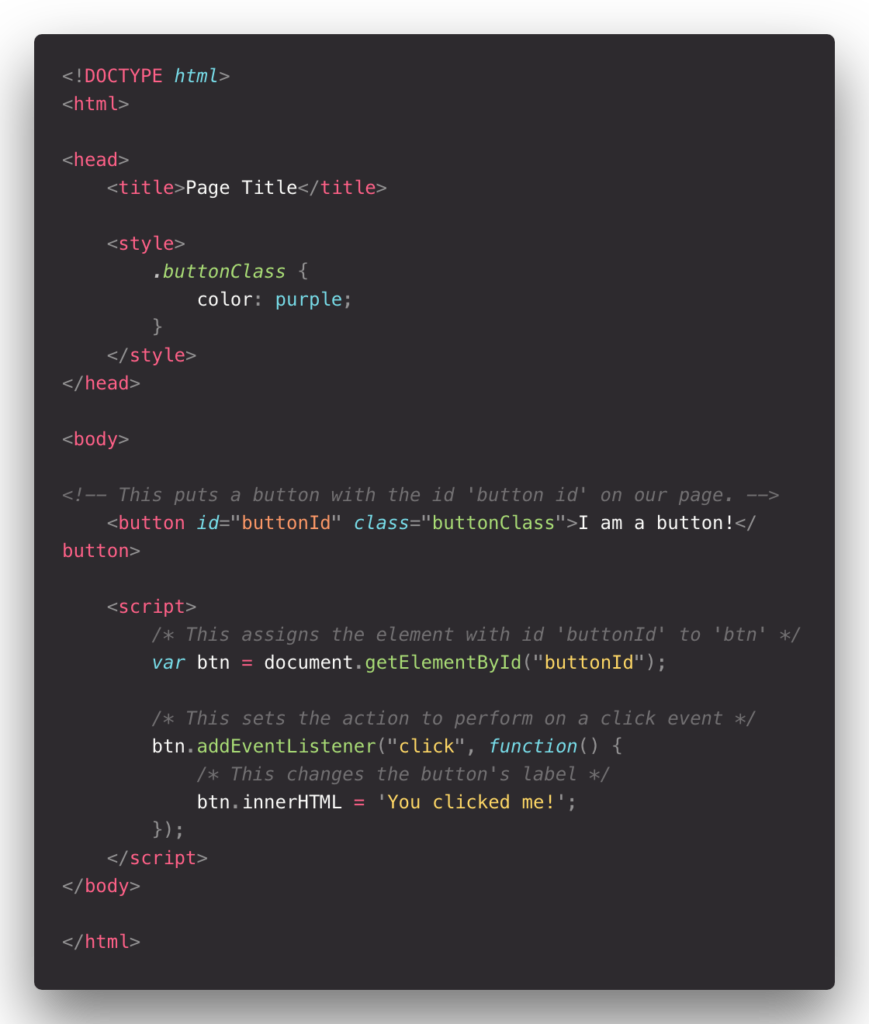
Now let’s using some features of JavaScript. Consider the following code:

The image below shows what the button looks like before and after it’s clicked:


Using addEventListener
The document.addEventListener() method attaches an event handler to the document.
Consider the following code:
The image below shows what the button looks like before and after it’s clicked:


Conclusion
In this article, we’ve been learning how to create a button by using JavaScript, HTML and also styling a button by CSS. Remember you can write HTML, CSS and JavaScript documents on the same file or in separate files. Events happen when users do something with your web, such as click on a link, scroll the mouse, type something, etc…addEventHandle and onClick are some of the ways that you can create an event on JavaScript through DOM (Document Object Model).
Styling buttons in javascript
Last updated: Jul 25, 2022
Reading time · 3 min
# Table of Contents
# Change a Button's color onClick in JavaScript
To change a button's color onClick:
- Add a click event listener to the button.
- Each time the button is clicked, set its style.backgroundColor property to a new value.
- Optionally set its style.color property.
Here is the HTML for the examples.
Copied!DOCTYPE html> html lang="en"> head> meta charset="UTF-8" /> head> body> button id="btn">Buttonbutton> script src="index.js"> script> body> html>
And here is the related JavaScript.
Copied!const btn = document.getElementById('btn'); btn.addEventListener('click', function onClick() btn.style.backgroundColor = 'salmon'; btn.style.color = 'white'; >);
We added an event listener to the button. The event listener invokes a function every time the button is clicked.
We used the style.backgroundColor property to change the button's background color and the style.color property to change the font color of the button.
We used the document.getElementById() method to select the button by its id , however, you can also use the document.querySelector() method.
Copied!const btn = document.querySelector('#btn'); btn.addEventListener('click', function onClick() btn.style.backgroundColor = 'salmon'; btn.style.color = 'white'; >);
The document.querySelector method returns the first element within the document that matches the specified selector.
The button has an id of btn , so its selector is #btn .
If you need to select a button by its class, prefix the selector with a dot, e.g. .btn .
Copied!const btn = document.querySelector('.btn'); btn.addEventListener('click', function onClick() btn.style.backgroundColor = 'salmon'; btn.style.color = 'white'; >);
The code sample assumes that there is a button with a class name of btn on the page.
Copied!button id="btn">Buttonbutton>
# Change a Button's color every time it's clicked
To change a button's color every time it's clicked:
- Add a click event listener to the button.
- Each time the button is clicked, set its style.backgroundColor property to a new value.
- Use an index variable to track the current and next colors.
Here is the HTML for this example.
Copied!DOCTYPE html> html lang="en"> head> meta charset="UTF-8" /> head> body> button id="btn">Buttonbutton> script src="index.js"> script> body> html>
And here is the related JavaScript code.
Copied!const btn = document.getElementById('btn'); let index = 0; const colors = ['salmon', 'green', 'blue', 'purple']; btn.addEventListener('click', function onClick() btn.style.backgroundColor = colors[index]; btn.style.color = 'white'; index = index >= colors.length - 1 ? 0 : index + 1; >);
If you load the page and click on the button, you'll see that the button's background color alternates between the colors in the array.
We used a counter variable that tracks the index of the color in the array.
Each time the button is clicked, we either increment the value in the index variable or set it back to 0 if the last color already was shown.
The ternary operator is very similar to an if/else statement.
If the expression to the left of the question mark is truthy, the operator returns the value to the left of the colon, otherwise, the value to the right of the colon is returned.
You can imagine that the value before the colon is the if block and the value after the colon is the else block.
Copied!const btn = document.getElementById('btn'); let index = 0; const colors = ['salmon', 'green', 'blue', 'purple']; btn.addEventListener('click', function onClick() btn.style.backgroundColor = colors[index]; btn.style.color = 'white'; index = index >= colors.length - 1 ? 0 : index + 1; >);
In the example, we check if the index variable stores a value that is equal to or greater than the last index in the colors array.
If we've reached the last index, we set the index variable back to 0 , otherwise, we increment the value stored in the variable by 1 .
This way, we are able to get a different background color every time we click the button.
# Additional Resources
You can learn more about the related topics by checking out the following tutorials:
I wrote a book in which I share everything I know about how to become a better, more efficient programmer.