- Установить ширину выпадающего элемента в вариантах выпадающего списка HTML
- ОТВЕТЫ
- Ответ 1
- Ответ 2
- Ответ 3
- Ответ 4
- Ответ 5
- Ответ 6
- Ответ 7
- Appearance
- Disabling a Select2 control
- Labels
- Container width
- Example
- Themes
- Style width javascript select
- # Table of Contents
- # How to set the Width of Select Options in HTML & CSS
- # The width of your option elements might exceed the width of your select
- # Set the Width of a Select Option in HTML & CSS using inline styles
- # Additional Resources
- Javascript Reference — HTML DOM Style width Property
- Browser Support
- Syntax
- Property Values
- Technical Details
- Example
- Example 3
- Example 4
Установить ширину выпадающего элемента в вариантах выпадающего списка HTML
Я работаю над сайтом, который включает автоматическое заполнение окна выбора с помощью PHP script. Все это прекрасно работает, но проблема заключается в том, что то, что я использую для заполнения текстового поля, имеет очень длинные заголовки (это статьи журналов и заголовки презентаций). Выпадающий квадрат простирается до ширины самого длинного элемента, который простирается от края экрана, поэтому сделать полосу прокрутки невозможно. Я пробовал различные методы, пытаясь вручную установить раскрывающийся список с помощью CSS на определенную ширину, но до сих пор безрезультатно. Лучшее, что я сделал, чтобы установить поле «Выбор» на определенную ширину, но выпадающее меню само по себе намного шире.
Любые советы по этому поводу будут очень признательны.
Оказывается, что следующая строка CSS работает во всех основных браузерах, кроме Google Chrome (это то, что я тестировал в этой странице). Если решение для Chrome известно, об этом было бы полезно узнать.
ОТВЕТЫ
Ответ 1
Вы можете стилизовать (хотя и с некоторыми ограничениями) фактические элементы с помощью селектора option :
Таким образом вы не только сдерживаете раскрывающийся список, но и все его элементы.
Ответ 2
Я считаю, что лучший способ обработки длинных выпадающих списков — разместить его в контейнере с фиксированной шириной div и использовать ширину: auto в теге select. Большинство браузеров будут содержать раскрывающийся список в div, но когда вы нажмете на него, он будет расширяться, чтобы отобразить полное значение параметра. Он не работает с IE Explorer, но есть исправление (как всегда, необходимо с IE). Ваш код будет выглядеть примерно так.
div.dropdown_container < width:10px; >select.my_dropdown < width:auto; >/*IE FIX */ select#my_dropdown < width:100%; >select:focus#my_dropdown
Ответ 3
// Shorten select option text if it stretches beyond max-width of select element $.each($('.shortenedSelect option'), function(key, optionElement) < var curText = $(optionElement).text(); $(this).attr('title', curText); // Tip: parseInt('350px', 10) removes the 'px' by forcing parseInt to use a base ten numbering system. var lengthToShortenTo = Math.round(parseInt($(this).parent('select').css('max-width'), 10) / 7.3); if (curText.length >lengthToShortenTo) < $(this).text('. ' + curText.substring((curText.length - lengthToShortenTo), curText.length)); >>); // Show full name in tooltip after choosing an option $('.shortenedSelect').change(function() < $(this).attr('title', ($(this).find('option:eq('+$(this).get(0).selectedIndex +')').attr('title'))); >); Работает отлично. У меня была такая же проблема. Проверьте этот JSFiddle http://jsfiddle.net/jNWS6/426/
Ответ 4
- Определить максимальную длину строки
- Клип строка
- (необязательно) добавить горизонтальный эллипс
Альтернативное решение: элемент выбора в вашем случае (только гадание) — элемент управления с одним выбором, и вместо этого вы можете использовать группу переключателей. Тогда вы могли бы лучше стилизовать стиль. Если у вас есть выбор [@multiple], вы можете сделать то же самое с группой флажков, потому что оба они могут рассматриваться как элемент управления с несколькими вариантами выбора.
Ответ 5
Ответ 6
u может просто использовать атрибут width для «style» для изменения длины раскрывающегося окна
Ответ 7
var i = 0; $("#container > option").each(function() < if($(this).val().length >i) < i = $(this).val().length; console.log(i); console.log($(this).val()); >>); Appearance
The appearance of your Select2 controls can be customized via the standard HTML attributes for elements, as well as various configuration options.
Disabling a Select2 control
Select2 will respond to the disabled attribute on elements. You can also initialize Select2 with disabled: true to get the same effect.
Labels
You can, and should, use a with Select2, just like any other element.
Click this to focus the single select element
Click this to focus the multiple select element
Container width
Select2 will try to match the width of the original element as closely as possible. Sometimes this isn’t perfect, in which case you may manually set the width configuration option:
| Value | Description |
|---|---|
| ‘element’ | Uses the computed element width from any applicable CSS rules. |
| ‘style’ | Width is determined from the select element’s style attribute. If no style attribute is found, null is returned as the width. |
| ‘resolve’ | Uses the style attribute value if available, falling back to the computed element width as necessary. |
| » | Valid CSS values can be passed as a string (e.g. width: ‘80%’ ). |
Example
The two Select2 boxes below are styled to 50% and 75% width respectively to support responsive design:
Select2 will do its best to resolve the percent width specified via a CSS class, but it is not always possible. The best way to ensure that Select2 is using a percent based width is to inline the style declaration into the tag.
Themes
Select2 supports custom themes using the theme option so you can style Select2 to match the rest of your application.
These examples use the classic theme, which matches the old look of Select2.
Various display options of the Select2 component can be changed. You can access the element (or ) and any attributes on those elements using .element .
Style width javascript select
Last updated: May 17, 2023
Reading time · 4 min
# Table of Contents
# How to set the Width of Select Options in HTML & CSS
Set the width CSS property of the select element and its option elements to set the width of a select dropdown using CSS.
If setting the property has no effect, you might have to use the !important flag.
Copied!DOCTYPE html> html lang="en"> head> meta charset="UTF-8" /> style> select width: 300px; > select option width: 300px; > style> head> body> h2>bobbyhadz.comh2> select name="languages" id="language-select"> option value="">--Choose an option--option> option value="javascript">JavaScriptoption> option value="typescript">TypeScriptoption> option value="python">Pythonoption> option value="java">Javaoption> option value="php">PHPoption> option value="php"> A very long select option abc 123 option> select> body> html>
Notice that we set the width of the select element and all of its option elements to the same value — 300px.
Copied!select width: 300px; > select option width: 300px; >
If setting the width has no effect in your case, you might have to use the !important flag.
Copied!select width: 300px !important; > select option width: 300px !important; >
The !important flag allows you to override styles that have higher precedence.
You will most likely want to set the width of the select and its option elements to the same value.
Here is an example of setting the width of the select element and its option elements to different values.
Copied!select width: 150px; > select option width: 300px; >
Setting the width of the select element to a lower value than the width of the option elements is most likely not what you want.
When a wider option is selected, its value is truncated.
Here is an example that sets the width of the select element to 300px and the width of its option elements to 150px .
Copied!select width: 300px; > select option width: 150px; >
# The width of your option elements might exceed the width of your select
In some cases, you might have very wide option elements.
You can try to set the max-width CSS property on the select element but this likely won’t work.
Copied!select width: 300px; max-width: 300px; >
Most browsers will still want to display the entire text of the option element, so setting the width CSS property might not have an effect.
In these cases, it’s best to use JavaScript to trim the text of the option element.
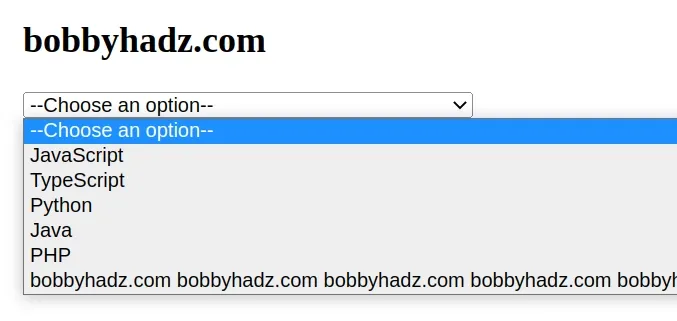
Here is the HTML for the example.
Copied!DOCTYPE html> html lang="en"> head> meta charset="UTF-8" /> style> body margin: 100px; > select width: 300px; > style> head> body> h2>bobbyhadz.comh2> select name="languages" id="language-select"> option value="">--Choose an option--option> option value="javascript">JavaScriptoption> option value="typescript">TypeScriptoption> option value="python">Pythonoption> option value="java">Javaoption> option value="php">PHPoption> option value="php"> bobbyhadz.com bobbyhadz.com bobbyhadz.com bobbyhadz.com bobbyhadz.com bobbyhadz.com bobbyhadz.com bobbyhadz.com bobbyhadz.com option> select> script src="index.js"> script> body> html>
And here is the code for the index.js file.
Copied!const optionElements = document.querySelectorAll('option'); Array.from(optionElements).forEach(element => if (element.textContent.length > 35) element.textContent = element.textContent.slice(0, 35) + '. '; > >);
We used the document.querySelectorAll method to select the option elements on the page.
We then converted the collection to an array using Array.from and used the Array.forEach to iterate over the array.
On each iteration, we check if the textContent of the current option element is greater than 35.
If the condition is met, we use the String.slice method to truncate the text to the first 35 characters and add an ellipsis . .
You might have to play around with the width of the select element and how many characters you want to display in your option elements depending on your use case.
# Set the Width of a Select Option in HTML & CSS using inline styles
If you weren’t able to set the width of the select element and its options using external styles, try using inline styles.
Copied!DOCTYPE html> html lang="en"> head> meta charset="UTF-8" /> head> body> h2>bobbyhadz.comh2> select name="languages" id="language-select" style="width: 240px" > option style="width: 240px" value=""> --Choose an option-- option> option style="width: 240px" value="javascript"> JavaScript option> option style="width: 240px" value="typescript"> TypeScript option> option style="width: 240px" value="python">Pythonoption> option style="width: 240px" value="java">Javaoption> option style="width: 240px" value="php">PHPoption> option style="width: 240px" value="php"> A very long select option abc 123 option> select> body> html>
The example sets the width of the select element and its options using inline styles.
Copied!select name="languages" id="language-select" style="width: 240px" > option style="width: 240px" value=""> --Choose an option-- option> select>
The width of both elements is set to 240px.
Inline styles have higher precedence than external stylesheets, so using this approach might work even if the previous approach didn’t work.
If none of the suggestions worked, you can try to use the !important flag which has the highest precedence.
Copied!select width: 300px !important; > select option width: 300px !important; >
# Additional Resources
You can learn more about the related topics by checking out the following tutorials:
- Set the Value of a Select Element using JavaScript
- Set a Radio button to Checked/Unchecked using JavaScript
- Get the Value/Text of Select or Dropdown on Change using JS
- Show a Div when a Select option is Selected using JavaScript
- Show an Element if a Checkbox is checked using JavaScript
- Show/Hide an element on Radio button Selection using JS
- How to put an Input element on the same line as its Label
- How to fetch and display JSON data in HTML using JavaScript
- Remove the outline (border) around Inputs & Links in Chrome & Firefox
- Change the Background Color on Scroll using JavaScript
- How to set the width and height of a Span in CSS
I wrote a book in which I share everything I know about how to become a better, more efficient programmer.
Javascript Reference — HTML DOM Style width Property
The width property in CSS controls width for block-level elements or on elements with absolute or fixed position.
The width property sets or gets the element’s width.
Browser Support
 |  |  |  |  | |
|---|---|---|---|---|---|
| width | Yes | Yes | Yes | Yes | Yes |
Syntax
Return the width property:
object.style.width='auto|length|%|initial|inherit' Property Values
| Value | Description |
|---|---|
| auto | Let browser decide. Default |
| length | Set the width in length units |
| % | Set the width in percent of the container element |
| initial | Set to default value |
| inherit | Inherit from parent element. |
Technical Details
Example
The following code shows how to set the width of an element.
!DOCTYPE html> html> body> !--from w w w .ja v a2 s .c o m--> button type="button" >"myBtn" onclick="myFunction()">test script> function myFunction() < document.getElementById("myBtn").style.width = "300px"; > The code above is rendered as follows:
Example 3
The following code shows how to change the height and width of an element.
!DOCTYPE html> html> body> !--from www . j av a2s .c o m--> img >"myImg" src="http://java2s.com/style/demo/border.png" width="100" height="132"> br> button type="button" onclick="myFunction()">test script> function myFunction() < document.getElementById("myImg").style.height = "300px"; document.getElementById("myImg").style.width = "300px"; > The code above is rendered as follows:
Example 4
The following code shows how to get the width of an element:
!DOCTYPE html> html> body> img >"myImg" src="http://java2s.com/style/demo/border.png" style="width:100px;height:132px;"> button type="button" onclick="myFunction()">test !--from w w w . j a va 2 s . c o m--> script> function myFunction() < console.log(document.getElementById("myImg").style.width); > The code above is rendered as follows:
java2s.com | © Demo Source and Support. All rights reserved.