- How to Store and Retrieve Image from database in Php
- Store and Retrieve Image from database in Php
- How to Upload Image in PHP and Store in Database and Folder
- How to Display an Image in Php from MySQL Database Example
- Conclusion
- Store and Retrieve Image from MySQL Database using PHP
- Insert Image File in MySQL
- Create Database Table
- Database Configuration (dbConfig.php)
- Image Upload Form
- Store Image File in Database (upload.php)
- Retrieve image from database (view.php)
- Conclusion
How to Store and Retrieve Image from database in Php
So, I am going to explain and showing you the best method to store and retrieve image from database in PHP.
And about with the code of upload and fetch an image from the MySQL database using PHP. As well as, when the insert image in MySQL database then with upload image a specific folder.
For example, we given all the easy ways to implement. So, insert and display images from the database with the code example step by step in the below section.
Store and Retrieve Image from database in Php
In this paragraph, I am showing you all steps to upload images and retrieve images from the database. Also, store an image in the folder using Php.
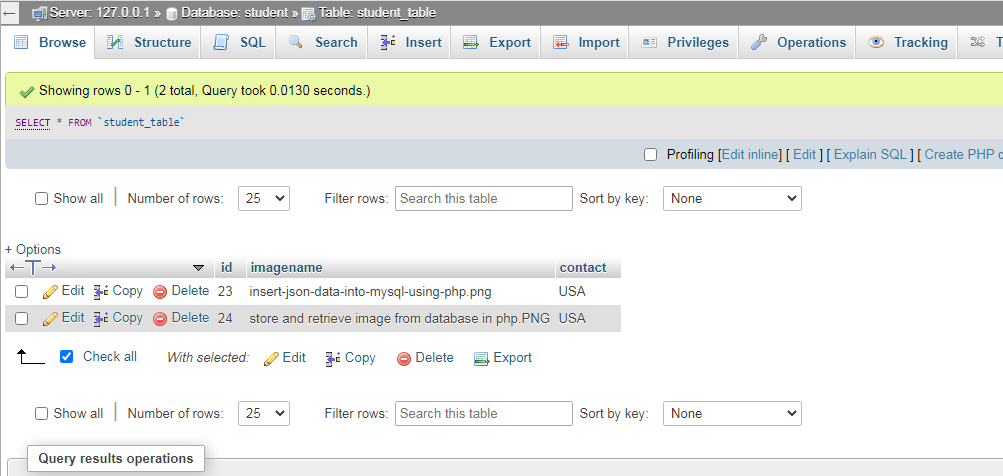
else < echo "Not Insert Image"; >> // Fetch image from database $img = mysqli_query($conn, "SELECT * FROM student_table"); while ($row = mysqli_fetch_array($img)) < echo " "; > ?>
 Generally, mostly use this method to store an image in a folder from MySQL database using Php.
As well as, some steps to following it. So, how to upload image from the database in the below section.
- Firstly, create a connection to the MySQL database.
- After that, Write input fields to store images using Php.
- Secondly, write the code of File to upload images in the folder.
- Add retrieve image code from the database in Php.
Here, these are some main points to clarify the purpose of code. Also, mentioned this code on your page everywhere.
Note: we have to implement these steps code on the above section. Find and add this code to your project.
How to Upload Image in PHP and Store in Database and Folder
Afterward, I discuss how to create a database connection for store image. As a rule, the SQL database provides a query that has to define over the code.
Step 1: Create a Database connection
Hence, in this query SQL given a direct connection with the database. As a rule, MySQLi they pass four-parameter. Namely, Servername, Username, Password, and Database name.
Such as, you can mention all parameter names properly in this SQL element function.
Step 2: Create Folder and file name with Insert Image Query MySQL code in Php.
// Get the name of images $Get_image_name = $_FILES['image']['name']; // image Path $image_Path = "images/".basename($Get_image_name); $sql = "INSERT INTO student_table (imagename, contact) VALUES ('$Get_image_name', 'USA')"; // Run SQL query mysqli_query($conn, $sql); if (move_uploaded_file($_FILES['image']['tmp_name'], $image_Path)) < echo "Your Image uploaded successfully"; >else < echo "Not Insert Image"; >>By the way, when you want to upload images in folder and SQL database in Php.
So, apply this code above implement insert query or folder upload image. Also, check the main topic about SQL Insert Multiple Rows
Therefore, we have to explain how to store an image in a folder from the database.

So, you can this image there is a folder of image store and inside the folder, all collect the image if you insert an image from the database.
Step 3: Insert image and fetch image Html structure code
Here, this is a code of form for an upload image files from the frontend.
So, in this form have one input that fetches image file and other fields for a button that is the event when clicking this button then run our program query. These are conditions that are used to over code.

How to Display an Image in Php from MySQL Database Example
Similarly, as same, we declared the display image code above.
Now, specified only display image from the database. See inside code here we implement query to fetch an image from MySQL database. As well as, have some examples.
// database connection $conn = mysqli_connect("localhost", "root", "", "student"); // Fetch image from database $img = mysqli_query($conn, "SELECT * FROM student_table"); while ($row = mysqli_fetch_array($img)) < echo ""; > As a rule, this is mainly commonly used in this code for fetch data from the folder.
So, I have created a database of student names. Also, create a table in the database whose name is student_table.
Here, we have to insert over image path. Also, the store image folder then gets the path and showing an image the same as the frontend.
Afterward, store and retrieve image both code available above code section. Also, you can retrieve multiple images from the database and folder.
As a rule, as you know about that whenever started this functionality.
Firstly, get the image name from an image using code and then put the image name in the database name.
As well as, upload image a folder this is the proper way to program the store and display image in the database.
Conclusion
In this article, included code of store and retrieve image from database in Php.
So then, if you any other queries and issues with it ask from the comment section. Also, you can learn more about How to Insert JSON data into MySQL using PHP
Store and Retrieve Image from MySQL Database using PHP
Generally, when we upload image file in PHP, the uploaded image is stored in a directory of the server and the respective image name is stored in the database. At the time of display, the file is retrieved from the server and the image is rendered on the web page. But, if you don’t want to consume the space of the server, the file can be stored in the database only. You can upload an image without storing the file physically on the server using the MySQL database. It’s very easy to store and retrieve images from the database using PHP and MySQL.
If you’re concerned about the server space and need free space on your server, you can insert the image file directly in the database without uploading it to the directory of the server. This procedure helps to optimize the server space because the image file content is stored in the database rather than the server. In this tutorial, we will show you how to store image files into the MySQL database and retrieve images from the database using PHP.
Before getting started to integrate file upload with the database, take a look at the file structure.
store_retrieve_image_from_database/ ├── dbConfig.php ├── index.php ├── upload.php ├── view.php └── css/ └── style.css
Insert Image File in MySQL
MySQL has a BLOB (binary large object) data type that can hold a large amount of binary data. The BLOB data type is perfect for storing image data in the database. In MySQL, four BLOB types are available – TINYBLOB, BLOB, MEDIUMBLOB, and LONGBLOB. The LONGBLOB data type is perfect to store the image file data.
Create Database Table
To store the file content, a table is required in the database. The following SQL creates an images table with the LONGBLOB data type field in the MySQL database.
CREATE TABLE `images` ( `id` int(11) NOT NULL AUTO_INCREMENT, `image` longblob NOT NULL, `created` datetime NOT NULL DEFAULT current_timestamp(), PRIMARY KEY (`id`) ) ENGINE=InnoDB DEFAULT CHARSET=utf8 COLLATE=utf8_unicode_ci;
Database Configuration (dbConfig.php)
The dbConfig.php file is used to connect and select the database. Specify the database host ( $dbHost ), username ( $dbUsername ), password ( $dbPassword ), and name ( $dbName ) as per your MySQL database credentials.
// Database configuration
$dbHost = "localhost";
$dbUsername = "root";
$dbPassword = "root";
$dbName = "codexworld";

// Create database connection
$db = new mysqli($dbHost, $dbUsername, $dbPassword, $dbName);

// Check connection
if ($db->connect_error) <
die("Connection failed: " . $db->connect_error);
>
Image Upload Form
Create an HTML form with a file input field to select an image file for upload. Make sure the < form >tag contains the following attributes.
form action="upload.php" method="post" enctype="multipart/form-data"> label>Select Image File: label> input type="file" name="image"> input type="submit" name="submit" value="Upload"> form>
Store Image File in Database (upload.php)
The upload.php file handles the image upload and database insertion process.
- Check whether the user selects an image file to upload.
- Retrieve the content of image file by the tmp_name using PHP file_get_contents() function.
- Insert the binary content of the image in the database using PHP and MySQL.
- Show the image uploading status to the user.
// Include the database configuration file
require_once 'dbConfig.php';

// If file upload form is submitted
$status = $statusMsg = '';
if(isset($_POST["submit"])) <
$status = 'error';
if(!empty($_FILES["image"]["name"])) <
// Get file info
$fileName = basename($_FILES["image"]["name"]);
$fileType = pathinfo($fileName, PATHINFO_EXTENSION);

// Allow certain file formats
$allowTypes = array('jpg','png','jpeg','gif');
if(in_array($fileType, $allowTypes)) <
$image = $_FILES['image']['tmp_name'];
$imgContent = addslashes(file_get_contents($image));

// Insert image content into database
$insert = $db->query("INSERT into images (image, created) VALUES ('$imgContent', NOW())");

if($insert) <
$status = 'success';
$statusMsg = "File uploaded successfully.";
>else <
$statusMsg = "File upload failed, please try again.";
>
>else <
$statusMsg = 'Sorry, only JPG, JPEG, PNG, & GIF files are allowed to upload.';
>
>else <
$statusMsg = 'Please select an image file to upload.';
>
>

// Display status message
echo $statusMsg;
?>
Retrieve image from database (view.php)
In the view.php file, we will retrieve the image content from the MySQL database and list them on the web page.
- The data, charset, and base64 parameters in the src attribute, are used to display image BLOB from MySQL database.
// Include the database configuration file
require_once 'dbConfig.php';

// Get image data from database
$result = $db->query("SELECT image FROM images ORDER BY id DESC");
?>  if($result->num_rows > 0) ?>
 div class="gallery">
 while($row = $result->fetch_assoc()) ?>
 img src="data:image/jpg;charset=utf8;base64, echo base64_encode($row['image']); ?>" />
 > ?>
 div>
 >else ?>
 p class="status error">Image(s) not found. p>
 > ?>
Conclusion
This tutorial helps you to integrate file upload functionality without storing files on the server. You can use this example script to upload & store images in the database, and fetch images from the database, and display them on the webpage using PHP and MySQL. To make the image upload process user-friendly, use jQuery to upload files with progress bar using Ajax and PHP.
Are you want to get implementation help, or modify or enhance the functionality of this script? Click Here to Submit Service Request
If you have any questions about this script, submit it to our QA community — Ask Question