- How to Create a Simple Web Page with HTML
- Adding a Head to Your HTML
- Adding a Body and Text to Your HTML
- All CSS Tutorials
- The final product
- 1. Plan your layout
- 2. Get the ‘boilerplate code’ set up
- 3. Create the elements in your layout
- 4. Fill in the HTML content
- 5. Add some basic layout CSS
- 6. Add more specific styles
- 7. Add colors and backgrounds
- 8. Celebrate! 🎉
- Further reading
- Conclusion
- Your FREE guide to learning HTML! 🎁
How to Create a Simple Web Page with HTML
This article was co-authored by wikiHow staff writer, Nicole Levine, MFA. Nicole Levine is a Technology Writer and Editor for wikiHow. She has more than 20 years of experience creating technical documentation and leading support teams at major web hosting and software companies. Nicole also holds an MFA in Creative Writing from Portland State University and teaches composition, fiction-writing, and zine-making at various institutions.
The wikiHow Tech Team also followed the article’s instructions and verified that they work.
This article has been viewed 4,543,027 times.
This wikiHow teaches you how to write a simple web page with HTML (hypertext markup language). HTML is one of the core components of the World Wide Web, making up the structure of web pages. Once you’ve created your web page, you can save it as an HTML document and view it in your web browser. Creating an HTML page is possible using basic text editors found on both Windows and Mac computers.
Adding a Head to Your HTML


Type in and press ↵ Enter . This tells the web browser that this is an HTML document. [1] X Research source


Type in and press ↵ Enter . This is the tag that opens your HTML head. The HTML head information that is not usually displayed on your web page. This information can include, the title, meta data, CSS style sheets, and other scripting languages. [2] X Research source


Type and press ↵ Enter . This is the tag to close your head. Your HTML code should look something like this.
html> head> title>My Web Pagetitle> head> Adding a Body and Text to Your HTML

Type in below the closed «Head» tag. This tag opens the body of your HTML document. Everything that goes in the HTML body displays on the web page.

Type in . This is the tag to add a heading to your HTML document. A Heading is large bold text that typically goes at the top of your HTML document.


- Add additional headings as you go. There are six different headings that you can create by using the through tags. These create headings of different sizes. For example, to create three different-sized headings in succession, you might write the following:
h1>Welcome to My Page!h1> h2>My name is Bob.h2> h3>I hope you like it here.h3> 
Type
. This is the tag to open a paragraph. Paragraph text is used to display normal sized text.

Type some text. This can be a description for your web page or any other information you wish to share.

Type
after your text and press ↵ Enter . This the tag to close your paragraph text. The following is an example of paragraph text in HTML:
- You can add multiple paragraph lines in a row in order to create a series of paragraphs under one heading.
- You can change the color of any text by framing the text with the and tags. Make sure to type your preferred color into the «color» section (you’ll keep the quotes). You can turn any text (e.g., headers) into a different color with this set of tags. For example, to turn a paragraph’s text blue, you would write the following code:
Whales are majestic creatures.
- You can add bolds, italics and other text formats using HTML. The following are examples of how you can format text using HTML tags: [3] X Research source
b>Bold textb> i>Italic texti> u>Underlined textu> sub>Subscript textsub> sup>Superscript textsup> All CSS Tutorials
This article is more about guiding you through the though-process of creating a website, rather than the techncical side of things. If you’re coming here because you want to learn how to code websites, check out How to learn web development, or my series on learning HTML.
The final product
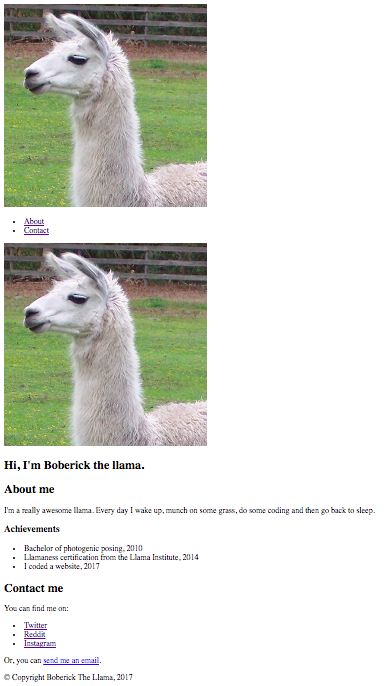
Here’s the final product of the site I’ll be building today. Take a look at it, and keep it in mind as we go through the tutorial.
It’s going to be a fictional site about Boberick the llama (I get the strangest ideas sometimes…)
1. Plan your layout
The first step of any website is always to know what you want on it and (vaguely) how you want it to look. So, the first step is to do a rough sketch — either on paper or on the computer, depending on which you find easier.
Remember, it doesn’t have to look good. Here’s mine:
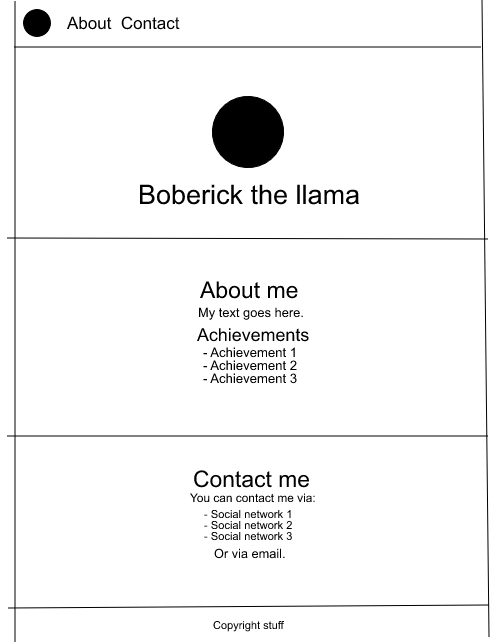
As you can see, it’s very rough. The lines aren’t straight and nothing is even but I can still see how the site is going to look and what sections I need to have.
In this layout, I have a header (navigation bar), three sections and a footer.
2. Get the ‘boilerplate code’ set up
Now, it’s time to get the basic code that you have at the start of any website (this is commonly called the boilerplate).
- Creating a new folder on your computer for the website
- Create new empty index.html and style.css files inside
- Add the basic ‘boilerplate code’ to your index.html file:
html> head> title>Boberick the llamatitle> link rel="stylesheet" href="style.css"> head> body> h1>Just testing this works!h1> body> html> Finally, open up your index.html in a web browser to check everything’s working:

This article will be more about explaining the process of creating a website, so I won’t be explaining the actual code in detail — but you can still follow along if you want.
If so, follow the steps above to get started!
3. Create the elements in your layout
Now it’s time to create the layout/section elements that you planned in step 1!
The best way to do this is by using semantic elements: , , , and .
html> head> title>Boberick the llamatitle> link rel="stylesheet" href="style.css"> head> body> header> header> main> section id="hero"> section> section id="about"> section> section id="contact"> section> main> footer> footer> body> html> Note that we are giving the s id s, so we can refer to them later.
If you reload the page, you will see there is nothing there — this is because we are just creating the sections of the page, not the actual stuff in them.
4. Fill in the HTML content
Once you have the sections of the page, it’s time to fill them up! If you know what content you are going to be using, put that in. If not, put in some dummy text and replace it with the actual content later.
Here is the HTML after filling in some content:
html> head> title>Boberick the llamatitle> link rel="stylesheet" href="style.css"> head> body> header> img src="https://codetheweb.blog/assets/img/posts/steps-to-creating-a-website/llama.jpg" class="profile-img"> nav> ul> li>a href="#hero">Homea>li> li>a href="#about">Abouta>li> li>a href="#contact">Contacta>li> ul> nav> header> main> section id="hero"> div class="section-inner"> img src="https://codetheweb.blog/assets/img/posts/steps-to-creating-a-website/llama.jpg" class="profile-img"> h1>Hi, I'm Boberick the llama.h1> div> section> section id="about"> div class="section-inner"> h2>About meh2> p>I'm a really awesome llama. Every day I wake up, munch on some grass, do some coding and then go back to sleep.p> h3>Achievementsh3> ul> li>Bachelor of photogenic posing, 2010li> li>Llamaness certification from the Llama Institute, 2014li> li>I coded a website, 2017li> ul> div> section> section id="contact"> div class="section-inner"> h2>Contact meh2> p>You can find me on:p> ul> li>a href="https://twitter.com/llama">Twittera>li> li>a href="https://www.reddit.com/user/llama">Reddita>li> li>a href="https://www.instagram.com/llamasporfavor/">Instagrama>li> ul> p>Or, you can a href="mailto:[email protected]">send me an emaila>.p> div> section> main> footer> © Copyright Boberick The Llama, 2017 footer> body> html> If you reload the page, you will see that we now have some content!
5. Add some basic layout CSS
Once we’re done with our HTML, it’s time to move on to CSS! The first and most important part to focus on first is to get it looking like our layout — then we can focus on the details.
This means that we need to focus on properties like width , height , margin , padding , position , and display . Also, we need to make sure the images are the right size so that they don’t obliterate the page.
Here is the CSS that we will add to our style.css :
body margin: 0; margin-top: 50px; > header display: flex; position: fixed; top: 0; left: 0; right: 0; height: 50px; line-height: 50px; background-color: #eee; > header * display: inline; height: 50px; > header ul padding: 0; > header li margin-left: 20px; > section height: 100vh; border: 1px solid black; display: flex; justify-content: center; align-items: center; text-align: center; > #hero .profile-img width: 300px; > footer text-align: center; padding: 50px; > Here, we are only adding styles to make our overall layout look similar — not the individual content. We make sure that the sections are set to 100% viewport height, make the header have a fixed position, position the items in the header, and more. We also use flexboxes to center the content in our sections.
6. Add more specific styles
Once the basic framework of the site is done, we can add more specific styles.
Now we can make our website look good!
body margin: 0; margin-top: 50px; font-family: sans-serif; /* Add this line */ > header display: flex; position: fixed; top: 0; left: 0; right: 0; height: 50px; line-height: 50px; background-color: #eee; > header * display: inline; height: 50px; > header ul padding: 0; > header li margin-left: 20px; > section height: 100vh; border: 1px solid black; display: flex; justify-content: center; align-items: center; text-align: center; > #hero .profile-img width: 300px; border-radius: 50%; /* Add this line */ > footer text-align: center; padding: 50px; > /* Add everything below here */ #hero h1 font-size: 3em; > section h2 font-size: 2.5em; > section h3 font-size: 1.5em; > header a text-decoration: none; color: black; > As you can see, we’ve made the title bigger, rounded our image (using border-radius ), and changed the font. We’ve also removed some default styling from the header links.
7. Add colors and backgrounds
Yay, we’re on the home stretch now! It’s time to add the finishing touches to our website — colors and backgrounds!
This is what will make our site look really awesome.
body margin: 0; margin-top: 50px; font-family: sans-serif; > header display: flex; position: fixed; top: 0; left: 0; right: 0; height: 50px; line-height: 50px; background-color: #eee; > header * display: inline; height: 50px; > header ul padding: 0; > header li margin-left: 20px; > section height: 100vh; border: 1px solid black; display: flex; justify-content: center; align-items: center; text-align: center; background-size: cover; /* Add this line */ background-position: center center; /* Add this line */ background-repeat: no-repeat; /* Add this line */ background-attachment: fixed; /* Add this line */ > #hero .profile-img width: 300px; border-radius: 50%; > footer text-align: center; padding: 50px; > #hero h1 font-size: 3em; > section h2 font-size: 2.5em; > section h3 font-size: 1.5em; > header a text-decoration: none; color: black; > /* Add everything below here */ #hero background-image: linear-gradient(rgba(255,255,255,0.75),rgba(255,255,255,0.75)), url('https://codetheweb.blog/assets/img/posts/steps-to-creating-a-website/field.jpg'); > #about background-image: linear-gradient(rgba(255,255,255,0.75),rgba(255,255,255,0.75)), url('https://codetheweb.blog/assets/img/posts/steps-to-creating-a-website/beach.jpg'); > #contact background-image: linear-gradient(rgba(255,255,255,0.75),rgba(255,255,255,0.75)), url('https://codetheweb.blog/assets/img/posts/steps-to-creating-a-website/canyon.jpg'); > As you can see, we’ve added some general background styles to the section elements, as well as adding a background-image to each section individually.
The reason for the linear-gradient(rgba(255,255,255,0.75),rgba(255,255,255,0.75)), before the url(‘image.jpg’) is because otherwise the text is hard to read — so we add a semi-transparent white overlay ontop. I wrote a bit more about that in my article on how to create a full-page hero image.
8. Celebrate! 🎉
Woo! You’re finally done your website! Now, go show it off to your friends, family and the entire internet 😉
Further reading
If you want to know more about a specific section of what I was showing today, check out:
Conclusion
So, I hope you enjoyed this article and hopefully you learned something along the way!
I did something a little different from usual today, so tell me your thoughts. Remember, this article is less about me showing you the actual technical parts of creating a website, but more about guiding you through the thought-process of creating a website.
If you liked this article, please be an awesome human and share or sign up to the newsletter, I’ll give you a free taco 🌮 (not really 😜 )
Have fun, keep coding, and I’ll see you next time, where’ I’ll be talking about how to style a navigation bar (header) using CSS — walking you through the nav bar that we created today, but in more detail. See you then!
This article was suggested by Alisa Dubik-Wilson — thanks! If you also want to suggest an article, you can contact me or tell me in the comments.