- How To Set Up Your CSS and HTML Website Project
- Prerequisites
- How To Prepare Your index.html File For HTML Content
- Conclusion
- Tutorial Series: How To Build a Website With CSS
- Tips for Optimal Browsing
- How to Get Rid of chrome://quick_start/content/index.html?
- How to Fix Browser Newtab Error Automatically with Security Tool SpyHunter?
- Как создать первую веб-страницу
- Текстовые редакторы
- Браузер
- Почему именно index.html ?
- Но прежде буквально пару слов о тегах
How To Set Up Your CSS and HTML Website Project
In this tutorial, you will set up the folders and files necessary for building a website with HTML and CSS. You will also prepare an index.html file so that it is ready to receive HTML content in the tutorials ahead.
Prerequisites
If you have been following along with this tutorial series, you can continue using the css-practice project directory, index.html file, images folder, css folder, and styles.css file that you created earlier in the series. If you have not been following along this tutorial series and need instructions for setting up these folders and files, please see our earlier tutorial in this series How To Set Up Your CSS and HTML Practice Project.
Note: If you decide to create your own names for the folders or files, make sure to avoid character spaces, special characters (such as !, #, %, or others), and capital letters, as these can cause problems later on. Be aware also that you will need to modify your file paths in some of the steps throughout the remainder of this tutorial series to ensure that they correspond with the names of your files.
You should have a project folder named css-practice that contains the following folders and files that are necessary to explore CSS in this tutorial series:
- A folder named css that contains the file styles.css
- An empty folder named images
- A file named index.html
In the first step of this tutorial, you will prepare the index.html file so that it is ready to receive content in the tutorials ahead.
How To Prepare Your index.html File For HTML Content
To prepare your index.html file to serve as your website’s homepage, we’ll need to add a few important lines of HTML. These lines of HTML will serve as instructions for the browser and will not be displayed on the webpage itself. Make sure that your index.html file is empty (if you have content from previous tutorials) and add the following code snippet to the document:
DOCTYPE html> html lang="en"> head> meta charset="utf-8"> title>Sammy the Sharktitle> link rel="stylesheet" href="css/styles.css"> head> body> body> html> Make sure to change the highlighted site title with a title of your own choosing. Then save the index.html file. Before continuing, let’s briefly review the code that you just added to understand its purpose:
- The declaration tells the browser which type of HTML is being used in this document. It is important to declare this value as there are multiple versions of the HTML standard, and browsers need to know which to use. In this declaration, html specifies the current web standard of HTML, which is HTML5.
- The opening and closing tags tell the browser that all content inserted between these two tags should be interpreted as HTML. Inside this tag, you also added the lang attribute, which specifies the language of the webpage. In this example, the language is set to English using the en language tag. For a full list of language tags, visit the IANA Language Subtag Registry.
- The opening and closing tags creates a section in the HTML document that typically contains information about the page, rather than page content itself. Browsers do not display the information in a section.
- The tag specifies the document’s character set should be UTF-8, a unicode format that supports a majority of characters from a wide variety of written languages.
- The tag tells the browser the name of the webpage. This title appears on the browser tab and when the site is listed in search results but it does not show up on the web page itself. Make sure to replace “Sammy the Shark” with your name or a title of your choosing if you want to personalize the site.
- The tells the browser where to find the stylesheet that contains the style rules. If you followed the instructions earlier in this series How To Set Up Your CSS and HTML Practice Project, your stylesheet should be located at this file path.
- The opening and closing tags will contain the main content of the webpage. You’ll add the HTML content between these tags in the tutorials ahead.
Conclusion
You have now created all of the folders and files necessary for creating a website with HTML and CSS. You should also have an index.html file prepared with the necessary HTML content for serving as your website’s homepage. In the next tutorial, you’ll explore how the demonstration site is constructed and the steps you will take to recreate it.
Thanks for learning with the DigitalOcean Community. Check out our offerings for compute, storage, networking, and managed databases.
Tutorial Series: How To Build a Website With CSS
This tutorial is part of a series on creating and customizing this website with CSS, a stylesheet language used to control the presentation of websites. You may follow the entire series to recreate the demonstration website and gain familiarity with CSS or use the methods described here for other CSS website projects.
Before proceeding, we recommend that you have some knowledge of HTML, the standard markup language used to display documents in a web browser. If you don’t have familiarity with HTML, you can follow the first ten tutorials of our series How To Build a Website With HTML before starting this series.
Tips for Optimal Browsing
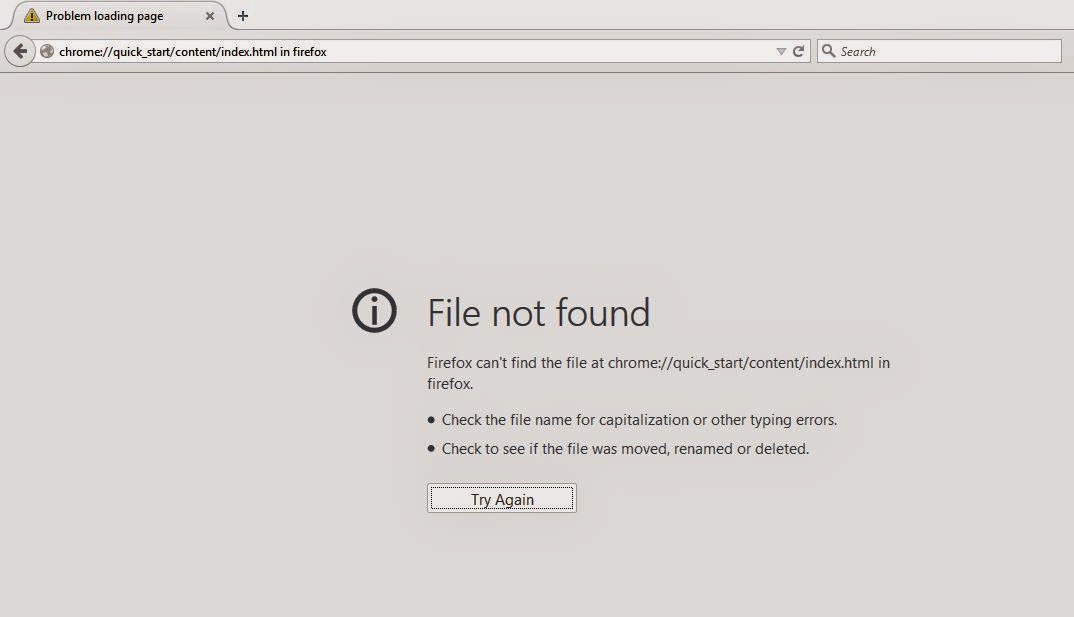
The occurrence of chrome://quick_start/content/index.html has frustrated a growing number of computer users.
CASE 1: «I cannot set my homepage. I want it to be Google, so I write Google address in the settings but when I open the browser it says it can’t find the website and in the address bar there’s «chrome://quick_start/content/index.html». I’m using Firefox. So how can I fix it?»
CASE 2: «I had to undertake some changes on my computer recently i.e. install Windows 7 after XP finished and other small alterations. Somehow the following started to appear in my address line: chrome://quick_start/content/index.html.»
CASE 3: «my new tab opens with chrome://quick_start/content/index.html on the adress bar. how do i get rid of it. after installing camstudio. i’m stuck with this. although my Firefox isn’t disturbed i wanna rid it asap.help!»
CASE 4: «Recently, when I search for something (using Bing), when I want to close the page by clicking on the small»x» in the tab at the top of the page, I get the error message «File not found — Firefox can’t find the file at chrome://quick_start/content/index.html.»
Is your Firefox new tab taken by chrome://quick_start/content/index.html, too? Does it also appear if you want to open any additional window while searching? You may take a second to follow the easy steps below and get the issue fixed quickly.
How to Get Rid of chrome://quick_start/content/index.html?
Your firefox new tab page has been altered so you will receive such error. Luckily, it is quite easy to relevant settings back.
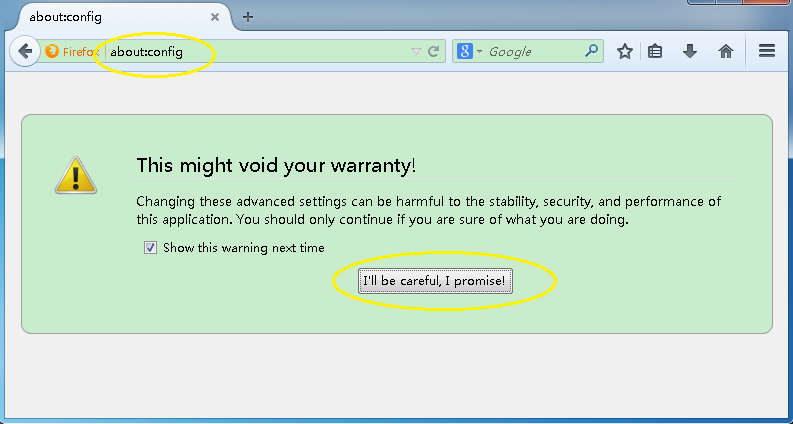
Solution One: Reconfigure new tab settings by using about:config
1) Open a new tab, type «about:config» in the url box and click «I’ll be careful, I promise!» button
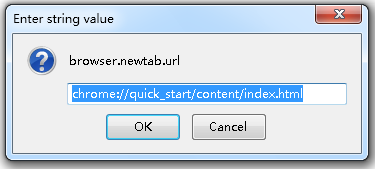
2)At the popping up window, type «newtab» in the Search box and click Enter. find out the entry with browser.newtab.url preference name and chrome://quick_start/content/index.html value


.png)
You could also type «about:blank» or «about:home» to omeget a blank new tab or home tab.
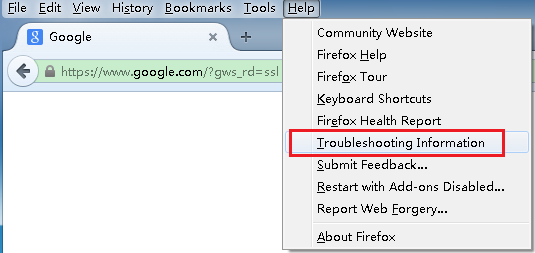
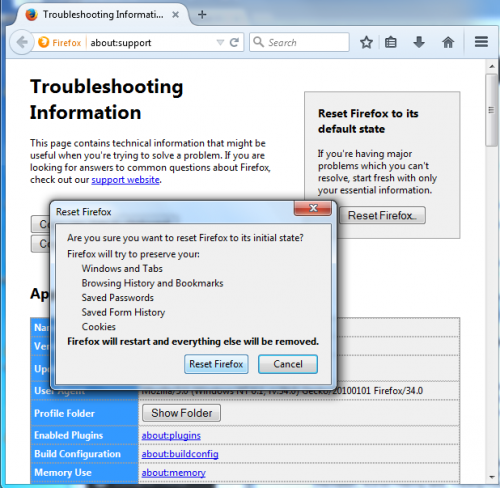
Solution Two: Restore your firefox to default
1) Click on the orange Firefox icon->> choose Help ->>choose Troubleshooting information
2) Click on Reset Firefox. Choose Reset Firefox again to make sure that you want to reset the browser to its initial state.
If the above settings won’t work on your computer, there is possibility that something bad such as browser-modifier performing malicious actions and take hold of your Firefox in the background. In this case, you may check in your Programs list for suspicious programs that might be the perpetrator.
(You are highly advised to download and install the most popular security tool — SpyHunter for assistance if you are not skilled in fixing manually . The tool designed to locate and delete corrupt files will help you out without pain.)
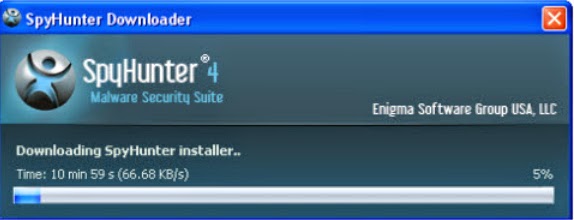
How to Fix Browser Newtab Error Automatically with Security Tool SpyHunter?
Tip 2. Follow the on-screen instructions to install the removal tool
(Double click on the download file and follow the prompts to install the program.)

.jpg)
Tip 3. Run SpyHunter to scan your PC
After the installation, run SpyHunter and click «Malware Scan» button to start a full or quick scan.


You are not suggested to take anything haunting and overtaking browsers like all kinds of security warning or error pop-ups slightly. If you fail to finish the manual removal due to any reason, you could feel free to run a scan anything suspicious with SpyHunter .
(The recommended free scanner is for malware detection only. If it detects the target on your computer, you could consider to activate the anti-malware tool to clean up your machine efficiently!)
Как создать первую веб-страницу
Данная статья написана командой Vertex Academy. Это одна из статей из нашего Самоучителя по HTML&CSS. Надеемся, что данная статья Вам будет полезна. Приятного прочтения!
В этой статье вы получите подсказки и советы, после которых сможете создать свою первую веб-страницу. Абсолютно с нуля. Поэтому весь материал будет излагаться максимально подробно.
Все, что вам понадобится, это
В качестве текстового редактора можно использовать как обычный Блокнот, так и более продвинутые программы. Рассмотрим некоторые из них:
Текстовые редакторы
Блокнот – это стандартная программа ОС Windows. Чтобы создать документ в этом редакторе – кликните по рабочему столу правой кнопкой мыши, выберите «создать» «текстовый документ».
Notepad++ представляет собой по сути более продвинутый блокнот, но в нем есть подсветка HTML-синтаксиса, что делает чтение кода более удобным. Рекомендую использовать этот редактор в процессе обучения.
Чтобы скачать Notepad++ идем на их сайт и жмем «download». После завершения загрузки устанавливаем его на свой компьютер. Программа абсолютно бесплатна.
Также в него можно установить плагины, которые позволят избежать кучи ручной работы, но для начала нам нужно набить руку и написать сотни метров кода именно вручную, чтобы все лучше усвоилось. Поэтому о плагинах пока не думаем.
Помните, как в 1-м классе мы писали одну и ту же букву по несколько строк в специальных тетрадках в косую линию? 🙂 Считайте, что сейчас я прошу вас писать эти буковки, т.к. это улучшит ваше понимание и запоминание кода.
Sublime Text очень удобен тем, что подсказывает теги (автодополнение), сам делает отступы, закрывает теги и много чего другого. Словом, он очень упрощает работу над HTML-документом, но рекомендую использовать его позже, когда уже выучите хотя бы основные теги и поймете главные правила синтаксиса. Правда, если у вас не Windows, а другая операционка – ставьте сразу Sublime.
Здесь выбирайте подходящую вам систему и качайте. Программой можно пользоваться бесплатно, но, если вам захочется убрать надпись “unregistered” – придётся заплатить $70.
Браузер
Используйте любой на ваш вкус. Но большинство разработчиков для веб разработки используют именно Chrome, который имеет ряд инструментов, которые облегчают жизнь разработчика. Имейте в виду, что некоторые браузеры могут по-разному отображать один и тот же код, поэтому, когда дело дойдет до создания серьезного сайта – его нужно будет проверить во всех популярных браузерах.
Итак, с рабочим инвентарём мы определились.
Теперь создайте папку с любым названием, например, “HTML_Start” и в ней сохраните свой первый HTML-документ:
- Открываем Notepad++
- В левом верхнем углу жмём «Файл» — «сохранить как», выбираем нашу папку
- Называем файл «index.html», либо просто «index» и в строке «тип файла» выбираем Hyper Text Markup Language file.
- Жмём «сохранить».
Конечно, первый файл вы можете назвать как угодно, но предлагаю сразу учиться, как правильно.
Почему именно index.html ?
Обычно мы заходим на сайт с главной страницы. Когда у сайта множество страниц, мы подсказываем веб-серверу, которую из них нужно загружать автоматически. В большинстве случаев, адрес сайта указывается кратко, без лишних файлов на конце. Сравните, vertex-academy.com и vertex-academy.com/index.html – это одна и та же страница, но мы конечно же напишем, как в первом варианте. Вот тогда браузер заходит в папку сайта и определяет файл, который нужно показать. Если index.html в этой папке отсутствует, тогда браузер покажет список всех файлов, которые лежат в этой папке.
Теперь мы наконец готовы создать свою первую веб-страницу.
Но прежде буквально пару слов о тегах
HTML-код всегда помещен между угловых скобок.
Например,