Stacked Bar Charts with Labels in Matplotlib

This post will go through a few examples of creating stacked bar charts using Matplotlib. We’ll look at some styling tweaks (like choosing custom colors) as well as go through how to add labels to the bars, both the totals and sub-totals for each bar.
And be sure to check out our related post on creating stacked bar charts using several python libraries beyond Matplotlib, like Seaborn and Altair.
Simple Stacked Bar Chart
The general idea for creating stacked bar charts in Matplotlib is that you’ll plot one set of bars (the bottom), and then plot another set of bars on top, offset by the height of the previous bars, so the bottom of the second set starts at the top of the first set. Sound confusing? It’s really not, so let’s get into it.
Let’s first get some data to work with.
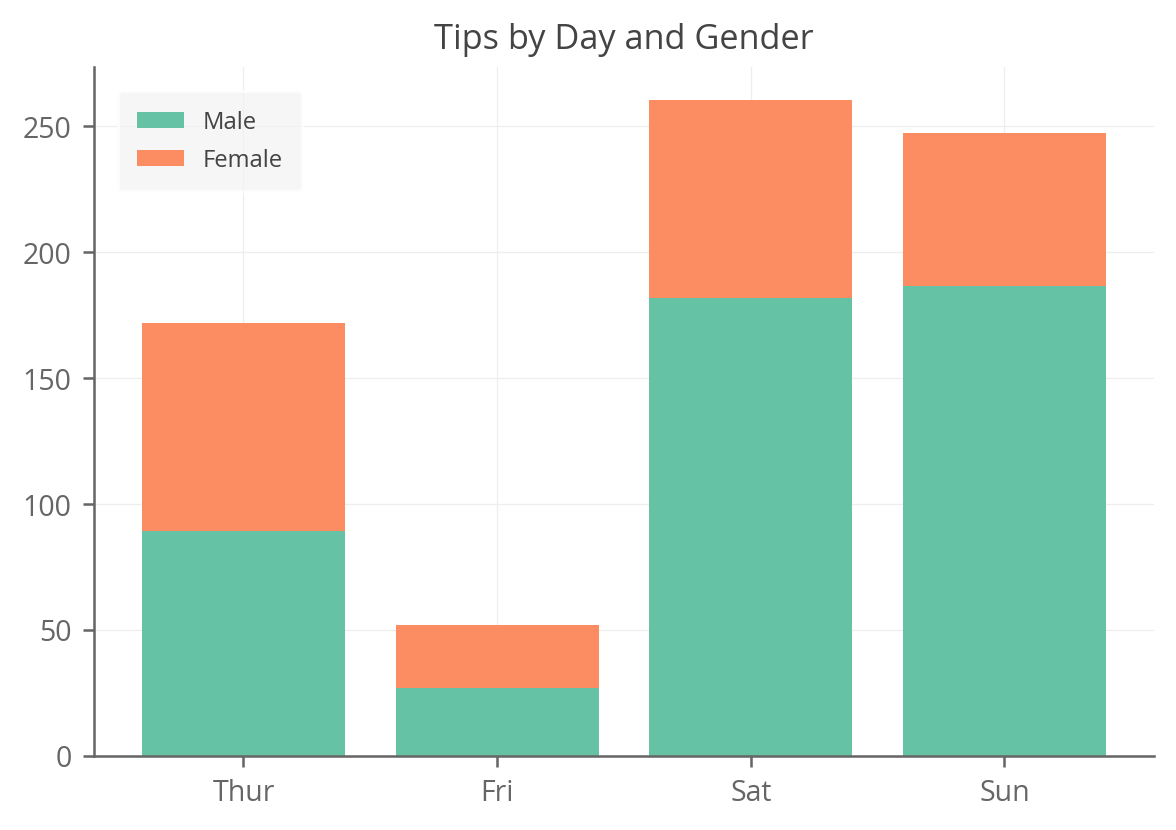
import seaborn as sns tips = sns.load_dataset('tips') # Let's massage the data a bit to be aggregated by day of week, with # columns for each gender. We could leave it in long format as well ( # with gender as values in a single column). agg_tips = tips.groupby(['day', 'sex'])['tip'].sum().unstack().fillna(0) agg_tips Now let’s create our first chart. We want to know the total amount tipped by day of week, split out by gender.
from matplotlib import pyplot as plt fig, ax = plt.subplots() # First plot the 'Male' bars for every day. ax.bar(agg_tips.index, agg_tips['Male'], label='Male') # Then plot the 'Female' bars on top, starting at the top of the 'Male' # bars. ax.bar(agg_tips.index, agg_tips['Female'], bottom=agg_tips['Male'], label='Female') ax.set_title('Tips by Day and Gender') ax.legend() As you can see, it’s pretty simple. We first plot tips that males gave and then plot tips that females gave, but give an additional bottom argument to tell Matplotlib where to start the bars (which happens to be the values of the previous bars; in this case male tips).
The above code generates this lovely plot:
Customizing the Stacked Bar Chart
The problem with the above code is that it starts to get very verbose, and quite repetitive, if we have more than a few layers in our stacked bars. So let’s make it a bit more DRY.
import numpy as np from matplotlib import pyplot as plt fig, ax = plt.subplots() # Initialize the bottom at zero for the first set of bars. bottom = np.zeros(len(agg_tips)) # Plot each layer of the bar, adding each bar to the "bottom" so # the next bar starts higher. for i, col in enumerate(agg_tips.columns): ax.bar(agg_tips.index, agg_tips[col], bottom=bottom, label=col) bottom += np.array(agg_tips[col]) ax.set_title('Tips by Day and Gender') ax.legend() This gives the exact same output as above, but is much nicer because we can apply it to any stacked bar need now, and it can handle as many layers as you need.
It’s also pretty flexible; for example, if we want to use custom colors we can easily do that:
fig, ax = plt.subplots() colors = ['#24b1d1', '#ae24d1'] bottom = np.zeros(len(agg_tips)) for i, col in enumerate(agg_tips.columns): ax.bar(agg_tips.index, agg_tips[col], bottom=bottom, label=col, color=colors[i]) bottom += np.array(agg_tips[col]) ax.set_title('Tips by Day and Gender') ax.legend() 
Adding Labels to the Bars
It’s often nice to add value labels to the bars in a bar chart. With a stacked bar chart, it’s a bit trickier, because you could add a total label or a label for each sub-bar within the stack. We’ll show you how to do both.
Adding a Total Label
We’ll do the same thing as above, but add a step where we compute the totals for each day of the week and then use ax.text() to add those above each bar.
fig, ax = plt.subplots() colors = ['#24b1d1', '#ae24d1'] bottom = np.zeros(len(agg_tips)) for i, col in enumerate(agg_tips.columns): ax.bar( agg_tips.index, agg_tips[col], bottom=bottom, label=col, color=colors[i]) bottom += np.array(agg_tips[col]) # Sum up the rows of our data to get the total value of each bar. totals = agg_tips.sum(axis=1) # Set an offset that is used to bump the label up a bit above the bar. y_offset = 4 # Add labels to each bar. for i, total in enumerate(totals): ax.text(totals.index[i], total + y_offset, round(total), ha='center', weight='bold') ax.set_title('Tips by Day and Gender') ax.legend() 
Adding both Sub-Bar and Total Labels
Now let’s do the same thing again, but this time, add annotations for each sub-bar in the stack. The method here is a bit different; we can actually get the patches or bars that we’ve already plotted, read their values, and then add those values as text annotations at the right location.
fig, ax = plt.subplots() colors = ['#24b1d1', '#ae24d1'] bottom = np.zeros(len(agg_tips)) for i, col in enumerate(agg_tips.columns): ax.bar( agg_tips.index, agg_tips[col], bottom=bottom, label=col, color=colors[i]) bottom += np.array(agg_tips[col]) totals = agg_tips.sum(axis=1) y_offset = 4 for i, total in enumerate(totals): ax.text(totals.index[i], total + y_offset, round(total), ha='center', weight='bold') # Let's put the annotations inside the bars themselves by using a # negative offset. y_offset = -15 # For each patch (basically each rectangle within the bar), add a label. for bar in ax.patches: ax.text( # Put the text in the middle of each bar. get_x returns the start # so we add half the width to get to the middle. bar.get_x() + bar.get_width() / 2, # Vertically, add the height of the bar to the start of the bar, # along with the offset. bar.get_height() + bar.get_y() + y_offset, # This is actual value we'll show. round(bar.get_height()), # Center the labels and style them a bit. ha='center', color='w', weight='bold', size=8 ) ax.set_title('Tips by Day and Gender') ax.legend() 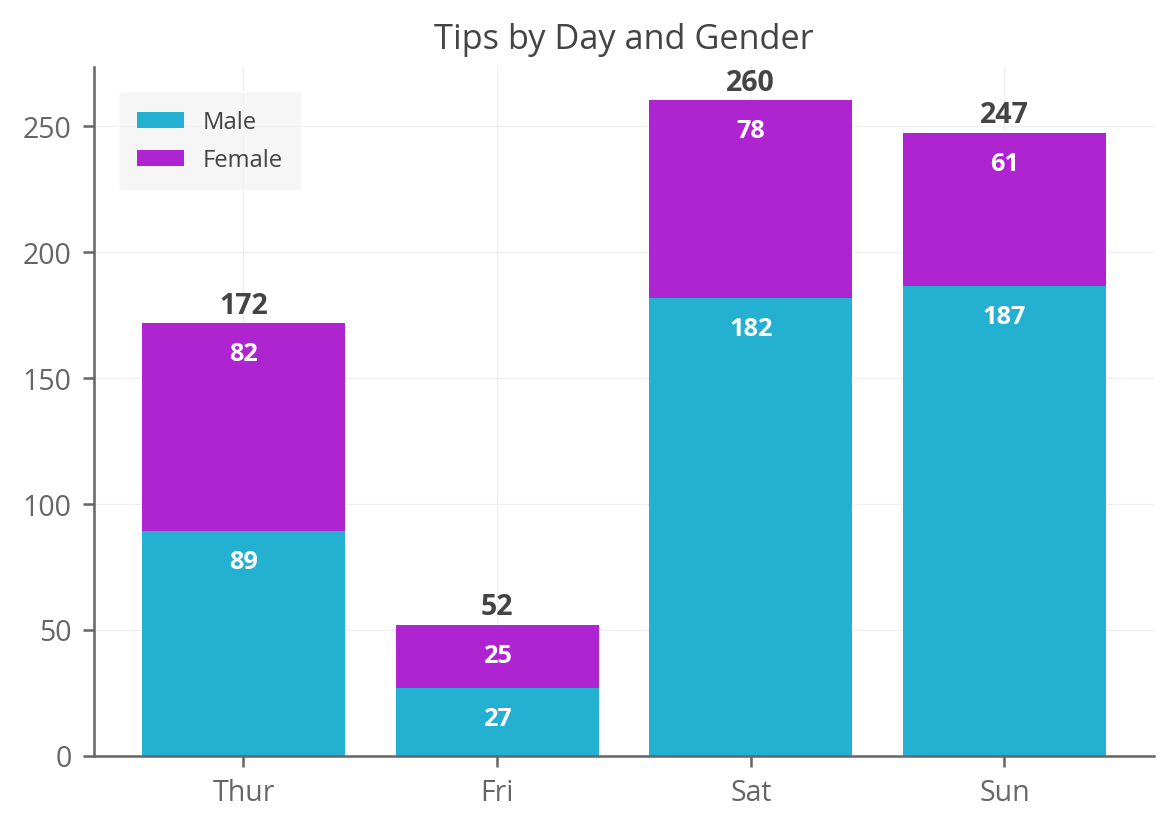
Looks good. Thanks for reading and hopefully this helps get you on your way in creating annotated stacked bar charts in Matplotlib.
Plot 100 percent stacked column chart using plotly in Python
We have seen in our previous posts how we can create 100 % stacked column chart in Tableau. Now in this post we will see how we can create 100 percent stacked column chart using plotly in Python.
Plotly is one of the best library for creating the interactive visualization charts. Its pretty easy to host it to any cloud platform to share it with other people. Now lets easy it is to create the chart using plotly in Python.
Code to plot the chart :
Lets first import the libraries which we need to plot the charts, which basically are:
import plotly.express as px import pandas as pd import plotly.graph_objs as go
Now import the data using the pandas libraries and check the column names as we need them while plotting the chart.
data= pd.read_csv(r"C:\Users\WeirdGeek\Desktop\Students.csv") data.columns
So, now lets try to print the top five columns to get an idea about the above data set:
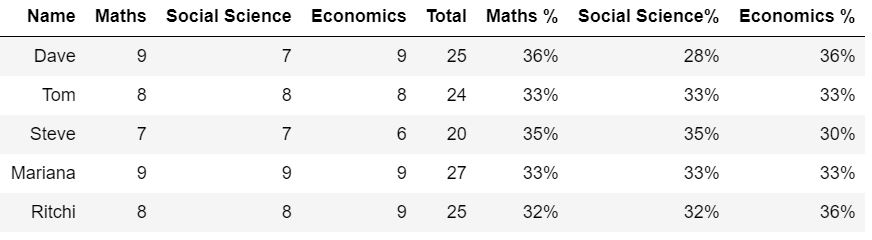
To bring the data in the above format we use Pandas library and its data manipulation power. Let’s see each steps one by one.
- First we bring the rows into columns by using pandas pivot_table function.
- Then, we summed up the total marks in one column
- Then finally we created new column for each subject for calculating the percentage of each subject. i.e. marks in one subject divided by total marks obtained.
Now let’s use the above formatted data into plotly library to plot the chart.
fig = go.Figure() fig.add_trace(go.Bar( y=data["Maths %"], x=data.Name, name="Maths %", marker=dict( color='rgba(0,128,0, 0.6)', line=dict(color='rgba(0,128,0, 0.5)', width=0.05) ) )) fig.add_trace(go.Bar( y=data["Social Science%"], x=data.Name, name="Social Science %", marker=dict( color='rgba(0,0,255, 0.6)', line=dict(color='rgba(0,0,255, 0.5)', width=0.05) ) )) fig.add_trace(go.Bar( y=data["Economics %"], x=data.Name, name="Economics %", marker=dict( color='rgba(128,0,0, 0.5)', line=dict(color='rgba(128,0,0, 0.5)', width=0.05) ) )) fig.update_layout( yaxis=dict( title_text="Marks %", ticktext=["0%", "20%", "40%", "60%","80%","100%"], tickvals=[0, 20, 40, 60, 80, 100], tickmode="array", titlefont=dict(size=15), ), autosize=False, width=1000, height=400, paper_bgcolor='rgba(0,0,0,0)', plot_bgcolor='rgba(0,0,0,0)', title=< 'text': "Students Marks %", 'y':0.96, 'x':0.5, 'xanchor': 'center', 'yanchor': 'top'>, barmode='stack') fig.show()
This is how the final chart looks like:

In the above code we have used the generic function go.Bar from plotly.graph_objects. Then added the x and y data to the respective place and choose the color (RGB code) along with the width. then in update_layout() function, we add few parameters like, chart size, Title and its x and y coordinates, and finally the barmode which is the “stack” as we are here plotting the stacked bar chart. Then, finally final line of code to show the figure.
To get more detailed knowledge about charts in Plotly you can check the official website Plotly by Dash. Also if you want to explore more codes/posts related to Data visualization on our website, then you can find it here.
If you have any questions or if you need any help please get in touch with me using the comment section below.