- HTML Select Lists
- Basic Select List Example
- Working Example
- Result:
- Multiple Options
- Result:
- Multiple Selections
- The form Attribute
- Result:
- Set a Default Value
- Disabling an Option
- Select Lists vs Radio Buttons & Checkboxes
- Поле со списком
- multiple
- name
- size
- selected
- value
- label
- Группирование элементов списка
- HTML Form Elements
- The HTML Elements
- The Element
- Example
- The Element
- The Element
- Example
- Example
- Visible Values:
- Example
- Allow Multiple Selections:
- Example
- The Element
- Example
- Example
- The Element
- Example
- The and Elements
- Example
- The Element
- Example
- The Element
- Example
- HTML Exercises
- HTML Form Elements
HTML Select Lists
This page contains HTML code for creating a select list. You can copy/paste this code into your own blog or website in order to create your own select list.
A select list is a form element that allows the user to select one or more options from a range of options.
Basic Select List Example
Here’s an example of an HTML select list:
Working Example
Here, we add a submit button so that the user’s selection can be submitted and processed. We also place the select list within a element that specifies a page to process the form.
Result:
Multiple Options
A select list can allow multiple options to be displayed at the one time. It can also allow multiple options to be selected by the user.
Result:
Multiple Selections
The user can select more than one option on these types of lists. For example, on a Mac, they could hold the command key down, while clicking on their multiple selections. On a PC, they could hold the Ctrl key down while making their selection. Users could also hold the Shift key down (but this won’t work on non-contiguous files). You could select all files by clicking in the select area and doing a «select all» ( command | A on a Mac, Ctrl | A on a PC)
The form Attribute
In the above example, we enclosed the select list inside a form. HTML5 also allows you to specify a form using the form attribute. This method could be used in the event that the select list is not inside the form that needs to submit its contents.
In the next example, add id=»myForm» to the form. We then add form=»myForm» to the select list and move the select list outside of the form. Submitting the form should still submit the contents of the select list, because the select list references the id of the form in its form attribute.
What would you like for lunch?
Result:
Set a Default Value
In this example, we’ve checked the first option.
What would you like for lunch?
Disabling an Option
You can disable an option by using the disabled attribute. You could use this in conjunction with a script to enable/disable the option depending on whether certain criteria has been met.
In this example, we’ve disabled the third option ( Lychee ).
Select Lists vs Radio Buttons & Checkboxes
Select lists provide similar functionality to radio buttons in that they allow the user to select one option from a list of options. Multi-select lists are more like checkboxes, in that they allow the user to select any number of options.
Given that select lists provide similar functionality to radio buttons and checkboxes, this raises the question:
When should you use a select list instead of radio buttons or checkboxes?
Here are some considerations.
- Select lists are great when the list is very long, and the user already knows which option they will choose. This means they don’t necessarily need to see all the alternative options. An good example of this is a list of countries when selecting your address. If a user lives in Australia, they already know what they’re going to select. Therefore, they simply scan the list for Australia , while ignoring all the other options. Their brain doesn’t need to process all other options trying to decide which is the best option. They already know.
- Radio buttons are ideal for when the user needs to see all the options before making a decision on which one to select. With radio buttons, the user doesn’t need to click on anything before they can see all the options. This is good usability — the user can scan all options without having to interact with the website first.
- Both checkboxes and multiple-selection select lists can be used to enable the user to select more than one option. Checkboxes are usually easier from a usability perspective (most—if not all—users will know how to select multiple checkboxes, but not as many users will know how to select multiple options from a select list). However, there may be times that a select list is more preferable to checkboxes — perhaps from a visual design perspective or some other reason.
Hopefully these factors will help you decide which option to use when designing your forms.
Поле со списком
Поле со списком, называемое еще ниспадающее меню, один из гибких и удобных элементов формы. В зависимости от настроек, в списке можно выбирать одно или несколько значений. Преимущество списка в его компактности и универсальности, список может занимать одну или несколько строк, в нём можно выбирать одно или несколько значений. Поле со списком создается следующим образом.
Тег выступает контейнером для пунктов списка и определяет его вид, будет ли это раскрывающийся список или же список с одним или множественным выбором. Вид зависит от использования атрибута size тега , который устанавливает высоту списка, ширина списка при этом определяется автоматически исходя из длины текста внутри . Ниже представлен список множественного выбора, в котором пункты выделяются с помощью клавиши Ctrl и Shift и раскрывающийся список.
| Список множественного выбора | Раскрывающийся список |
Атрибуты тега
Рассмотрим атрибуты тега , с помощью которых можно изменять представление списка.
multiple
Наличие multiple сообщает браузеру отображать содержимое элемента как список множественного выбора. Конечный вид списка зависит от используемого атрибута size . Если он отсутствует, то высота списка равна количеству пунктов, если значение size меньше числа пунктов, то появляется вертикальная полоса прокрутки.
| Атрибут size отсутствует | Атрибут size равен 2 |
Для выбора нескольких значений списка применяются клавиши Ctrl и Shift совместно с курсором мыши.
В примере 1 показано создание списка множественного выбора.
Пример 1. Список множественного выбора
name
Определяет уникальное имя элемента . Как правило, это имя используется для доступа к данным через скрипты или для получения выбранного значения серверным обработчиком.
size
Устанавливает высоту списка. Если значение size равно единице, то список превращается в раскрывающийся. Значение по умолчанию зависит от атрибута multiple . Если он присутствует, то размер списка равен числу элементов. Когда multiple нет, то значение атрибута size равно 1.
Атрибуты тега
Тег также имеет атрибуты, влияющие на вид списка, они представлены далее.
selected
Делает текущий пункт списка выделенным. Если у тега добавлен атрибут multiple , то можно выделять более одного пункта.
value
Определяет значение пункта списка, которое будет отправлено на сервер. На сервер отправляется пара «имя/значение», где имя задаётся атрибутом name тега , а значение — атрибутом value выделенных пунктов списка. Значение может как совпадать с текстом пункта, так быть и самостоятельным.
label
Предназначен для указания метки пункта списка, сокращённой по сравнению с текстом внутри . Если атрибут label присутствует, то текст внутри тега игнорируется и в списке выводится значение label . Браузер Firefox не поддерживает этот атрибут.
Создание списка показано в примере 2.
Пример 2. Использование списка
Группирование элементов списка
При достаточно обширном списке имеет смысл сгруппировать его элементы по блокам, чтобы обеспечить наглядность списка и удобство работы с ним. Для этой цели применяется тег . Он представляет собой контейнер, внутри которого располагаются теги объединённые в одну группу. Особенностью тега является то, что он не выделяется как обычный элемент списка, акцентируется с помощью жирного начертания, а все элементы, входящие в этот контейнер, смещаются вправо от своего исходного положения. Для добавления заголовка группы используется атрибут label , как показано в примере 3.
Пример 3. Группирование элементов списка
Результат примера показан на рис. 1.
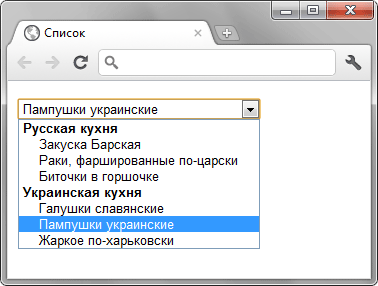
Рис. 1. Группированный список
HTML Form Elements
This chapter describes all the different HTML form elements.
The HTML Elements
The HTML element can contain one or more of the following form elements:
The Element
One of the most used form element is the element.
The element can be displayed in several ways, depending on the type attribute.
Example
All the different values of the type attribute are covered in the next chapter: HTML Input Types.
The Element
The element defines a label for several form elements.
The element is useful for screen-reader users, because the screen-reader will read out loud the label when the user focus on the input element.
The element also help users who have difficulty clicking on very small regions (such as radio buttons or checkboxes) — because when the user clicks the text within the element, it toggles the radio button/checkbox.
The for attribute of the tag should be equal to the id attribute of the element to bind them together.
The Element
The element defines a drop-down list:
Example
The elements defines an option that can be selected.
By default, the first item in the drop-down list is selected.
To define a pre-selected option, add the selected attribute to the option:
Example
Visible Values:
Use the size attribute to specify the number of visible values:
Example
Allow Multiple Selections:
Use the multiple attribute to allow the user to select more than one value:
Example
The Element
The element defines a multi-line input field (a text area):
Example
The rows attribute specifies the visible number of lines in a text area.
The cols attribute specifies the visible width of a text area.
This is how the HTML code above will be displayed in a browser:
You can also define the size of the text area by using CSS:
Example
The Element
The element defines a clickable button:
Example
This is how the HTML code above will be displayed in a browser:
Note: Always specify the type attribute for the button element. Different browsers may use different default types for the button element.
The and Elements
The element is used to group related data in a form.
The element defines a caption for the element.
Example
This is how the HTML code above will be displayed in a browser:
The Element
The element specifies a list of pre-defined options for an element.
Users will see a drop-down list of the pre-defined options as they input data.
The list attribute of the element, must refer to the id attribute of the element.
Example
The Element
The element represents the result of a calculation (like one performed by a script).
Example
Perform a calculation and show the result in an element:
HTML Exercises
HTML Form Elements
| Tag | Description |
|---|---|
| Defines an HTML form for user input | |
| Defines an input control | |
| Defines a multiline input control (text area) | |
| Defines a label for an element | |
| Groups related elements in a form | |
| Defines a caption for a element | |
| Defines a drop-down list | |
| Defines a group of related options in a drop-down list | |
| Defines an option in a drop-down list | |
| Defines a clickable button | |
| Specifies a list of pre-defined options for input controls | |
| Defines the result of a calculation |
For a complete list of all available HTML tags, visit our HTML Tag Reference.