Magento Hello world module (extension)

Previously I already wrote how to build custom module (extension) in Magento. Here is a new, refreshed article on that subject.
We will start by creating a simple “Hello world” module. However, you will soon see that simple takes a new meaning with Magento. Creating a bare bone module requires at least two files in Magento. For your module to work you need /app/etc/modules/MyCompany_MyModule.xml, app/code/local/MyCompany/MyModule/etc/config.xml. But, barebone module will not give you a “Hello developer” 🙂 -So, we need to add few more files to the game.
file 1:
/app/etc/modules/Inchoo_HelloDeveloper.xml
Each module starts and ends with “config” element. Most simple modules have merely one sub-element under the “config” called “modules”, It holds the definition of individual modules. In our case we have only one module declared under the “modules” element, called Inchoo_HelloDeveloper. Not the “two part” name the module has. It is a practise (and necessity) to call your modules by MyCompanyName plus TheModuleItSelf. There are three places in the system where modules can reside: /app/code/community/, /app/code/core/, /app/code/local/ folders. Take a look at file 1 content for a moment. Notice the “codePool” element? Its value is currently set to “local”, meaning our module config instructed the module to look for module files in /app/code/local/ folder. Whereas “Inchoo_HelloDeveloper” element is a mapping to /app/code/local/Inchoo/HelloDeveloper/ location.
file 2: app/code/local/Inchoo/HelloDeveloper/etc/config.xml
content of file 2 (partial):
Content of file 2 is the base module config file. With the above two files you should be able to see your module listed under Magento Admin > System Configuration > Advanced > Advanced. For now we have our module “working”, but we do not see no direct results of its work, no output. So we need to add a bit more to it. First we will expand config.xml file giving it some extra parametars to “turn on” controllers so that I can call them from frontend.
0.1.0 Inchoo_HelloDeveloper inchoo-hellodeveloper Notice the additions we added to final file!? We needed a way to tell Magento to “use” controllers of a module. Controllers are placed in app/code/local/Inchoo/HelloDeveloper/controllers/ folder.
And to wrap this one up, we will add one more file, the cntroller we would like to call from the frontend. As you might notice there is an element called “frontend” within wich we define routers. Routers are defined in sub-element “routers” with a few additional parametars. Notice the element “Inchoo_HelloDeveloper_SomeFreeRouterName1”? This is merely a router name. It can be freely assigned. Parametar “use” can have value “admin” or “standard”, while element “args” mainly holds two additional parametars, “module” and “frontName”. Element (param) “frontName” is most interestig since its value defines the url on which the controller will be accessible. In our example, if I were to open url http://shop.local/index.php/inchoo-hellodeveloper or http://shop.local/inchoo-hellodeveloper I would see “Hello developer…”. And if I were to open http://shop.local/index.php/inchoo-hellodeveloper/index/sayHello I would see ‘Hello one more time…’;
file 3: app/code/local/Inchoo/HelloDeveloper/controllers/IndexController.php
public function sayHelloAction() < echo 'Hello one more time. '; >> ?>Altough extremely simple, file 3 shows us one important thing: Naming connvention. Note the name of the class. Your moudle classes should keep names in form of MyCompany_MyModule_FileName, or in case of block and modules: MyCompany_MyModule_Block_FileName or MyCompany_MyModule_Module_FileName.
Thats it for “simple hello world” module.
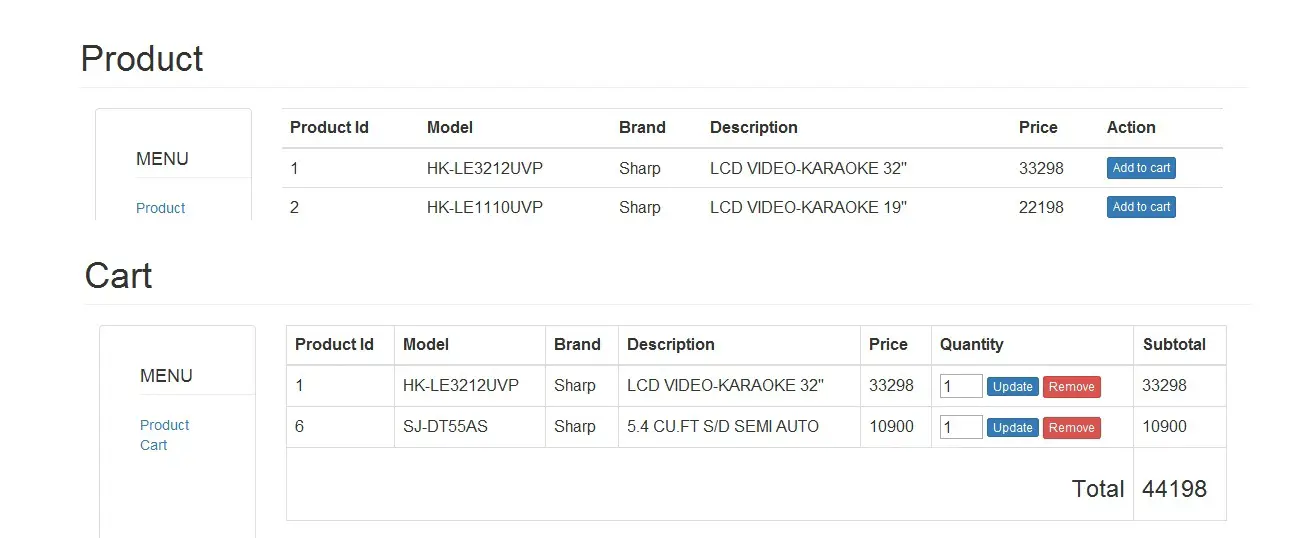
How to Create a Simple Shopping Cart in PHP 2022
The Shopping Add to Cart Script is useful because it allows you to add multiple order products in a single transaction. You will also see here how powerful the functionality of the session.
What are the features of PHP Shopping Cart Source Code?
This PHP Shopping Cart Source Code contains the following features.
-
- Product Listing
- Adding of Products
- Product Updating
- PHP Cart Removing of item.
In this PHP code for shopping cart system, it advised that you will use Twitter Bootstrap templates for you to have a beautiful design.

Let’s begin to write PHP Code for Shopping Cart System:
1. Create a MySQL Database and name it “productdb”.
Note: You can click here MySQL Database if you want to learn more about the database.
2. Execute the query for “add to cart database table” in the MySQL database.
CREATE TABLE IF NOT EXISTS `tblproduct` ( `PRODUCTID` int(11) NOT NULL AUTO_INCREMENT, `MODEL` varchar(30) NOT NULL, `BRAND` varchar(30) NOT NULL, `DESCRIPTION` varchar(99) NOT NULL, `PRICE` double NOT NULL, PRIMARY KEY (`PRODUCTID`) ) ENGINE=InnoDB DEFAULT CHARSET=latin1 AUTO_INCREMENT=7 ;
3. Populate the add to cart database table by executing the query below.
INSERT INTO `tblproduct` (`PRODUCTID`, `MODEL`, `BRAND`, `DESCRIPTION`, `PRICE`) VALUES (1, 'HK-LE3212UVP', 'Sharp', 'LCD VIDEO-KARAOKE 32''''', 33298), (2, 'HK-LE1110UVP', 'Sharp', 'LCD VIDEO-KARAOKE 19''''', 22198), (3, '21V-FS720S', 'Sharp', 'Pure Flat TV ', 7190), (4, 'ES-D708', 'Sharp', 'Spin Dryer 7kg ', 4998), (5, 'ES-D958', 'Sharp', 'Spin Dryer 9.5 KG', 5698), (6, 'SJ-DT55AS', 'Sharp', '5.4 CU.FT S/D SEMI AUTO ', 10900);
4. Create a connection between the PHP script and MySQL Database. Name it “config.php”
Note: You can follow the tutorial Connect PHP/MYSQL if you want to have another variation in connecting PHP/MySQL.
$server = ‘localhost’; $dbuser = ‘root’; $dbpass = »; $dbname = ‘productdb’; $con = mysql_connect($server, $dbuser, $dbpass); if (isset($con)) < # code. $dbSelect = mysql_select_db($dbname); if (!$dbSelect) < echo "Problem in selecting database! Please contact administraator"; die(mysql_error()); >> else
5. Create a PHP file called “index.php” for index PHP Cart.
6. Do the following code for the cart list. Name it “cart.php.”
7. Create a PHP file called “process.php” and add the following code for removing of adding and removing of an item in the cart.
if (!empty($_SESSION[‘janobecart’])) < // count the session array varible $max = count($_SESSION['janobecart']); if (!isset($exist))
/* */ alert(‘Item is already in the cart.’) /**/ $_SESSION[‘janobecart’] = array(); $_SESSION[‘janobecart’][0][‘PRODUCTID’] = $pid; $_SESSION[‘janobecart’][0][‘PRICE’] = $price; $_SESSION[‘janobecart’][0][‘QUANTITY’] = 1; > ?>
Note: The code below is a Pop-up Message Using Javascript. This pop-up message is used to display messages about the action of the user, whether successfully executed or not.
/* */ alert('Item has been added in the cart.') /* */ unset($_SESSION['tot']); ?>/* */ alert('Item has been removed in the cart.') /* redirect to main page.*/ window.location='cart.php' $_SESSION['janobecart'] = array_values($_SESSION['janobecart']); > ?>Conclusion
In this lesson, we learn how to make add to cart in PHP. Wherein, the output you have done here can be integrated later on to your website. I hope we can hear some feedback from you.