- How to Set JAVA_HOME Linux
- Prerequisites
- JDK vs. JRE
- Environment variables
- JAVA_HOME
- Setting up JAVA_HOME
- Setting JAVA_HOME globally
- Final thoughts
- About the author
- Sidratul Muntaha
- How to set JAVA_HOME for Java?
- How to Set JAVA_HOME Variable in Ubuntu Linux Correctly
- Step 1: Check if JDK is installed
- Step 2: Get the location of JDK executable (Java Compiler)
- Step 3: Setting JAVA_HOME variable
How to Set JAVA_HOME Linux
![]()
Java is one of the most influential and popular programming languages. Originally released by Sun Microsystems in 1995, Java is a cross-platform language that is now a part of almost every aspect of technology. You will find Java everywhere – banking, financial services, big data, stock market, mobile (Android), and more. It easily ranks among the top programming languages and is likely to remain so for at least a decade.
In this guide, we’ll showcase one of the basic and crucial steps of configuring Java on your system – setting up the JAVA_HOME environment variable in Linux.
Prerequisites
Before diving deeper, let’s quickly refresh on various concepts and keywords.
JDK vs. JRE
If you’re interested in Java, you are probably already familiar with them. JDK stands for “Java Development Kit.” It contains the necessary tools and libraries to build and run (using JRE) Java apps. If you’re interested in learning or working on a Java project, JDK is the option to choose.
JRE stands for “Java Runtime Environment.” This package contains the tools and libraries needed to run a Java application. It’s a must-have to run any Java program on the system.
Note that JDK comes bundled with JRE by default. So, you don’t have to install JRE separately if you already have JDK installed.
Environment variables
In Linux, environment variables hold various system info available to apps. The info can be about how apps run on the environment, different system behaviors, etc.
Depending on the accessibility of the variables, we can divide them into 2 categories.
- Local environment variables: These variables are set on a per-user basis. Only the specific user can use them in their sessions.
- Global environment variables: These variables are accessible by everyone on the system.
JAVA_HOME
The JAVA_HOME is an environment variable. It holds the location of the Java binaries. Many applications rely on this environment variable to locate the Java binaries and libraries.
It can be set both on a local or global basis.
Setting up JAVA_HOME
Now that we understand what JAVA_HOME is, it’s time to learn how to set its value.
First, figure out the version of Java installed. This version number is often linked to the Java binary path.

If Java was installed globally, then the installation is likely stored at the following location.
This directory contains the Java binaries and libraries. Check the content of the directory.

In my case, I have OpenJDK 11 installed on Ubuntu (more on installing the latest Java on Ubuntu). From the output, we can see entries like “default-java” and “java-1.11.0-openjdk-amd64” are symlinks of “java-11-openjdk-amd64”.
We’re going to set the value of JAVA_HOME to java-1.11.0-openjdk-amd64 (recommended).


Note that this environment variable will only last for the current shell session. Once restarted, you have to set the value once again manually. To solve this issue, most shells come with a configuration file that contains codes and commands the shell must run whenever it launches. In the case of bash, it’s called bashrc (for zsh, it’s zshrc, etc.).
Open the file in a text editor.
Now, add the following line at the end of the file. It will mark the environment variable accessible to all shell sessions and the binaries available directly from the PATH variable.
$ export JAVA_HOME =/ usr / lib / jvm / java — 1.11.0 — openjdk — amd64
$ export PATH = $PATH : $JAVA_HOME / bin
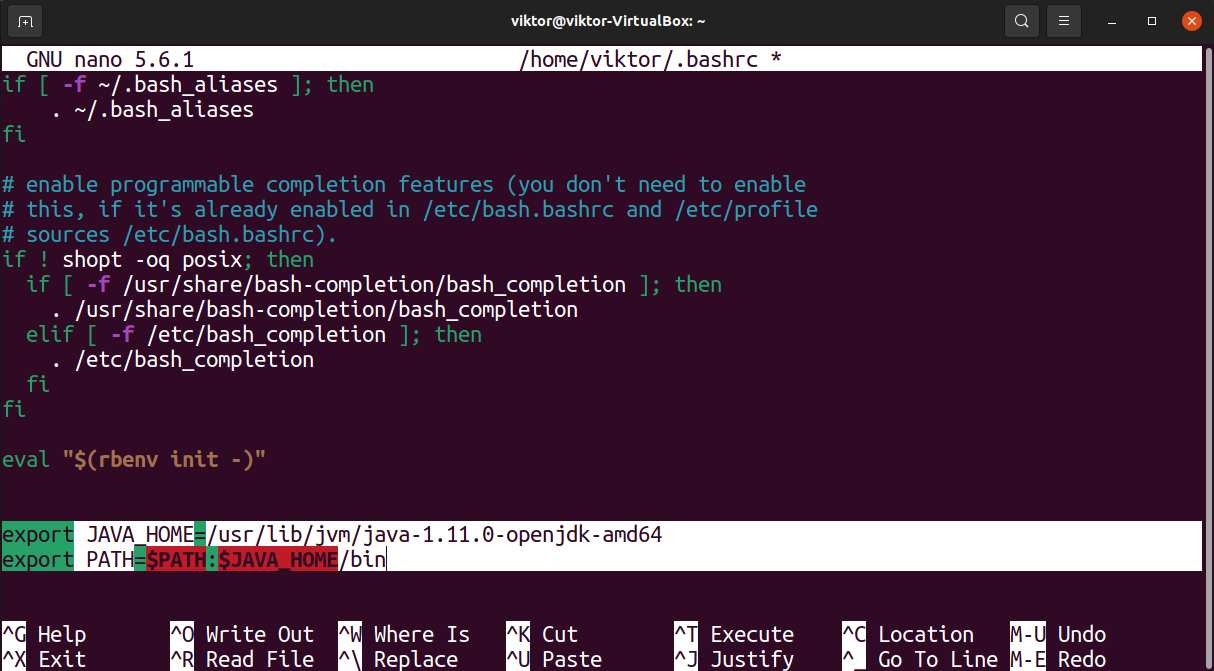
Save the file and close the editor. To take the changes into effect, reload the bashrc file.
Setting JAVA_HOME globally
The previous section demonstrates setting up JAVA_HOME on a single user account. It’s a good practice because each user may prefer different configurations. Some may even use a completely different Java version or Java flavor.
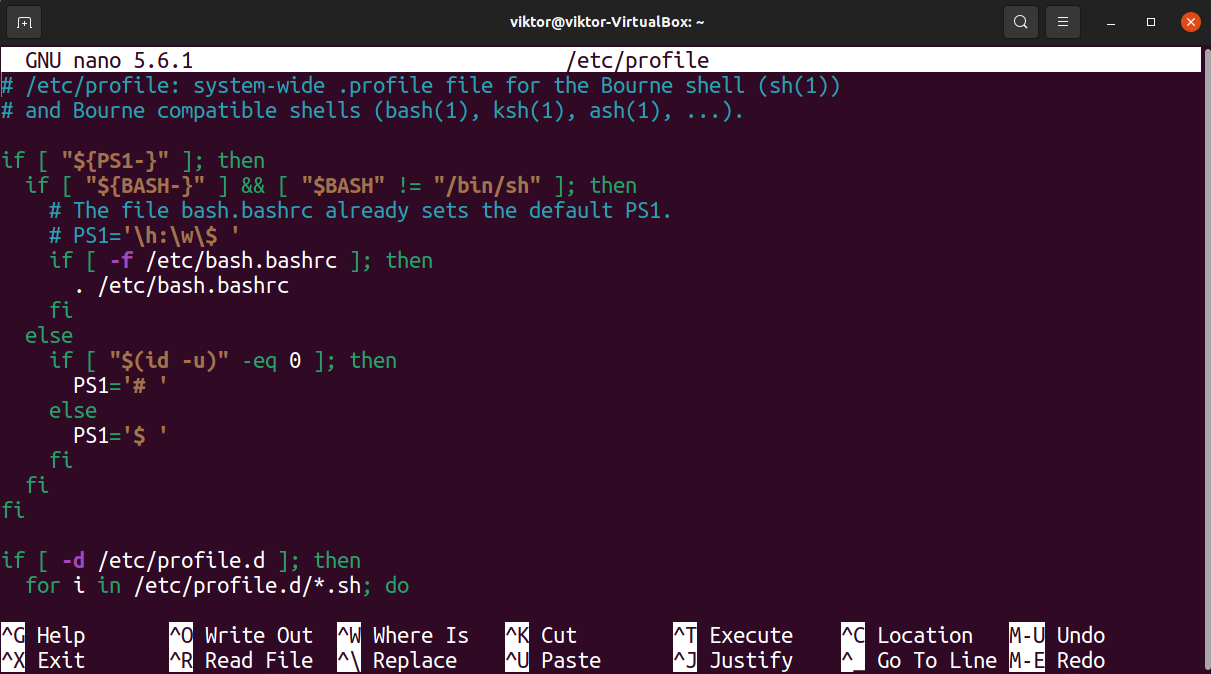
Bash comes with a global bashrc file that every shell session in the system must load, irrespective of the user. By declaring the location of JAVA_HOME there, we can make it available for all users in the system. Note that it’s not recommended and should be used only in specific situations.
Open up the global bashrc file in a text editor. Note that it requires sudo privilege to tweak this file.
Now, update the values of JAVA_HOME and PATH.
$ export JAVA_HOME =/ usr / lib / jvm / java — 1.11.0 — openjdk — amd64
$ export PATH = $PATH : $JAVA_HOME / bin
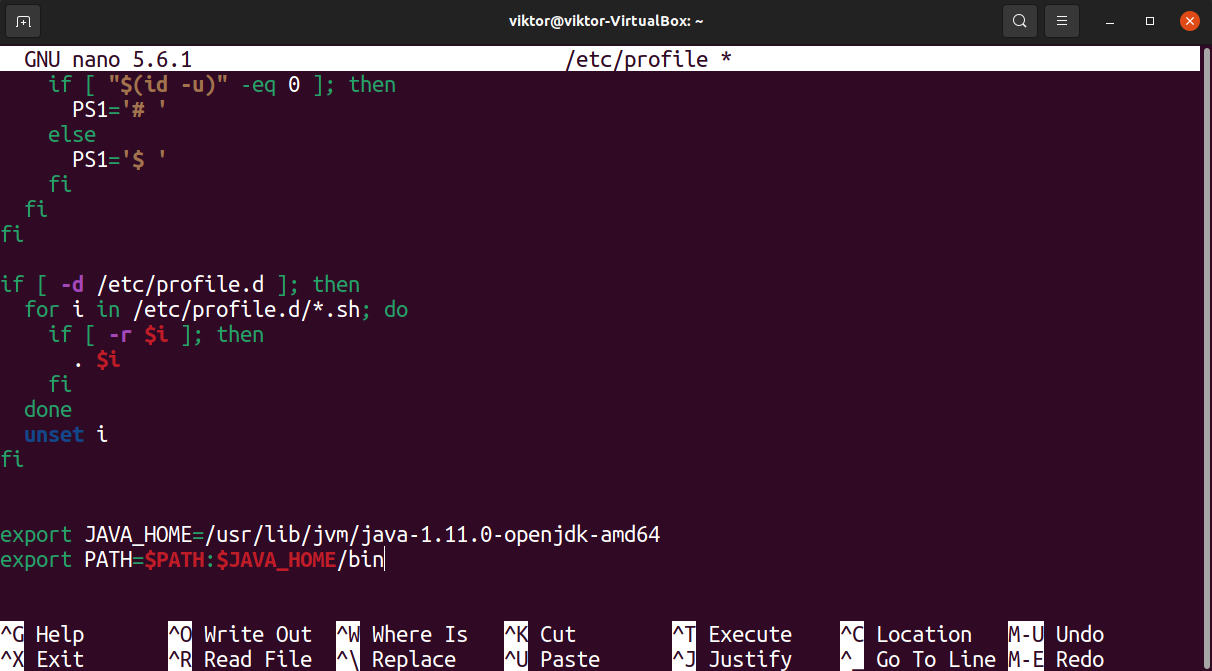
Save the file and close the editor. Reload the file into the bash shell to take the changes into effect.

Final thoughts
In this guide, we’ve explored various concepts like environment variables and demonstrated how to set JAVA_HOME as a local or global environment variable. Numerous development apps like NetBeans, Eclipse, Maven, ANT, Apache Tomcat, Android Studio, and more depend on JAVA_HOME to function properly.
Note that if the variable was set globally, then the location must be accessible to all users in the system. Otherwise, it will cause many issues, leading to severe headaches. To solve file permission conflicts, Linux comes with a built-in tool: chown. Learn more about chown and how to use it.
About the author
Sidratul Muntaha
Student of CSE. I love Linux and playing with tech and gadgets. I use both Ubuntu and Linux Mint.
How to set JAVA_HOME for Java?
You can set your JAVA_HOME in /etc/profile as Petronilla Escarabajo suggests. But the preferred location for JAVA_HOME or any system variable is /etc/environment .
Open /etc/environment in any text editor like nano or gedit and add the following line:
JAVA_HOME="/usr/lib/jvm/open-jdk" (java path could be different)
Use source to load the variables, by running this command:
Then check the variable, by running this command:
Usually most linux systems source /etc/environment by default. If your system doesn’t do that add the following line to ~/.bashrc (Thanks @pje)
When i tried to run Android Studio (that has IntelliJ IDEA as a base), i had an error message very similar to @advocate’s: «‘tools.jar’ seems to be not in Android Studio classpath.» After fiddling a lot with JAVA_HOME without success, i decided to take a look at studio.sh, the shellscript that starts Android Studio. As a wild guess, i set JDK_HOME to the same value expected for JAVA_HOME, and voila! It installed without great problems.
For those doing software development, don’t put your JAVA_HOME in /etc/environment unless you want to reboot everytime you switch JDK versions.
This is a temporary solution, as others pointed out. No one would want to run source every time they restart their bash.
As others have pointed out, this doesn’t stick between terminal sessions. What I did to address this is just added the line source /etc/environment to the top of my bash config file ~/.bashrc so that it loads all my environment settings on startup. Working for me so far.
How to Set JAVA_HOME Variable in Ubuntu Linux Correctly
If you are running Java programs on Ubuntu using Eclipse, Maven or Netbeans etc, you’ll need to set JAVA_HOME to your path. Otherwise, your system will complain that “java_home environment variable is not set”.
In this beginner’s tutorial, I’ll show the steps to correctly set Java Home variable on Ubuntu. The steps should be valid for most other Linux distributions as well.
The process consists of these steps:
- Making sure Java Development Kit (JDK) is installed.
- Finding the correct location of JDK executable.
- Setting the JAVA_HOME variable and making the change permanent.
Step 1: Check if JDK is installed
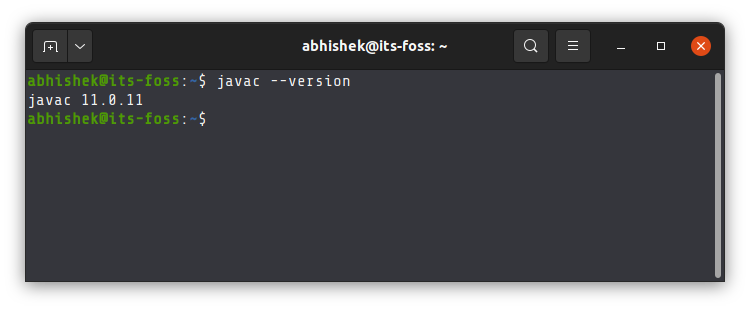
The simplest way to check if Java Development Kit (JDK) is installed on your Linux system is by running this command:
The above command checks the version of Java compiler. If it is installed, it will show the Java version.
If the command shows an error like javac command not found, you’ll have to install JDK.
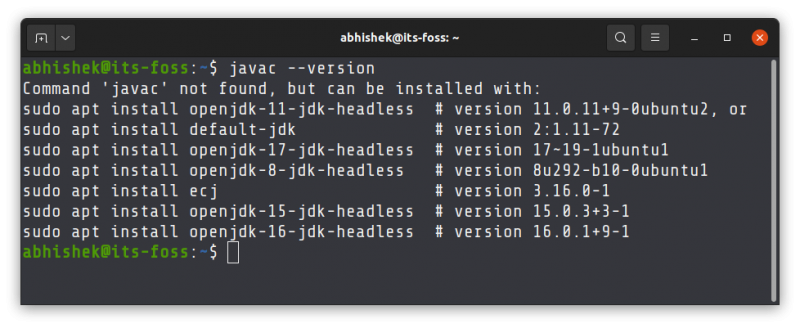
If Java Compiler is not installed on your system, install Java Development Kit using this command:
sudo apt install default-jdkThis will install the default Java version in your current Ubuntu version. If you need some other specific Java version, you’ll have to specify it while installing Java on Ubuntu.
Once you have made sure that Java Compiler is present on your system, it’s time to find its location.
Step 2: Get the location of JDK executable (Java Compiler)
The executable is usually located in the /usr/lib/jvm directory. I won’t left you on your own for a guessing game. Instead, let’s find out the path of the Java executable.
Use the which command to get the location of Java Compiler executable:
The problem here is that the location it gives is actually a symbolic link. You’ll have to follow it a couple of times:
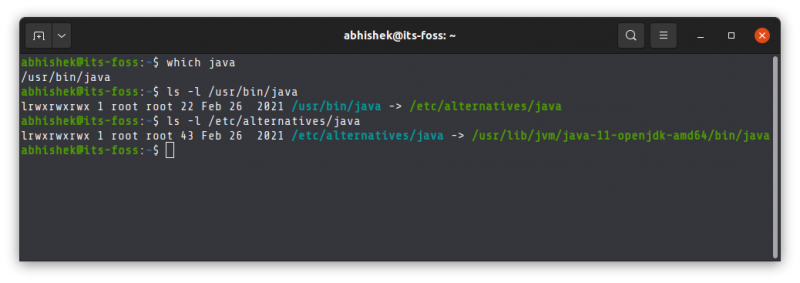
And when you find a path like /usr/lib/jvm/java-11-openjdk-amd64/bin/javac, you remove the /bin/javac from it to get something like /usr/lib/jvm/java-11-openjdk-amd64
An easier method is to follow the symbolic link and get to the actual executable file directly using this command:
readlink -f `which javac` | sed "s:/bin/javac::"The readlink command follows a symbolic link. I have used ` around which java. This is called command substitution and it replaces the command with its output. Sed is then used to replace /bin/javac by nothing and thus removing it altogether.
In my example, the location of the executable file is /usr/lib/jvm/java-11-openjdk-amd64. It could be different for you. Copy the correct path you got from the above command in your system. You know, you can copy paste in the Ubuntu terminal.
Step 3: Setting JAVA_HOME variable
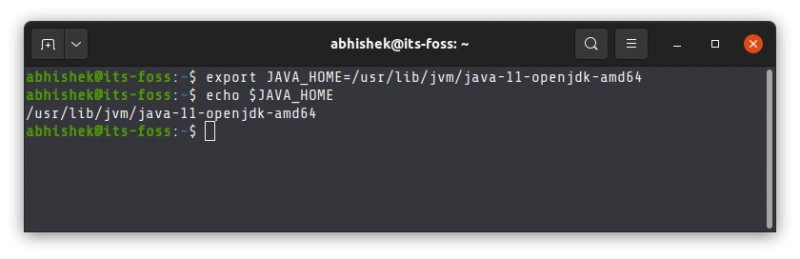
Now that you have got the location, use it to set the JAVA_HOME environment variable:
export JAVA_HOME=/usr/lib/jvm/java-11-openjdk-amd64/bin/javaCheck the value of JAVA_HOME directory:
Try to run your program or project in the SAME TERMINAL and see if it works.
This is not over yet. The JAVA_HOME variable you just declared is temporary. If you close the terminal or start a new session, it will be empty again.
To set JAVA_HOME variable ‘permanently’, you should add it to the bashrc file in your home directory.
You can use the Nano editor for editing files in the Linux terminal. If you do not want that and take a simple copy-paste approach, use the following commands:
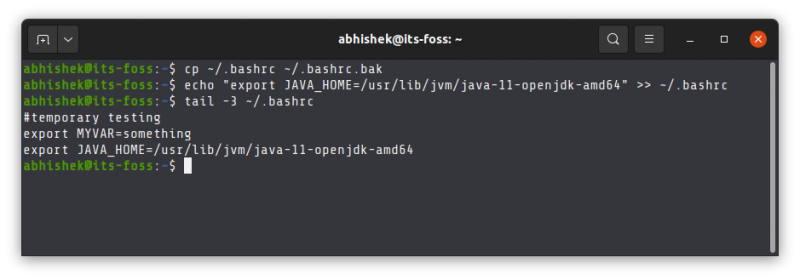
Back up your bashrc file (in case you mess it, you can get it back):
Next, use the echo command to append the export command you used at the beginning of this section. Change the command below to use the correct path as displayed by your system in.
echo "export JAVA_HOME=/usr/lib/jvm/java-11-openjdk-amd64" >> ~/.bashrcVerify that it has been correctly added to the end of the file:
The above tail command will show the last 3 lines of the specified file.
Here’s the entire output of the above three commands.
Now, even if you exit the session or restart the system, the JAVA_HOME variable will still be set to the value you specified. That’s what you want, right?
Do note that if you change the default Java version in the future, you’ll have to change the value of JAVA_HOME and point it to the correct executable path.
I hope this tutorial not only helped you to set Java Home, it also taught you how you are doing it.
If you are still facing issues or have any questions or suggestions, please let me know in the comments.