- How to set JAVA_HOME and PATH in Linux? Example
- 1. Steps to set JAVA_HOME in Linux
- 2. Why should you set JAVA_HOME in Linux
- How to Set JAVA_HOME Variable in Ubuntu Linux Correctly
- Step 1: Check if JDK is installed
- Step 2: Get the location of JDK executable (Java Compiler)
- Step 3: Setting JAVA_HOME variable
How to set JAVA_HOME and PATH in Linux? Example
Hello guys, welcome to the world of Java application programming. One of the hardest things to mater is not any feature but environment-specific details which nobody teaches. To bridge that gap, I am going to cover a couple of very important environment variables like PATH and JAVA_HOME. The JAVA_HOME environment variable points to the JDK installation directory and is used by many Java tools and applications like Tomcat, Maven, Eclipse, NetBeans or IntelliJIDEA, etc. to figure out Java executables as they need Java for running.
Like in the previous article, I explained a Maven issue (invalid target release: 1.7, 1.8) related to the Java version, which occurred even though the correct version of Java was installed on the machine, but JAVA_HOME was pointing to an older version.
Unfortunately, When you install Java on Linux or Windows, this environment variable is not set automatically. You need to do it yourself. Java developers like me always set mandatory environment variables like JAVA_HOME, PATH, and CLASSPATH on the login scripts executed by the shell when you log in to Linux like bash_profile.sh , but you can also set JAVA_HOME into /etc/profile for all users.
I’ll show you steps on how to find the location of Java and how to set up the JAVA_HOME in Linux in this article, and these steps should also work with any Linux or Java version like Ubuntu, RedHat, CentOS, SUSE, ArchLinux, Debian, Fedora, etc.
Though I strongly encourage every Java developer to learn Linux, it’s a really important skill and serves you for a long time. If you decide to improve your Linux skill this year, I suggest you take a look at these best online Linux courses, which are both short and sweet and also explains all important details.
1. Steps to set JAVA_HOME in Linux
1) The first step is to find the location where Java is installed on your Linux machine. To check that open putty and connect to your Linux server and type the following command
$ java Usage: java [-options] class [args. ] (to execute a class) or java [-options] -jar jarfile [args. ] (to execute a jar file)
where options include:
-d32 use a 32-bit data model if available
-d64 use a 64-bit data model if available
-server to select the «server» VM
It means Java is installed and added to your PATH, so half of the job is done already. All you need to is find the location of JDK, which you can find either by printing PATH as follows
$ echo $PATH /usr/local/bin:/bin:/usr/bin:/usr/sun/jdk/v1.6.0_16-64bit/bin:.
$ which java usr/sun/jdk/v1.6.0_16-64bit
You can see that JDK is installed on «/usr/sun/jdk/v1.6.0_16-64bit».
2) Add the following line of your .bash_profile file if you want to set JAVA_HOME for yourself or /etc/profile if you want to set JAVA_HOME for all user
vim ~/bash_profile export JAVA_HOME=/usr/sun/jdk/v1.6.0_16-64bit/ export PATH = $JAVA_HOME/bin:$PATH
vim /etc/profile export JAVA_HOME=/usr/sun/jdk/v1.6.0_16-64bit/ export PATH = $JAVA_HOME/bin:$PATH
That’s it you are done. Though don’t forget to open another shell window by typing bash , csh , or ksh . The new environment variable will not be added to an existing shell, you need to open a new shell window.
Also, if you use bash shell then adding into ~/.bash_profile makes sense, if you use csh (C shell) then add JAVA_HOME into ~/.csh_profile, and similarly for ksh (K shell) add JAVA_HOME into ~/.ksh_profile .
They are hidden files in your home directory in Linux, that’s why they had prefix dot (.) in their name. You can use «ls — alrt» command to see them.
Here is a sample /etc/profile file with JAVA_HOME and PATH variable defined for your reference:

By the way, if you don’t see Java installed on your machine, then download the Linux version of Java from Oracle’s website and install it.
Once you are done with installation just find the folder where JDK is installed and follow the steps given above to set JAVA_HOME for your Linux environment.
For applications, JAVA_HOME is generally referred to on the start script. It’s bad practice to refer to the hardcoded path of Java installation in scripts, you will never find Tomcat, Maven, Eclipse, NetBeans, or IntelliJ doing that because then when you update to a new Java version they won’t be able to use it until you change their start script.
Using JAVA_HOME makes it easy to switch to a different or new Java version. See these free Java development courses to learn more about the core concepts of Java in detail. It’s updated for Java 11 and also not very expensive, I just bouthbought11 a couple of days ago.

2. Why should you set JAVA_HOME in Linux
Even though many developers know about JAVA_HOME, they don’t set it in their environment due to various reasons. I strongly recommend you to set JAVA_HOME , PATH , and CLASSPATH for your development environment. Here are some reasons why you set JAVA_HOME in Linux
1) It’s easy to upgrade JDK without affecting your application startup and config file, which points to JAVA_HOME . You just need to download a new version and make sure your JAVA_HOME points to the new version of Java. This is the best benefit of using an environment variable or links.
2) The JAVA_HOME variable is short and concise instead of the full path to the JDK installation directory.
3) JAVA_HOME variable helps your program achieve platform independence like if your startup script uses JAVA_HOME, then it can run on Windows and UNIX without any modification; you just need to set JAVA_HOME on the respective operating system.
4) The JAVA_HOME is standard, which means other tools that need Java, like Maven, Eclipse can refer to this variable without having any knowledge of where Java is physically installed on your machine, which is obviously different in different user’s machines. JAVA_HOME allows everybody to access Java in a common and standard way.
I also suggest joining Java Fundamentals: The Java Language course on Pluralsight to learn more about Java fundamentals like this one.

That’s all about how to set the JAVA_HOME environment variable in Linux. I have also touched base on why you should do it, which is probably more important. Many tools like Maven and IDEs like Eclipse and Netbeans use this variable to locate the JDK binaries installed on this machine, hence it’s better to set this up. If you face any problem while setting and using the JAVA_HOME environment variable, feel free to ask. I’ll be glad to help you out.
- The Java Developer RoadMap (guide)
- 10 Things Java Developer should learn (goals)
- What is the difference between PATH and CLASSPATH in Java? (answer)
- What is the java.librarypath system property in Java? (answer)
- How to run a Java program from the command line? (guide)
- How to install JDK 7 on Windows 8? (guide)
- Explanation of HelloWorld Program in Java? (read here)
- 10 Tips to become a better Java developer (tips)
- 10 Free Java Courses for Programmers (courses)
- 10 Frameworks Java and Web Developer should learn (frameworks)
- 5 Courses to learn Spring Framework in-depth (courses)
- Top 5 Courses to learn Microservices in Java (courses)
How to Set JAVA_HOME Variable in Ubuntu Linux Correctly
If you are running Java programs on Ubuntu using Eclipse, Maven or Netbeans etc, you’ll need to set JAVA_HOME to your path. Otherwise, your system will complain that “java_home environment variable is not set”.
In this beginner’s tutorial, I’ll show the steps to correctly set Java Home variable on Ubuntu. The steps should be valid for most other Linux distributions as well.
The process consists of these steps:
- Making sure Java Development Kit (JDK) is installed.
- Finding the correct location of JDK executable.
- Setting the JAVA_HOME variable and making the change permanent.
Step 1: Check if JDK is installed
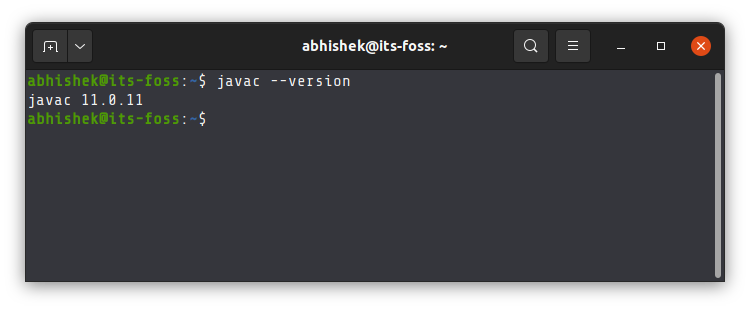
The simplest way to check if Java Development Kit (JDK) is installed on your Linux system is by running this command:
The above command checks the version of Java compiler. If it is installed, it will show the Java version.
If the command shows an error like javac command not found, you’ll have to install JDK.
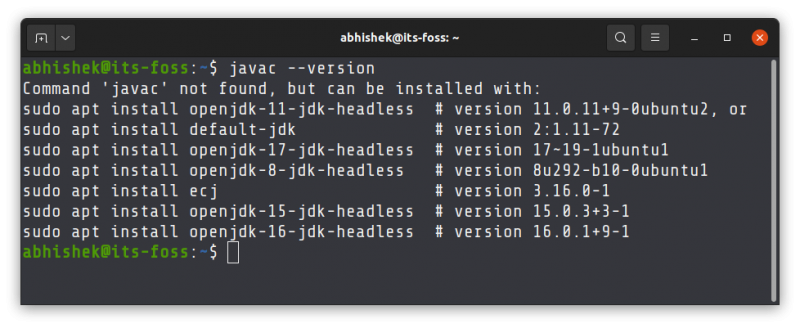
If Java Compiler is not installed on your system, install Java Development Kit using this command:
sudo apt install default-jdkThis will install the default Java version in your current Ubuntu version. If you need some other specific Java version, you’ll have to specify it while installing Java on Ubuntu.
Once you have made sure that Java Compiler is present on your system, it’s time to find its location.
Step 2: Get the location of JDK executable (Java Compiler)
The executable is usually located in the /usr/lib/jvm directory. I won’t left you on your own for a guessing game. Instead, let’s find out the path of the Java executable.
Use the which command to get the location of Java Compiler executable:
The problem here is that the location it gives is actually a symbolic link. You’ll have to follow it a couple of times:
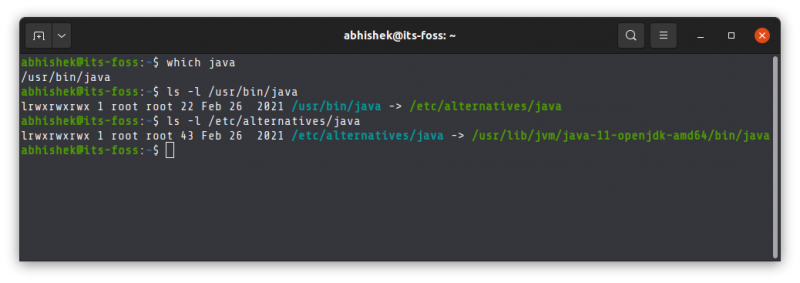
And when you find a path like /usr/lib/jvm/java-11-openjdk-amd64/bin/javac, you remove the /bin/javac from it to get something like /usr/lib/jvm/java-11-openjdk-amd64
An easier method is to follow the symbolic link and get to the actual executable file directly using this command:
readlink -f `which javac` | sed "s:/bin/javac::"The readlink command follows a symbolic link. I have used ` around which java. This is called command substitution and it replaces the command with its output. Sed is then used to replace /bin/javac by nothing and thus removing it altogether.
In my example, the location of the executable file is /usr/lib/jvm/java-11-openjdk-amd64. It could be different for you. Copy the correct path you got from the above command in your system. You know, you can copy paste in the Ubuntu terminal.
Step 3: Setting JAVA_HOME variable
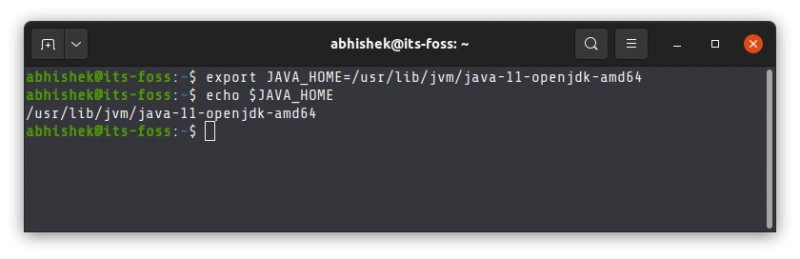
Now that you have got the location, use it to set the JAVA_HOME environment variable:
export JAVA_HOME=/usr/lib/jvm/java-11-openjdk-amd64/bin/javaCheck the value of JAVA_HOME directory:
Try to run your program or project in the SAME TERMINAL and see if it works.
This is not over yet. The JAVA_HOME variable you just declared is temporary. If you close the terminal or start a new session, it will be empty again.
To set JAVA_HOME variable ‘permanently’, you should add it to the bashrc file in your home directory.
You can use the Nano editor for editing files in the Linux terminal. If you do not want that and take a simple copy-paste approach, use the following commands:
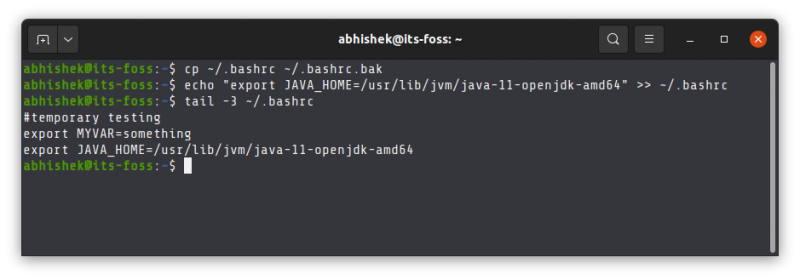
Back up your bashrc file (in case you mess it, you can get it back):
Next, use the echo command to append the export command you used at the beginning of this section. Change the command below to use the correct path as displayed by your system in.
echo "export JAVA_HOME=/usr/lib/jvm/java-11-openjdk-amd64" >> ~/.bashrcVerify that it has been correctly added to the end of the file:
The above tail command will show the last 3 lines of the specified file.
Here’s the entire output of the above three commands.
Now, even if you exit the session or restart the system, the JAVA_HOME variable will still be set to the value you specified. That’s what you want, right?
Do note that if you change the default Java version in the future, you’ll have to change the value of JAVA_HOME and point it to the correct executable path.
I hope this tutorial not only helped you to set Java Home, it also taught you how you are doing it.
If you are still facing issues or have any questions or suggestions, please let me know in the comments.