- JButton basic tutorial and examples
- 1. Creating a JButton object
- 2. Adding the button to a container
- 3. Adding event listener for JButton
- 4. Setting mnemonic and hotkey for JButton
- 5. Setting a JButton as the default button
- 6. Customizing JButton’s appearance
- 7. JButton demo program
- Other Java Swing Tutorials:
- About the Author:
- Add comment
- Comments
- Set color to button in java
- Attributes of Button in Android:
- Button Example In Android Studio:
JButton basic tutorial and examples
In this Java Swing tutorial, you will learn how to use button that allows the user to perform action in a desktop application.
You know, JButton is a fundamental Swing component that renders a button on screen and responds to user’s clicking event for performing a specific task. This article summarizes common programming practices for using JButton in Swing.
Table of content:
1. Creating a JButton object
JButton button = new JButton("Edit"); Image:
Create a button with only an icon in the file system:
JButton button = new JButton(new ImageIcon("images/start.gif")); Here the icon file start.gif is placed under images directory which is relative to the program.
Image:
Create a button with only icon inside a jar file or in classpath:
String iconPath = "/net/codejava/swing/jbutton/stop.jpg"; Icon icon = new ImageIcon(getClass().getResource(iconPath)); JButton button = new JButton(icon);
Here the icon file stop.jpg is placed under a specific package in the classpath.
Image:
Create a button with a caption and an icon:
JButton button = new JButton("Start", new ImageIcon("images/start.gif")); Image:
2. Adding the button to a container
frame.add(button); dialog.add(button); panel.add(button); applet.getContentPane().add(button);
frame.add(button, BorderLayout.CENTER); panel.add(button, gridbagConstraints);
3. Adding event listener for JButton
button.addActionListener(new ActionListener() < @Override public void actionPerformed(ActionEvent evt) < // do everything here. >>);
button.addActionListener(new ActionListener() < @Override public void actionPerformed(ActionEvent evt) < // delegate to event handler method buttonActionPerformed(evt); >>);
private void buttonActionPerformed(ActionEvent evt) < // do something here. >
public class App extends JFrame implements ActionListener < public App() < // creates the button. // adds event listener: button.addActionListener(this); >@Override public void actionPerformed(ActionEvent evt) < // do something here. >>
Here the container ( JFrame ) must implement the ActionListener interface and override the method actionPerformed() .
4. Setting mnemonic and hotkey for JButton
button.setMnemonic(KeyEvent.VK_E);
The letter E is underlined: so user can invoke that button’s action by pressing Alt + Einstead of clicking mouse.
String mapKey = "KEY_F2"; InputMap inputMap = button.getInputMap(JComponent.WHEN_IN_FOCUSED_WINDOW); inputMap.put(KeyStroke.getKeyStroke("F2"), mapKey); button.getActionMap().put(mapKey, new AbstractAction() < public void actionPerformed(ActionEvent evt) < buttonActionPerformed(evt); >>); 5. Setting a JButton as the default button
A window can have a default button whose action will be invoked when the user hits Enter key. Here is the code to set the button as default button in the frame window:
getRootPane().setDefaultButton(button);
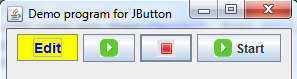
The default button is bold in the window like the 3 rd button in this screenshot:
 6. Customizing JButton’s appearance
button.setFont(new java.awt.Font("Arial", Font.BOLD, 14)); button.setBackground(Color.YELLOW); button.setForeground(Color.BLUE); Image:
7. JButton demo program
For reference, we created a demo program which incorporates all the practices mentioned above. The program looks like this:
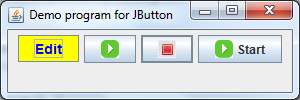
You can download source code of this program in the attachment section.
Other Java Swing Tutorials:
About the Author:

Nam Ha Minh is certified Java programmer (SCJP and SCWCD). He started programming with Java in the time of Java 1.4 and has been falling in love with Java since then. Make friend with him on Facebook and watch his Java videos you YouTube.
Add comment
Comments
merci
I want to add to the button text using a variable. how do I get this to work? jpFormatPanel.add(new JButton(«Format Citation: «
+ strTemplateName
I want to add to the button text using a variable. how do I get this to work? jpFormatPanel.add(new JButton(«Format Citation: »
+ strTemplateName
+ » — »
+ strTemplateCode),
BorderLayout.NORTH);
CodeJava.net shares Java tutorials, code examples and sample projects for programmers at all levels.
CodeJava.net is created and managed by Nam Ha Minh — a passionate programmer.
Copyright © 2012 — 2023 CodeJava.net, all rights reserved.
Set color to button in java
In Android, Button represents a push button. A Push buttons can be clicked, or pressed by the user to perform an action. There are different types of buttons used in android such as CompoundButton, ToggleButton, RadioButton.
Button is a subclass of TextView class and compound button is the subclass of Button class. On a button we can perform different actions or events like click event, pressed event, touch event etc.
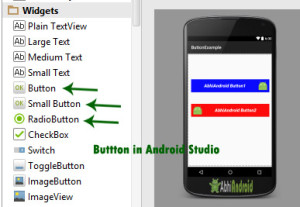
Android buttons are GUI components which are sensible to taps (clicks) by the user. When the user taps/clicks on button in an Android app, the app can respond to the click/tap. These buttons can be divided into two categories: the first is Buttons with text on, and second is buttons with an image on. A button with images on can contain both an image and a text. Android buttons with images on are also called ImageButton.
Button code in XML:
The below code will create Button and write “Abhi Android” text on it.

Attributes of Button in Android:
Now let’s we discuss some important attributes that helps us to configure a Button in your xml file (layout).
1. id: id is an attribute used to uniquely identify a text Button. Below is the example code in which we set the id of a Button.
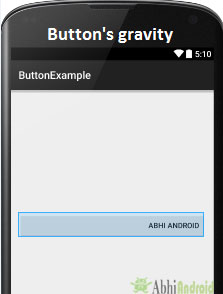
2. gravity: The gravity attribute is an optional attribute which is used to control the alignment of the text like left, right, center, top, bottom, center_vertical, center_horizontal etc.
Below is the example code with explanation included in which we set the right and center vertical gravity for text of a Button.
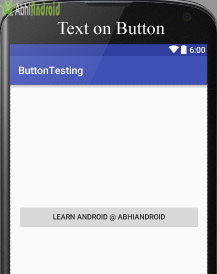
3. text: text attribute is used to set the text in a Button. We can set the text in xml as well as in the java class.
Below is the example code with explanation included in which we set the text “Learning Android @ AbhiAndroid” in a Button.
Setting Text Using Java class:
Below is the example code in which we set the text on Button programmatically means in java class. The output will be same as the above.
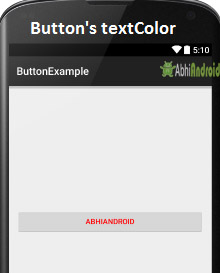
Button button = (Button) findViewById(R.id.simpleButton); button.setText("Learn Android @ AbhiAndroid");//set the text on button 4.textColor: textColor attribute is used to set the text color of a Button. Color value is in the form of “#argb”, “#rgb”, “#rrggbb”, or “#aarrggbb”.
Below is the example code with explanation included in which we set the red color for the displayed text of a Button.
Setting Text Color On Button Inside Java class:
Below is the example code in which we set the text color of a Button programmatically means in java class.
Button simpleButton=(Button) findViewById(R.id.simpleButton); simpleButton.setTextColor(Color.RED);//set the red color for the text
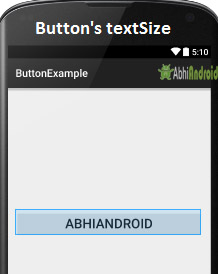
5. textSize: textSize attribute is used to set the size of the text on Button. We can set the text size in sp(scale independent pixel) or dp(density pixel).
Below is the example code in which we set the 25sp size for the text of a Button.
Setting textSize In Java class:
Below is the example code in which we set the text size of a Button programmatically means in java class.
Button simpleButton=(Button)findViewById(R.id.simpleButton); simpleButton.setTextSize(25);//set the text size of button
6. textStyle: textStyle attribute is used to set the text style of a Button. The possible text styles are bold, italic and normal. If we need to use two or more styles for a Button then “|” operator is used for that.
Below is the example code with explanation included, in which we set the bold and italic text styles for text of a button.

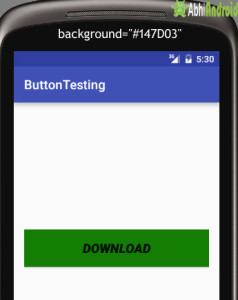
7. background: background attribute is used to set the background of a Button. We can set a color or a drawable in the background of a Button.
Below is the example code in which we set the gren color for the background, Black color for the displayed text and set 15dp padding from all the side’s for Button.
Setting background in Button In Java class:
Below is the example code in which we set the background color of a Button programmatically means in java class.
Button simpleButton=(Button)findViewById(R.id.simpleButton); simpleButton.setBackgroundColor(Color.BLACK);//set the black color of button background
8. padding: padding attribute is used to set the padding from left, right, top or bottom. In above example code of background we also set the 10dp padding from all the side’s of button.
9. drawableBottom: drawableBottom is the drawable to be drawn to the below of the text.
Below is the example code in which we set the icon to the below of the text.
Make sure you have image saved in your drawable folder name ic_launcher.

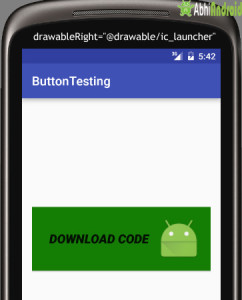
10. drawableTop, drawableRight And drawableLeft: Just like the above attribute we can draw drawable to the left, right or top of text.
In the Below example we set the icon to the right of the text. In the same way you can do for other two attribute by your own:
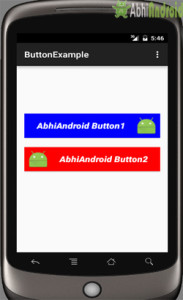
Button Example In Android Studio:
Below is the example of button in which we display two buttons with different background and whenever a user click on the button the text of the button will be displayed in a toast.
Step 1: Create a new project in Android Studio and name it ButtonExample.
Select File -> New -> New Project and Fill the forms and click "Finish" button.
Step 2: Now open res -> layout -> xml (or) activity_main.xml and add following code. Here we are designing the UI of two button in Relative Layout.
Step 3: Now Open app -> package -> MainActivity.java and the following code. Here using setOnClickListener() method on button and using Toast we will display which button is clicked by user.
package example.abhiandriod.buttonexample; import android.support.v7.app.AppCompatActivity; import android.os.Bundle; import android.view.Menu; import android.view.MenuItem; import android.view.View; import android.widget.Button; import android.widget.Toast; public class MainActivity extends AppCompatActivity < Button simpleButton1, simpleButton2; @Override protected void onCreate(Bundle savedInstanceState) < super.onCreate(savedInstanceState); setContentView(R.layout.activity_main); simpleButton1 = (Button) findViewById(R.id.simpleButton1);//get id of button 1 simpleButton2 = (Button) findViewById(R.id.simpleButton2);//get id of button 2 simpleButton1.setOnClickListener(new View.OnClickListener() < @Override public void onClick(View view) < Toast.makeText(getApplicationContext(), "Simple Button 1", Toast.LENGTH_LONG).show();//display the text of button1 >>); simpleButton2.setOnClickListener(new View.OnClickListener() < @Override public void onClick(View view) < Toast.makeText(getApplicationContext(), "Simple Button 2", Toast.LENGTH_LONG).show();//display the text of button2 >>); > >
Now start the AVD in Emulator and run the App. You will see two button. Click on any button and you will see the message on screen which button is clicked.