- Sendmail in PHP using mail(), SMTP with Phpmailer
- Quick Example
- PHP mail()
- Syntax
- Parameters
- Return Values
- PHP sendmail – configurations
- Examples to Sendmail in PHP
- Sendmail in PHP to send plaintext content
- PHP Sendmail code to send HTML content
- Sendmail in PHP to attach files
- Sendmail on form submit
- PHP sendmail via SMTP
- Related function to sendmail in PHP
- Conclusion
- Отправка писем через SMTP в PHPMailer
- Яндекс Почта
- Mail.ru
- Gmail
- Рамблер
- iCloud
- Мастерхост
- Timeweb
- Хостинг Центр (hc.ru)
- REG.RU
- ДЖИНО
- nic.ru
- Бегет — beget.com
- Спринтхост — sprinthost.ru
- Отправка почты через SMTP с помощью PHP
- Готовый класс — PHP
- Настройка класса
- Прикрепление файлов к письму
Sendmail in PHP using mail(), SMTP with Phpmailer
Sendmail in PHP is possible with just single line of code. PHP contains built-in mail functions to send mail.
There are reasons why I am feeling embraced with this PHP feature. Because I write lot of code for sending mails regularly. PHP really saves our time with its built-ins.
Quick Example
In this tutorial, we will see how to add code to sendmail in PHP. We will see several examples in this to enrich the features with more support.
The below list examples we are going to see below. It will cover basic to full-fledged support to sendmail in PHP.
- Simple text mail with PHP mail().
- Send rich-text content via mail.
- Sendmail in PHP with attachments.
- Sendmail using PHPMailer with SMTP.
PHP mail()
The PHP mail() is to sendmail from an application. Let’s see the PHP configurations required to make the mail() function work. Also, we will see the common syntax and parameters of this PHP function below.
Syntax
mail( string $recipient_email, string $subject, string $message, array|string $headers = [], string $additional_params = "" ) Parameters
$recipient_email
One or more comma-separated value that is the target mail addresses. The sample format of the values are,
$subject
Mail subject. It should satisfy RFC 2047.
$message
Mail content body. It uses \r\n for passing a multi-line text. It has a character limit of 70 for a line. It accepts various content types depends on the specification in the extra header.
$headers
This is an extra string or array append to the mail header. Use to pass the array of specifications like content-type, charset and more. It’s an optional parameter. It uses \r\n to append multiple headers. The header array contains key-value pair to specify header name and specification respectively.
$additional_params
This is also optional. It is to pass extra flags like envelope sender address with a command-line option.
Return Values
This function returns boolean true or false based on the sent status of the mail. By receiving boolean true that doesn’t mean the mail was sent successfully. Rather, it only represents that the mail sending request is submitted to the server.
PHP sendmail – configurations
We have to configure some directives to make the mail script work in your environment.
Locate your php.ini file and set the mail function attributes. The below image shows the PHP configuration of the mail function.
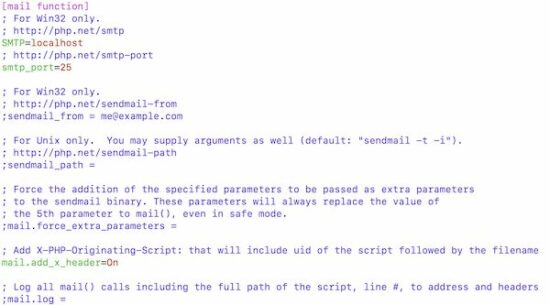
Set the mail server configuration and the sendmail path with this php.ini section. Then restart the webserver and ensure that the settings are enabled via phpinfo().
Examples to Sendmail in PHP
Sendmail in PHP to send plaintext content
This is a short example of sending plain text content via PHP Script. It sets the mail subject, message and recipient email parameter to sendemail in PHP.
This program print response text based on the boolean returned by the mail() function.
PHP Sendmail code to send HTML content
Like the above example, this program also uses the PHP mail() function to send emails. It passes HTML content to the mail function.
For sending HTML content, it sets the content type and other header values with the mail header.
Sendmail in PHP with HTML content. '; if (mail($to, $subject, $message, $headers)) < echo 'Mail sent successfully.'; >else < echo 'Unable to send mail. Please try again.'; >?> Sendmail in PHP to attach files
This program attaches a text file with the email content. It reads a source file using PHP file_get_contents(). It encodes the file content and prepares a mail header to attach a file.
It sets content-type, encoding with the message body to make it work. This script uses the optional $header variable on executing sendmail in PHP.
\r\n"; $headers .= "Content-Type: multipart/mixed; boundary=\"" . $divider . "\"\r\n"; $headers .= "Content-Transfer-Encoding: 7bit\r\n"; // prepare mail body with attachment $message = "--" . $divider. "\r\n"; $message .= "Content-Type: application/octet-stream; name=\"" . $file . "\"\r\n"; $message .= "Content-Transfer-Encoding: base64\r\n"; $message .= "Content-Disposition: attachment\r\n"; $message .= $encodedContent. "\r\n"; $message .= "--" . $divider . "--"; //sendmail with attachment if (mail($to, $subject, $message, $headers)) < echo 'Mail sent successfully.'; >else < echo 'Unable to send mail. Please try again.'; >?> 
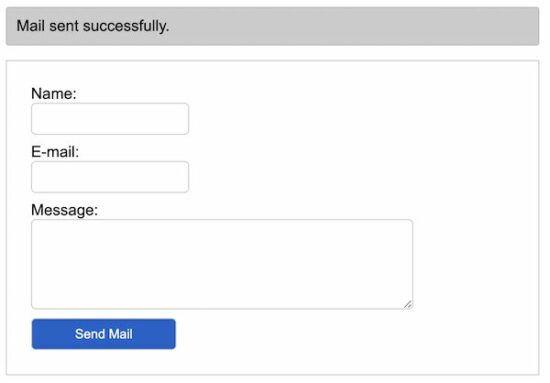
Sendmail on form submit
Instead of static values, we can also pass user-entered values to the PHP sendmail. An HTML form can get the values from the user to send mail. We have already seen how to send a contact email via the form.
This example shows a form that collects name, from-email and message from the user. It posts the form data to the PHP on the submit action.
The PHP reads the form data and uses them to prepare mail sending request parameters. It prepares the header with the ‘from’ email. It sets the mail body with the message entered by the user.
All the form fields are mandatory and the validation is done by the browser’s default feature.
else < $responseText = 'Unable to send mail. Please try again.'; >> ?> body < font-family: Arial; width: 550px; >.response-ribbon < padding: 10px; background: #ccc; border: #bcbcbc 1px solid; margin-bottom: 15px; border-radius: 3px; >input, textarea < padding: 8px; border: 1px solid #ccc; border-radius: 5px; >#Submit-btn < background: #1363cc; color: #FFF; width: 150px; >#email-form < border: 1px solid #ccc; padding: 20px; >.response-ribbon ?> 
PHP sendmail via SMTP
PHP mail() function has some limitation. To have a full-fledge functionality to sendmail in PHP, I prefer to use the PHPmailer library.
This library is one of the best that provides advanced mailing utilities. We have seen examples already to sendmail in PHP using PHPMailer via SMTP. If you are searching for the code to sendmail using OAuth token, the linked article has an example.
This example uses a minimal script to sendmail in PHP with PHPMailer via SMTP. It loads the PHPMailer library to create and set the mail object.
The mail object is used to configure the mail parameters. Then it invokes the send() method of the PHPMailer class to send mail.
Download PHPMailer from Github and put it into the vendor of this example directory. Replace the SMTP configurations in the below script to make this mail script working.
SMTPDebug = 0; $mail->isSMTP(); $mail->Host = 'smtp.gmail.com'; $mail->SMTPAuth = true; $mail->Username = ""; $mail->Password = ""; $mail->SMTPSecure = "ssl"; $mail->Port = 465; $mail->From = "test@testmail.com"; $mail->FromName = "Full Name"; $mail->addAddress("recipient@email.com", "recipient name"); $mail->isHTML(true); $mail->Subject = "Mail sent from php send mail script."; $mail->Body = "Text content from send mail."; $mail->AltBody = "This is the plain text version of the email content"; try < $mail->send(); echo "Message has been sent successfully"; > catch (Exception $e) < echo "Mailer Error: " . $mail->ErrorInfo; > ?>
Related function to sendmail in PHP
The PHP provides alternate mail functions to sendmail. Those are listed below.
- mb_send_mail() – It sends encoded mail based on the language configured with mb_language() setting.
- imap_mail() – It allows to sendmail in PHP with correct handling of CC, BCC recipients.
Conclusion
The mail sending examples above provides code to sendemail in PHP. It supports sending various types of content, file attachments in the mail.
The elaboration on PHP in-built mail() function highlights the power of this function.
Hope this article will be helpful to learn more about how to sendmail in PHP.
Download
Отправка писем через SMTP в PHPMailer
В последнее время письма отправляемые с хостингов через функции mail() и mb_send_mail() часто попадают в спам или совсем не доходят до адресатов. Альтернатива – это отправка e-mail через SMTP с реального почтового ящика.
use PHPMailer\PHPMailer\PHPMailer; use PHPMailer\PHPMailer\Exception; require_once '/PHPMailer/src/Exception.php'; require_once '/PHPMailer/src/PHPMailer.php'; require_once '/PHPMailer/src/SMTP.php'; // Для более ранних версий PHPMailer //require_once '/PHPMailer/PHPMailerAutoload.php'; $mail = new PHPMailer; $mail->CharSet = 'UTF-8'; // Настройки SMTP $mail->isSMTP(); $mail->SMTPAuth = true; $mail->SMTPDebug = 0; $mail->Host = 'ssl://smtp.gmail.com'; $mail->Port = 465; $mail->Username = 'Логин'; $mail->Password = 'Пароль'; // От кого $mail->setFrom('mail@snipp.ru', 'Snipp.ru'); // Кому $mail->addAddress('mail@site.com', 'Иван Петров'); // Тема письма $mail->Subject = $subject; // Тело письма $body = '«Hello, world!»
'; $mail->msgHTML($body); // Приложение $mail->addAttachment(__DIR__ . '/image.jpg'); $mail->send();
Если при отправки писем возникает ошибка « Could not connect to SMTP host », то необходимо добавить следующие строки:
$mail->SMTPOptions = array( 'ssl' => array( 'verify_peer' => false, 'verify_peer_name' => false, 'allow_self_signed' => true ) );
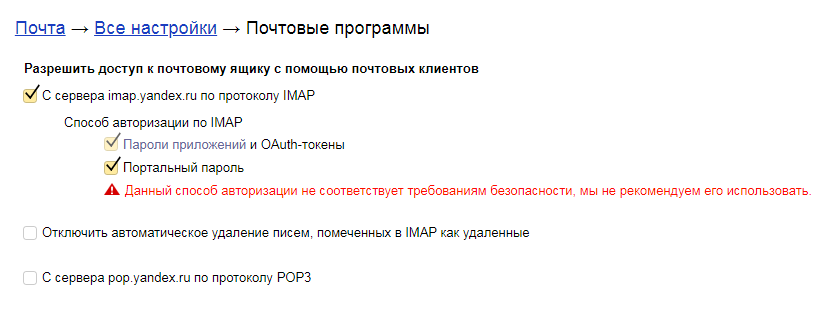
Яндекс Почта
$mail->Host = 'ssl://smtp.yandex.ru'; $mail->Port = 465; $mail->Username = 'Логин@yandex.ru'; $mail->Password = 'Пароль';
В настройках почты нужно разрешить доступ к почтовому ящику с помощью почтовых клиентов:

Mail.ru
$mail->Host = 'ssl://smtp.mail.ru'; $mail->Port = 465; $mail->Username = 'Логин@mail.ru'; $mail->Password = 'Пароль';
Gmail
$mail->Host = 'ssl://smtp.gmail.com'; $mail->Port = 465; $mail->Username = 'Логин@gmail.com'; $mail->Password = 'Пароль';
Если возникает ошибка при отправки почты, то нужно отключить двухфакторную авторизацию и разблокировать «ненадежные приложения» в настройках конфиденциальности аккаунта https://myaccount.google.com/security?pli=1
Рамблер
$mail->Host = 'ssl://smtp.rambler.ru'; $mail->Port = 465; $mail->Username = 'Логин@rambler.ru'; $mail->Password = 'Пароль';
iCloud
$mail->Host = 'ssl://smtp.mail.me.com'; $mail->Port = 587; $mail->Username = 'Логин@icloud.com'; $mail->Password = 'Пароль';
Мастерхост
$mail->Host = 'ssl://smtp.masterhost.ru'; $mail->Port = 465; $mail->Username = 'Логин@домен.ru'; $mail->Password = 'Пароль';
Timeweb
$mail->Host = 'ssl://smtp.timeweb.ru'; $mail->Port = 465; $mail->Username = 'Логин@домен.ru'; $mail->Password = 'Пароль';
Хостинг Центр (hc.ru)
Доступ к сторонним почтовым серверам по SMTP-портам (25, 465, 587) ограничен, разрешена отправка не более 300 сообщений в сутки.
$mail->Host = 'smtp.домен.ru'; $mail->SMTPSecure = 'TLS'; $mail->Port = 25; $mail->Username = 'Логин@домен.ru'; $mail->Password = 'Пароль';
REG.RU
$mail->Host = 'ssl://serverXXX.hosting.reg.ru'; $mail->Port = 465; $mail->Username = 'Логин@домен.ru'; $mail->Password = 'Пароль';
ДЖИНО

$mail->Host = 'ssl://smtp.jino.ru'; $mail->Port = 465; $mail->Username = 'Логин@домен.ru'; $mail->Password = 'Пароль';
nic.ru
$mail->Host = 'ssl://mail.nic.ru'; $mail->Port = 465; $mail->Username = 'Логин@домен.ru'; $mail->Password = 'Пароль';
Бегет — beget.com
$mail->Host = 'ssl://smtp.beget.com'; $mail->Port = 465; $mail->Username = 'Логин@домен.ru'; $mail->Password = 'Пароль';
Спринтхост — sprinthost.ru
$mail->Host = 'ssl://smtp.ВАШ_ДОМЕН'; $mail->Port = 465; $mail->Username = 'Логин@домен.ru'; $mail->Password = 'Пароль';
Отправка почты через SMTP с помощью PHP

Здравствуйте дорогие читатели. В этой записи я расскажу Вам как отправить письмо с вашего сайта через SMTP сервер. Перед тем, как отправлять письма через SMTP необходимо обязательно настроить DMARC, DKIM, SPF. Если не настроить, ваши письма будут попадать в спам, но нам этого не нужно. Статья — Как настроить DMARC, SPF, DKIM подпись на своем сайте.
Готовый класс — PHP
Для начала загрузите готовый класс, по ссылке — SendMailSmtpClass.php.zip
Распаковываем архив, и размещаем в любую директорию на Вашем сайте.
Настройка класса
Настройка очень простая. Разместите этот код на странице, которая присутствует на каждой. Обычно это — страница конфига.
require_once "SendMailSmtpClass.php"; // подключаем класс //ДЛЯ YANDEX.RU $mailSMTP = new SendMailSmtpClass('mail@yandex.ru', 'pass', 'ssl://smtp.yandex.ru', 465, "UTF-8"); //ДЛЯ MAIL.RU $mailSMTP = new SendMailSmtpClass('mail@mail.ru', 'pass', 'ssl://smtp.mail.ru', 465, "UTF-8"); //РАСШИФРОВКА ЗНАЧЕНИЙ $mailSMTP = new SendMailSmtpClass('логин', 'пароль', 'хост', 'порт', 'кодировка письма');
Код отправки самого письма:
$from = array("Блог программиста", // Имя отправителя "support@212d.ru" // почта отправителя ); $result = $mailSMTP->send('Кому письмо, можно через , два получателя', 'Тема письма', 'Текст письма', $from);
$result возвращает либо true — успешная отправка, либо false — ошибка.
Прикрепление файлов к письму
$mailSMTP->addFile("file1.jpg"); $mailSMTP->addFile("file2.jpg");
В итоге, если Вы все настроили правильно Ваше письмо будет отправляется через этот SMTP сервер с подписей DKIM, и не попадет в спам.
Пишите свои вопросы, предложения в комментариях помогу Всем!