- Change Option Using JavaScript [With Examples]
- 1. Change Select Option by Value
- 2. Change Select Option by Text
- 3. Change Select Option by Option ID, CLASS, or attribute
- 4. Change Selected Option by its Index
- Conclusion
- Related articles
- Manipulation of HTML Select Element with Javascript
- Important Properties and Methods of Select Element
- Important Properties of Option Element
- Setting Value of Select Element
- Getting the Value and Text/Label of the Selected Options
- Adding an Option
- Deleting an Option
- Selecting an option in javascript
- События элемента select
Change Option Using JavaScript [With Examples]
There are multiple ways you can do it and choosing one or another will depend on the information you have available.
Let’s see 6 different ways of changing the selected option using JavaScript:
1. Change Select Option by Value
To change the selected option programmatically by the value attribute, all we have to do is change the value property of the element.
The select box will then update itself to reflect the state of this property. This is the most straightforward way of updating a select box state.
Let’s say that we want to select the option containing the attribute value=»steve» .
select id="my-select">
option value="ann">Ann Frankoption>
option value="paul" selected>Paul Allenoption>
option value="steve">Steve Jobsoption>
select>
All we have to do is set the value of the select box to that same value:
const changeSelected = (e) =>
const $select = document.querySelector('#mySelect');
$select.value = 'steve'
>;
2. Change Select Option by Text
We might also want to change the value of a select box by the text of the element that gets displayed to visitors.
Doing this is probably the most complicated way, but still, something relatively simple to do. We have to iterate over the options and compare their text with the text of the element we want to select.
Once we find the element we want to update, we’ll be updating its selected property and setting it to true . This way, the select box will also update itself to reflect this change.
Note: this only works for select box elements that only admit a single value. If you are using a select box admiting multiple selected elements this will just add another option to the multi-select instead of changing the active one for another.
const changeSelected = (e) =>
const text = 'Steve Jobs';
const $select = document.querySelector('#mySelect');
const $options = Array.from($select.options);
const optionToSelect = $options.find(item => item.text ===text);
optionToSelect.selected = true;
>;
There’s another way of doing this and that will solve the problem with multi-select inputs. Basically, once we find the element that has the text we are looking for, instead of just changing its selected property, we’ll be getting its value attribute and using it to set it as the only value for the whole select box.
const changeSelected = (e) =>
const text = 'Steve Jobs';
const $select = document.querySelector('#mySelect');
const $options = Array.from($select.options);
const optionToSelect = $options.find(item => item.text ===text);

// Here's the trick:
$select.value = optionToSelect.value;
>;
3. Change Select Option by Option ID, CLASS, or attribute
This is quite simple too. This solution will also work for multi-select inputs by assigning a single value to them:
const changeSelected = (e) =>
const $select = document.querySelector('#mySelect');
const $option = $select.querySelector('#myId');
$select.value = $option.value;
>;
And of course, it can be done in the same way if we have a class attribute instead of an id or any other attribute like data-selected=»true» . Just change the query to get the option element:
// Using id
const $option = $select.querySelector('#myId');

// Using classname
const $option = $select.querySelector('#mySelect .myId');

// Using data-attribute
const $option = $select.querySelector('#mySelect [data-selected="myElement"]');
4. Change Selected Option by its Index
If all we have is the index of the option element, we can set the selected attribute by retrieving the select box options. Then we only have to select the one we need from the array by its index.
Notice that the index is 0-based. So, the first element will have index 0 , the next 1 , and so forth.
Knowing this, if we want to select the 3rd element, we’ll be using index 2 in our code to select it:
// Selecting the 3rd option (Demo 2)
document.querySelector('#mySelect').querySelector('option')[2].selected = 'selected'
Let’s see it working on a click event:
And rewritten to work for multi-select inputs:
// Selecting the 3rd option (Demo 2)
const $select = document.querySelector('#mySelect');
$select.value = $select.querySelector('option')[2].value;
Conclusion
Remember that, no matter what way you choose to use to replace and change the selected element on your elements, you’d be better off updating the value property if you want a single element to be selected. Otherwise, when having select boxes admitting multiple elements you won’t replace the active element but just add another one.
Now you know how to set the value of a element dynamically with JavaScript!
If you are learning JavaScript and this seems a bit difficult for you, there’s nothing to worry about! Eventually, you’ll get there. See how long does it take to learn JavaScript and what’s the best way to learn JavaScript!
Related articles
Manipulation of HTML Select Element with Javascript

Manipulation of the element with Javascript is quite commonly required in web applications. This tutorial explains how you can perform common operations on select element with vanilla Javascript — adding/deleting options or getting/setting the selected options.
Important Properties and Methods of Select Element
- value : It gives the value of the first selected option (a multi-valued select may have multiple selected options)
- options : It gives the list of all option elements in the select
- selectedOptions : It gives the list of option elements that are currently selected
- selectedIndex : It is an integer that gives the index of first selected option. In case no option is selected, it gives -1
- add() : This method adds a new option to the list of options
- remove() : This method removes an option from the select element
Important Properties of Option Element
- value : It gives the value of the option
- text : It gives the text inside the option
- selected : It tells whether the option is selected or not
Setting Value of Select Element
For a single valued select, setting its value can be done with the value or the selectedIndex property.
// Set option with value 'Orange' as selected document.querySelector('#choose-fruit').value = 'Orange'; // Set the option with index 2 as selected => Sets the 'Banana' option as selected document.querySelector('#choose-fruit').selectedIndex = 2; For a multiple valued select, setting multiple selected options can be done by setting the selected attribute of the required option.
// choose the first option document.querySelector('#choose-fruit-multiple').options[0].selected = true; // also choose the third option document.querySelector('#choose-fruit-multiple').options[2].selected = true; This will obviously work for single valued select also, but using the value property is much direct for them.
Getting the Value and Text/Label of the Selected Options
The selectedOptions property of the select element gives the list of options that are currently selected. Each element in this list is a DOM element — so you can use the value and text property to get the value and inside text of the option.
// For a normal select (and not multi-select) the list would contain only a single element var text = document.querySelector('#choose-fruit').selectedOptions[0].text; var value = document.querySelector('#choose-fruit').selectedOptions[0].value; For a multiple select element, you can loop over the list to get all selected options.
var selected_options = document.querySelector('#choose-fruit-multiple').selectedOptions; for(var i=0; i // output Orange 2 Grapes 5 Adding an Option
The add method can be used to add a new option in the select. You can also specify the exact positon where the option needs to be inserted.
var option = document.createElement('option'); option.text = 'BMW'; // append option at the end // new options will be Volvo, Audi, Mercedes & BMW document.querySelector('#choose-car').add(option, null); var option = document.createElement('option'); option.text = 'BMW'; // append option before index 0 // new options will be BMW, Volvo, Audi & Mercedes document.querySelector('#choose-car').add(option, 0); var option = document.createElement('option'); option.text = 'BMW'; // append option before index 2 // new options will be Volvo, Audi, BMW & Mercedes document.querySelector('#choose-car').add(option, 2); Deleting an Option
The remove method can be used to delete an option at a specified index.
// remove the option at index 1 // new options will be Volvo & Mercedes document.querySelector('#choose-car').remove(1); Selecting an option in javascript

Для создания списка используется html-элемент select. Причем с его помощью можно создавать как выпадающие списки, так и обычные с ординарным или множественным выбором. Например, стандартный список:
Атрибут size позволяет установить, сколько элементов будут отображаться одномоментно в списке. Значение size=»1″ отображает только один элемент списка, а сам список становится выпадающим. Если установить у элемента select атрибут multiple , то в списке можно выбрать сразу несколько значений.
Каждый элемент списка представлен html-элементом option, у которого есть отображаемая метка и есть значения в виде атрибута value .
В JavaScript элементу select соответствует объект HTMLSelectElement , а элементу option — объект HtmlOptionElement или просто Option .
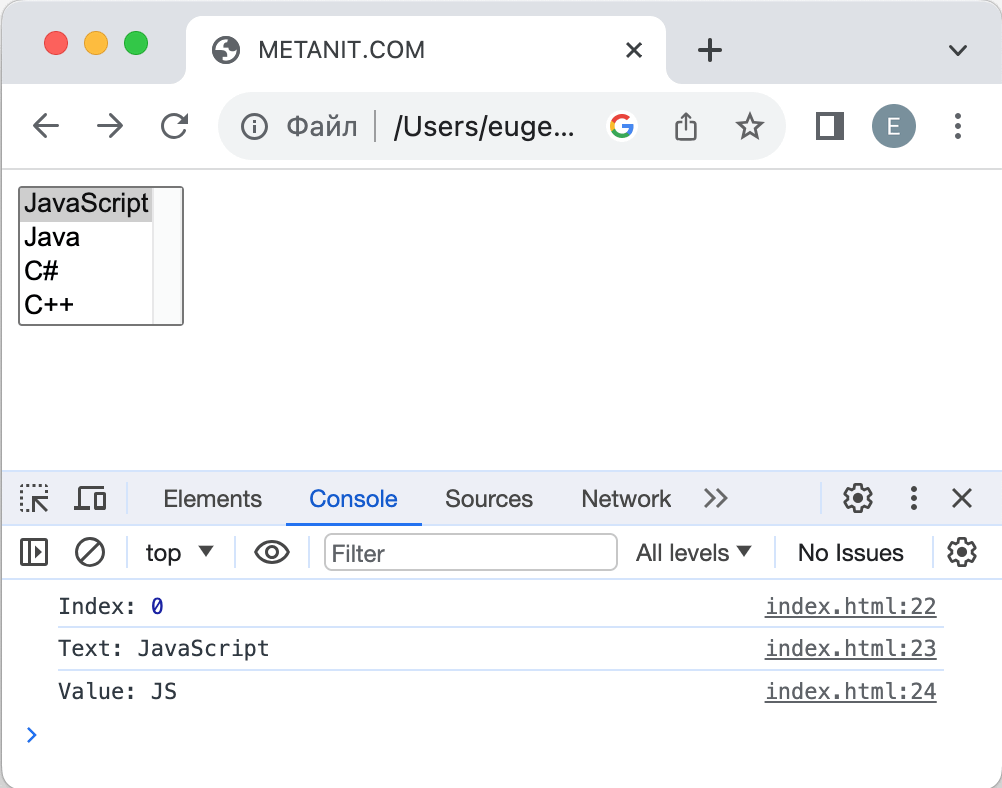
Все элементы списка в javascript доступны через коллекцию options . А каждый объект HtmlOptionElement имеет свойства: index (индекс в коллекции options), text (отображаемый текст) и value (значение элемента). Например, получим первый элемент списка и выведем о нем через его свойства всю информацию:
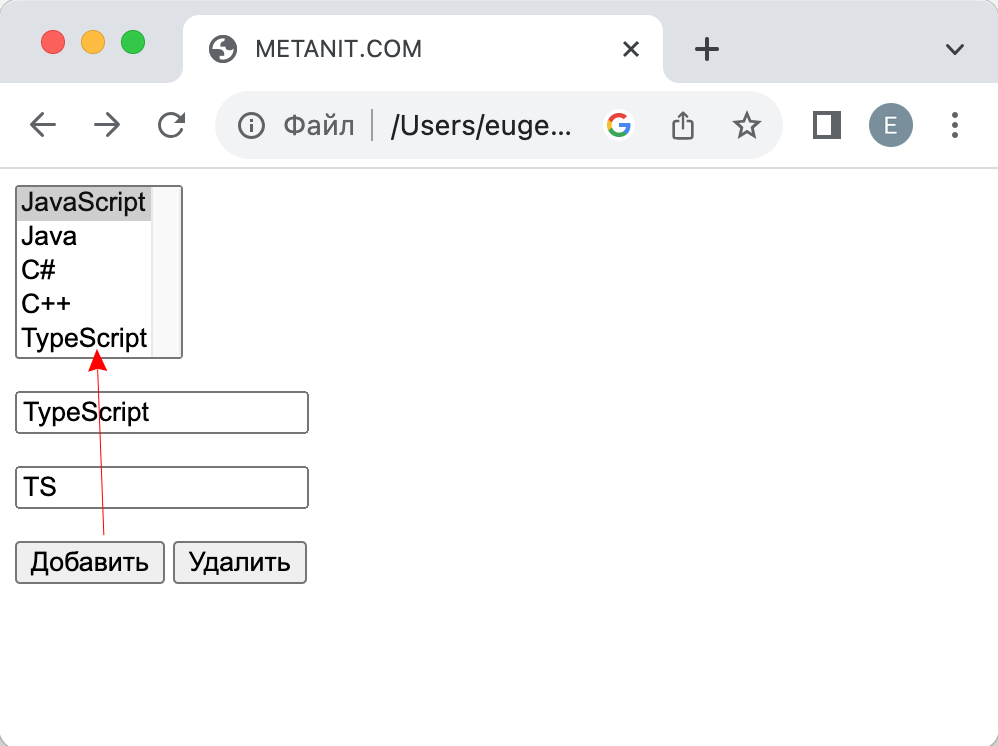
В javascript мы можем не только получать элементы, но и динамически управлять списком. Например, применим добавление и удаление объектов списка:
Для добавления на форме предназначены два текстовых поля (для текстовой метки и значения элемента option) и кнопка. Для удаления выделенного элемента предназначена еще одна кнопка.
За добавление в коде javascript отвечает функция addOption , в которой получаем введенные в текстовые поля значения, создаем новый объект Option и добавляем его в массив options объекта списка.
За удаление отвечает функция removeOption , в которой просто получаем индекс выделенного элемента с помощью свойства selectedIndex и в коллекции options приравниваем по этому индексу значение null.
Для добавления/удаления также в качестве альтернативы можно использовать методы элемента select:
// вместо вызова // languagesSelect.options[languagesSelect.options.length]=newOption; // использовать для добавления вызов метода add languagesSelect.add(newOption); // вместо вызова // languagesSelect.options[selectedIndex] = null; // использовать для удаления метод remove languagesSelect.remove(selectedIndex);
События элемента select
Элемент select поддерживает три события: blur (потеря фокуса), focus (получение фокуса) и change (изменение выделенного элемента в списке). Рассмотрим применение события select: