- Java Guides
- Video Tutorial
- Tools and technologies used
- Development Steps
- 1. Create an Eclipse Dynamic Web Project
- 2. Add Jar Files to Classpath
- 3. Project Structure
- 4. MySQL Database Setup
- 5. Create a FileUploadDao.java
- 6. Create a FileUploadServlet.java
- 7. Creating a User Profile form — upload-file.jsp
- 8. Create a JSP Page for Success Message — message.jsp
- 9. Deploying and Testing the Application Demo
- 10. Test in MySQL Workbench
- Write and Read MySQL BLOB/binary files Using JDBC
Java Guides
You can download the source code of this tutorial from my GitHub repository and the link is given at the end of this tutorial.
Video Tutorial
Tools and technologies used
- JSP — 2.2 +
- IDE — STS/Eclipse Neon.3
- JDK — 1.8 or later
- Apache Tomcat — 8.5
- Servlet API — 2.5
- MySQL — mysql-connector-java-8.0.13.jar
Development Steps
- Create an Eclipse Dynamic Web Project
- Add Dependencies
- Project Structure
- MySQL Database Setup
- Create a FileUploadDao.java
- Create a FileUploadServlet.java
- Creating a User Profile form — upload-file.jsp
- Create a JSP Page for Success Message — message.jsp
- Deploying and Testing the Application Demo
1. Create an Eclipse Dynamic Web Project

4. Enter project name as «jsp-servlet-jdbc-mysql-example»;
5. Make sure that the target runtime is set to Apache Tomcat with the currently supported version.
2. Add Jar Files to Classpath
3. Project Structure

4. MySQL Database Setup
Let’s create a database named «java_demo» in MySQL. Now, create a users table using below DDL script:
CREATE DATABASE 'java_demo'; USE demo; CREATE TABLE `users` ( `id` int(11) NOT NULL AUTO_INCREMENT, `first_name` varchar(45) DEFAULT NULL, `last_name` varchar(45) DEFAULT NULL, `photo` mediumblob, PRIMARY KEY (`id`) ) ENGINE=InnoDB AUTO_INCREMENT=4 DEFAULT CHARSET=latin1;
5. Create a FileUploadDao.java
Create a new Java class file named FileUploadDao.java under net.javaguides.fileupload.dao package. Add the code shown in the following snippet.
package net.javaguides.fileupload.dao; import java.io.InputStream; import java.sql.Connection; import java.sql.DriverManager; import java.sql.PreparedStatement; import java.sql.SQLException; public class FileUploadDao < private static final String url = "jdbc:mysql://localhost:3306/java_demo?useSSL=false"; private static final String user = "root"; private static final String password = "root"; private static final String sql = "INSERT INTO users (first_name, last_name, photo) values (?, ?, ?)"; public int uploadFile(String firstName, String lastName, InputStream file) < int row = 0; try < Class.forName("com.mysql.jdbc.Driver"); > catch (ClassNotFoundException e1) < // TODO Auto-generated catch block e1.printStackTrace(); > try (Connection connection = DriverManager .getConnection(url, user, password); // Step 2:Create a statement using connection object PreparedStatement preparedStatement = connection .prepareStatement(sql)) < preparedStatement.setString(1, firstName); preparedStatement.setString(2, lastName); if (file != null) < // fetches input stream of the upload file for the blob column preparedStatement.setBlob(3, file); > // sends the statement to the database server row = preparedStatement.executeUpdate(); > catch (SQLException e) < // process sql exception printSQLException(e); > return row; > private void printSQLException(SQLException ex) < for (Throwable e: ex) < if (e instanceof SQLException) < e.printStackTrace(System.err); System.err.println("SQLState: " + ((SQLException) e).getSQLState()); System.err.println("Error Code: " + ((SQLException) e).getErrorCode()); System.err.println("Message: " + e.getMessage()); Throwable t = ex.getCause(); while (t != null) < System.out.println("Cause: " + t); t = t.getCause(); > > > > >
if (file != null) < // fetches input stream of the upload file for the blob column preparedStatement.setBlob(3, file); >
6. Create a FileUploadServlet.java
Create a new Java class file named FileUploadServlet.java under net.javaguides.fileupload.controller package. Add the code shown in the following snippet.
package net.javaguides.fileupload.controller; import java.io.IOException; import java.io.InputStream; import javax.servlet.ServletException; import javax.servlet.annotation.MultipartConfig; import javax.servlet.annotation.WebServlet; import javax.servlet.http.HttpServlet; import javax.servlet.http.HttpServletRequest; import javax.servlet.http.HttpServletResponse; import javax.servlet.http.Part; import net.javaguides.fileupload.dao.FileUploadDao; @WebServlet("/uploadServlet") @MultipartConfig(maxFileSize = 16177215) // upload file's size up to 16MB public class FileUploadServlet extends HttpServlet < private static final long serialVersionUID = 1 L; private FileUploadDao fileUploadDao; @Override public void init() < fileUploadDao = new FileUploadDao(); > protected void doPost(HttpServletRequest request, HttpServletResponse response) throws ServletException, IOException < // gets values of text fields String firstName = request.getParameter("firstName"); String lastName = request.getParameter("lastName"); InputStream inputStream = null; // input stream of the upload file String message = null; // obtains the upload file part in this multipart request Part filePart = request.getPart("photo"); if (filePart != null) < // prints out some information for debugging System.out.println(filePart.getName()); System.out.println(filePart.getSize()); System.out.println(filePart.getContentType()); // obtains input stream of the upload file inputStream = filePart.getInputStream(); > // sends the statement to the database server int row = fileUploadDao.uploadFile(firstName, lastName, inputStream); if (row > 0) < message = "File uploaded and saved into database"; > // sets the message in request scope request.setAttribute("Message", message); // forwards to the message page getServletContext().getRequestDispatcher("/message.jsp") .forward(request, response); > >
- @WebServlet: marks this servlet so that the servlet container will load it at startup, and map it to the URL pattern /uploadServlet.
- @MultipartConfig: indicates this servlet will handle the multipart request. We restrict the maximum size of the upload file up to 16 MB.
Part filePart = request.getPart("photo");
The name “photo” is the name of the file input field in the upload-file.jsp page. Obtaining the input stream of the upload file:
inputStream = filePart.getInputStream();
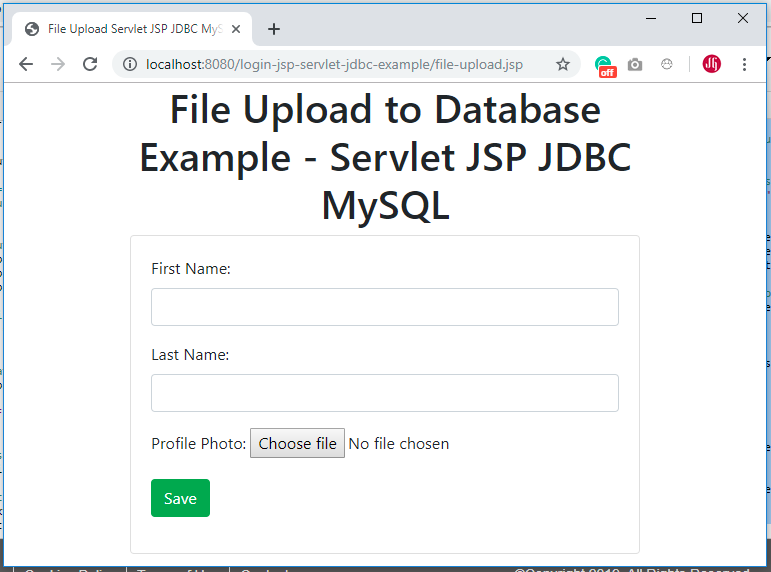
7. Creating a User Profile form — upload-file.jsp
"-//W3C//DTD HTML 4.01 Transitional//EN" "http://www.w3.org/TR/html4/loose.dtd"> html> head> meta http-equiv="Content-Type" content="text/html; charset=ISO-8859-1"> title>File Upload Servlet JSP JDBC MySQL Exampletitle> link href="https://stackpath.bootstrapcdn.com/bootstrap/4.3.1/css/bootstrap.min.css" rel="stylesheet" integrity="sha384-ggOyR0iXCbMQv3Xipma34MD+dH/1fQ784/j6cY/iJTQUOhcWr7x9JvoRxT2MZw1T" crossorigin="anonymous"> head> body> div class="container col-lg-6"> h1 class="text-center">File Upload to Database Example - Servlet JSP JDBC MySQL h1> div class="card"> div class="card-body"> form method="post" class="form-group" action="uploadServlet" enctype="multipart/form-data"> div class="form-group"> label for="first name">First Name: label> input type="text" class="form-control" name="firstName" size="50" /> div> div class="form-group"> label for="last name">Last Name: label> input type="text" class="form-control" name="lastName" size="50" /> div> div class="form-group"> label for="Profile Photo">Profile Photo:label> input type="file" name="photo" size="50" /> div> input type="submit" value="Save" class="btn btn-success"> form> div> div> div> body> html>
8. Create a JSP Page for Success Message — message.jsp
"-//W3C//DTD HTML 4.01 Transitional//EN" "http://www.w3.org/TR/html4/loose.dtd"> html> head> meta http-equiv="Content-Type" content="text/html; charset=ISO-8859-1"> title>Success massagetitle> link href="https://stackpath.bootstrapcdn.com/bootstrap/4.3.1/css/bootstrap.min.css" rel="stylesheet" integrity="sha384-ggOyR0iXCbMQv3Xipma34MD+dH/1fQ784/j6cY/iJTQUOhcWr7x9JvoRxT2MZw1T" crossorigin="anonymous"> head> body> center> div class="alert alert-success"> strong> strong> div> center> body> html>
9. Deploying and Testing the Application Demo
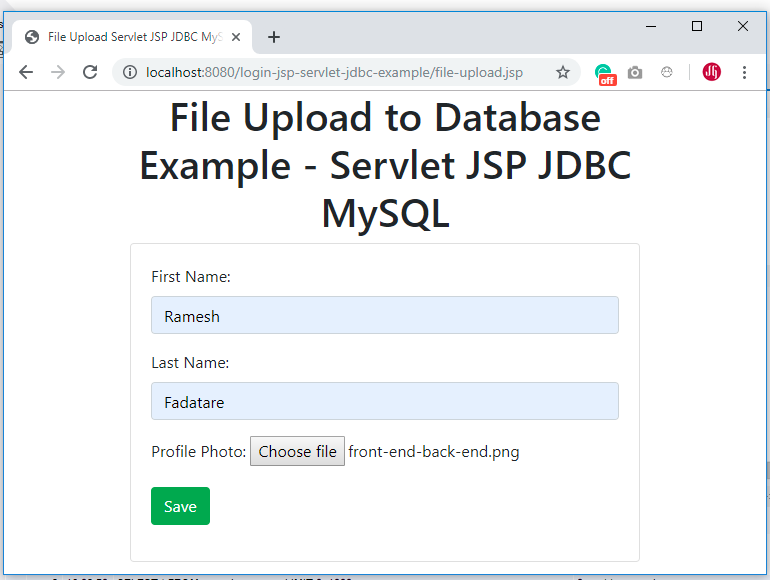
After form data along with photo (image) store in database then the user will navigate to below screen with success message:

10. Test in MySQL Workbench
To verify that the file is stored successfully in the database, open a new SQL Editor in MySQL Workbench and execute the following query:
The query would return the newly inserted record, right-click on the BLOB cell of the column photo, and select Open Value in Editor from the context menu:
Write and Read MySQL BLOB/binary files Using JDBC


In previous couple of posts How to store file in MySQL database using JDBC and How to read files/CLOB Data from MySQL database using JDBC we learnt how to save text file or CLOB(character large object) data in MYSQL database and how read it back from database. In this post we will learn how to Write and Reade MySQL BLOB/binary files Using JDBC
Create a folder InputFiles in project home directory and dump all binary files(.doc,PDF,images,audio,video etc..)
Project structure in eclipse:
SQL Query to create storebinaryfile_table in MySQL database (jdbcdb schema)
DB.sql
DBUtil.java class which is responsible to connect with MySQL database.
SaveBinaryFilesInDBClientTest.java class uses to save four binary files( GST.pdf,java collection .jpg,JDBC Introduction.docx and JDBC Introduction.pptx ) in MYSQL database .
String SQL = «INSERT INTO storebinaryfile_table (file_name,file_size_in_kb,file_extension,file_content)VALUES(. )» ;
After running SaveBinaryFilesInDBClientTest.java program you will look below output on eclipse console:
If you query storebinaryfile_table in jdbcdb schema of MYSQL database.You will find all binary files are saved as below screen shot.
Now lets read these binary files from MySQL database and write into DownLoadFiles folder in project home directory.
DownloadBinaryFilesFromDBClientTest.java class uses to read all binary files from MYSQL database and writes in DownLoadFiles folder in project home directory .
NOTE:You have to create DownLoadFiles folder manually in project home directory(You can modify this program to automate folder creation) .