- Java JDBC CRUD Tutorial: SQL Insert, Select, Update, and Delete Examples
- 1. Prerequisites
- 2. Creating a sample MySQL database
- 3. Understand the main JDBC interfaces and classes
- 4. Connecting to the database
- 5. JDBC Execute INSERT Statement Example
- 6. JDBC Execute SELECT Statement Example
- 7. JDBC Executing UPDATE Statement Example
- 8. JDBC Execute DELETE Statement Example
- JDBC API References:
- Related JDBC Tutorials:
- About the Author:
- Шаг 3. Подтверждение концепции: подключение к SQL с помощью Java
- Шаг 1. Подключение
- Шаг 2. Выполнение запроса
- Шаг 3. Вставка строки
Java JDBC CRUD Tutorial: SQL Insert, Select, Update, and Delete Examples
This JDBC tutorial is going to help you learning how to do basic database operations (CRUD — Create, Retrieve, Update and Delete) using JDBC (Java Database Connectivity) API. These CRUD operations are equivalent to the INSERT, SELECT, UPDATE and DELETE statements in SQL language. Although the target database system is MySQL, but the same technique can be applied for other database systems as well because the query syntax used is standard SQL which is supported by all relational database systems.
We will learn how to do insert, query, update and delete database records by writing code to manage records of a table Users in a MySQL database called SampleDB.
Table of content:
1. Prerequisites
-
- JDK (download JDK 7).
- MySQL (download MySQL Community Server 5.6.12). You may also want to download MySQL Workbench — a graphical tool for working with MySQL databases.
- JDBC Driver for MySQL (download MySQL Connector/J 5.1.25). Extract the zip archive and put the mysql-connector-java-VERSION-bin.jar file into classpath (in a same folder as your Java source files).
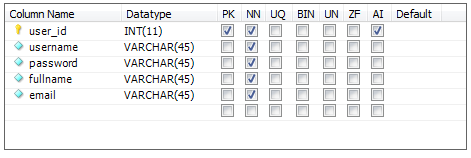
2. Creating a sample MySQL database
Let’s create a MySQL database called SampleDB with one table Users with the following structure:

Execute the following SQL script inside MySQL Workbench:
create database SampleDB; use SampleDB; CREATE TABLE `users` ( `user_id` int(11) NOT NULL AUTO_INCREMENT, `username` varchar(45) NOT NULL, `password` varchar(45) NOT NULL, `fullname` varchar(45) NOT NULL, `email` varchar(45) NOT NULL, PRIMARY KEY (`user_id`) );
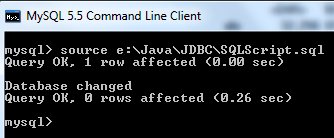
Or if you are using MySQL Command Line Client program, save the above script into a file, let’s say, SQLScript.sql and execute the following command:
source Path\To\The\Script\File\SQLScript.sql
Here’s an example screenshot taken while executing the above script in MySQL Command Line Client program:

3. Understand the main JDBC interfaces and classes
Let’s take an overview look at the JDBC’s main interfaces and classes with which we usually work. They are all available under the java.sql package:
-
- DriverManager : this class is used to register driver for a specific database type (e.g. MySQL in this tutorial) and to establish a database connection with the server via its getConnection() method.
- Connection : this interface represents an established database connection (session) from which we can create statements to execute queries and retrieve results, get metadata about the database, close connection, etc.
- Statement and PreparedStatement : these interfaces are used to execute static SQL query and parameterized SQL query, respectively. Statement is the super interface of the PreparedStatement interface. Their commonly used methods are:
-
-
- boolean execute(String sql) : executes a general SQL statement. It returns true if the query returns a ResultSet , false if the query returns an update count or returns nothing. This method can be used with a Statement only.
- int executeUpdate(String sql) : executes an INSERT, UPDATE or DELETE statement and returns an update account indicating number of rows affected (e.g. 1 row inserted, or 2 rows updated, or 0 rows affected).
- ResultSet executeQuery(String sql) : executes a SELECT statement and returns a ResultSet object which contains results returned by the query.
-
A prepared statement is one that contains placeholders (in form question marks ?) for dynamic values will be set at runtime. For example:
SELECT * from Users WHERE user_id=?
Here the value of user_id is parameterized by a question mark and will be set by one of the setXXX() methods from the PreparedStatement interface, e.g. setInt(int index, int value) .
-
- ResultSet : contains table data returned by a SELECT query. Use this object to iterate over rows in the result set using next() method, and get value of a column in the current row using getXXX() methods (e.g. getString() , getInt() , getFloat() and so on). The column value can be retrieved either by index number (1-based) or by column name.
- SQLException : this checked exception is declared to be thrown by all the above methods, so we have to catch this exception explicitly when calling the above classes’ methods.
4. Connecting to the database
Supposing the MySQL database server is listening on the default port 3306 at localhost. The following code snippet connects to the database name SampleDB by the user root and password secret:
String dbURL = «jdbc:mysql://localhost:3306/sampledb»; String username = «root»; String password = «secret»; try < Connection conn = DriverManager.getConnection(dbURL, username, password); if (conn != null) < System.out.println("Connected"); >> catch (SQLException ex)
Once the connection was established, we have a Connection object which can be used to create statements in order to execute SQL queries. In the above code, we have to close the connection explicitly after finish working with the database:
However, since Java 7, we can take advantage of the try -with-resources statement which will close the connection automatically, as shown in the following code snippet:
try (Connection conn = DriverManager.getConnection(dbURL, username, password)) < // code to execute SQL queries goes here. >catch (SQLException ex)
If you are using Java 7 or later, this approach is recommended. The sample programs in this tutorial are all using this try-with-resources statement to make a database connection.
NOTE: For details about connecting to a MySQL database, see the article: Connect to MySQL database via JDBC.
5. JDBC Execute INSERT Statement Example
-
- username: bill
- password: secretpass
- fullname: Bill Gates
- email: bill.gates@microsoft.com
String sql = «INSERT INTO Users (username, password, fullname, email) VALUES (?, ?, ?, ?)»; PreparedStatement statement = conn.prepareStatement(sql); statement.setString(1, «bill»); statement.setString(2, «secretpass»); statement.setString(3, «Bill Gates»); statement.setString(4, «bill.gates@microsoft.com»); int rowsInserted = statement.executeUpdate(); if (rowsInserted > 0)
In this code, we create a parameterized SQL INSERT statement and create a PreparedStatement from the Connection object. To set values for the parameters in the INSERT statement, we use the PreparedStatement ‘s setString() methods because all these columns in the table Users are of type VARCHAR which is translated to String type in Java. Note that the parameter index is 1-based (unlike 0-based index in Java array).
The PreparedStatement interface provides various setXXX() methods corresponding to each data type, for example:
-
- setBoolean(int parameterIndex, boolean x)
- setDate(int parameterIndex, Date x)
- setFloat(int parameterIndex, float x)
- …
Finally we call the PreparedStatement ’s executeUpdate() method to execute the INSERT statement. This method returns an update count indicating how many rows in the table were affected by the query, so checking this return value is necessary to ensure the query was executed successfully. In this case, executeUpdate() method should return 1 to indicate one record was inserted.
6. JDBC Execute SELECT Statement Example
The following code snippet queries all records from the Users table and print out details for each record:
String sql = «SELECT * FROM Users»; Statement statement = conn.createStatement(); ResultSet result = statement.executeQuery(sql); int count = 0; while (result.next())
User #1: bill — secretpass — Bill Gates — bill.gates@microsoft.com
Because the SQL SELECT query here is static so we just create a Statement object from the connection. The while loop iterates over the rows contained in the result set by repeatedly checking return value of the ResultSet ’s next() method. The next() method moves a cursor forward in the result set to check if there is any remaining record. For each iteration, the result set contains data for the current row, and we use the ResultSet ’s getXXX(column index/column name) method to retrieve value of a specific column in the current row, for example this statement:
String name = result.getString(2);
Retrieves value of the second column in the current row, which is the username field. The value is casted to a String because we know that the username field is of type VARCHAR based on the database schema mentioned previously. Keep in mind that the column index here is 1-based, the first column will be at index 1, the second at index 2, and so on. If you are not sure or don’t know exactly the index of column, so passing a column name would be useful:
String fullname = result.getString("fullname");7. JDBC Executing UPDATE Statement Example
String sql = «UPDATE Users SET password=?, fullname=?, email=? WHERE username=?»; PreparedStatement statement = conn.prepareStatement(sql); statement.setString(1, «123456789»); statement.setString(2, «William Henry Bill Gates»); statement.setString(3, «bill.gates@microsoft.com»); statement.setString(4, «bill»); int rowsUpdated = statement.executeUpdate(); if (rowsUpdated > 0)
8. JDBC Execute DELETE Statement Example
String sql = «DELETE FROM Users WHERE username=?»; PreparedStatement statement = conn.prepareStatement(sql); statement.setString(1, «bill»); int rowsDeleted = statement.executeUpdate(); if (rowsDeleted > 0)
So far we have one through some examples demonstrating how to use JDBC API to execute SQL INSERT, SELECT, UPDATE and DELETE statements. The key points to remember are:
-
- Using a Statement for a static SQL query.
- Using a PreparedStatement for a parameterized SQL query and using setXXX() methods to set values for the parameters.
- Using execute() method to execute general query.
- Using executeUpdate() method to execute INSERT, UPDATE or DELETE query
- Using executeQuery() method to execute SELECT query.
- Using a ResultSet to iterate over rows returned from a SELECT query, using its next() method to advance to next row in the result set, and using getXXX() methods to retrieve values of columns.
NOTE: If you use Spring framework to acces relation database, consider to use Spring JdbcTemplate that simplifies and reduces the code you need to write.
JDBC API References:
Related JDBC Tutorials:
About the Author:

Nam Ha Minh is certified Java programmer (SCJP and SCWCD). He started programming with Java in the time of Java 1.4 and has been falling in love with Java since then. Make friend with him on Facebook and watch his Java videos you YouTube.
Attachments:
JdbcDeleteDemo.java [Demo program for DELETE statement] 0.9 kB JdbcInsertDemo.java [Demo program for INSERT statement] 1 kB JdbcSelectDemo.java [Demo program for SELECT statement] 1 kB JdbcUpdateDemo.java [Demo program for UPDATE statement] 1 kB SQLScript.sql [MySQL script to create database and table] 0.2 kB Шаг 3. Подтверждение концепции: подключение к SQL с помощью Java
Этот пример следует рассматривать только как подтверждение концепции. Пример кода упрощен для ясности и для него не гарантируется соблюдение рекомендаций корпорации Майкрософт.
Шаг 1. Подключение
Используйте класс подключения для подключения к базе данных SQL.
import java.sql.Connection; import java.sql.DriverManager; import java.sql.SQLException; public class SQLDatabaseConnection < // Connect to your database. // Replace server name, username, and password with your credentials public static void main(String[] args) < String connectionUrl = "jdbc:sqlserver://yourserver.database.windows.net:1433;" + "database=AdventureWorks;" + "user=yourusername@yourserver;" + "password=yourpassword;" + "encrypt=true;" + "trustServerCertificate=false;" + "loginTimeout=30;"; try (Connection connection = DriverManager.getConnection(connectionUrl);) < // Code here. >// Handle any errors that may have occurred. catch (SQLException e) < e.printStackTrace(); >> >Шаг 2. Выполнение запроса
В этом примере следует подключиться к базе данных SQL Azure, выполнить инструкцию SELECT и вернуть выбранные строки.
import java.sql.Connection; import java.sql.DriverManager; import java.sql.ResultSet; import java.sql.SQLException; import java.sql.Statement; public class SQLDatabaseConnection < // Connect to your database. // Replace server name, username, and password with your credentials public static void main(String[] args) < String connectionUrl = "jdbc:sqlserver://yourserver.database.windows.net:1433;" + "database=AdventureWorks;" + "user=yourusername@yourserver;" + "password=yourpassword;" + "encrypt=true;" + "trustServerCertificate=false;" + "loginTimeout=30;"; ResultSet resultSet = null; try (Connection connection = DriverManager.getConnection(connectionUrl); Statement statement = connection.createStatement();) < // Create and execute a SELECT SQL statement. String selectSql = "SELECT TOP 10 Title, FirstName, LastName from SalesLT.Customer"; resultSet = statement.executeQuery(selectSql); // Print results from select statement while (resultSet.next()) < System.out.println(resultSet.getString(2) + " " + resultSet.getString(3)); >> catch (SQLException e) < e.printStackTrace(); >> >Шаг 3. Вставка строки
В этом примере следует выполнить инструкцию INSERT, передать параметры и извлечь автоматически созданное значение первичного ключа.
import java.sql.Connection; import java.sql.DriverManager; import java.sql.PreparedStatement; import java.sql.ResultSet; import java.sql.Statement; public class SQLDatabaseConnection < // Connect to your database. // Replace server name, username, and password with your credentials public static void main(String[] args) < String connectionUrl = "jdbc:sqlserver://yourserver.database.windows.net:1433;" + "database=AdventureWorks;" + "user=yourusername@yourserver;" + "password=yourpassword;" + "encrypt=true;" + "trustServerCertificate=false;" + "loginTimeout=30;"; String insertSql = "INSERT INTO SalesLT.Product (Name, ProductNumber, Color, StandardCost, ListPrice, SellStartDate) VALUES " + "('NewBike', 'BikeNew', 'Blue', 50, 120, '2016-01-01');"; ResultSet resultSet = null; try (Connection connection = DriverManager.getConnection(connectionUrl); PreparedStatement prepsInsertProduct = connection.prepareStatement(insertSql, Statement.RETURN_GENERATED_KEYS);) < prepsInsertProduct.execute(); // Retrieve the generated key from the insert. resultSet = prepsInsertProduct.getGeneratedKeys(); // Print the ID of the inserted row. while (resultSet.next()) < System.out.println("Generated: " + resultSet.getString(1)); >> // Handle any errors that may have occurred. catch (Exception e) < e.printStackTrace(); >> >