Qt creator for python

Qt for Python/GettingStarted

Refer to the official docs to start building and using Qt for Python.

Using Qt Creator as a project explorer

Qt Creator 4.0+ can be used to open the PySide and Shiboken CMakeLists.txt files as projects, and thus provide usual IDE features for developing PySide — project file navigation, code completion (C++ only), following symbols under cursor (C++ only), syntax highlighting, locator usage, debugging, etc.

Currently, there is a limitation that Shiboken has to be built first using the terminal because the installed shiboken CMake packages will have to be specified for the PySide project in Qt Creator.

The steps for opening the projects in Qt Creator are:

  1. Open pyside-setup/sources/shiboken2/CMakeLists.txt and specify a 5.12+ Qt Kit to be used
  2. Build the project as usual (by pressing the build icon for instance)
  3. Open pyside-setup/sources/pyside2/CMakeLists.txt and specify the same 5.12+ Qt Kit
  4. Go to the projects tab, and under the Build / CMake section find the Shiboken2_DIR setting. You have to specify the path to the folder where the Shiboken CMake package was installed when you compiled Shiboken from the terminal·
  5. An example path under macOS is /Users/user/Dev/pyside2-setup/pyside_install/py3.6-qt5.12.1-64bit-debug/lib/cmake/Shiboken2-2.0.0. The path has to be adjusted depending on the user folder name, the version of python and qt, etc
  6. (Optional) On MacOS you also have to set the ALTERNATIVE_QT_INCLUDE_DIR setting to the Qt kit include path (e.g. /Users/user/Dev/qt511_source/include)
  7. Apply the CMake configuration changes (by pressing the button), and you should be able to build PySide

Now you can use the project explorer to look through the source cpp files, python files, use the locator feature to open files and file classes / methods, and other features that Qt Creator provides.

Troubleshooting / Known Issues

  • Qt 5.9 does not work with OpenSSL 1.1
    • When doing a custom Qt build (some unspecified versions for now), It is necessary to have an OpenSSL version of 1.0.x, since there are compatibility issues with newer versions of OpenSSL (see details)
    • The only workaround is to uninstall any module from the system, then PySide2 can look at only the Qt path currently being use.
    python -c "from distutils.sysconfig import get_python_lib; print(get_python_lib())"
    • Building failing because graphviz wasn’t found. If you’re using pyenv and installed it using pip, try to install it using your package manager:
    dnf install graphviz.x86_64 #Fedora
    PYTHON_CONFIGURE_OPTS="--enable-shared --with-trace-refs" 
    PYTHON_CONFIGURE_OPTS="--enable-shared --with-trace-refs" pyenv install -kg 3.9.13

    Источник

    Developing Qt for Python Applications

    For more information about developing with Qt for Python, including limitations, see Qt for Python.
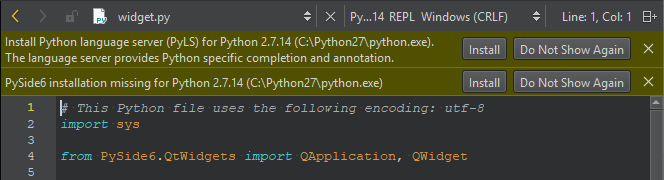
    Setting Up PySide6

    If you have not installed the required version of PySide6, Qt Creator prompts you to do so when you open a .py file.

    <Prompts to install PySide6 and Python language server data-lazy-src=

    »/>

    Further, Qt Creator prompts you to install the Python language server that offers services such as code completion and annotations. Select Install to install PySide6 and the language server.

    Selecting the Python Interpreter

    You select the initial Python interpreter when you use the Qt for Python Application wizard templates to create Python projects.

    <Define Python Interpreter wizard page data-lazy-src=

    To create a virtual environment ( venv ) when you use the Qt for Python Application wizard templates to create Python projects, select the Create new virtual environment check box on the Define Python Interpreter wizard page. Specify the directory where to create the environment in Path to virtual environment.

    Using Python Interactive Shell

    You can write Python code in the Edit mode. Select REPL on the toolbar to start the Python interactive shell in the Terminal pane.

    <Python shell on the taskbar data-lazy-src=

    Qt for Python Getting Started

    This page is focused on building Qt for Python from source, if you just want to install PySide2 with pip you need to run:

    for more details, refer to our Quick Start guide. Additionally, you can check the FAQ related to the project.

    General Requirements

    • Python: 3.5+ and 2.7
    • Qt: 5.12+ is recommended
    • libclang: The libclang library, recommended: version 10 for PySide2 5.15. Prebuilt versions of it can be downloaded here.
    • CMake: 3.1+ is needed.

    Guides per platform

    You can refer to the following pages for platform specific instructions:

    • Windows
    • macOS
    • Linux
    • Mobile platforms (iOS/Android) (no support)
    • Embedded platforms (no official support)

    Note Most Linux-based embedded OS provide PySide2 with their official package manager (e.g. Raspbian and ArchlinuxARM).

    A normal building command will look like this:

    python setup.py install --qmake=/path/to/qmake \ --ignore-git \ --debug \ --build-tests \ --parallel=8 \ --make-spec=ninja \ --verbose-build \ --module-subset=Core,Gui,Widgets 

    Which will build and install the project with debug symbols, including the tests, using ninja (instead of make), and considering only the module subset of QtCore, QtGUI and QtWidgets.

    • —cmake , to specify the path to the cmake binary,
    • —reuse-build , to rebuild only the modified files,
    • —openssl=/path/to/openssl/bin , to use a different path for OpenSSL,
    • —standalone , to copy over the Qt libraries into the final package to make it work on other machines,
    • —doc-build-online , to build documentation using the online template.

    Testing the installation

    Once the installation finishes, you will be able to execute any of our examples:

    python examples/widgets/widgets/tetrix.py 

    Running Tests

    Using the —build-tests option will enable us to run all the auto tests inside the project:

    python testrunner.py test > testlog.txt 

    On Windows, don’t forget to have qmake in your path ( set PATH=E:\Path\to\Qt\5.15\msvc2017_64\bin;%PATH% )

    You can also run a specific test (for example qpainter_test ) by running:

    ctest -R qpainter_test --verbose 

    Building the documentation

    Starting from 5.15, there are two options to build the documentation:

    1. Building rst-only documentation (no API)

    The process of parsing Qt headers to generate the PySide API documentation can take several minutes, this means that modifying a specific section of the rst files we currently have, might become a hard task.

    For this, you can install sphinx on a virtual environment, and execute the following command:

    python setup.py build_rst_docs 

    which will generate a html/ directory with the following structure:

    html └── pyside2 ├── index.html ├── . └── shiboken2 ├── index.html └── .

    so you can open the main page html/pyside2/index.html on your browser to check the generated files.

    This is useful when updating the general sections of the documentation, adding tutorials, modifying the build instructions, and more.

    2. Building the documentation (rst + API)

    The documentation is being generated using qdoc to get the API information, and also sphinx for the local Python related notes.

    The system required libxml2 and libxslt , also on the Python environment, sphinx and graphviz need to be installed before running the installation process:

    pip install graphviz sphinx 

    After installing graphviz , the dot command needs to be in PATH, otherwise, the process will fail. Installing graphviz system-wide is also an option.

    Since the process rely on a Qt installation, you need to specify where the qtbase directory you will use with your qmake is located:

    export QT_SRC_DIR=/path/to/qtbase 

    Once the build process finishes, you can go to the generated *_build/*_release/pyside2 directory, and run:

    The apidoc make target builds offline documenation in QCH (Qt Creator Help) format by default. You can switch to building for the online use with the —doc-build-online configure option.

    Finally, you will get a html directory containing all the generated documentation. The offline help files, PySide.qch and Shiboken.qch , can be moved to any directory of your choice. You can find Shiboken.qch in the build directory, *_build\*_release\shiboken2\doc\html .

    Viewing offline documentation

    The offline documentation (QCH) can be viewed using the Qt Creator IDE or Qt Assistant, which is a standalone application for viewing QCH files.

    To view the QCH using Qt Creator, following the instructions outlined in Using Qt Creator Help Mode. If you chose to use Qt Assistant instead, use the following command to register the QCH file before launching Qt Assistant:

    assistant -register PySide.qch

    Qt Assistant renders the QCH content using the QTextBrowser backend, which supports a subset of the CSS styles, However, Qt Creator offers an alternative litehtml-based backend, which offers better browsing experience. At the moment, this is not the default backend, so you have to select the litehtml backend explicitly under the General tab in Qt Creator >> Tools >> Options >> Help .

    Using the internal tools

    A set of tools can be found under the tools/ directory inside the pyside-setup repository.

      checklibs.py : Script to analyze dynamic library dependencies of Mach-O binaries. To use this utility, just run:

    python checklibs.py /path/to/some.app/Contents/MacOS/Some 
    python create_changelog.py -r 5.15.1 -v v5.15.0..5.15 -t bug-fix 
    python missing_bindings.py --qt-version 5.15.1 -w all 

    © 2022 The Qt Company Ltd. Documentation contributions included herein are the copyrights of their respective owners. The documentation provided herein is licensed under the terms of the GNU Free Documentation License version 1.3 as published by the Free Software Foundation. Qt and respective logos are trademarks of The Qt Company Ltd. in Finland and/or other countries worldwide. All other trademarks are property of their respective owners.

    Источник

    Читайте также:  Графический редактор для питон
Оцените статью