- Как создать несколько графиков Matplotlib на одном рисунке
- Пример 1: сложите графики вертикально
- Пример 2: сложить графики по горизонтали
- Пример 3: создание сетки графиков
- Пример 4: Совместное использование осей между участками
- Seaborn Multiple Plots Subplotting with matplotlib and seaborn
- Plotting (and subplotting) samples
- Using data
- Final example
- Как сделать два графика рядом с помощью Python
Как создать несколько графиков Matplotlib на одном рисунке
Вы можете использовать следующий синтаксис для создания нескольких графиков Matplotlib на одном рисунке:
import matplotlib.pyplot as plt #define grid of plots fig, axs = plt.subplots(nrows= 2 , ncols= 1 ) #add data to plots axs[0].plot(variable1, variable2) axs[1].plot(variable3, variable4) В следующих примерах показано, как использовать эту функцию на практике.
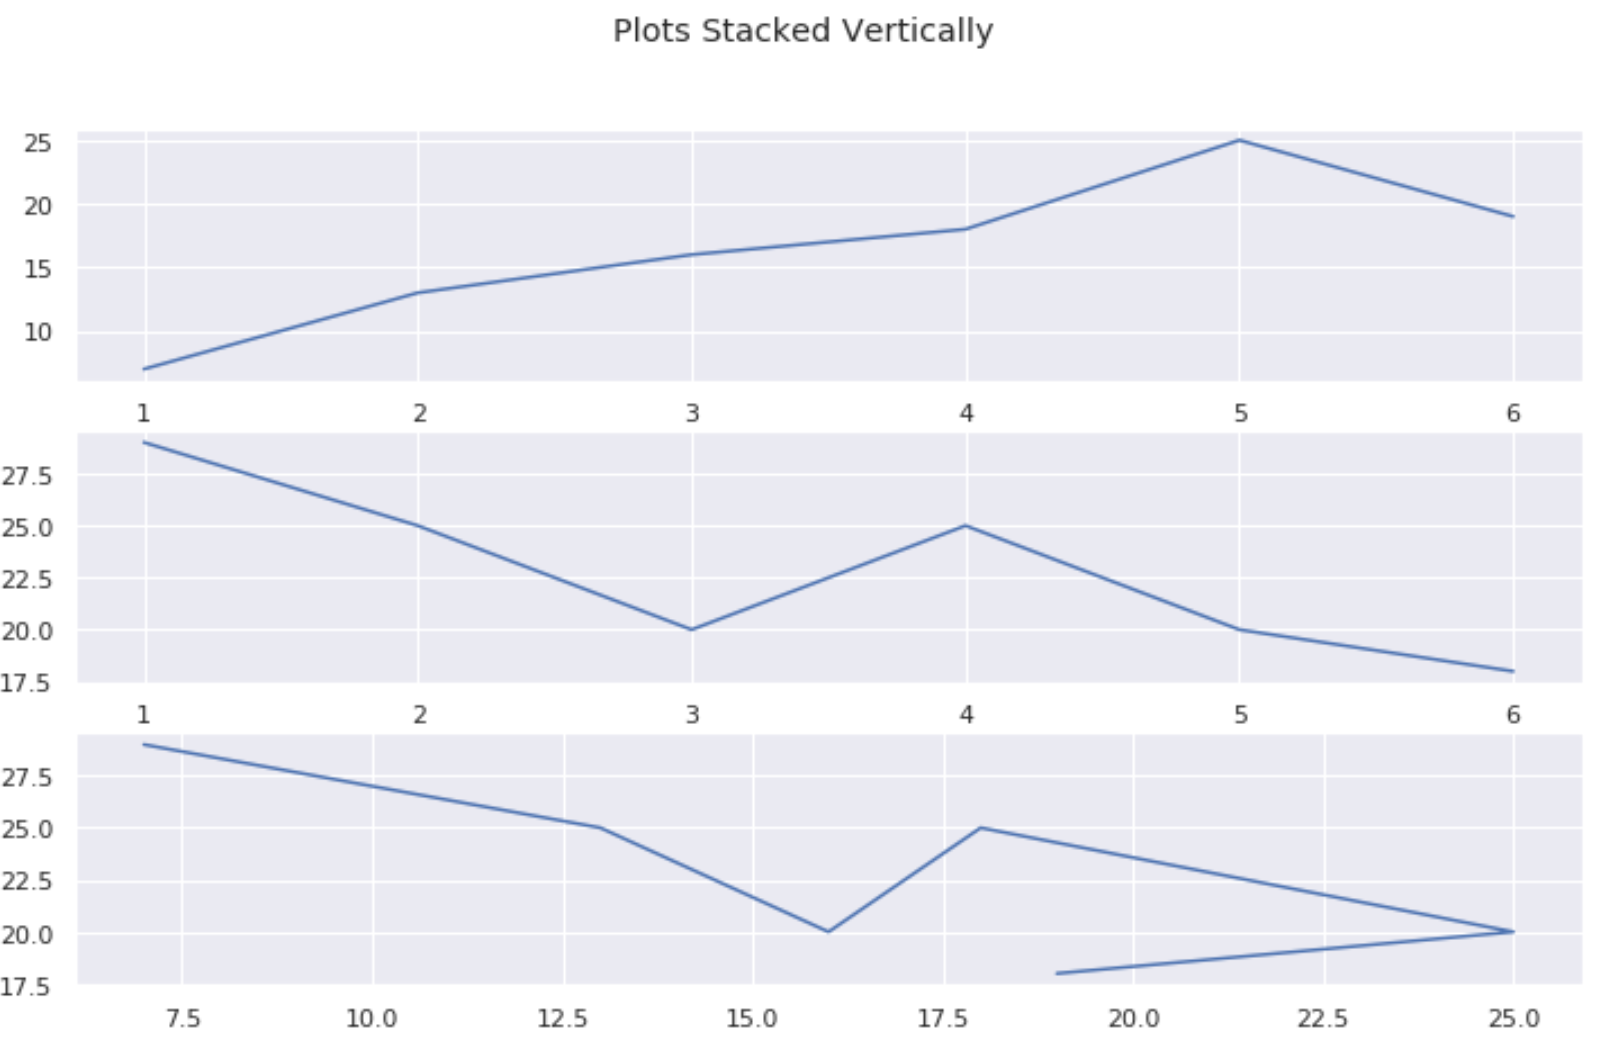
Пример 1: сложите графики вертикально
В следующем коде показано, как создать три графика Matplotlib, расположенные вертикально:
#create some data var1 = [1, 2, 3, 4, 5, 6] var2 = [7, 13, 16, 18, 25, 19] var3 = [29, 25, 20, 25, 20, 18] #define grid of plots fig, axs = plt.subplots(nrows= 3 , ncols= 1 ) #add title fig. suptitle('Plots Stacked Vertically') #add data to plots axs[0].plot(var1, var2) axs[1].plot(var1, var3) axs[2].plot(var2, var3) 
Пример 2: сложить графики по горизонтали
В следующем коде показано, как создать три графика Matplotlib, расположенные горизонтально:
#create some data var1 = [1, 2, 3, 4, 5, 6] var2 = [7, 13, 16, 18, 25, 19] var3 = [29, 25, 20, 25, 20, 18] #define grid of plots fig, axs = plt.subplots(nrows= 1 , ncols= 3 ) #add title fig. suptitle('Plots Stacked Horizontally') #add data to plots axs[0].plot(var1, var2) axs[1].plot(var1, var3) axs[2].plot(var2, var3) 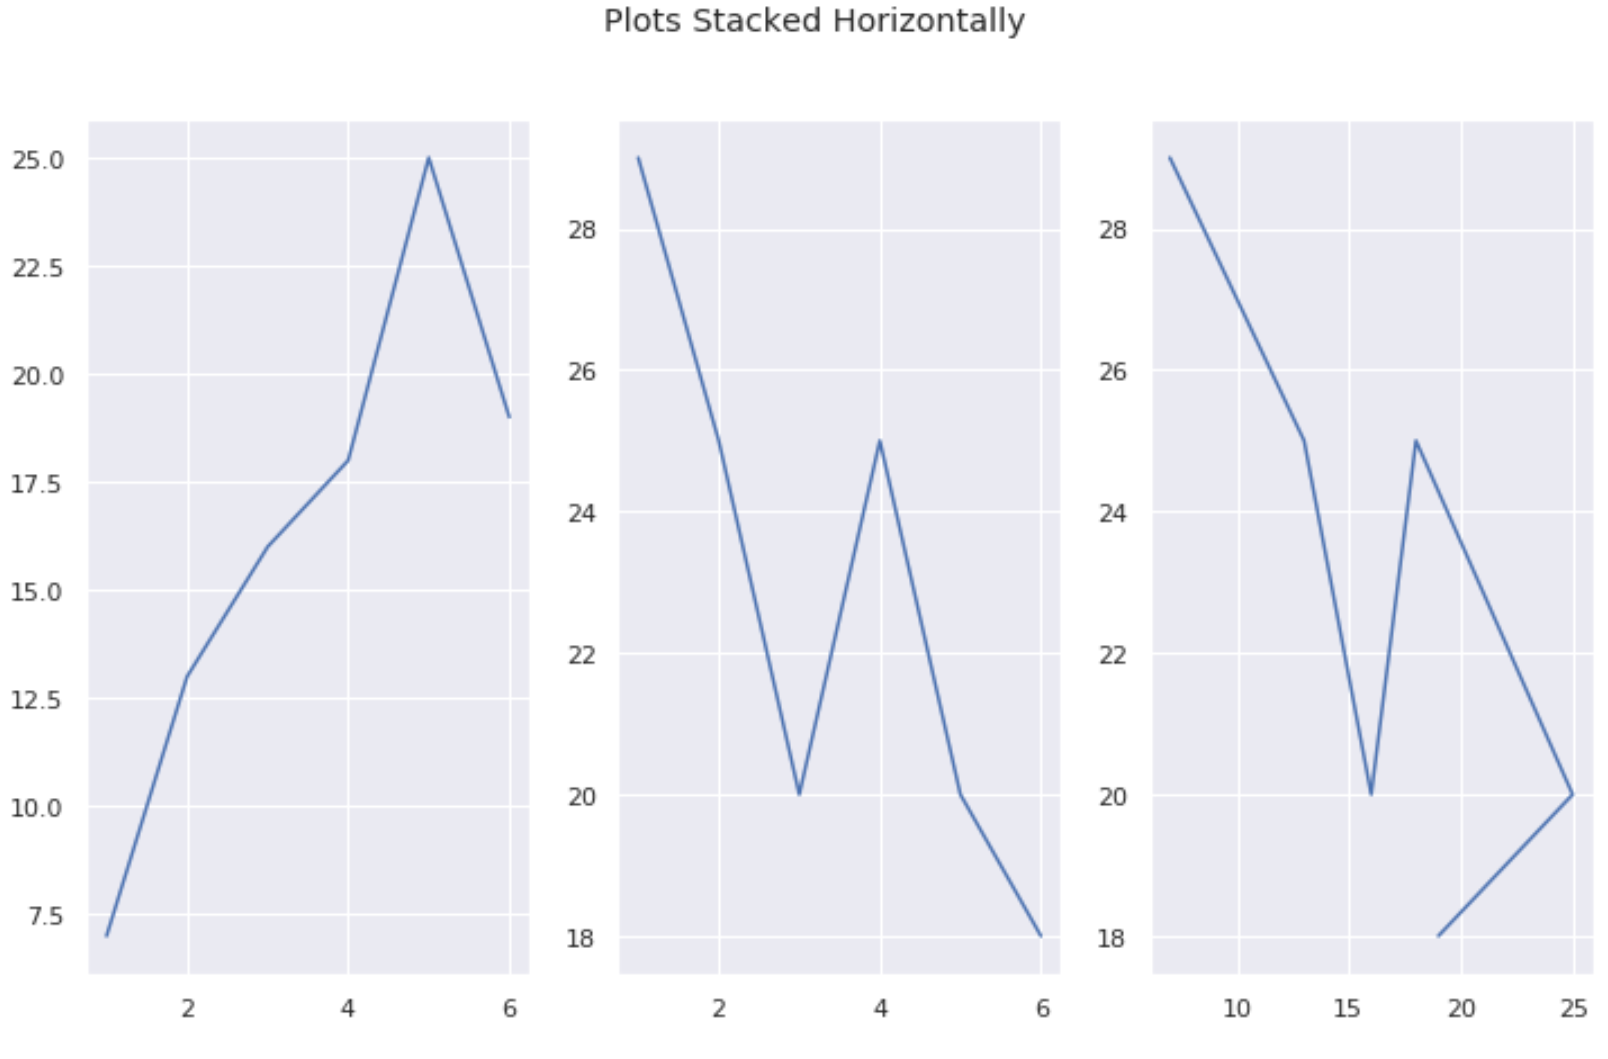
Пример 3: создание сетки графиков
Следующий код показывает, как создать сетку графиков Matplotlib:
#create some data var1 = [1, 2, 3, 4, 5, 6] var2 = [7, 13, 16, 18, 25, 19] var3 = [29, 25, 20, 25, 20, 18] var4 = [4, 4, 6, 4, 7, 11] #define grid of plots fig, axs = plt.subplots(nrows= 2 , ncols= 2 ) #add title fig. suptitle('Grid of Plots') #add data to plots axs[0, 0].plot(var1, var2) axs[0, 1].plot(var1, var3) axs[1, 0].plot(var1, var4) axs[1, 1].plot(var3, var1) 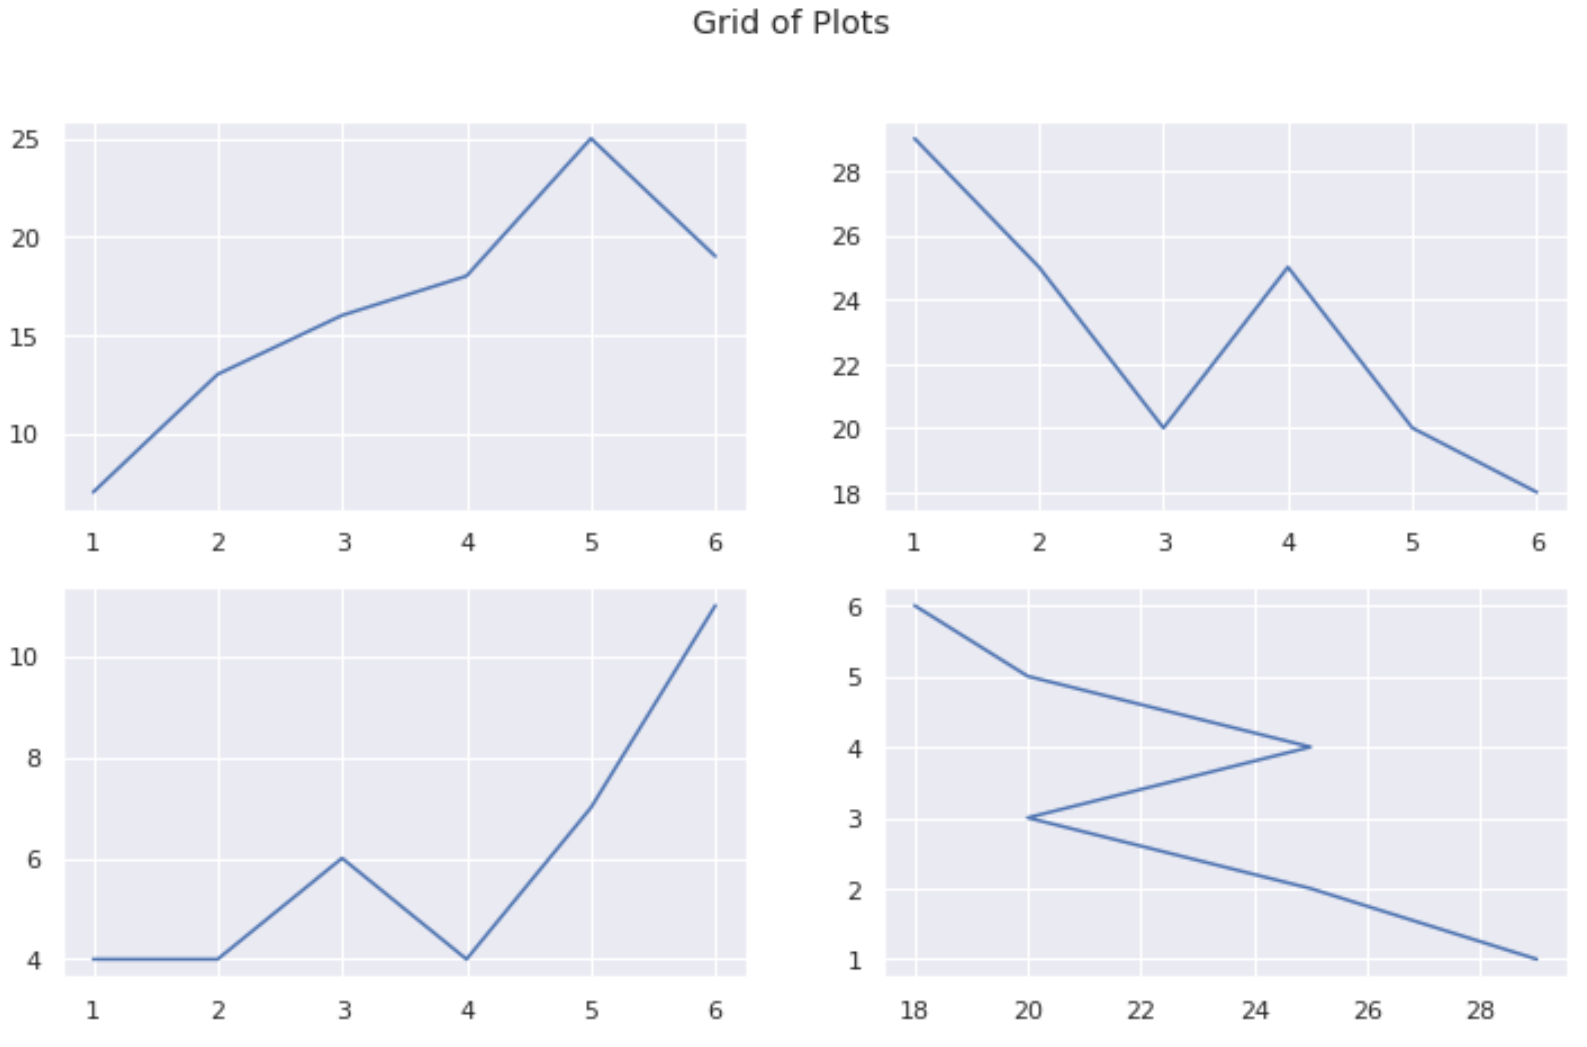
Пример 4: Совместное использование осей между участками
Вы можете использовать аргументы sharex и sharey , чтобы убедиться, что несколько графиков используют одну и ту же ось X:
#create some data var1 = [1, 2, 3, 4, 5, 6] var2 = [7, 13, 16, 18, 25, 19] var3 = [29, 25, 20, 25, 20, 18] var4 = [4, 4, 6, 4, 7, 11] #define grid of plots fig, axs = plt.subplots(nrows= 2 , ncols= 2 , sharex= True , sharey= True ) #add title fig. suptitle('Grid of Plots with Same Axes') #add data to plots axs[0, 0].plot(var1, var2) axs[0, 1].plot(var1, var3) axs[1, 0].plot(var1, var4) axs[1, 1].plot(var3, var1) Seaborn Multiple Plots Subplotting with matplotlib and seaborn
We are using the Pokemon with stats dataset from Kaggle. The cell below import the dataset file and create the pokemon pandas DataFrame. So use show the 4 first rows using pd.DataFrame.head function.
pokemon_filepath = '../datasets/pokemon.csv' pokemon = pd.read_csv(pokemon_filepath) pokemon.head() 
Plotting (and subplotting) samples
As we can see in the matplotlib documentation (references at the end of file), subplots() without arguments returns a Figure and a single Axes, which we can unpack using the syntax bellow.
fig, ax = plt.subplots() fig.suptitle('A single ax with no data') 
Thus, we can give two arguments to subplots functions: nrows and ncols . If given in that order, we don’t need to type the arg names, just its values. In our example we create a plot with 1 row and 2 columns, still no data passed.
fig, axes = plt.subplots(1, 2) fig.suptitle('1 row x 2 columns axes with no data') 
Now axes is an array of AxesSubplot, so we can access each ax separetely and set a different title, for instance. More arguments:
- figsize set the total dimension of our figure
- sharex and sharey are used to share one or both axes between the charts (needed data to work)
fig, axes = plt.subplots(1, 2, sharex=True, figsize=(10,5)) fig.suptitle('Bigger 1 row x 2 columns axes with no data') axes[0].set_title('Title of the first chart') 
fig, axes = plt.subplots(3, 4, sharex=True, figsize=(16,8)) fig.suptitle('3 rows x 4 columns axes with no data') 
Using data
We select three Pokemon to use in the next example. The three initial Pokemon of 1st Generation: Bulbasaur, Charmander and Squirtle.
# bulbasaur = pokemon[['Name', 'HP', 'Attack', 'Defense', 'Sp. Atk', 'Sp. Def', 'Speed']][pokemon.loc[:, 'Name'] == 'Bulbasaur'] poke_num = pokemon[['Name', 'HP', 'Attack', 'Defense', 'Sp. Atk', 'Sp. Def', 'Speed']].set_index('Name') bulbasaur = poke_num.loc['Bulbasaur'] charmander = poke_num.loc['Charmander'] squirtle = poke_num.loc['Squirtle'] Then, we create a plot with 3 subplots in a 1 row x 3 columns figure.
We use sns.barplot where we need to set the a argument with the correspondent element from axes variable.
fig, axes = plt.subplots(1, 3, figsize=(15, 5), sharey=True) fig.suptitle('Initial Pokemon - 1st Generation') # Bulbasaur sns.barplot(ax=axes[0], x=bulbasaur.index, y=bulbasaur.values) axes[0].set_title(bulbasaur.name) # Charmander sns.barplot(ax=axes[1], x=charmander.index, y=charmander.values) axes[1].set_title(charmander.name) # Squirtle sns.barplot(ax=axes[2], x=squirtle.index, y=squirtle.values) axes[2].set_title(squirtle.name) 
Final example
And a final example plottin a 2 rows X 3 columns plot showing Pokemon stats by Generation.
fig, axes = plt.subplots(2, 3, figsize=(18, 10)) fig.suptitle('Pokemon Stats by Generation') sns.boxplot(ax=axes[0, 0], data=pokemon, x='Generation', y='Attack') sns.boxplot(ax=axes[0, 1], data=pokemon, x='Generation', y='Defense') sns.boxplot(ax=axes[0, 2], data=pokemon, x='Generation', y='Speed') sns.boxplot(ax=axes[1, 0], data=pokemon, x='Generation', y='Sp. Atk') sns.boxplot(ax=axes[1, 1], data=pokemon, x='Generation', y='Sp. Def') sns.boxplot(ax=axes[1, 2], data=pokemon, x='Generation', y='HP') Как сделать два графика рядом с помощью Python

Параметрами для subplot являются: количество строк, количество столбцов и какая подзадача, в которой вы сейчас находитесь. Итак, 1, 2, 1 означает «1-строчный, 2-столбцовый рисунок: перейдите к первому подзаголовку». Затем 1, 2, 2 означает «1-строчный, 2-столбцовый рисунок: перейдите ко второму подзаголовку». В настоящее время вы запрашиваете двухстрочный 1-столбцовый (то есть один поверх другого) макет. Вместо этого вам нужно запросить 1-строчный, 2-колонный макет. Когда вы это сделаете, результатом будет: Чтобы свести к минимуму перекрытие подзаголовков, вам может понадобиться:

перед шоу. Уступая:
Проверьте эту страницу: http://matplotlib.org/examples/pylab_examples/subplots_demo.html plt.subplots аналогичен. Первые два аргумента определяют макет (в вашем случае 2 строки, 1 столбец). Просто поменяйте их, чтобы получить их бок о бок (а не поверх друг друга).
Я бы предложил использовать plt.subplots . Вы можете указать аргумент figsize чтобы определить размер фигуры. Как и в plt.subplots(1, 2, figsize=(20, 4)) . В противном случае вы можете сначала определить фигуру и размер фигуры: plt.figure(figsize=(20, 4)) .
По какой-то причине я получаю пустые данные, когда пытаюсь сохранить «plt.savefig (‘. png’)» подзаговор. В начале я повторял тот же код (я добавил только plt.figure (figsize = (7, 3))).