Tkinter Listbox
Summary: in this tutorial, you’ll learn how to use the Tkinter Listbox widget to display a list of items.
Introduction to the Tkinter Listbox
A Listbox widget displays a list of single-line text items. A Listbox allows you to browse through the items and select one or multiple items at once.
To create a Listbox, you use the tk.Listbox class like this:
listbox = tk.Listbox(container, listvariable, height)Code language: Python (python)- The container is the parent component of the Listbox.
- The listvariable links to a tkinter.Variable object. More explanation on this later.
- The height is the number of items that the Listbox will display without scrolling.
List items
To populate items to a Listbox, you first create a Variable object that is initialized with a list of items. And then you assign this Variable object to the listvariable option as follows:
list_items = tk.Variable(value=items) listbox = tk.Listbox( container, height, listvariable=list_items )Code language: Python (python)To add, remove, or rearrange items in the Listbox, you just need to modify the list_items variable.
Select mode
The selectmode option determines how many you can select and how the mouse drags will affect the items:
- tk.BROWSE – allows a single selection. If you select an item and drag it to a different line, the selection will follow the mouse. This is the default.
- tk.EXTENDED – select any adjacent group of items at once by clicking the first item and dragging to the last line.
- tk.SINGLE – allow you to select one line and you cannot drag the mouse.
- tk.MULTIPLE – select any number of lines at once. Clicking on any line toggles whether it is selected or not.
Binding the selected event
To execute a function when the selected items change, you bind that function to the > event:
listbox.bind('>', callback)Code language: Python (python)Tkinter Listbox widget example
The following program displays a Listbox that contains a list of programming languages. When you select one or more items, the program displays the selected ones in a message box:
import tkinter as tk from tkinter import ttk from tkinter.messagebox import showinfo # create the root window root = tk.Tk() root.title('Listbox') # create a list box langs = ('Java', 'C#', 'C', 'C++', 'Python', 'Go', 'JavaScript', 'PHP', 'Swift') var = tk.Variable(value=langs) listbox = tk.Listbox( root, listvariable=var, height=6, selectmode=tk.EXTENDED ) listbox.pack(expand=True, fill=tk.BOTH) def items_selected(event): # get all selected indices selected_indices = listbox.curselection() # get selected items selected_langs = ",".join([listbox.get(i) for i in selected_indices]) msg = f'You selected: ' showinfo(title='Information', message=msg) listbox.bind('>', items_selected) root.mainloop() Code language: Python (python)
First, create a Variable that holds a list of programming languages:
langs = ('Java', 'C#', 'C', 'C++', 'Python', 'Go', 'JavaScript', 'PHP', 'Swift') var = tk.Variables(value=langs)Code language: Python (python)Second, create a new Listbox widget and assign the var object to the listvariable :
listbox = tk.Listbox( root, listvariable=var, height=6, selectmode=tk.EXTENDED )Code language: Python (python)The height shows six programming languages without scrolling. The selectmode=tk.EXTENDED allows multiple selections.
Third, define a function that will be invoked when one or more items are selected. The items_selected() function shows a list of currently selected list items:
def items_selected(event): # get all selected indices selected_indices = listbox.curselection() # get selected items selected_langs = ",".join([listbox.get(i) for i in selected_indices]) msg = f'You selected: ' showinfo(title='Information', message=msg)Code language: Python (python)Finally, bind the items_selected function with the ‘>’ event:
listbox.bind('>', items_selected)Code language: Python (python)Adding a scrollbar to the Listbox
The following program illustrates how to add a scrollbar to a Listbox:
import tkinter as tk from tkinter import ttk from tkinter.messagebox import showinfo # create the root window root = tk.Tk() root.title('Listbox') # create a list box langs = ('Java', 'C#', 'C', 'C++', 'Python', 'Go', 'JavaScript', 'PHP', 'Swift') var = tk.Variable(value=langs) listbox = tk.Listbox( root, listvariable=var, height=6, selectmode=tk.EXTENDED) listbox.pack(expand=True, fill=tk.BOTH, side=tk.LEFT) # link a scrollbar to a list scrollbar = ttk.Scrollbar( root, orient=tk.VERTICAL, command=listbox.yview ) listbox['yscrollcommand'] = scrollbar.set scrollbar.pack(side=tk.LEFT, expand=True, fill=tk.Y) def items_selected(event): # get selected indices selected_indices = listbox.curselection() # get selected items selected_langs = ",".join([listbox.get(i) for i in selected_indices]) msg = f'You selected: ' showinfo(title='Information', message=msg) listbox.bind('>', items_selected) root.mainloop()Code language: Python (python)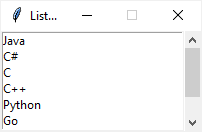
For more information on how to link a scrollbar to a scrollable widget, check out the scrollbar widget tutorial.
Summary
- Use the tk.Listbox(container, height, listvariable) to create a Listbox widget; a listvariable should be a tk.StringVar(value=items) .
- Bind a callback function to the ‘>’ event to execute the function when one or more list items are selected.
Виджет Listbox
От класса Listbox создаются списки – виджеты, внутри которых в столбик перечисляются элементы. При этом можно выбирать один или множество элементов списка.
В Tkinter сначала создается экземпляр Listbox , после этого он заполняется с помощью метода insert .
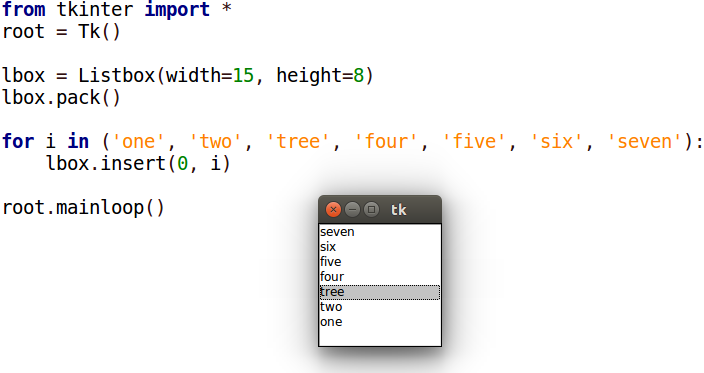
Первым аргументом в insert передается индекс места, куда будет вставлен элемент. Если нужно вставлять в конец списка, то индекс обозначают константой END . Вторым аргументом передается вставляемый элемент.
По-умолчанию в Listbox, кликая мышкой, можно выбирать только один элемент. Если необходимо обеспечить множественный выбор, то для свойства selectmode можно установить значение EXTENDED . В этом режиме можно выбрать сколь угодно элементов, зажав Ctrl или Shift .
Если для Listbox необходим скроллер, то он настраивается также как для текстового поля. В программу добавляется виджет Scrollbar и связывается с экземпляром Listbox .
С помощью метода get из списка можно получить один элемент по индексу, или срез, если указать два индекса. Метод delete удаляет один элемент или срез.
Метод curselection позволяет получить в виде кортежа индексы выбранных элементов экземпляра Listbox .
Ниже приводится пример программы, иллюстрирующей применение методов get , insert , delete и curselection класса Listbox . Первая кнопка добавляет введенную пользователем в текстовое поле строку в список, вторая кнопка удаляет выбранные элементы из списка, третья – сохраняет список в файл.
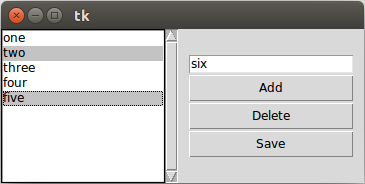
from tkinter import * def add_item(): box.insert(END, entry.get()) entry.delete(0, END) def del_list(): select = list(box.curselection()) select.reverse() for i in select: box.delete(i) def save_list(): f = open('list000.txt', 'w') f.writelines("\n".join(box.get(0, END))) f.close() root = Tk() box = Listbox(selectmode=EXTENDED) box.pack(side=LEFT) scroll = Scrollbar(command=box.yview) scroll.pack(side=LEFT, fill=Y) box.config(yscrollcommand=scroll.set) f = Frame() f.pack(side=LEFT, padx=10) entry = Entry(f) entry.pack(anchor=N) Button(f, text="Add", command=add_item).pack(fill=X) Button(f, text="Delete", command=del_list).pack(fill=X) Button(f, text="Save", command=save_list).pack(fill=X) root.mainloop()
В функции del_list кортеж выбранных элементов превращается в список, после чего выполняется его реверс, т. е. переворот. Это делается для того, чтобы удаление элементов происходило с конца списка. Иначе программа бы неверно работала, так как удаление элемента приводило бы к изменению индексов всех следующих за ним. Если же удалять с конца, то индексы впереди стоящих не меняются.
Метод curselection возвращает кортеж. Кортежи не имеют метода reverse , поэтому мы преобразуем его в список.
В функции save_list кортеж строк-элементов, который вернул метод get , преобразуется в одну строку с помощью строкового метода join через разделитель ‘\n’ . Это делается для того, чтобы элементы списка записались в файл столбиком.
Listbox – достаточно сложный виджет. Кроме рассмотренных он обладает другими методами, а также множеством свойств.
Практическая работа
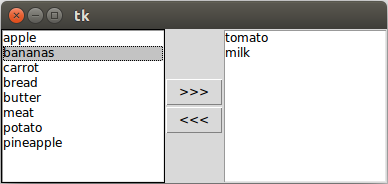
Напишите программу, состоящую из двух списков Listbox . В первом будет, например, перечень товаров, заданный программно. Второй изначально пуст, пусть это будет перечень покупок. При клике на одну кнопку товар должен переходить из одного списка в другой. При клике на вторую кнопку – возвращаться (человек передумал покупать). Предусмотрите возможность множественного выбора элементов списка и их перемещения.
Курс с примерами решений практических работ: pdf-версия
Tkinter. Программирование GUI на Python