- Tkinter LabelFrame
- Introduction to the Tkinter LabelFrame
- Tkinter LabelFrame widget example
- Specify the label position
- Summary
- Python — Tkinter LabelFrame
- Syntax
- Parameters
- Example
- Tkinter Frame and Label: An easy reference
- Let’s Talk About the Tkinter Frame and Label Widgets
- What is a Tkinter Frame?
- Coding a Tkinter Frame
- What is a Tkinter Label?
- Coding a Label
- Implementing Tkinter Frame and Label Widgets
- Conclusion
Tkinter LabelFrame
Summary: in this tutorial, you’ll how to use the Tkinter LabelFrame widget that contains other widgets.
Introduction to the Tkinter LabelFrame
Tkinter LabelFrame widget is a container that contains other related widgets. For example, you can group Radiobutton widgets and place the group on a LabelFrame .
To create a LabelFrame widget, you use the ttk.LabelFrame :
lf = ttk.LabelFrame(container, **option)Code language: Python (python)In this syntax, you specify the parent component ( container ) of the LabelFrame and one or more options. A notable option is text which specifies a label for the LabelFrame .
Tkinter LabelFrame widget example
The following program illustrates how to create a LabelFrame widget that groups three radio buttons:
import tkinter as tk from tkinter import ttk # root window root = tk.Tk() # configure the root window root.geometry('300x200') root.resizable(False, False) root.title('LabelFrame Demo') # label frame lf = ttk.LabelFrame(root, text='Alignment') lf.grid(column=0, row=0, padx=20, pady=20) alignment_var = tk.StringVar() alignments = ('Left', 'Center', 'Right') # create radio buttons and place them on the label frame grid_column = 0 for alignment in alignments: # create a radio button radio = ttk.Radiobutton(lf, text=alignment, value=alignment, variable=alignment_var) radio.grid(column=grid_column, row=0, ipadx=10, ipady=10) # grid column grid_column += 1 root.mainloop()Code language: Python (python)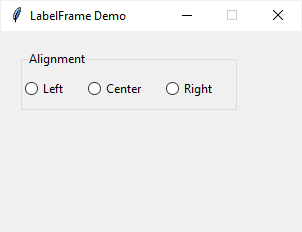
First, create a LabelFrame widget and use the grid geometry manager to manage its layout:
lf = ttk.LabelFrame(root, text='Alignment') lf.grid(column=0, row=0, padx=20, pady=20)Code language: Python (python)Second, create the three radio button widgets based on the alignments list and place them on the label frame widget:
grid_column = 0 for alignment in alignments: # create a radio button radio = ttk.Radiobutton(lf, text=alignment, value=alignment, variable=alignment_var) radio.grid(column=grid_column, row=0, ipadx=10, ipady=10) # grid column grid_column += 1Code language: Python (python)Specify the label position
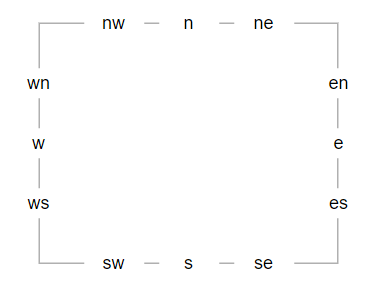
To specify the position of the label on the widget, you use the labelanchor option. The labelanchor defaults to ‘nw’ , which places the label at the left end of the top border:
The following program illustrates the label anchor options. When you select a label option, the label of the LabelFrame widget change accordingly:
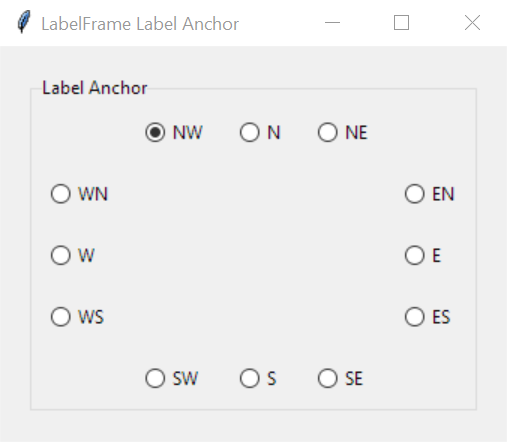
import tkinter as tk from tkinter import ttk # root window root = tk.Tk() root.title('LabelFrame Label Anchor') # label frame lf = ttk.LabelFrame(root, text='Label Anchor') lf.grid(column=0, row=0, padx=20, pady=20, sticky=tk.NSEW) anchor_var = tk.StringVar() anchors = < 'nw': 'row': 0, 'column': 1>, 'n': 'row': 0, 'column': 2>, 'ne': 'row': 0, 'column': 3>, 'en': 'row': 1, 'column': 4>, 'e': 'row': 2, 'column': 4>, 'es': 'row': 3, 'column': 4>, 'se': 'row': 4, 'column': 3>, 's': 'row': 4, 'column': 2>, 'sw': 'row': 4, 'column': 1>, 'ws': 'row': 3, 'column': 0>, 'w': 'row': 2, 'column': 0>, 'wn': 'row': 1, 'column': 0> > def change_label_anchor(): lf['labelanchor'] = anchor_var.get() # create radio buttons and place them on the label frame for key, value in anchors.items(): # create a radio button radio = ttk.Radiobutton( lf, text=key.upper(), value=key, command=change_label_anchor, variable=anchor_var ).grid(**value, padx=10, pady=10, sticky=tk.NSEW) # set the radio button selected anchor_var.set(lf['labelanchor']) # show the root window root.mainloop()Code language: Python (python)First, create a LabelFrame widget and place it on the root window:
lf = ttk.LabelFrame(root, text='Label Anchor') lf.grid(column=0, row=0, padx=20, pady=20, sticky=tk.NSEW)Code language: Python (python)Next, define a StringVar object that will associate with the radio buttons:
anchor_var = tk.StringVar()Code language: Python (python)Then, define a dictionary with the key stores the label options and value stores the cell (row, column) of the grid:
anchors = < 'nw': 'row': 0, 'column': 1>, 'n': 'row': 0, 'column': 2>, 'ne': 'row': 0, 'column': 3>, 'en': 'row': 1, 'column': 4>, 'e': 'row': 2, 'column': 4>, 'es': 'row': 3, 'column': 4>, 'se': 'row': 4, 'column': 3>, 's': 'row': 4, 'column': 2>, 'sw': 'row': 4, 'column': 1>, 'ws': 'row': 3, 'column': 0>, 'w': 'row': 2, 'column': 0>, 'wn': 'row': 1, 'column': 0> >Code language: Python (python)After that, define a function that handles the radio button change event. The function changes the labelanchor option of the LabelFrame widget to the value of the selected radio button:
def change_label_anchor(): lf['labelanchor'] = anchor_var.get()Code language: Python (python)Finally, create the radio buttons from the anchors dictionary and place them on the LabelFrame widget:
for key, value in anchors.items(): # create a radio button radio = ttk.Radiobutton( lf, text=key.upper(), value=key, command=change_label_anchor, variable=anchor_var ).grid(**value, padx=10, pady=10, sticky=tk.NSEW)Code language: Python (python)Summary
- Use LabelFrame widget to group related widgets into one group.
- Use ttk.LabelFrame(container, **option) to create a LabelFrame widget.
Python — Tkinter LabelFrame
A labelframe is a simple container widget. Its primary purpose is to act as a spacer or container for complex window layouts.
This widget has the features of a frame plus the ability to display a label.
Syntax
Here is the simple syntax to create this widget −
w = LabelFrame( master, option, . )
Parameters
- master − This represents the parent window.
- options − Here is the list of most commonly used options for this widget. These options can be used as key-value pairs separated by commas.
The normal background color displayed behind the label and indicator.
The size of the border around the indicator. Default is 2 pixels.
If you set this option to a cursor name (arrow, dot etc.), the mouse cursor will change to that pattern when it is over the checkbutton.
The vertical dimension of the new frame.
The vertical dimension of the new frame.
Specifies where to place the label.
Color of the focus highlight when the frame does not have focus.
Color shown in the focus highlight when the frame has the focus.
Thickness of the focus highlight.
With the default value, relief=FLAT, the checkbutton does not stand out from its background. You may set this option to any of the other styles
Specifies a string to be displayed inside the widget.
Specifies the desired width for the window.
Example
Try the following example yourself. Here is how to create a labelframe widget −
from Tkinter import * root = Tk() labelframe = LabelFrame(root, text="This is a LabelFrame") labelframe.pack(fill="both", expand="yes") left = Label(labelframe, text="Inside the LabelFrame") left.pack() root.mainloop()
When the above code is executed, it produces the following result −
Tkinter Frame and Label: An easy reference
In this article, we’ll talk about the Tkinter Frame and Label widgets.
Let’s Talk About the Tkinter Frame and Label Widgets
We’ll go over both the widgets one by one to understand the fundamentals
What is a Tkinter Frame?
A frame in tkinter is a widget that appears as a rectangular area on the screen. This widget serves as a base for the placement of other widgets such as Labels, Checkbuttons, RadioButtons, etc. Tkinter frame widgets are basically used to group the other widgets on the screen.
Frames are not only used for widgets, they can also be used to place video overlays and other external processes. The frame widget has various properties such as background color, height and width.
Coding a Tkinter Frame
Here’s an example for the Frame is as shown below.
from tkinter import * root=Tk() frame = Frame(width=100, height=100, bg="red", colormap="new") frame.pack(side=LEFT) # set size of window root.geometry('500x500') # set an infinite loop so window stays in view root.mainloop() 
The small red box on the left side of the output is the tkinter frame that we created. Let’s move on to creating a label widget.
What is a Tkinter Label?
Tkinter provides the Label widget to insert any text or images into the frame. Tkinter allows several lines of text to be displayed on the frame however, only one choice of font to the user.
Labels are like typical text boxes and can be of any size. If the user defines the size, then the contents are adjusted within that size and if not it adjusts according to the length of your content on its own.
Labels have foreground and background fields to specify your choice of color. The syntax of the same is as shown below.
w = Label(root, text="Hey there", fg="red")
For background color make sure you use bg as the attribute.
Labels can be used to display PhotoImages and BitMapImages. The syntax for this is also shown below.
photo = PhotoImage(file="welcome.jpg") w = Label(root, image=photo) w.photo = photo
Coding a Label
from tkinter import * root=Tk() label1 = Label(root, text="hi, welcome to GUI using Tkinter") label1.pack() root.geometry('500x400') root.mainloop() The output of the above code is as shown below.

Implementing Tkinter Frame and Label Widgets
from tkinter import * root=Tk() root.title("My first GUI") # set resizing to false root.resizable(width=FALSE, height=FALSE) # set size of window root.geometry('500x400') leftFrame = Frame(root) leftFrame.pack(side=LEFT) rightFrame = Frame(root) rightFrame.pack(side=RIGHT) label1 = Label(leftFrame, text="Left column") label1.pack() label3 = Label(leftFrame, text="Column content") label3.pack() label2 = Label(rightFrame, text="Right column") label2.pack() # set an infinite loop so window stays in view root.mainloop() The output of the above code is as shown below.

Conclusion
This comes to the end of our tutorial on the creation of a Frame and Labels using Tkinter. Try out this code and let us know your feedback in the comment section below.