How to Disable / Enable a Button in TKinter?
There are various attributes and properties in each tkinter widget to help us extend the functionality of the application. Tkinter Button widgets can be enabled and disabled by defining its state in the Button Object. The state attribute generally accepts two values Normal and Disabled which are used for enabling and disabling the button, respectively.
Example
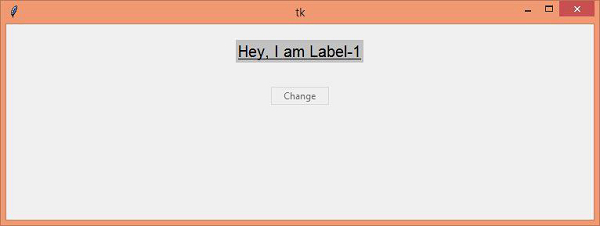
#Import necessary Library from tkinter import * from tkinter import ttk from tkinter.filedialog import asksaveasfile #Create an instance of tkinter window win= Tk() #Set the geometry of tkinter window win.geometry("750x250") #Define the function to change the value in label widget def change_text(label): label.configure(text= "Hey, I am Label-2", background="gray91") #Create a Label label = Label(win, text= "Hey, I am Label-1", font= ('Helvetica 15 underline'), background="gray76") label.pack(pady=20) #Create a button btn= ttk.Button(win,text= "Change", command= lambda:change_text(label), state= DISABLED) btn.pack(pady=10) win.mainloop() Output
Running the above code will display a window that has a disabled button. We can change the state of the button to Normal.
Now, change the value of the state attribute to NORMAL to make the button active on the window.
Python Tkinter – Changing the state of buttons
In this Python tutorial, we will learn how to use Tkinter to examine and alter the states of buttons.
To begin, we must first install Tkinter in our Python environment. We’ll see a graphical user interface window where we may modify the status of the Tkinter button by pressing it.
First, we must grasp what the state is in Python Tkinter.
Tkinter is a Python package that allows us to design our own graphical user interface (GUI). The Tkinter button has two states: normal and disabled. In the regular condition, we can push the button; but, in the disabled state, we cannot click the button.
So, in this tutorial, we’ll learn about Tkinter button states.
Implementing Button State
Let’s get started with the coding component of the provided challenge. First, import the Tkinter package. Now we’ll create an app object and set the window size to 200 x 200.
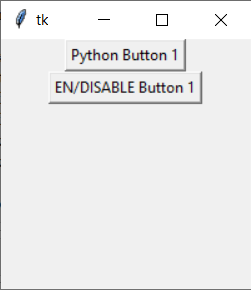
import tkinter as tk app = tk.Tk() app.geometry("200x200") We’ll add two more buttons, button 1 and button 2. We’ll offer an argument as an app that will be displayed in the app window, and we’ll give it a name by setting text attributes to “Python Button 1.”
By providing the value tk to the state of button 1, we will indicate that it is disabled. DISABLED.
Similarly, in Button 2, we will supply the instruction as to some function name, so that when we hit that button, the following function will be executed.
As a function, we provide them switchButtonState. That function will be defined later. We’ll also use the pack to place those two buttons.
button1 = tk.Button(app, text="Python Button 1",state=tk.DISABLED) button2 = tk.Button(app, text="EN/DISABLE Button 1",command = switchButtonState) button1.pack() button2.pack()
The function below will alter the status of the button. By clicking the button, if the status of button1 is normal, it will be changed to disabled; else, it will remain normal.
def switchButtonState(): if (button1['state'] == tk.NORMAL): button1['state'] = tk.DISABLED else: button1['state'] = tk.NORMAL
Finally, we must use app.mainloop() to make the app execute.
By clicking on Button2, you may now modify the status of that Button1.
Changing the state of buttons using Python tkinter
import tkinter as tk def switchButtonState(): if (button1['state'] == tk.NORMAL): button1['state'] = tk.DISABLED else: button1['state'] = tk.NORMAL app = tk.Tk() app.geometry("200x200") button1 = tk.Button(app, text="Python Button 1",state=tk.DISABLED) button2 = tk.Button(app, text="EN/DISABLE Button 1",command = switchButtonState) button1.pack() button2.pack() app.mainloop() Output Screens

Conclusion
Congratulations! You just learned how to Changing the state of buttons. Hope you enjoyed it! 😇
Liked the tutorial? In any case, I would recommend you to have a look at the tutorials mentioned below:
Thank you for taking your time out! Hope you learned something new!! 😄
How to Disable / Enable a Button in TKinter?
There are various attributes and properties in each tkinter widget to help us extend the functionality of the application. Tkinter Button widgets can be enabled and disabled by defining its state in the Button Object. The state attribute generally accepts two values Normal and Disabled which are used for enabling and disabling the button, respectively.
Example
#Import necessary Library from tkinter import * from tkinter import ttk from tkinter.filedialog import asksaveasfile #Create an instance of tkinter window win= Tk() #Set the geometry of tkinter window win.geometry("750x250") #Define the function to change the value in label widget def change_text(label): label.configure(text= "Hey, I am Label-2", background="gray91") #Create a Label label = Label(win, text= "Hey, I am Label-1", font= ('Helvetica 15 underline'), background="gray76") label.pack(pady=20) #Create a button btn= ttk.Button(win,text= "Change", command= lambda:change_text(label), state= DISABLED) btn.pack(pady=10) win.mainloop() Output
Running the above code will display a window that has a disabled button. We can change the state of the button to Normal.
Now, change the value of the state attribute to NORMAL to make the button active on the window.