- Combobox Widget in Python Tkinter
- Creating Combobox Widget Usingtkinter
- Step 1: Import the Required Modules
- Step 2: Creating an Instance of Tk Class
- Step 3: Creating Combobox Widget
- Step 4: Adding Options to the Drop Down Menu
- Step 5: Getting and Setting Values
- Step 6: Handling Events
- Step 7: Showing the Window
- Example
- Output
- Conclusion
- How to create a combo box with auto-completion in Tkinter?
- Example
- Output
- Tkinter Combobox
- Introduction to the Tkinter Combobox widget
- Create a combobox
- Define value list
- Bind events
- Set the current value
- Python Tkinter combobox example
- Summary
Combobox Widget in Python Tkinter
Tkinter is a Python binding to the Tk GUI toolkit. It is the standard Python interface to the Tk GUI toolkit, and is Python’s standard GUI. Tkinter is included with standard Linux, Microsoft Windows and macOS installations of Python. We can create many widgets from python’s tkinter module. One of those multiple widgets is Combobox which is a very widely used powerful tool that can be customized to create lists that allow users to select one or more options from a list of given options.
The Combobox widget combines a text input with a drop-down list, allowing the user to type directly into the input box and/or select any item from the list. This widget is used in places where the user has to choose one or more options from a limited number of the given options.
Creating Combobox Widget Usingtkinter
To create this Combobox widget using Python’s Tkinter module to create a drop-down list having multiple options We have to follow the below steps –
Step 1: Import the Required Modules
We need to first import modules required to make a Combobox. We have to import tkinter module of python which provides access to advanced Tk widgets.
from tkinter import * from tkinter import ttk
Step 2: Creating an Instance of Tk Class
Next, we create an instance of the Tk class, defining the size of window and give it a title −
root = Tk() root.title("Combobox Example") root.geometry('300x300') Step 3: Creating Combobox Widget
We then create a Combobox widget using the ttk.Combobox() method −
combo = ttk.Combobox(root) combo.pack()
This will create a combobox widget with no options.
Step 4: Adding Options to the Drop Down Menu
We can add options to the Combobox using the «values» parameter −
combo = ttk.Combobox(root, values=["Option 1", "Option 2", "Option 3", "Option 4", "Option 5"]) combo.pack()
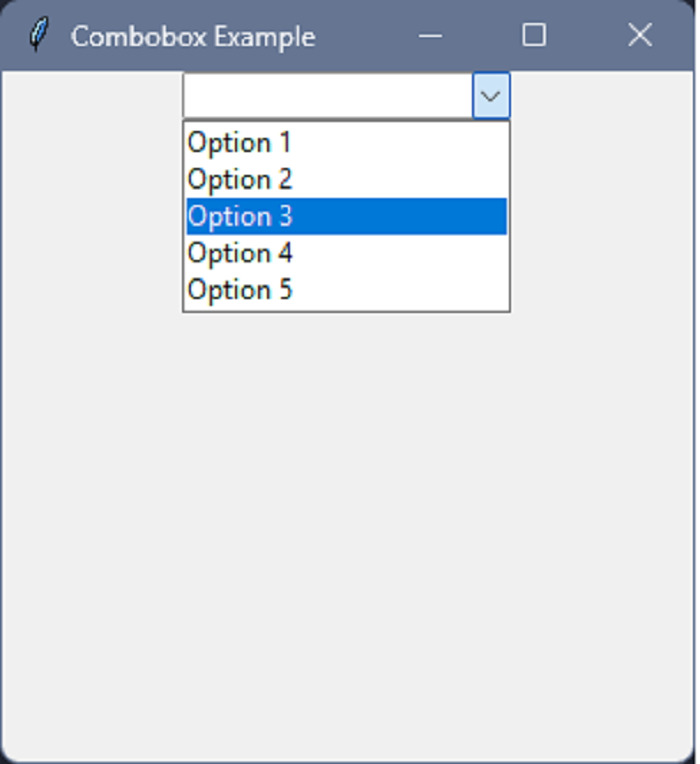
This will create a drop down with 5 options : “Option 1”, “Option 2”, “Option 3”, “Option 4”, and “Option 5”.
Step 5: Getting and Setting Values
To get the currently selected value from a Combobox, we can use the get() method −
selected_option = combo.get()
This will return the currently selected option as a string.
Step 6: Handling Events
We can handle events for a Combobox using the bind() method. For example, if we want to execute a function whenever the user selects an option, we can bind the «>» event −
def option_selected(event): print(combo.get()) combo.bind(">", option_selected) We have defined a function called option_selected that is executed whenever the user selects an option from the Combobox. This function retrieves the currently selected option using combo.get() and then prints a message using the print() function.
Step 7: Showing the Window
The below line of code will start displaying the GUI of the combobox.
Example
Here is the full source code of the program −
from tkinter import * from tkinter import ttk root = Tk() root.title("Combobox Example") root.geometry('300x300') combo = ttk.Combobox(root, values=["Option 1", "Option 2", "Option 3", "Option 4", "Option 5"]) combo.pack() def option_selected(event): selected_option = combo.get() print("You selected:", selected_option) combo.bind(">", option_selected) root.mainloop() Output
Below is the output for the code written −
On selecting any of these options from the drop down we will get a message in the terminal as shown below −
Conclusion
In this article we discussed how we can create a combobox widget in python using its tkinter module. We made a drop down menu list with 5 different options and the user can choose any option. We went through the different steps needed to make a combobox widget like setting a value, handling events etc.
How to create a combo box with auto-completion in Tkinter?
Tkinter Combobox widget is one of the useful widgets to implement dropdown menus in an application. It uses the combination of the Entry widget and ListBox widget on the top of it. We can select Menu items by typing the item name (if it exists in the Menu List) in the Entry field. However, sometimes, there might be cases when we need to use autocompletion to select the menu items.
In order to create an auto-completion Combobox, we will create a Listbox first to list out the menus and an Entry widget to display the selected Menu. You can bind the «Keyrelease» event with the entry widget to search for a particular keyword in the list. If the item exists, we will update the Listbox widget.
Example
In this example, we will create two functions such that,
- A function check(e) will find if the entered item exists in the list or not. If the item matches with the entered keyword, we will update the Entry widget by inserting the particular data.
- A function update(data) will update the Entry box by inserting the value in the Entry widget.
# Import the Required libraries from tkinter import * from tkinter import ttk # Create an instance of tkinter frame or window win= Tk() # Set the size of the window win.geometry("700x350") # Set the title of the window win.title("Combobox- TutorialsPoint") # Update the Entry widget with the selected item in list def check(e): v= entry.get() if v=='': data= values else: data=[] for item in values: if v.lower() in item.lower(): data.append(item) update(data) def update(data): # Clear the Combobox menu.delete(0, END) # Add values to the combobox for value in data: menu.insert(END,value) # Add a Label widget label= Label(win, text= "Demo Combobox Widget", font= ('Helvetica 15 bold'), background= "green3") label.pack(padx= 10, pady= 25) # Add a Bottom Label text= Label(win, text="Select a Programming Language") text.pack(padx= 15,pady= 20) # Create an Entry widget entry= Entry(win, width= 35) entry.pack() entry.bind('',check) # Create a Listbox widget to display the list of items menu= Listbox(win) menu.pack() # Create a list of all the menu items values= ['Python', 'C++', 'Java','Ruby on Rails', 'Rust', 'GoLang','Objective-C', 'C# ', 'PHP', 'Swift', 'JavaScript'] # Add values to our combobox update(values) # Binding the combobox onclick win.mainloop() Output
Running the above Python script will display a window with an Entry widget and a ListBox. Whenever we enter a Keyword, it will update the ListBox widget showing the result that matches with the entered keyword.
Tkinter Combobox
Summary: in this tutorial, you’ll learn to create a Tkinter combobox widget that allows users to select one value from a set of values.
Introduction to the Tkinter Combobox widget
A combobox is a combination of an Entry widget and a Listbox widget. A combobox widget allows you to select one value in a set of values. In addition, it allows you to enter a custom value.
Create a combobox
To create a combobox widget, you’ll use the ttk.Combobox() constructor. The following example creates a combobox widget and links it to a string variable:
current_var = tk.StringVar() combobox = ttk.Combobox(container, textvariable=current_var)Code language: Python (python)The container is the window or frame on which you want to place the combobox widget.
The textvariable argument links a variable current_var to the current value of the combobox.
To get the currently selected value, you can use the current_var variable:
current_value = current_var.get()Code language: Python (python)Alternatively, you can use the get() method of the combobox object:
current_value = combobox.get()Code language: Python (python)To set the current value, you use the current_var variable or the set() method of the combobox object:
current_value.set(new_value) combobox.set(new_value)Code language: Python (python)Define value list
The combobox has the values property that you can assign a list of values to it like this:
combobox['values'] = ('value1', 'value2', 'value3')Code language: Python (python)By default, you can enter a custom value in the combobox. If you don’t want this, you can set the state option to ‘readonly’ :
combobox['state'] = 'readonly'Code language: Python (python)To re-enable editing the combobox, you use the ‘normal’ state like this:
combobox['state'] = 'normal'Code language: Python (python)Bind events
When a select value changes, the combobox widget generates a ‘>’ virtual event. To handle the event, you can use the bind() method like this:
combobox.bind('>', callback)Code language: Python (python)In this example, the callback function will execute when the selected value of the combobox changes.
Set the current value
To set the current value, you use the set() method:
combobox.set(self, value)Code language: Python (python)Also, you can use the current() method:
current(self, newindex=None)Code language: Python (python)The newindex specifies the index of values from the list that you want to select as the current value.
If you don’t specify the newindex , the current() method will return the index of the current value in the list of values or -1 if the current value doesn’t appear in the list.
Python Tkinter combobox example
The following program illustrates how to create a combobox widget:
import tkinter as tk from tkinter import ttk from tkinter.messagebox import showinfo from calendar import month_name root = tk.Tk() # config the root window root.geometry('300x200') root.resizable(False, False) root.title('Combobox Widget') # label label = ttk.Label(text="Please select a month:") label.pack(fill=tk.X, padx=5, pady=5) # create a combobox selected_month = tk.StringVar() month_cb = ttk.Combobox(root, textvariable=selected_month) # get first 3 letters of every month name month_cb['values'] = [month_name[m][0:3] for m in range(1, 13)] # prevent typing a value month_cb['state'] = 'readonly' # place the widget month_cb.pack(fill=tk.X, padx=5, pady=5) # bind the selected value changes def month_changed(event): """ handle the month changed event """ showinfo( title='Result', message=f'You selected !' ) month_cb.bind('>', month_changed) root.mainloop()Code language: Python (python)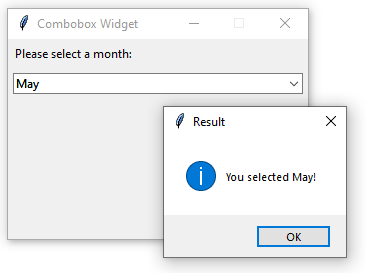
The following program shows the same month combobox widget and uses the set() method to set the current value to the current month:
import tkinter as tk from tkinter import ttk from tkinter.messagebox import showinfo from calendar import month_name from datetime import datetime root = tk.Tk() # config the root window root.geometry('300x200') root.resizable(False, False) root.title('Combobox Widget') # label label = ttk.Label(text="Please select a month:") label.pack(fill=tk.X, padx=5, pady=5) # create a combobox selected_month = tk.StringVar() month_cb = ttk.Combobox(root, textvariable=selected_month) # get first 3 letters of every month name month_cb['values'] = [month_name[m][0:3] for m in range(1, 13)] # prevent typing a value month_cb['state'] = 'readonly' # place the widget month_cb.pack(fill=tk.X, padx=5, pady=5) # bind the selected value changes def month_changed(event): """ handle the month changed event """ showinfo( title='Result', message=f'You selected !' ) month_cb.bind('>', month_changed) # set the current month current_month = datetime.now().strftime('%b') month_cb.set(current_month) root.mainloop()Code language: Python (python)Summary
- Use ttk.Combobox(root, textvariable) to create a combobox.
- Set the state property to readonly to prevent users from entering custom values.
- A combobox widget emits the ‘>’ event when the selected value changes.