How to bind a click event to a Canvas in Tkinter? [closed]
Want to improve this question? Update the question so it focuses on one problem only by editing this post.
I was just wondering if there was any possible way to bind a click event to a canvas using Tkinter. I would like to be able to click anywhere on a canvas and have an object move to it. I am able to make the motion, but I have not found a way to bind clicking to the canvas.
This question is not to broad and should be reopened. (It could be a duplicate but that not important. I suspect that someone, or worse, a program saw the word ‘wondering’ and thought the question might be broad
1 Answer 1
Taken straight from an example from an Effbot tutorial on events.
In this example, we use the bind method of the frame widget to bind a callback function to an event called . Run this program and click in the window that appears. Each time you click, a message like “clicked at 44 63” is printed to the console window. Keyboard events are sent to the widget that currently owns the keyboard focus. You can use the focus_set method to move focus to a widget:
from Tkinter import * root = Tk() def key(event): print "pressed", repr(event.char) def callback(event): print "clicked at", event.x, event.y canvas= Canvas(root, width=100, height=100) canvas.bind("", key) canvas.bind("", callback) canvas.pack() root.mainloop() Update: The example above will not work for ‘key’ events if the window/frame contains a widget like a Tkinter.Entry widget that has keyboard focus. Putting:
in the ‘callback’ function would give the canvas widget keyboard focus and would cause subsequent keyboard events to invoke the ‘key’ function (until some other widget takes keyboard focus).
События
Обычно, чтобы приложение с графическим интерфейсом что-то делало, должны происходить те или иные события, чаще всего представляющие собой воздействие человека на элементы GUI.
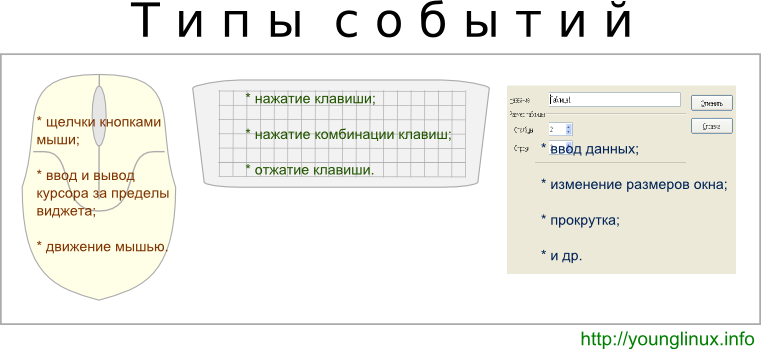
Можно выделить три основных типа событий: производимые мышью, нажатиями клавиш на клавиатуре, а также события, возникающие в результате изменения виджетов. Нередко обрабатываются сочетания. Например, клик мышью с зажатой клавишей на клавиатуре.
При вызове метода bind событие передается в качестве первого аргумента.
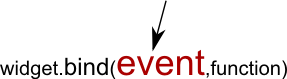
Название события заключается в кавычки, а также в угловые скобки < и >. События описывается с помощью зарезервированных ключевых слов.
Часто используемые события, производимые мышью:
- – клик левой кнопкой мыши
- – клик средней кнопкой мыши
- – клик правой кнопкой мыши
- – двойной клик левой кнопкой мыши
- – движение мыши
- и т. д.
from tkinter import * def b1(event): root.title("Левая кнопка мыши") def b3(event): root.title("Правая кнопка мыши") def move(event): x = event.x y = event.y s = "Движение мышью <>x<>".format(x, y) root.title(s) root = Tk() root.minsize(width=500, height=400) root.bind('', b1) root.bind('', b3) root.bind('', move) root.mainloop()
В этой программе меняется надпись в заголовке главного окна в зависимости от того, двигается мышь, щелкают левой или правой кнопкой.
Событие ( Event ) – это один из объектов tkinter . У событий есть атрибуты, как и у многих других объектов. В примере в функции move извлекаются значения атрибутов x и y объекта event , в которых хранятся координаты местоположения курсора мыши в пределах виджета, по отношению к которому было сгенерировано событие. В данном случае виджетом является главное окно, а событием – , т. е. перемещение мыши.
В программе ниже выводится информация об экземпляре Event и некоторым его свойствам. Все атрибуты можно посмотреть с помощью команды dir(event) . У разных событий они одни и те же, меняются только значения. Для тех или иных событий часть атрибутов не имеет смысла, такие свойства имеют значения по умолчанию.
В примере хотя обрабатывается событие нажатия клавиши клавиатуры, в поля x , y , x_root , y_root сохраняются координаты положения на экране курсора мыши.
from tkinter import * def event_info(event): print(type(event)) print(event) print(event.time) print(event.x_root) print(event.y_root) root = Tk() root.bind('a', event_info) root.mainloop()
Пример выполнения программы:
Для событий с клавиатуры буквенные клавиши можно записывать без угловых скобок (например, ‘a’ ).
Для неалфавитных клавиш существуют специальные зарезервированные слова. Например, — нажатие клавиши Enter , — пробел. (Заметим, что есть событие , которое не имеет отношения к нажатию клавиши Enter , а происходит, когда курсор заходит в пределы виджета.)
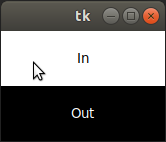
from tkinter import * def enter_leave(event): if event.type == '7': event.widget['text'] = 'In' elif event.type == '8': event.widget['text'] = 'Out' root = Tk() lab1 = Label(width=20, height=3, bg='white') lab1.pack() lab1.bind('', enter_leave) lab1.bind('', enter_leave) lab2 = Label(width=20, height=3, bg='black', fg='white') lab2.pack() lab2.bind('', enter_leave) lab2.bind('', enter_leave) root.mainloop()
В ней две метки используют одну и ту же функцию, и каждая метка использует эту функцию для обработки двух разных событий: ввода курсора в пределы виджета и вывода во границы.
Функция, в зависимости от того, по отношению к какому виджету было зафиксировано событие, изменяет свойства только этого виджета. Как изменяет, зависит от произошедшего события.
Свойство event.widget содержит ссылку на виджет, сгенерировавший событие. Свойство event.type описывает, что это было за событие. У каждого события есть имя и номер. С помощью выражения print(repr(event.type)) можно посмотреть его полное описание. При этом на одних платформах str(event.type) возвращает имя события (например, ‘Enter’), на других – строковое представление номера события (например, ‘7’).
Вернемся к событиям клавиатуры. Сочетания клавиш пишутся через тире. В случае использования так называемого модификатора, он указывается первым, детали на третьем месте. Например, — одновременное нажатие клавиш Shift и стрелки вверх, – движение мышью с зажатой левой кнопкой и клавишей Ctrl .
from tkinter import * def exit_win(event): root.destroy() def to_label(event): t = ent.get() lbl.configure(text=t) def select_all(event): def select_all2(widget): widget.selection_range(0, END) widget.icursor(END) # курсор в конец root.after(10, select_all2, event.widget) root = Tk() ent = Entry(width=40) ent.focus_set() ent.pack() lbl = Label(height=3, fg='orange', bg='darkgreen', font="Verdana 24") lbl.pack(fill=X) ent.bind('', to_label) ent.bind('', select_all) root.bind('', exit_win) root.mainloop()
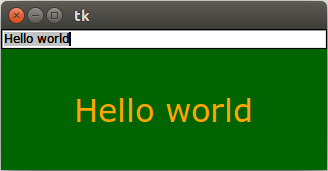
Здесь сочетание клавиш Ctrl+a выделяет текст в поле. Без root.after() выделение не работает. Метод after выполняет функцию, указанную во втором аргументе, через промежуток времени, указанный в первом аргументе. В третьем аргументе передается значение атрибута widget объекта event . В данном случае им будет поле ent . Именно оно будет передано как аргумент в функцию select_all2 и присвоено параметру widget .
Практическая работа
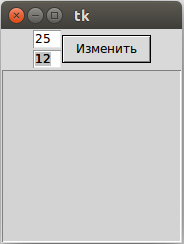
Напишите программу по описанию. Размеры многострочного текстового поля определяются значениями, введенными в однострочные текстовые поля. Изменение размера происходит при нажатии мышью на кнопку, а также при нажатии клавиши Enter .
Цвет фона экземпляра Text светлосерый ( lightgrey ), когда поле не в фокусе, и белый, когда имеет фокус.
Событие получения фокуса обозначается как , потери – как .
Для справки: фокус перемещается по виджетам при нажатии Tab , Ctrl+Tab , Shift+Tab , а также при клике по ним мышью (к кнопкам последнее не относится).
Курс с примерами решений практических работ: pdf-версия
Tkinter. Программирование GUI на Python
How to handle a Button click event in tkinter?
Sometimes, handling events in a Tkinter application can become a daunting task for us. We have to manage the action and events which need to be executed at the time of running the application. The Button widget is useful for handling such events. We can use Button widget to perform a certain task or event by passing the callback in the command.
While giving the command to the Button widget, we can have an optional lambda or anonymous functions which interpret to ignore any errors in the program. These are just like a general function but they don’t have any function bodies in it.
Example
In this example, we will create a button and pass the function to show a popup message on the window.
# Import the required libraries from tkinter import * from tkinter import messagebox from tkinter import ttk # Create an instance of tkinter frame win= Tk() # Set the size of the tkinter window win.geometry("700x350") # Define a function to show the popup message def show_msg(): messagebox.showinfo("Message","Hey There! I hope you are doing well.") # Add an optional Label widget Label(win, text= "Welcome Folks!", font= ('Aerial 17 bold italic')).pack(pady= 30) # Create a Button to display the message ttk.Button(win, text= "Click Here", command=show_msg).pack(pady= 20) win.mainloop() Output
Running the above code will display a window with a Button widget. When we click the button, it will trigger an event to happen.
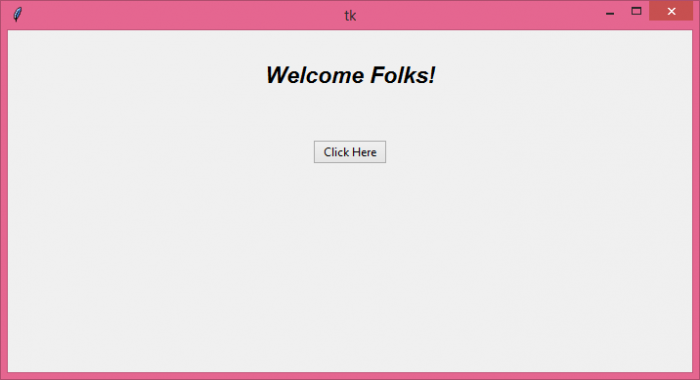
Now, click the Button to see the event of displaying the popup message on the screen.
Tkinter
Examples
Events in tkinter are all the command inputs that can happen inside your application such as mouse movements / clicks, keyboard entries, window resizes, widget introduction, the list goes on. Generally there are two types of events, those which are built into a widget and those which are explicitly bound to a widget.
Implicit Events
Some widgets have events built into them such as the Button widget which takes a command= argument. When we click the button, the callable in our command parameter will be called. Some other widgets with built in event bindings (via command= ) are:
- Checkbutton — called on selection
- Radiobutton — called on selection
- Scale — called on update (movement of scale widget)
- Scrollbar — called on update (movement of scrollbar)
- Spinbox — called on update (new value selected)
Explicitly-Bound Events
There are many events which can be bound to any widget with the syntax: widget.bind(«», callable_handler) . This causes the specified handler to get called whenever the event occurs. Note that we can also bind events to our container objects such as Tk, Frame, & TopLevel
Binding Options
There are multiple ways to bind events to widgets in tkinter :
- .bind() — bind to the specific widget only (instance binding)
- .bind_class() — bind to the all widgets of this class (class binding)
- .bind_all() — bind across the whole application (application binding)
Be aware that .bind_class() can get in the way of default widget behavior since this is how tkinter itself implements default behaviors for widgets. The preferred method is creating a widget class that inherits from the base class and configures a bind on instantiation.
class BoundButton(tkinter.Button): def __init__(self, master, **kw): apply(tkinter.Button.__init__, (self, master), kw) self.bind("", lambda event: print(event)) Declaring Callables
When we declare callables to act as event handlers we should take note that the triggering event will pass an event object (see below) into our callable function. This means we should define our event handlers with one parameter. Implicit events sometimes have the additional argument.
def keyboard_handler(event): print(event.char) def mouse_handler(event): print(event.x, event.y) print(event.char) # prints ?? Note that we can also pass callables directly into the .bind() function using lambdas.
root.bind("k", lambda event: print("k was pressed!")) The Event Object
The event object passed into our event-handlers has many attributes. Some of the commonly used ones are:
- widget — the widget which generated the event
- type — the type of event this is (equal to inner text of the event specifier)
- x, y — the position of the mouse relative to the bound widget (mouse events only)
- num — the mouse button pressed (mouse events only)
- char — the pressed key as a character literal (keyboard events only)
- keycode, keysym — the pressed key as a code or symbol (keyboard events only)