- Python Tkinter Colors + Example
- Python Tkinter Colors
- Python Tkinter Colors RGB
- Python Tkinter Color Text
- Python Tkinter Color Button
- Python Tkinter Color Chooser
- Python Tkinter Color Label
- Python Tkinter Color Transparent
- Python Tkinter Color Window
- Рисуем линии, прямоугольники, круг и текст в Tkinter [Урок №6]
- Рисуем линии в Tkinter — create_line()
- Создаем цветные прямоугольники в Tkinter
- Рисуем различные формы в Tkinter
Python Tkinter Colors + Example
In this Python tutorial, we will learn how to implement colors using Python Tkinter. Let us understand in detail Python Tkinter colors with the points:
- Python Tkinter Colors
- Python Tkinter Colors RGB
- Python Tkinter Color Text
- Python Tkinter Color Button
- Python Tkinter Color Chooser
- Python Tkinter Color Label
- Python Tkinter Color Transparent
- Python Tkinter Color Window
Python Tkinter Colors
Colors play an important role in the UI/UX of the application. It adds a professional touch to the application and helps in engaging the user for a longer time.
- Every color has some thought behind it, selecting the right color for an application is an art & it takes time to master it.
- Red symbolizes an error, green means okay or done, yellow means something is incomplete, etc.
- Every color has two things and the developer/user can provide either of them:
- color name: ‘white smoke’, ‘red’, ‘floral white’, ‘blue’, etc
- color code: #F5F5F5, #FF0000, #FFFAF0, 0000FF, etc
Python Tkinter Colors RGB
Python Tkinter does not support input of colors in RGB format but we can create a workaround that accepts inputs in a RGB format.
- In the below program, you can notice that we have created a function that accepts user input and it adds pound sign (#) as prefix and byte code as a suffix.
- Now while providing the background color we have used this function and provided the RGB values.
from tkinter import * def rgb_hack(rgb): return "#%02x%02x%02x" % rgb ws = Tk() ws.title('PythonGuides') ws.geometry('400x300') ws.config(bg=rgb_hack((255, 0, 122))) ws.mainloop()In this output, you can see that window has a color passed in the code in a RGB format.

Python Tkinter Color Text
In this section, we will learn how to set the color of the Text in Python Tkinter.
- foreground or fg is the option that accepts the color input from the user and sets the font or text color.
- This option is common in almost all the widgets and can be applied on the text of any widget.
- In our example, we will be implementing color on the Text box widget. By default the Text color is blue but we will change it to Blue.
from tkinter import * ws = Tk() ws.title('PythonGuides') ws.config(bg='#D9D8D7') ws.geometry('400x300') tb = Text( ws, width=25, height=8, font=('Times', 20), wrap='word', fg='#4A7A8C' ) tb.pack(expand=True) ws.mainloop()Output of Python Tkinter Color Text
In this output, we have changed the default color of the text from black to light blue.

Python Tkinter Color Button
In this section, we will learn how to change the color of the Button and button text in Python Tkinter.
- Button widget in Python Tkinter has mainly three colors applied on it.
- Button Text Color
- Button background Color
- Button color when clicked
from tkinter import * ws = Tk() ws.titlSelect colorSelect colore('PythonGuides') ws.config(bg='#D9D8D7') ws.geometry('400x300') Button( ws, text='Download', font=('Times', 20), padx=10, pady=10, bg='#4a7abc', fg='yellow', activebackground='green', activeforeground='white' ).pack(expand=True) ws.mainloop()In this output, a button has a background color as light-blue and yellow text. When the mouse is hovered-over it, the button changes to a green background and white foreground or text color.
Python Tkinter Color Chooser
In this section, we will learn to create a color chooser using python tkinter.
- Python Tkinter provides colorchooser module using which color toolbox can be displayed.
- Color chooser allows users to choose colors from the color tray.
- colorchooser returns the RGB code with hexadecimal color code in the tuple format.
- In our example, we will create an application that allows users to choose any color from the color tray, and then that color will be displayed on the label.
from tkinter import * from tkinter import colorchooser def pick_color(): color = colorchooser.askcolor(title ="Choose color") color_me.config(bg=color[1]) color_me.config(text=color) ws = Tk() ws.title('PythonGuides') ws.geometry('400x300') color_me = Label( ws, text='(217, 217, 217) #d9d9d9', font = ('Times', 20), relief = SOLID, padx=20, pady=20 ) color_me.pack(expand=True) button = Button( ws, text = "Choose Color", command = pick_color, padx=10, pady=10, font=('Times', 18), bg='#4a7a8c' ) button.pack() ws.mainloop()In this output, you can see that when the user clicks on the choose color button then a color tray is pop-up. and the label changes color to the selected color.
This is how to use a color chooser in Python Tkinter.
Python Tkinter Color Label
In this section, we will learn how to change color of a Label widget in Python Tkinter.
- Label in Python Tkinter is a widget that is used to display text and images on the application.
- We can apply color on the Label widget and Label Text.
- To color the widget label, the background or bg keyword is used, and to change the text color of the label widget, the foreground or fg keyword is used.
- In this example, we have a colored label widget and label text.
from tkinter import * ws = Tk() ws.title('PythonGuides') ws.config(bg='#D9D8D7') ws.geometry('400x300') Label( ws, text='This text is displayed \n using Label Widget', font=('Times', 20), padx=10, pady=10, bg='#4a7abc', fg='yellow' ).pack(expand=True) ws.mainloop()In this output, Label widget is painted with light blue and Label text with yellow

Python Tkinter Color Transparent
In this section, we will learn how to set the color to transparent in Python Tkinter. In other words, removing all the colors from the background so that background things start appearing through the window.
- The first step in the process is to set the background color to the window using the config keyword.
- now provide the same background color in the wm_attributes()
- Here is the implementation of Python Tkinter Color Transparent.
from tkinter import * ws = Tk() ws.title('PythonGuides') ws.geometry('400x300') ws.config(bg='#4a7a8c') ws.wm_attributes('-transparentcolor','#4a7a8c') ws.mainloop()Here is the output of Python Tkinter Color Transparent
In this output, the application is transparent and the color you are seeing is the background color of the desktop.

Python Tkinter Color Window
In this section, we will learn how to color the main window of Python Tkinter.
- In Python Tkinter, we can change the default settings of the widget by changing the configuration.
- To change the configuration we can use the keyword config or configure.
from tkinter import * ws = Tk() ws.title('PythonGuides') ws.geometry('400x300') ws.config(bg='#116562') ws.mainloop()In this output, window color is changed displayed. Default color of Python Tkinter window is Light Gray, but we have changed it to see green.

You may like the following Python Tkinter tutorials:
In this tutorial, we have learned how to use color in Python Tkinter. Also, we have covered these topics.
- Python Tkinter Colors
- Python Tkinter Colors Example
- Python Tkinter Colors RGB
- Python Tkinter Color Text
- Python Tkinter Color Button
- Python Tkinter Color Chooser
- Python Tkinter Color Label
- Python Tkinter Color Transparent
- Python Tkinter Color Window
I am Bijay Kumar, a Microsoft MVP in SharePoint. Apart from SharePoint, I started working on Python, Machine learning, and artificial intelligence for the last 5 years. During this time I got expertise in various Python libraries also like Tkinter, Pandas, NumPy, Turtle, Django, Matplotlib, Tensorflow, Scipy, Scikit-Learn, etc… for various clients in the United States, Canada, the United Kingdom, Australia, New Zealand, etc. Check out my profile.
Рисуем линии, прямоугольники, круг и текст в Tkinter [Урок №6]

В этой части изучения Tkinter мы немного порисуем. Рисование в Tkinter реализовано при помощи виджета Canvas. Это функционал высокого уровня, который позволяет создавать графику в Tkinter. Рисование можно использовать для создания графиков статистики, самодельных пользовательских виджетов и даже небольших игр.
Рисуем линии в Tkinter — create_line()
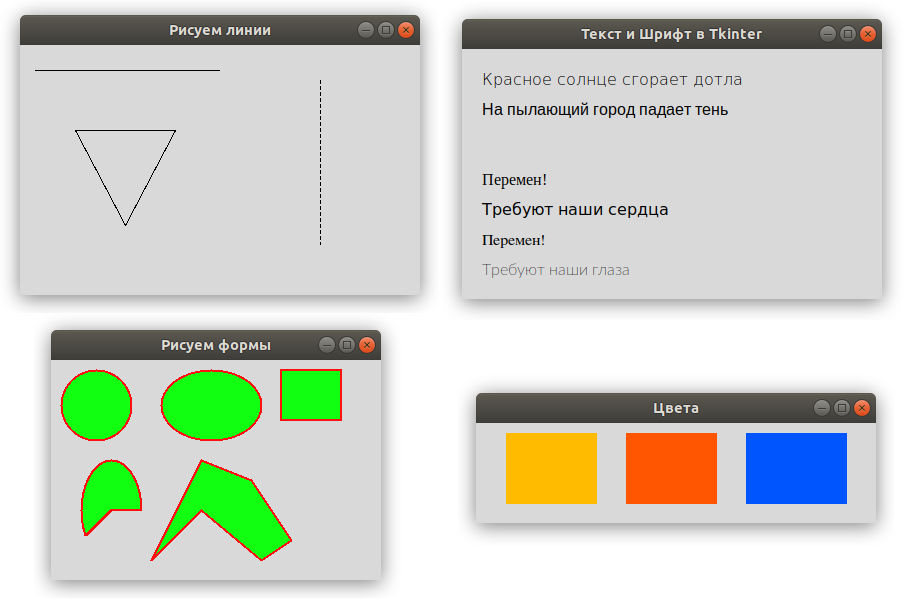
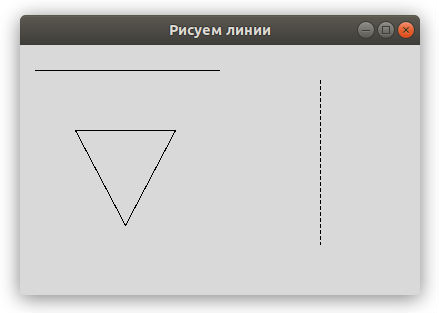
Линия – это примитивный геометрический элемент. На виджете Canvas создать линию можно при помощи метода create_line().
В примере нашего кода, мы рисуем простые линии в Tkinter.
Параметрами метода create_line() являются координаты x и y , которые обозначают стартовые и конечные точки линии.
Мы нарисовали вертикальную линию. Опция dash позволяет создать пунктированную линию. Множества (4, 3) означает:
Если указать dash=(1, 1) то у нас будет линия из точек.
Метод create_line() может содержать несколько конечных точек, которые будут пресекаться линией. Согласно этому коду мы нарисовали треугольник имея три координата разных точек.

Создаем цветные прямоугольники в Tkinter
Цвет является объектом, который отображает комбинацию Красного, Зеленого и Синего цветов (RGB).
В данном примере мы нарисовали прямоугольники и закрасили их разными цветами. Мы ранее работали с выбором цвета в Tkinter используя диалоговое окно цветовой палитры.
Есть вопросы по Python?
На нашем форуме вы можете задать любой вопрос и получить ответ от всего нашего сообщества!
Telegram Чат & Канал
Вступите в наш дружный чат по Python и начните общение с единомышленниками! Станьте частью большого сообщества!
Одно из самых больших сообществ по Python в социальной сети ВК. Видео уроки и книги для вас!
С помощью create_rectangle() мы создаем прямоугольник на холсте. Первыми четырьмя параметрами являются x и y координаты двух ограничительных точек: верхней левой и нижней правой. При помощи параметра outline мы можем задать цвет контура прямоугольников. А параметр fill используется для окрашивания всей внутренней области прямоугольника.

Рисуем различные формы в Tkinter
На холсте мы можем нарисовать самые разнообразные формы. На представленном ниже примере показаны некоторые из них.
Мы нарисовали разные формы в окне:
Контур окрашен в красный цвет, фигуры были наполнены зеленым цветом. Ширина контура указана в 2 пикселя.
Метод create_oval() используется для того, чтобы создать круг в Tkinter. Первые четыре параметра определяют ограничивающие координаты фигуры. Иными словами, это x и y координаты верхней левой и правой нижней точек квадрата, в который помещен круг.
Мы нарисовали прямоугольник в Tkinter. Координаты снова обозначают ограничительные точки с координатами x и y ..
С помощью этого кода мы создаем дугу. Дуга является частью круга. Мы указывает ограничительные координаты нашей дуги.
Успейте заказать просмотры на видео в YouTube ДокторСмм по наиболее дешевой цене с большими оптовыми скидками. Кроме того, с заказом Вы сможете получить также персональные условия на приобретение ресурса с возможностью выбора более подходящей для Вашей ситуации скорости поступления просмотров. Торопитесь, скидки действуют ограниченное время!
С помощью параметра start мы устанавливаем угол дуги. Параметр extent указывает на размер угла.