Send HTML Email With Attachments via SMTP
Starting from Python 3.6, the standard library includes the email package to build email messages (which may eventually contain HTML code and attachments) and the smtplib module to send them through the SMTP protocol, with the possibility of using secure SSL and TLS connections. In this post we will learn how to build and send an email in Python through any SMTP server (Gmail, Outlook, Yahoo, etc. or a custom SMTP service).
Let’s start by sending a plain text email. The first step is to import the necessary modules. The email package has several modules ( email.message , email.parser , etc.) to work with emails. We are only interested in email.message , which contains the necessary class ( EmailMessage ) to create an email. On the other hand, we will need the smtplib module to send it through an SMTP server once the message has been created.
Next, let’s define three variables to store the email sender and recipient, and the message itself (in plain text or HTML).
You will need to replace the content of sender and recipient with the actual email addresses. If you’re using a service like Gmail, Outlook, or Yahoo, make sure to put in the sender variable the email address of the account you want to send the message from.
Now let’s use this data to build the message via the email.message.EmailMessage class:
| email = EmailMessage () |
| email [ «From» ] = sender |
| email [ «To» ] = recipient |
| email [ «Subject» ] = «Sent from Python!» |
| email . set_content ( message ) |
The email instance is like a dictionary in which the «From» (wherefrom the message is sent), «To» (where it is sent to) and «Subject» keys are defined. By default, the set_content() method, which defines the body of the email, assumes that the message passed as an argument is plain text.
Once the email has been created, we must send it through one of the many existing protocols. In this case we will use SMTP with the help of the standard module smtplib . The first thing to do is to connect to the proper server (typically a domain, such as smtp.gmail.com or smtp.example.com , or an IP address).
Check your email provider’s documentation for the exact SMTP server address. The smtplib.SMTP class establishes an insecure connection by default. The default port is 25. However, virtually all modern SMTP servers will require a secure connection using SSL or TLS. If your email provider requires TLS, use this code instead:
| # The port of the TLS protocol is usually 587. |
| smtp = smtplib . SMTP ( «smtp.example.com» , port = 587 ) |
| # Start the secure connection via TLS. |
| smtp . starttls () |
If the SMTP server requires a secure connection via SSL (instead of TLS), then we must use the smtplib.SMTP_SSL class (thus the starttls() call is not necessary):
The smtplib.SMTP_SSL class uses port 465 by default, which is the one normally used for SSL connections. Many email servers (such as Gmail) support SSL and TLS interchangeably, so either of the two previous codes will work.
Once the connection to the SMTP server is established, we must authenticate with our credentials (username and password) and send the built email.
| smtp . login ( sender , «password123» ) |
| smtp . sendmail ( sender , recipient , email . as_string ()) |
| smtp . quit () |
The user that is passed as an argument to the login() method is usually the same email address from which we send the message, stored in sender . In services like Gmail, Outlook or Yahoo, the password passed as the second argument is the same as your account password. The sendmail() method is responsible for sending the email to the recipient. Finally, we close the connection to the server via the quit() method.
| from email.message import EmailMessage |
| import smtplib |
| sender = «sender@example.com» |
| recipient = «recipient@example.com» |
| message = «Hello world!» |
| email = EmailMessage () |
| email [ «From» ] = sender |
| email [ «To» ] = recipient |
| email [ «Subject» ] = «Sent from Python!» |
| email . set_content ( message ) |
| smtp = smtplib . SMTP_SSL ( «smtp.example.com» ) |
| # Or if TLS is used: |
| # smtp = SMTP(«smtp.example.com», port=587) |
| # smtp.starttls() |
| smtp . login ( sender , «password123» ) |
| smtp . sendmail ( sender , recipient , email . as_string ()) |
| smtp . quit () |
Sending a HTML Email
In order to include HTML code in an email, just add the subtype=»html» argument when defining the email body via the set_content() method.
| from email.message import EmailMessage |
| import smtplib |
| sender = «sender@example.com» |
| recipient = «recipient@example.com» |
| message = «Hello, world!» |
| email = EmailMessage () |
| email [ «From» ] = sender |
| email [ «To» ] = recipient |
| email [ «Subject» ] = «Sent from Python!» |
| email . set_content ( message , subtype = «html» ) |
| smtp = smtplib . SMTP_SSL ( «smtp.example.com» ) |
| # Or if TLS is used: |
| # smtp = SMTP(«smtp.example.com», port=587) |
| # smtp.starttls() |
| smtp . login ( sender , «password123» ) |
| smtp . sendmail ( sender , recipient , email . as_string ()) |
| smtp . quit () |
Attachments
We can attach files to an email by calling the add_attachment() method as many times as needed. For example, if we want to attach the file attachment.zip , after setting the body of the message we will do the following:
| with open ( «attachment.zip» , «rb» ) as f : |
| email . add_attachment ( |
| f . read (), |
| filename = «attachment.zip» , |
| maintype = «application» , |
| subtype = «zip» |
| ) |
filename=»attachment.zip» defines the name that the file will have in the email, which may differ from the original file name as read via the open() function. The maintype and subtype arguments define the type of the file according to the MIME specification. You can see a list of valid values for these two arguments at https://developer.mozilla.org/en-US/docs/Web/HTTP/Basics_of_HTTP/MIME_types/Common_types. So, for example, if the MIME type for .zip files is application/zip (according to the list in the previous link), then maintype should be «application» and subtype should be «zip» .
| from email.message import EmailMessage |
| import smtplib |
| sender = «sender@example.com» |
| recipient = «recipient@example.com» |
| message = «Hello, world!» |
| email = EmailMessage () |
| email [ «From» ] = sender |
| email [ «To» ] = recipient |
| email [ «Subject» ] = «Sent from Python!» |
| email . set_content ( message , subtype = «html» ) |
| with open ( «attachment.zip» , «rb» ) as f : |
| email . add_attachment ( |
| f . read (), |
| filename = «attachment.zip» , |
| maintype = «application» , |
| subtype = «zip» |
| ) |
| smtp = smtplib . SMTP_SSL ( «smtp.example.com» ) |
| # Or if TLS is used: |
| # smtp = SMTP(«smtp.example.com», port=587) |
| # smtp.starttls() |
| smtp . login ( sender , «password123» ) |
| smtp . sendmail ( sender , recipient , email . as_string ()) |
| smtp . quit () |
Related Posts
Отправка писем из Python используя модуль smtplib

Возможно вы наткнулись на эту статью, потому что хотите отсылать письма при помощи Python. Возможно, вам нужно получать уведомления по почте из вашего кода, отправлять пользователям письма-подтверждения, когда те создают аккаунт, или отсылать письма коллегам. Отправка писем вручную — это весьма трудоемкая задача, однако ее легко автоматизировать при помощи Python.
Из данной статьи мы узнаем:
- Как настроить безопасное подключение при помощи SMTP_SSL() и .starttls()
- Как использовать встроенную библиотеку Python под названием smtplib для отправки простых писем;
- Как отправлять письма с HTML содержимым и прикрепленными файлами при помощи пакета email;
- Как отправлять несколько персонализированных писем при помощи файла СSV с контактными данными;
- Как использовать пакет Yagmail для отправки через аккаунт Gmail используя всего несколько строк кода.
В конце данной статьи вы ознакомитесь с рядом транзакционных почтовых сервисов, которые могут пригодиться, если вам понадобиться рассылать большие количества писем.
Изучаем модуль smtplib Python
В Python есть встроенный модуль smtplib, предназначенный для отправки писем, используя Simple Mail Transfer Protocol (SMTP). Модуль smtplib использует протокол RFC 821 для SMTP. Примеры в данной статье будут браться из сервера Gmail SMTP для отправки писем, однако те же принципы будут актуальны и для других почтовых сервисов. Кроме этого, множество почтовых провайдеров используют те же порты подключения, что и упомянутые в этой статье, так что вы можете провести быстрый поиск в гугле, чтобы узнать о используемых вами портах.
Для начала, настроим аккаунт Gmail для разработки, или настроим сервер отладки SMTP, который отбрасывает отправленные вами письма и выводит их в командную строку. Мы рассмотрим оба варианта дальше. Локальный сервер отладки SMTP может быть полезным для решения любых проблем, связанных с функционалом почты и обеспечения исправности функций электронной почты перед перед тем как какое-либо из писем будет отправлено.
Настройка аккаунта Gmail для тестов с smtplib
Если вы решили использовать аккаунт Gmail для отправки писем, я настоятельно рекомендую настроить одноразовую учетную запись для разработки вашего кода. Это важно, так как вам придется настроить параметры безопасности вашего аккаунта Gmail для открытия доступа из вашего кода Python, а также есть вероятность того, что вы раскроете свои данные входа. Кстати, я обнаружил, что раздел входящих писем моего тестового аккаунта быстро набился тестовыми письмами, что является еще одной причиной настроить новый аккаунт Gmail для тестов.
Хорошая возможность Gmail в том, что вы можете использовать знак + для внесения любых модификаторов в ваш адрес электронной почты, прямо перед значком @ . Например, письмо отправленное на my+person1@gmail.com и my+person2@gmail.com придет на мой адрес my@gmail.com . При тестировании функционала почты, вы можете использовать это для эмуляции нескольких адресов, которые имеют общие входящие письма.
Для настройка адреса Gmail для тестирования вашего кода, выполните следующее:
- Создайте новый аккаунт в гугле;
- Активируйте разрешение на использование небезопасных приложений. Учитывайте, что это упрощает другим получить доступ к вашему аккаунту;
Если вы не хотите снижать уровень безопасности в настройках вашего аккаунта Gmail, ознакомьтесь в документацией гугла о том, как получить учетные данные для доступа к вашему скрипту Python, используя фреймворк авторизации OAuth2.
Настройка VPS сервера c SMTP от Fornex (Вариант №2)
Работая на уже настроенном VPS сервере позволяет вам быстрее изучить операционную систему Linux. Такие знания приветствуются у тех кто только начинает свой путь как Python-разработчик. В качестве примера мы выбрали самый устойчивый VPS хостинг от Fornex. Используя такой подход, вы можете запускать парсеры того же Avito или Юла для составления собственной базы данных для E-mail рассылки. Мощный SSD Хостинг позволит ускорить работу по сбору и обработки данных на VPS.
После регистрации на Fornex вам предстоит выбор услуги:
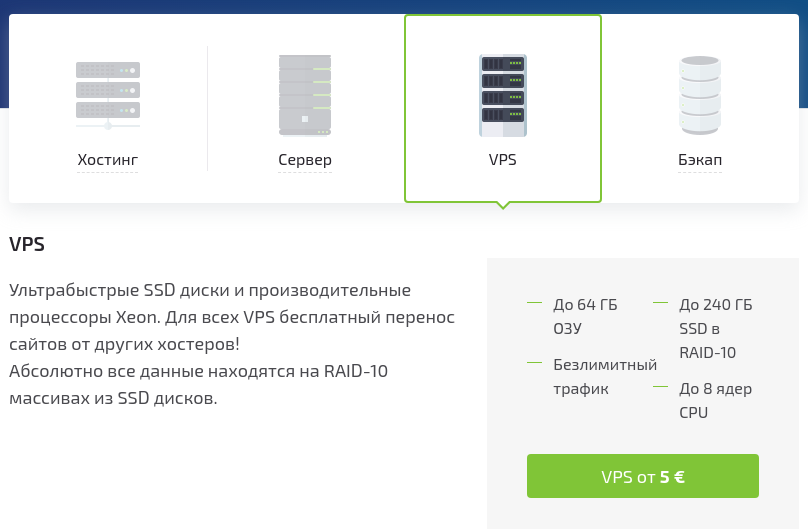
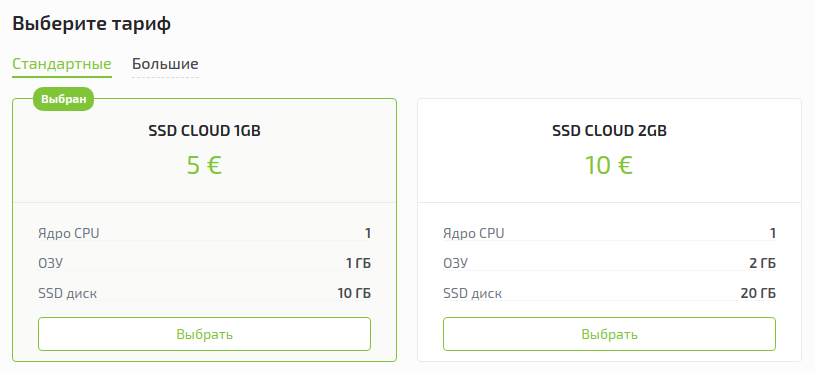
Выбираем нужный нам VPS с которым мы будем работать:
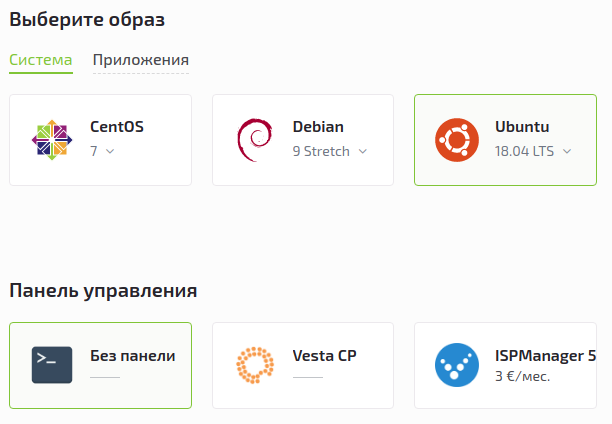
После, нам предстоит выбрать операционную системы. Мы отдаём предпочтение Ubuntu. В нашем случае, необходимости в панели управления нет. Выбираем «Без панели».
После удачной установки, Fornex предоставит нам все данные для входа в наш новый VPS. Прежде чем начать работу с ним, Вам предстоит установка обновлений, необходимых библиотек и установка последней версии Python 3.7.