- Take Webpage Screenshot with Python Selenium
- Selenium screenshot
- Example
- Take screenshot of full page with Python Selenium
- How To Take A Screenshot Using Python & Selenium?
- What Is Selenium Python Bindings?
- Python selenium get screenshot
- Taking Screenshot using Python Selenium WebDriver
- save_screenshot()
- get_screenshot_as_file()
- get_screenshot_as_png()
- 3 Responses
Take Webpage Screenshot with Python Selenium
Screenshots of webpages can be taken automatically with Python Selenium Web Driver. First load the selenium module and time module. You need the time module to wait for page loading to complete.
Then once the page is loaded, take the screenshot. This can be a png file or another image format. Then close the web browser, otherwise it will stay open indefinetly.
Related course:
Selenium screenshot
Example
Before you start, make sure that you have the Selenium Web Driver installed (unique for your Web Browser) and that you have the selenium module installed.
You can take a screenshot of a webpage with the method get_screenshot_as_file() with as parameter the filename.
The program below uses firefox to load a webpage and take a screenshot, but any web browser will do.
from selenium import webdriver
from time import sleep
driver = webdriver.Firefox()
driver.get(‘https://www.python.org’)
sleep(1)
driver.get_screenshot_as_file(«screenshot.png»)
driver.quit()
print(«end. «)
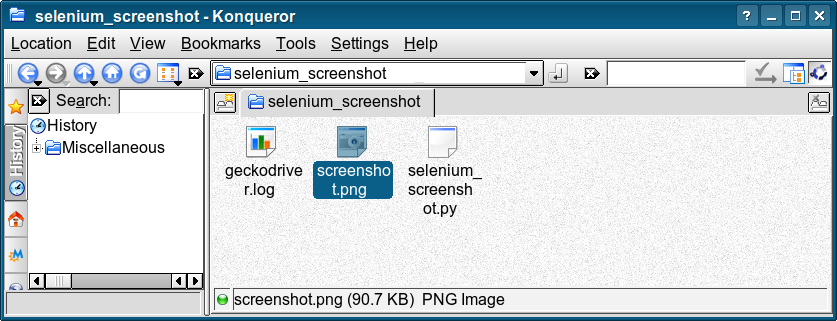
The screenshot image will be stored in the same directory as your Python script. Unless you explicitly define the path where the screenshot has to be stored.
The first step is to import the required modules,
from selenium import webdriver
from time import sleep
Then fire up the browser and load a webpage.
driver = webdriver.Firefox()
driver.get(‘https://www.python.org’)
sleep(1)
When the page has loaded, you can take a screenshot using the method .get_screenshot_as_file(filename).
driver.get_screenshot_as_file(«screenshot.png»)
Take screenshot of full page with Python Selenium
The above code only takes a screenshot of the visible browser window. There are several ways to take a full page screenshot, which includes the web page from top to bottom.
You can do it this way, note that it’s mandatory to set the browser to headless for this to work:
1
2
3
4
5
6
7
8
9
10
11
12
13
14
15
16
17
18
19
#coding=utf-8
import time
from selenium import webdriver
from selenium.webdriver.chrome.options import Options
options = webdriver.ChromeOptions()
options.headless = True
driver = webdriver.Chrome(options=options)
URL = ‘https://pythonbasics.org’
driver.get(URL)
S = lambda X: driver.execute_script(‘return document.body.parentNode.scroll’+X)
driver.set_window_size(S(‘Width’),S(‘Height’)) # May need manual adjustment
driver.find_element_by_tag_name(‘body’).screenshot(‘web_screenshot.png’)
driver.quit()
selenium find element by id
How To Take A Screenshot Using Python & Selenium?

This article is a part of our Content Hub. For more in-depth resources, check out our content hub on Selenium Python Tutorial.
The goto software framework for any web developer looking for an open-source, free test automation tool is Selenium. It is used with various programming languages, including Java, Python, PHP, Perl, and C#. Selenium can also be used as a web-scraping tool or to create a human-replica bot to automate social-media or even test PDF files! Geeks at Google & Thoughtworks are highly credited for its development and maintenance.
In this Python Selenium screenshot tutorial, we are going to explore different ways of taking screenshots using Selenium’s Python bindings. Before we hop-on to capturing Python Selenium screenshots, let’s first acquaint ourselves with Selenium Python bindings.
What Is Selenium Python Bindings?
Selenium has different components; we have Selenium WebDriver, Selenium IDE, and Selenium Grid. Selenium Python bindings is an API interface to use Python with Selenium WebDriver for writing functional/acceptance tests. We shall be using these Python bindings for Selenium to capture full page screenshots, HTML element-specific screenshots and save it in our desired location.
Installing Dependencies
Before we learn how to use Selenium Python for taking screenshots, we need to install some dependencies. Below is a list of all that you need in your machine-
- Python
- Pip
- Selenium Python bindings
- GeckoDriver
- ChromeDriver

Note: Python 2 is redundant now. So, if your Linux or Mac system is having the older version, you may consider updating them to the latest stable versions.
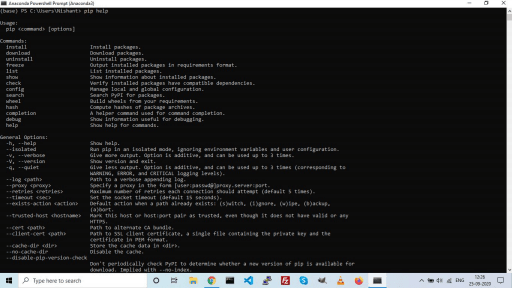 If it displays something like this-
 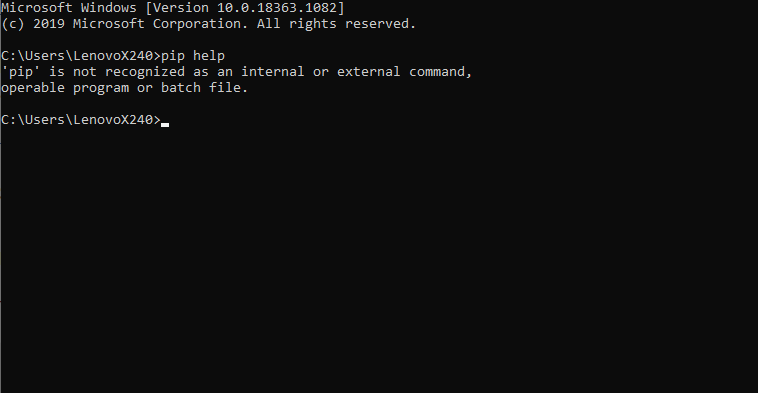 Then you have to download this get-pip.py file to any location in your system, but you should have the path to the file. Remember, you only have to do this if pip is not installed in your system. Next, run this command to install pip. python get-pip.py If you aren’t in the directory as that of the downloaded file, replace the file name in the command given above with the full path to the file location. Now try the command pip help again, you should see the screen we shared earlier.
- Chrome
- Firefox
- Edge
- Internet Explorer
Now let’s make a trial file named check_setup.py. Write the following code in it –
Python selenium get screenshot
- Action Chains in Selenium Python
- click method – Action Chains in Selenium Python
- click_and_hold – Action Chains in Selenium Python
- context_click – Action Chains in Selenium Python
- double_click method – Action Chains in Selenium Python
- drag_and_drop – Action Chains in Selenium Python
- key_down method – Action Chains in Selenium Python
- key_up method – Action Chains in Selenium Python
- move_by_offset – Action Chains in Selenium Python
- move_to_element method – Action Chains in Selenium Python
- move_to_element_with_offset method – Action Chains in Selenium Python
- release method – Action Chains in Selenium Python
- reset_actions method – Action Chains in Selenium Python
- send_keys method – Action Chains in Selenium Python
- add_cookie driver method – Selenium Python
- back driver method – Selenium Python
- close driver method – Selenium Python
- create_web_element driver method – Selenium Python
- delete_all_cookies driver method – Selenium Python
- delete_cookie driver method – Selenium Python
- execute_async_script driver method – Selenium Python
- execute_script driver method – Selenium Python
- forward driver method – Selenium Python
- fullscreen_window driver method – Selenium Python
- get_cookies driver method – Selenium Python
- get_log driver method – Selenium Python
- get_screenshot_as_base64 driver method – Selenium Python
- get_screenshot_as_file driver method – Selenium Python
- get_screenshot_as_png driver method – Selenium Python
- get_window_position driver method – Selenium Python
- get_window_rect driver method – Selenium Python
- get_window_size driver method – Selenium Python
- implicitly_wait driver method – Selenium Python
- maximize_window driver method – Selenium Python
- minimize_window driver method – Selenium Python
- quit driver method – Selenium Python
- refresh driver method – Selenium Python
- set_page_load_timeout driver method – Selenium Python
- set_script_timeout driver method – Selenium Python
- set_window_position driver method – Selenium Python
- set_window_rect driver method – Selenium Python
- current_url driver method – Selenium Python
- current_window_handle driver method – Selenium Python
- page_source driver method – Selenium Python
- title driver method – Selenium Python
- is_displayed() element method – Selenium Python
- is_enabled() element method – Selenium Python
- get_property() element method – Selenium Python
- get_attribute() element method – Selenium Python
- send_keys() element method – Selenium Python
- click() element method – Selenium Python
- clear() element method – Selenium Python
- screenshot() element method – Selenium Python
- submit() element method – Selenium Python
- value_of_css_property() element method – Selenium Python
- location element method – Selenium Python
- screenshot_as_png element method – Selenium Python
- parent element method – Selenium Python
- size element method – Selenium Python
- tag_name element method – Selenium Python
- text element method – Selenium Python
- rect element method – Selenium Python
- screenshot_as_base64 element method – Selenium Python
Taking Screenshot using Python Selenium WebDriver
Selenium can take screenshots during execution and save it in a file. We need to type cast WebDriver instance to TakesScreenshot in case of Java/Selenium. Where as Python/Selenium directly calls methods to take screenshot and these methods support screenshot file as ‘.png’.
WebDriver offers total three APIs to take screenshot of a web page.
- save_screenshot(‘filename’)
- get_screenshot_as_file(‘filename’)
- get_screenshot_as_png()
First two APIs are used to take and store screenshots as ‘.png’ files.
Third API, get_screenshot_as_png(), returns a binary data. This binary data will create an image in memory and can be useful if we want to manipulate before saving it.
An important note to store screenshots is that save_screenshot(‘filename’) and get_screenshot_as_file(‘filename’) will work only when extension of file is ‘.png’
Otherwise content of the screenshot can’t be viewed and Python throws a warning message.
/usr/local/lib/python2.7/dist-packages/selenium/webdriver/remote/webdriver.py:907: UserWarning: name used for saved screenshot does not match file type. It should end with a `.png` extension type. It should end with a `.png` extension, UserWarning
save_screenshot()
from selenium import webdriver driver = webdriver.Firefox(executable_path='[Browser Driver Path]') driver.get('[URL to Open]') driver.find_element_by_id('username').send_keys('admin') driver.find_element_by_id('password').send_keys('admin') driver.find_element_by_id('login').click() driver.save_screenshot('sample_screenshot_1.png') get_screenshot_as_file()
from selenium import webdriver driver = webdriver.Firefox(executable_path='[Browser Driver Path]') driver.get('[URL to Open]') driver.find_element_by_id('username').send_keys('admin') driver.find_element_by_id('password').send_keys('admin') driver.find_element_by_id('login').click() driver.get_screenshot_as_file('sample_screenshot_2.png') get_screenshot_as_png()
from selenium import webdriver import StringIO from PIL import Image driver = webdriver.Firefox(executable_path='[Browser Driver Path]') driver.get('[URL to Open]') driver.find_element_by_id('username').send_keys('admin') driver.find_element_by_id('password').send_keys('admin') driver.find_element_by_id('login').click() screenshot = driver.get_screenshot_as_png() size = (0, 0, 680, 400) image = Image.open(StringIO.StringIO(screen)) region = image.crop(size) region.save('sample_screenshot_3.jpg', 'JPEG', optimize=True, quality=95) Here we are taking screenshot, cropping it to a particular size, and storing it a ‘.jpg’ file named sample_screenshot_3.jpg.
3 Responses
Hi, hm, your post is interesting but what I am missing is, how to make a screenshot from the whole entire page, as you can do it with Phantom JS. Unfortunately, Phantom JS is depreciated, so whats the alternative? Another thing… where do you get the library “StringIO”? It seems, that it is not included in the regular anaconda data base or at PyPI, which is the reason I am not able to reproduce your examples.
This makes your post interesting but somehow weak on the other side. Greetings.