- matplotlib.pyplot.savefig#
- matplotlib save figure
- Save figure
- The savefig method
- Additional savefig options
- Save as PDF file
- Save as SVG file
- Save as JPEG file
- Сохранить график как изображение с помощью Matplotlib
- Создание сюжета
- Сохранить график как изображение в Matplotlib
- Настройка разрешения изображения
- Сохраните прозрачное изображение с помощью Matplotlib
- Изменение цвета графика
- Настройка границы изображения
- Вывод
matplotlib.pyplot.savefig#
The available output formats depend on the backend being used.
Parameters : fname str or path-like or binary file-like
A path, or a Python file-like object, or possibly some backend-dependent object such as matplotlib.backends.backend_pdf.PdfPages .
If format is set, it determines the output format, and the file is saved as fname. Note that fname is used verbatim, and there is no attempt to make the extension, if any, of fname match format, and no extension is appended.
If format is not set, then the format is inferred from the extension of fname, if there is one. If format is not set and fname has no extension, then the file is saved with rcParams[«savefig.format»] (default: ‘png’ ) and the appropriate extension is appended to fname.
Other Parameters : dpi float or ‘figure’, default: rcParams[«savefig.dpi»] (default: ‘figure’ )
The resolution in dots per inch. If ‘figure’, use the figure’s dpi value.
format str
The file format, e.g. ‘png’, ‘pdf’, ‘svg’, . The behavior when this is unset is documented under fname.
metadata dict, optional
Key/value pairs to store in the image metadata. The supported keys and defaults depend on the image format and backend:
- ‘png’ with Agg backend: See the parameter metadata of print_png .
- ‘pdf’ with pdf backend: See the parameter metadata of PdfPages .
- ‘svg’ with svg backend: See the parameter metadata of print_svg .
- ‘eps’ and ‘ps’ with PS backend: Only ‘Creator’ is supported.
Bounding box in inches: only the given portion of the figure is saved. If ‘tight’, try to figure out the tight bbox of the figure.
pad_inches float, default: rcParams[«savefig.pad_inches»] (default: 0.1 )
Amount of padding around the figure when bbox_inches is ‘tight’.
facecolor color or ‘auto’, default: rcParams[«savefig.facecolor»] (default: ‘auto’ )
The facecolor of the figure. If ‘auto’, use the current figure facecolor.
edgecolor color or ‘auto’, default: rcParams[«savefig.edgecolor»] (default: ‘auto’ )
The edgecolor of the figure. If ‘auto’, use the current figure edgecolor.
backend str, optional
Use a non-default backend to render the file, e.g. to render a png file with the «cairo» backend rather than the default «agg», or a pdf file with the «pgf» backend rather than the default «pdf». Note that the default backend is normally sufficient. See The builtin backends for a list of valid backends for each file format. Custom backends can be referenced as «module://. «.
orientation
Currently only supported by the postscript backend.
papertype str
One of ‘letter’, ‘legal’, ‘executive’, ‘ledger’, ‘a0’ through ‘a10’, ‘b0’ through ‘b10’. Only supported for postscript output.
transparent bool
If True, the Axes patches will all be transparent; the Figure patch will also be transparent unless facecolor and/or edgecolor are specified via kwargs.
If False has no effect and the color of the Axes and Figure patches are unchanged (unless the Figure patch is specified via the facecolor and/or edgecolor keyword arguments in which case those colors are used).
The transparency of these patches will be restored to their original values upon exit of this function.
This is useful, for example, for displaying a plot on top of a colored background on a web page.
bbox_extra_artists list of Artist , optional
A list of extra artists that will be considered when the tight bbox is calculated.
pil_kwargs dict, optional
Additional keyword arguments that are passed to PIL.Image.Image.save when saving the figure.
matplotlib save figure
If you want to save matplotlib figures as individual files, you can do this with the savefig function. If you want to save figures in a single file, use the saveas function instead.
Matplotlib is a python plotting library which produces publication quality figures in a variety of hardcopy formats and interactive environments across platforms.
Related course
The course below is all about data visualization:
Data Visualization with Matplotlib and Python
Save figure
For those who didn’t know, matplotlib savefig creates a file of the current figure as a PNG (with transparency), and saves it to your filesystem.
So Matplotlib can save plots directly to a file using savefig(). In this article we won’t cover the installation of matplotlib, if you want to install it see the installation faq.
Savefig is useful when you need to save a figure for viewing outside of matplotlib, such as in another program, or when you want to use a vector graphics program (Inkscape, Illustrator, etc.) to modify it.
It’s also useful if you want to save a copy of a figure in the same directory as your matplotlib script.
The method can be used like this:
It can make an image from the figure. It decides on the image format based on the extension. For example to save a jpg image named figure1. jpg. The figure image must have an extension of jpg, png, or pdf.
The savefig method
The savefig() method is part of the matplotlib.pyplot module. This saves the contents of your figure to an image file.
It must have the output file as the first argument. You can add the full path, relative path or no path. If you don’t define a path, it will save the image in the current working directory.
The most basic program you can do is just 5 lines of code:
import matplotlib.pyplot as plt
plt.plot([0, 1, 2, 3, 4], [0, 2, 4, 8, 16])
plt.xlabel(‘Months’)
plt.ylabel(‘Movies watched’)
plt.savefig(‘example.png’)
This works for larger plots too:
# load matplotlib modules
import matplotlib
import matplotlib.pyplot as plt
import numpy as np
# data to plot
y = [2,4,6,8,10,12,14,16,18,20]
x = np.arange(10)
# create plot
fig = plt.figure()
ax = plt.subplot(111)
ax.plot(x, y, label=‘$y = numbers’)
plt.title(‘Legend inside’)
ax.legend()
# save plot to file
fig.savefig(‘plot.png’)
To change the format, simply change the extension like so:
You can open your file with any external image program, because it’s just a regular image. If you use Linux, you can use the command below:
or open it in an image or pdf viewer if you saved it as pdf
Additional savefig options
A number of new savefig options have been added to matplotlib. Backwards compatibility is maintained.
The options are:
savefig(filename, dpi=None, format=‘png’, bbox_inches=‘tight’, pad_inches=0.2, bbox=None, pad=None, dashes=None, loc=‘upper left’, rot=0, vmax=‘I’, vmin=‘I’, hmax=‘I’, hmin=‘I’)
The output file name extension and format is controlled by the extension and format parameters; the above are defaults.
- filename the output file to save, if no path is included it will save it in the same directory as your program
- transparent if you a transparent background set it to True
- bbox_inches change the size of the white space around the image, in most cases tight is ideal
Save as PDF file
To save your matplotlib chart as a pdf, just change the file extension to .pdf
The file will be saved in your working directory.
Save as SVG file
SVG is another vector-based graphics format, which lets you zoom in without losing quality. Not every program can open the svg image files.
To save as an SVG file, just change the extension to SVG
Save as JPEG file
If you save as jpeg file, you can include the quality parameter. This lets you save some disk space, but at the cost of image quality.
plt.savefig(‘line_plot.jpg’, dpi=300, quality=80, optimize=True, progressive=True)
In general I recommend going with vector graphics formats like svg or pdf, because the quality is higher. If you don’t care about quality and just want to email the image or show it on a website, you could use png or jpeg.
Сохранить график как изображение с помощью Matplotlib
Matplotlib — одна из наиболее широко используемых библиотек визуализации данных в Python. Обычно графики и визуализации Matplotlib делятся с другими.
В этой статье мы рассмотрим, как сохранить график в виде файла изображения с помощью Matplotlib.
Создание сюжета
Сначала создадим простой сюжет:
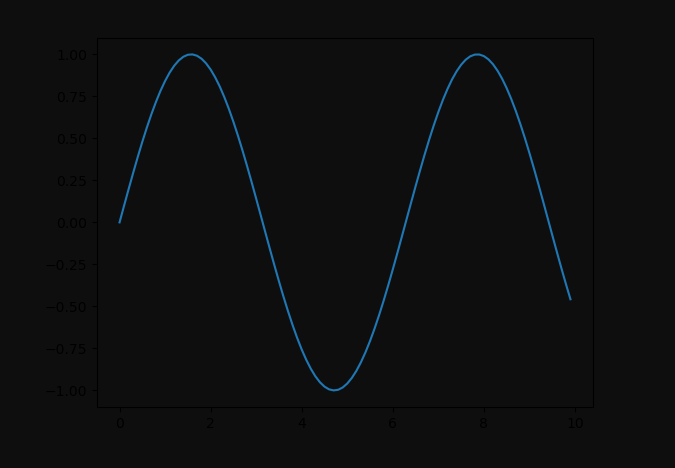
import matplotlib.pyplot as plt import numpy as np x = np.arange(0, 10, 0.1) y = np.sin(x) plt.plot(x, y) plt.show() Здесь мы построили синусоидальную функцию, начиная с 0 и заканчивая 10 с шагом 0.1 . Выполнение этого кода дает:

Теперь давайте посмотрим, как мы можем сохранить эту фигуру как изображение.
Сохранить график как изображение в Matplotlib
В предыдущем примере мы сгенерировали график с помощью функции plot() , передав данные, которые мы хотели бы визуализировать.
Этот график создается, но не отображается нам, если мы не вызываем функцию show() . Функция show() , как следует из названия, показывает сгенерированный участок пользователю в окне.
После создания мы также можем сохранить этот рисунок / график как файл — используя функцию savefig() :
import matplotlib.pyplot as plt import numpy as np x = np.arange(0, 10, 0.1) y = np.sin(x) plt.plot(x, y) plt.savefig('saved_figure.png') Теперь, когда мы запускаем код, вместо всплывающего окна с графиком у нас есть файл ( saved_figure.png ) в каталоге нашего проекта.
Этот файл содержит точно такое же изображение, которое мы бы показывали в окне:

Стоит отметить, что функция savefig() не уникальна для экземпляра plt . Вы также можете использовать его на объекте Figure :
import matplotlib.pyplot as plt import numpy as np fig = plt.figure() x = np.arange(0, 10, 0.1) y = np.sin(x) plt.plot(x, y) fig.savefig('saved_figure.png') У функции savefig() есть обязательный аргумент filename . Здесь мы указали имя файла и формат.
Кроме того, она принимает другие варианты, такие как dpi , transparent , bbox_inches , quality и т.д.
В следующих разделах мы рассмотрим некоторые популярные варианты.
Настройка разрешения изображения
Параметр DPI определяет количество точек (пикселей) на дюйм. По сути, это разрешение создаваемого изображения. Давайте протестируем несколько разных вариантов:
import matplotlib.pyplot as plt import numpy as np fig = plt.figure() x = np.arange(0, 10, 0.1) y = np.sin(x) plt.plot(x, y) fig.savefig('saved_figure-50pi.png', dpi = 50) fig.savefig('saved_figure-100dpi.png', dpi = 100) fig.savefig('saved_figure-1000dpi.png', dpi = 1000) Это приводит к появлению трех новых файлов изображений на нашем локальном компьютере, каждый с разным DPI:

Значение по умолчанию — 100 .
Сохраните прозрачное изображение с помощью Matplotlib
Аргумент transparent может быть использован для создания участка с прозрачным фоном. Это полезно, если вы будете использовать графическое изображение в презентации, на бумаге или хотите представить его в настройках индивидуального дизайна:
import matplotlib.pyplot as plt import numpy as np x = np.arange(0, 10, 0.1) y = np.sin(x) plt.plot(x, y) plt.savefig('saved_figure.png', transparent=True) Если мы поместим это изображение на темный фон, это приведет к:
Изменение цвета графика
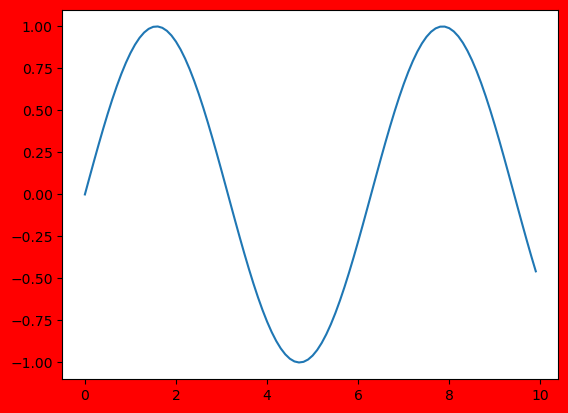
Вы можете изменить цвет подложки, используя аргумент facecolor . Он принимает color и по умолчанию white .
import matplotlib.pyplot as plt import numpy as np x = np.arange(0, 10, 0.1) y = np.sin(x) plt.plot(x, y) plt.savefig('saved_figure-colored.png', facecolor = 'red') 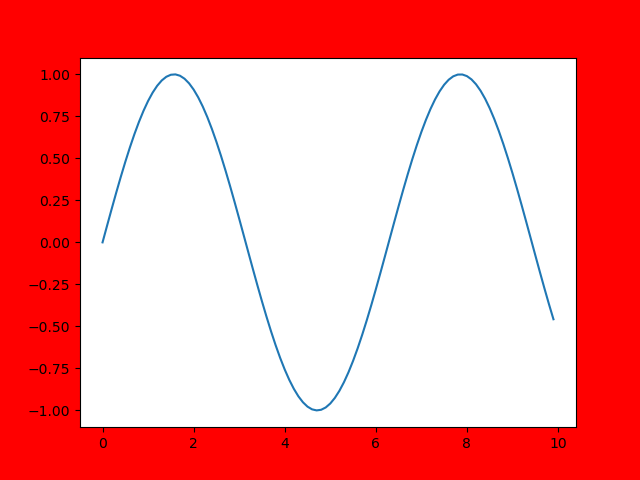
Настройка границы изображения
Аргумент bbox_inches принимает строку и определяет границу вокруг граффика. Если мы хотим установить его так tight , то есть максимально обрезать рамку, мы можем установить аргументу bbox_inches значение ‘tight’ :
import matplotlib.pyplot as plt import numpy as np x = np.arange(0, 10, 0.1) y = np.sin(x) plt.plot(x, y) plt.savefig('saved_figure-tight.png', bbox_inches = 'tight', facecolor='red') В результате получается плотно упакованная коробка. Это легче визуализировать, если для справки раскрасить края другим цветом:
Вывод
В этом уроке мы рассмотрели несколько способов сохранить график в виде файла изображения с помощью Matplotlib.