- pandas.core.groupby.DataFrameGroupBy.plot#
- Pandas: как использовать Groupby и Plot (с примерами)
- Метод 1: группировка и построение нескольких линий на одном графике
- Метод 2: группировка по и сюжетным линиям в отдельных подзаговорах
- Дополнительные ресурсы
- Pandas: groupby plotting and visualization in Python
- Data acquisition
- Plot groupby in Pandas
- Groupby pie chart
- Groupby barplot
- Groupby Histogram
- Plot Grouped Data in Pandas
- Plot Grouped Data Using a Bar Chart in Pandas
- Plot Grouped Data Using a Pie Chart in Pandas
- Related Article — Pandas Plot
pandas.core.groupby.DataFrameGroupBy.plot#
Uses the backend specified by the option plotting.backend . By default, matplotlib is used.
Parameters data Series or DataFrame
The object for which the method is called.
x label or position, default None
Only used if data is a DataFrame.
y label, position or list of label, positions, default None
Allows plotting of one column versus another. Only used if data is a DataFrame.
The kind of plot to produce:
- ‘line’ : line plot (default)
- ‘bar’ : vertical bar plot
- ‘barh’ : horizontal bar plot
- ‘hist’ : histogram
- ‘box’ : boxplot
- ‘kde’ : Kernel Density Estimation plot
- ‘density’ : same as ‘kde’
- ‘area’ : area plot
- ‘pie’ : pie plot
- ‘scatter’ : scatter plot (DataFrame only)
- ‘hexbin’ : hexbin plot (DataFrame only)
An axes of the current figure.
subplots bool or sequence of iterables, default False
Whether to group columns into subplots:
- False : No subplots will be used
- True : Make separate subplots for each column.
- sequence of iterables of column labels: Create a subplot for each group of columns. For example [(‘a’, ‘c’), (‘b’, ‘d’)] will create 2 subplots: one with columns ‘a’ and ‘c’, and one with columns ‘b’ and ‘d’. Remaining columns that aren’t specified will be plotted in additional subplots (one per column).
In case subplots=True , share x axis and set some x axis labels to invisible; defaults to True if ax is None otherwise False if an ax is passed in; Be aware, that passing in both an ax and sharex=True will alter all x axis labels for all axis in a figure.
sharey bool, default False
In case subplots=True , share y axis and set some y axis labels to invisible.
layout tuple, optional
(rows, columns) for the layout of subplots.
figsize a tuple (width, height) in inches
use_index bool, default True
Use index as ticks for x axis.
title str or list
Title to use for the plot. If a string is passed, print the string at the top of the figure. If a list is passed and subplots is True, print each item in the list above the corresponding subplot.
grid bool, default None (matlab style default)
legend bool or
Place legend on axis subplots.
style list or dict
The matplotlib line style per column.
logx bool or ‘sym’, default False
Use log scaling or symlog scaling on x axis.
logy bool or ‘sym’ default False
Use log scaling or symlog scaling on y axis.
loglog bool or ‘sym’, default False
Use log scaling or symlog scaling on both x and y axes.
xticks sequence
Values to use for the xticks.
yticks sequence
Values to use for the yticks.
xlim 2-tuple/list
Set the x limits of the current axes.
ylim 2-tuple/list
Set the y limits of the current axes.
xlabel label, optional
Name to use for the xlabel on x-axis. Default uses index name as xlabel, or the x-column name for planar plots.
Changed in version 1.2.0: Now applicable to planar plots ( scatter , hexbin ).
Changed in version 2.0.0: Now applicable to histograms.
Name to use for the ylabel on y-axis. Default will show no ylabel, or the y-column name for planar plots.
Changed in version 1.2.0: Now applicable to planar plots ( scatter , hexbin ).
Changed in version 2.0.0: Now applicable to histograms.
Rotation for ticks (xticks for vertical, yticks for horizontal plots).
fontsize float, default None
Font size for xticks and yticks.
colormap str or matplotlib colormap object, default None
Colormap to select colors from. If string, load colormap with that name from matplotlib.
colorbar bool, optional
If True, plot colorbar (only relevant for ‘scatter’ and ‘hexbin’ plots).
position float
Specify relative alignments for bar plot layout. From 0 (left/bottom-end) to 1 (right/top-end). Default is 0.5 (center).
table bool, Series or DataFrame, default False
If True, draw a table using the data in the DataFrame and the data will be transposed to meet matplotlib’s default layout. If a Series or DataFrame is passed, use passed data to draw a table.
yerr DataFrame, Series, array-like, dict and str
xerr DataFrame, Series, array-like, dict and str
stacked bool, default False in line and bar plots, and True in area plot
If True, create stacked plot.
secondary_y bool or sequence, default False
Whether to plot on the secondary y-axis if a list/tuple, which columns to plot on secondary y-axis.
mark_right bool, default True
When using a secondary_y axis, automatically mark the column labels with “(right)” in the legend.
include_bool bool, default is False
If True, boolean values can be plotted.
backend str, default None
Backend to use instead of the backend specified in the option plotting.backend . For instance, ‘matplotlib’. Alternatively, to specify the plotting.backend for the whole session, set pd.options.plotting.backend .
Options to pass to matplotlib plotting method.
Returns matplotlib.axes.Axes or numpy.ndarray of them
If the backend is not the default matplotlib one, the return value will be the object returned by the backend.
- See matplotlib documentation online for more on this subject
- If kind = ‘bar’ or ‘barh’, you can specify relative alignments for bar plot layout by position keyword. From 0 (left/bottom-end) to 1 (right/top-end). Default is 0.5 (center)
Pandas: как использовать Groupby и Plot (с примерами)
Вы можете использовать следующие методы для выполнения группировки и построения графика с помощью pandas DataFrame:
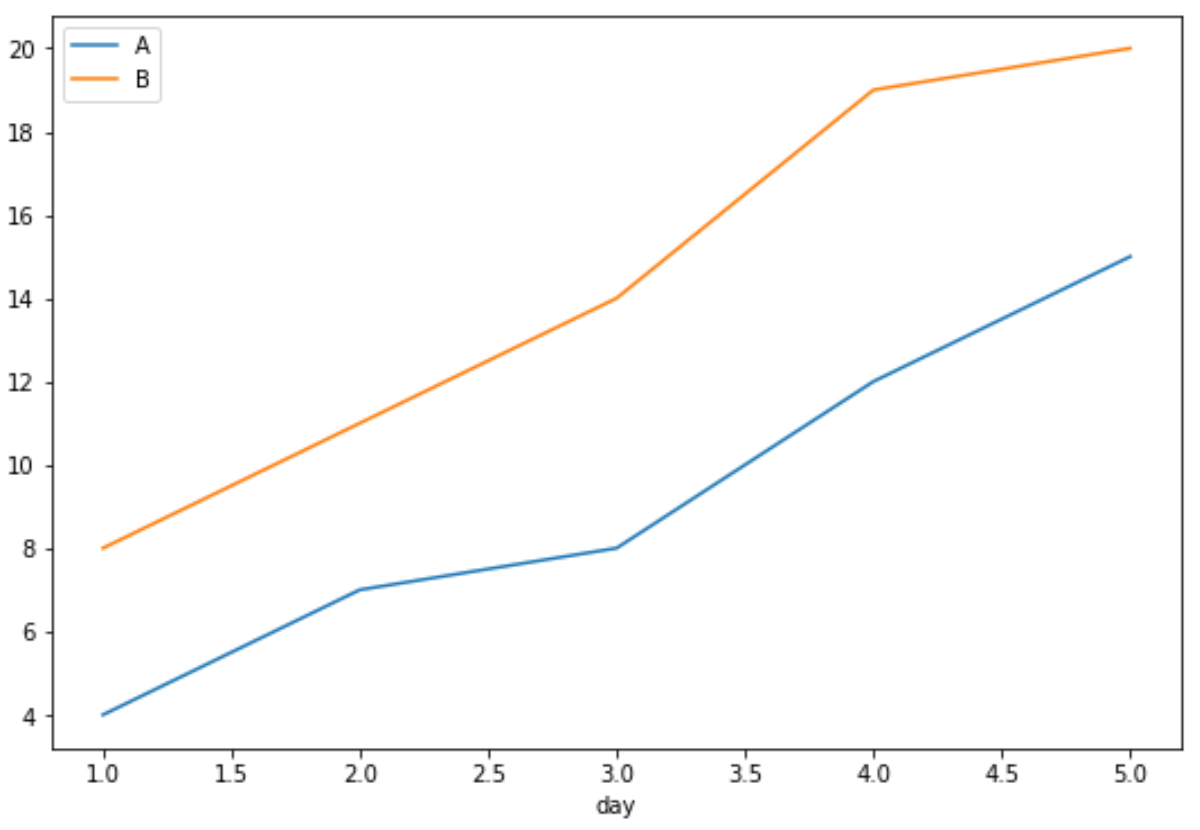
Метод 1: группировка и построение нескольких линий на одном графике
#define index column df.set_index('day', inplace= True ) #group data by product and display sales as line chart df.groupby('product')['sales'].plot(legend= True ) Метод 2: группировка по и сюжетным линиям в отдельных подзаговорах
pd.pivot_table(df.reset_index(), index='day', columns='product', values='sales ' ).plot(subplots= True ) В следующем примере показано, как использовать каждый метод на практике со следующими пандами DataFrame:
import pandas as pd #create DataFrame df = pd.DataFrame() #view DataFrame df day product sales 0 1 A 4 1 2 A 7 2 3 A 8 3 4 A 12 4 5 A 15 5 1 B 8 6 2 B 11 7 3 B 14 8 4 B 19 9 5 B 20 Метод 1: группировка и построение нескольких линий на одном графике
В следующем коде показано, как сгруппировать DataFrame по переменной «продукт» и отобразить «продажи» каждого продукта на одной диаграмме:
#define index column df.set_index('day', inplace= True ) #group data by product and display sales as line chart df.groupby('product')['sales'].plot(legend= True ) 
По оси X отображается день, по оси Y — продажи, а в каждой отдельной строке — продажи отдельных продуктов.
Метод 2: группировка по и сюжетным линиям в отдельных подзаговорах
В следующем коде показано, как сгруппировать DataFrame по переменной «продукт» и отобразить «продажи» каждого продукта на отдельных подграфиках:
pd.pivot_table(df.reset_index(), index='day', columns='product', values='sales ' ).plot(subplots= True ) 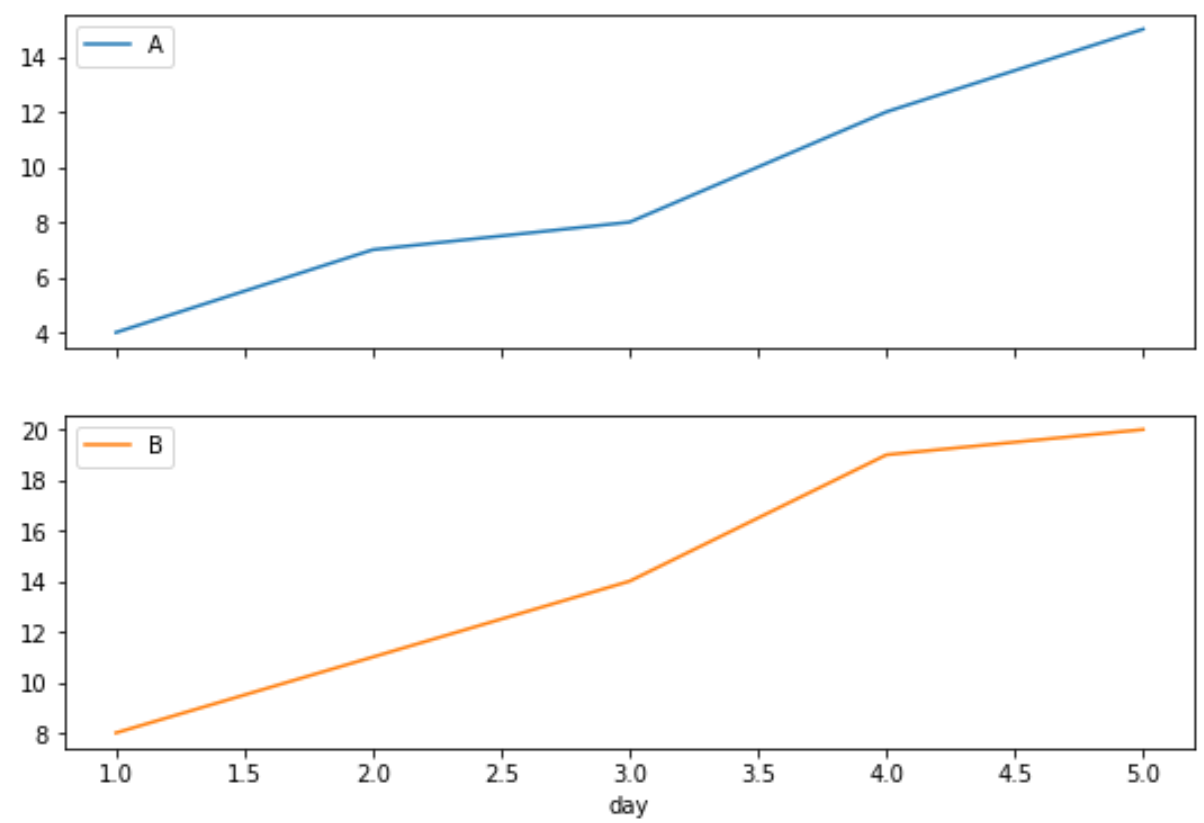
Первый график показывает продажи продукта А, а второй график показывает продажи продукта Б.
Обратите внимание, что мы также можем использовать аргумент макета , чтобы указать макет подграфиков.
Например, мы могли бы указать, что подграфики должны находиться в сетке с одной строкой и двумя столбцами:
pd.pivot_table(df.reset_index(), index='day', columns='product', values='sales ' ).plot(subplots= True , layout=(1,2)) 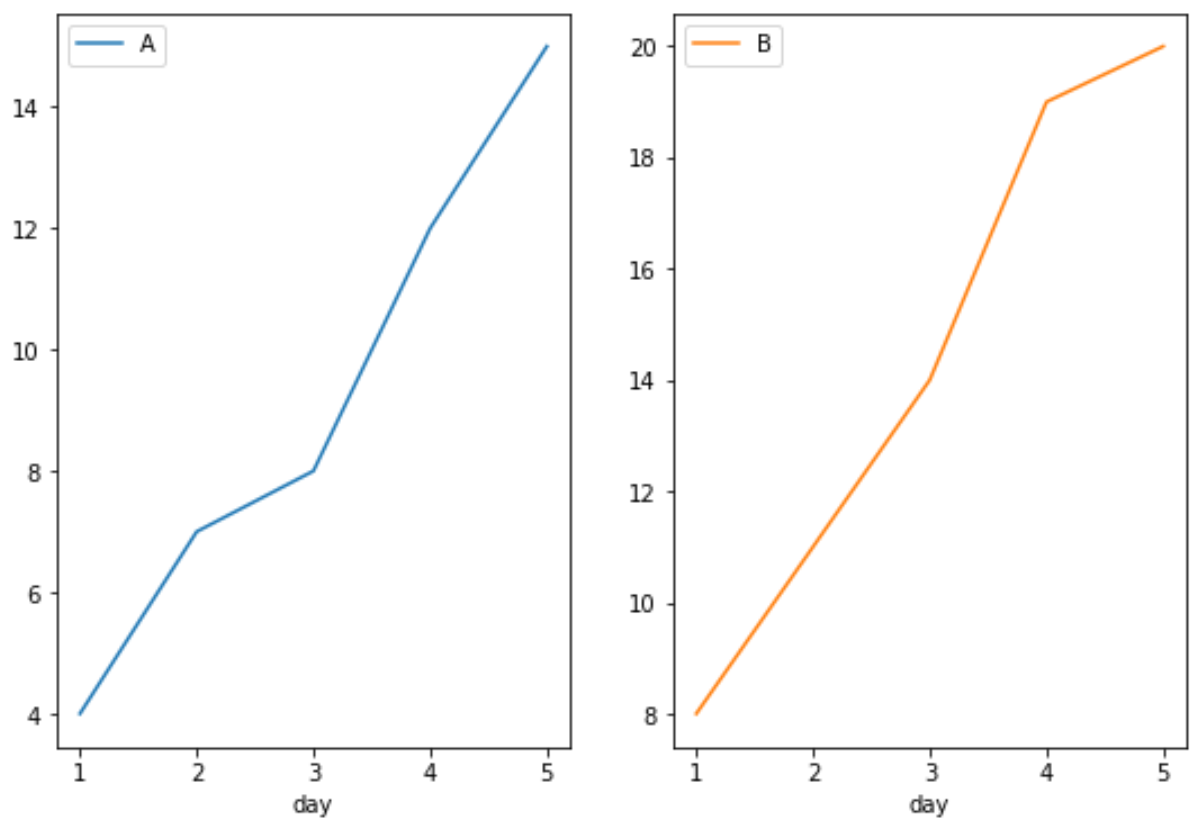
Дополнительные ресурсы
В следующих руководствах объясняется, как создавать другие распространенные визуализации в pandas:
Pandas: groupby plotting and visualization in Python
In this data visualization recipe we’ll learn how to visualize grouped data using the Pandas library as part of your Data wrangling workflow.
Data acquisition
We’ll start by creating representative data. Copy the code below and paste it into your notebook:
# Python3 # Import Pandas import pandas as pd # Create Dataframe budget = pd.DataFrame() budget.head()Here’s our DataFrame header:
| quarter | area | target | |
|---|---|---|---|
| 0 | 1 | North | 6734 |
| 1 | 3 | South | 7265 |
| 2 | 2 | West | 1466 |
| 3 | 4 | Midwest | 5426 |
| 4 | 1 | North | 6578 |
Plot groupby in Pandas
Let’s first go ahead a group the data by area
sales_by_area = budget.groupby('area').agg(sales_target =('target','sum'))Here’s the resulting new DataFrame:
Groupby pie chart
We’ll use the DataFrame plot method and puss the relevant parameters. Note the usage of the optional title , cmap (colormap), figsize and autopct parameters.
- title assigns a title to the chart
- cmap assigns a color scheme map.
- figsize: determines the width and height of the plot.
- autopct helps us to format the values as floating numbers representing the percentage of the total.
sales_by_area.plot(kind='pie', x='area', y='sales_target', title = 'Sales by Zone', cmap='Dark2', autopct="%.1f%%", figsize = (10,6), legend=False); 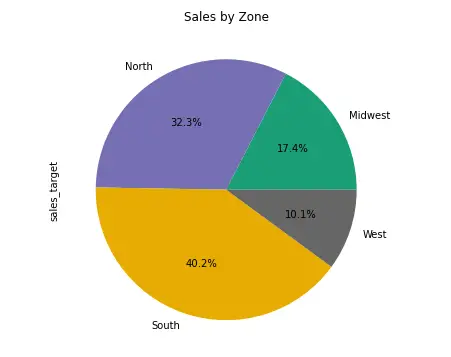
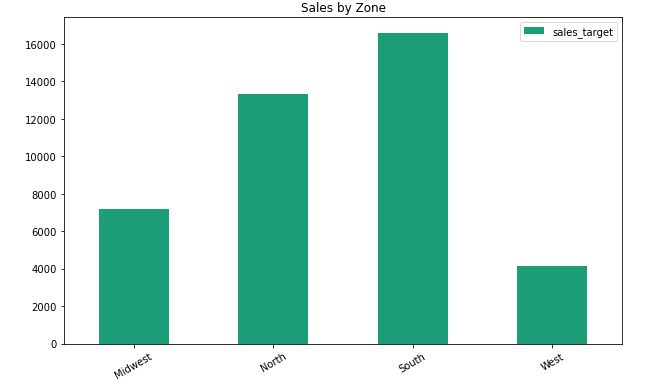
Groupby barplot
A similar example, this time using the barplot. Here’s the code that we’ll be using.
sales_by_area.plot(kind='bar', title = 'Sales by Zone', figsize = (10,6), cmap='Dark2', rot = 30);Note the legend that is added by default to the chart. Also worth noting is the usage of the optional rot parameter, that allows to conveniently rotate the tick labels by a certain degree. In our case – 30.
Here’s the resulting chart:
Groupby Histogram
We are able to quickly plot an histagram in Pandas. Note the usage of kind=’hist’ as a parameter into the plot method:
sales_by_area.plot(kind='hist', title = 'Sales by Zone', figsize = (10,6), cmap='Dark2', rot = 30);Plot Grouped Data in Pandas

- Plot Grouped Data Using a Bar Chart in Pandas
- Plot Grouped Data Using a Pie Chart in Pandas
Pandas is an open-source data analysis library in Python. It provides many built-in methods to perform operations on numerical data.
groupby() is one of the methods available in Pandas that divides the data into multiple groups according to some criteria. We can further plot the grouped data for a better data visualization using Matplotlib in Python.
This tutorial will demonstrate plotting the data of a grouped data in Pandas Python.
Plot Grouped Data Using a Bar Chart in Pandas
We have the students’ data in the Pandas data frame in the following example. First, we will group the data according to the department using the groupby(‘Department’) method.
Now, the data will be split into two groups. Then we will calculate the maximum marks achieved in each department using the max() function on the grouped data.
Finally, we will display each department’s highest score using the plot() function and specify the type of graph as a bar chart in the argument. As an output, we will get a bar chart showing the maximum score of each department.
#Python 3.x import pandas as pd import matplotlib.pyplot as plt df = pd.DataFrame( 'Name': ['Robert', 'Sam', 'Alia', 'Jhon', 'Smith'], 'Department': ['CS', 'SE', 'SE', 'SE', 'CS'], 'Marks': [60, 70, 59, 51, 80], 'Age': [20, 21, 20, 22, 23] >) display(df) df.groupby('Department')['Marks'].max().plot(kind='bar', legend=True) plt.show() 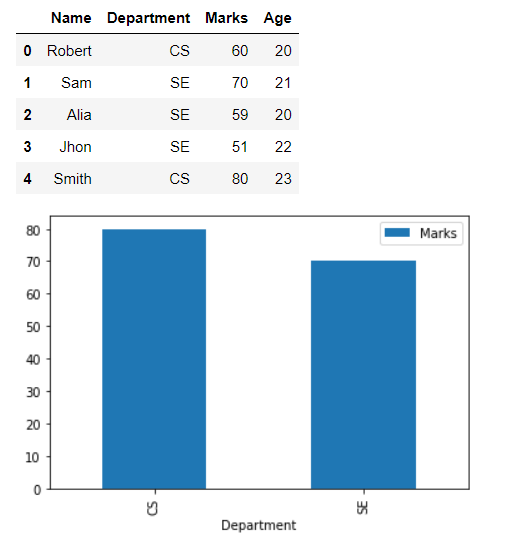
Plot Grouped Data Using a Pie Chart in Pandas
In this example, we have the students’ data with their marks in each subject. First, we will group the data according to the names, calculate each student’s average marks, and plot them using a pie chart.
Every color or sector of the pie chart indicates the mean marks of each student.
#Python 3.x import pandas as pd import matplotlib.pyplot as plt df = pd.DataFrame( 'Name': ['Robert', 'Robert', 'Alia', 'Alia', 'Smith', 'Smith'], 'Subject': ['Java', 'Python', 'Java', 'Python', 'Java', 'Python'], 'Marks': [60, 70, 59, 51, 80, 70] >) display(df) df.groupby('Name')['Marks'].mean().plot(kind='pie') plt.show() 
I am Fariba Laiq from Pakistan. An android app developer, technical content writer, and coding instructor. Writing has always been one of my passions. I love to learn, implement and convey my knowledge to others.