- Сканирование IP устройств в локальной сети. Python
- Python Ping
- Ping Server in Python Using the subprocess.call() Method
- Ping Server in Python Using the os.system() Method
- Ping Server in Python Using the ping3.ping() Function
- Related Article — Python Network
- Ping With Python
- 🌟 What is Ping?
- 🌟 Windows Ping
- 🌟 os module
- 🌟 pythonping
- 🌟 Conclusion
Сканирование IP устройств в локальной сети. Python
Немного подумав, пришел к выводу что самое простое это просто пингануть всю локальную сеть. На самом деле Ping это название утилиты которая входит в ОС, а сама эта хрень называется ICMP Echo-Request( запрос ) и ICMP Echo-Reply( ответ ). К стати пинг не гарантирует что устройство не доступно, так как ответ на пинг может быть просто запрещен на устройстве или брандмауэре .
ICMP (Internet Control Message Protocol — протокол межсетевых управляющих сообщений) — сетевой протокол, входящий в стек протоколов TCP/IP.
Вообщем он там зарыт где то глубоко глубоко, писать реализацию своего стека мне уж точно не под силу. По этому будем пользоваться уже готовой системной утилитой. Для отправки ICMP Echo-Request мы должны иметь права АДМИНИСТРАТОРА ( root ). Поехали.
Первым дело узнаем IP нашего сетевого интерфейса, в какой мы вообще сети :
import socket def getMyIp(): s = socket.socket(socket.AF_INET, socket.SOCK_DGRAM) #Создаем сокет (UDP) s.setsockopt(socket.SOL_SOCKET, socket.SO_BROADCAST, 1) # Настраиваем сокет на BROADCAST вещание. s.connect(('', 0)) return s.getsockname()[0]- socket.AF_INET — для сокета используем IPv4 .
- socket.SOCK_DGRAM — тип сокета. Датаграммный сокет (UDP) .
- getsockname() — Вернет сокету его собственный адрес.
Это наверное не самый элегантный способ.Но должен работать в любой локальной сети, которая позволяет широковещательную рассылку UDP и не требует доступа куда либо. Есть еще идее ? Пишите в комментах )
Далее нам надо узнать платформу. В Windows и Linux команда будет выглядеть немного по разному. Для определение ОС в Питоне есть команды platform.system() которая входит в стандартную библиотеку OS . Возвращает имя системы / ОС, например ‘Linux’ , ‘Windows’ , или ‘Java’ . Пустая строка возвращается, если значение не может быть определено :
import os import platform oc = platform.system() if (oc == "Windows"): ping_com = "ping -n 1 " else: ping_com = "ping -c 1 "Введем диапазон адресов для сканирования :
start_point = int(input("Enter the Starting Number: ")) end_point = int(input("Enter the Last Number: "))Ну теперь напишем саму функцию сканирования :
net = getMyIp() net_split = net.split('.') a = '.' net = net_split[0] + a + net_split[1] + a + net_split[2]+ a def scan_ip(ip): addr = net + str(ip) comm = ping_com + addr response = os.popen(comm) data = response.readlines() for line in data: if 'TTL' in line: print(addr, "--> Ping Ok") break- os.popen(comm) — Класс Popen Python выполняет дочернюю программу в новом процессе.
- data = response.readlines() — читаем ответ от утилиты.
- Дальше просто парсим ответ, если есть TTL в строке значит пинг успешен.
Еще добавим многопоточность что бы быстрей пинговать. Весь код целиком :
import os import platform import threading import socket from datetime import datetime def getMyIp(): s = socket.socket(socket.AF_INET, socket.SOCK_DGRAM) #Создаем сокет (UDP) s.setsockopt(socket.SOL_SOCKET, socket.SO_BROADCAST, 1) # Настраиваем сокет на BROADCAST вещание. s.connect(('', 0)) return s.getsockname()[0] def scan_Ip(ip): addr = net + str(ip) comm = ping_com + addr response = os.popen(comm) data = response.readlines() for line in data: if 'TTL' in line: print(addr, "--> Ping Ok") break net = getMyIp() print('You IP :',net) net_split = net.split('.') a = '.' net = net_split[0] + a + net_split[1] + a + net_split[2] + a start_point = int(input("Enter the Starting Number: ")) end_point = int(input("Enter the Last Number: ")) oc = platform.system() if (oc == "Windows"): ping_com = "ping -n 1 " else: ping_com = "ping -c 1 " t1 = datetime.now() print("Scanning in Progress:") for ip in range(start_point, end_point): if ip == int(net_split[3]): continue potoc = threading.Thread(target=scan_Ip, args=[ip]) potoc.start() potoc.join() t2 = datetime.now() total = t2 - t1 print("Scanning completed in: ", total)
Получилось достаточно простая программка. В следующий раз добавим еще отображение MAC адреса и Vendor . Можно еще добавить определение сетевого имени ПК и т.д.
Ошибка в тексте? Выделите её и нажмите «Ctrl + Enter»
Python Ping

- Ping Server in Python Using the subprocess.call() Method
- Ping Server in Python Using the os.system() Method
- Ping Server in Python Using the ping3.ping() Function
This tutorial will explain various methods to ping a server using Internet Control Message Protocol (ICMP) in Python. Ping is used to check if a particular server is available or not on an Internet Protocol. It measures the time it takes for a message to reach the destination (server) and for a server response to reach the source.
Ping Server in Python Using the subprocess.call() Method
The subprocess.call(command) method takes command as input and executes it. It returns 0 if the command executes successfully.
The command to ping a server will be ping -c 1 host_address for Unix and ping -n 1 host_address for Windows, where 1 is the number of packets and host_address is the server address we want to ping.
We can use the platform.system() method first to check the OS of the machine and then run the command accordingly. The below example code demonstrates how to use the subprocess.call() method to execute the command to ping a server in Python.
import platform import subprocess def myping(host): parameter = '-n' if platform.system().lower()=='windows' else '-c' command = ['ping', parameter, '1', host] response = subprocess.call(command) if response == 0: return True else: return False print(myping("www.google.com")) Ping Server in Python Using the os.system() Method
The os.system(command) method takes the command (a string) as input and executes it in a subshell. The method returns 0 if the command executes without any error.
We can use the os.system() method in the following way to execute the ping server command:
import os def myping(host): response = os.system("ping -c 1 " + host) if response == 0: return True else: return False print(myping("www.google.com")) Ping Server in Python Using the ping3.ping() Function
The ping(addr) function of the ping3 module takes server address as input and returns the ping time as output if the server is available and returns False if it is not available.
We can install the ping3 module with the root privileges.
We can pass the server address to the ping() method to ping the server.
from ping3 import ping def myping(host): resp = ping(host) if resp == False: return False else: return True print(myping("www.google.com")) Related Article — Python Network
Ping With Python

At one point in life, you will ping if you are a programmer, techy, network engineer or in the IT World. This simple command allows you to check if a remote device is alive, and it offers some other amenities.
🌟 What is Ping?
According to Tech Target, a ping (Packet Internet or Inter-Network Groper) is a basic Internet program that allows a user to test and verify if a particular destination IP address exists and can accept requests in computer network administration.

Ping measures the round-trip time for messages sent from the originating host to a destination computer that are echoed back to the source.
🌟 Windows Ping
In windows, you could simply ping in your terminal. Let’s ping google
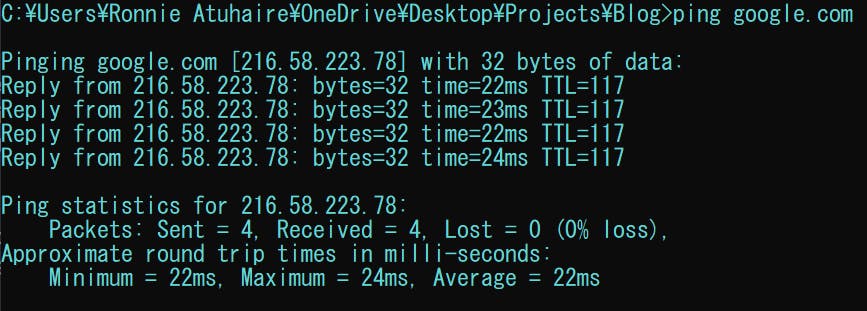
Output
The command below returns the same output above since we have the IP translation of google.com.
What if you have a bunch of hosts or remote computers that you really want to check if they are online and running? You need to use some tools or you could write your own ping sweep programmatically.
This can also come in handy for pen-testers and network engineers who want to check for all subnets under a particular IP.
We could achieve the same output above by using the os module
🌟 os module
The OS module in Python provides functions for interacting with the operating system. OS comes under Python’s standard utility modules.
import os response = os.popen('ping -n 1 google.com') for line in response.readlines(): print(line) 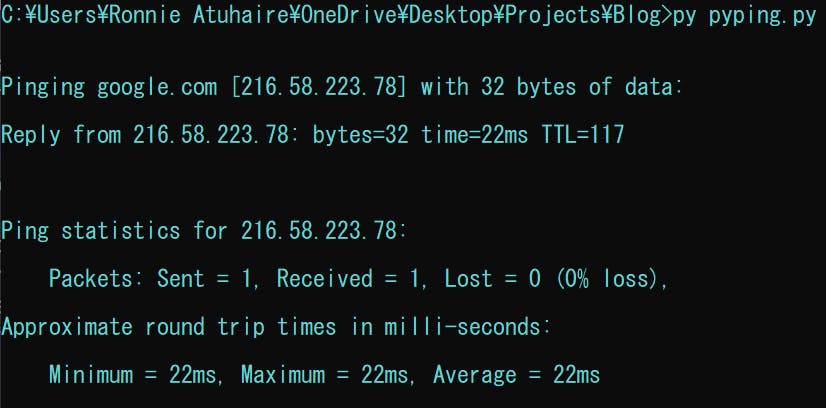
Output; The popen() function executes the command specified by the string command. It creates a pipe between the calling program and the executed command
Before I proceed, let me explain these major keywords that you will continuously come across.
TTL 💨 Time to live (TTL) refers to the amount of time or “hops” that a packet is set to exist inside a network before being discarded by a router.
byte 💨 The payload of the packet.
timeout 💨 How long before considering a non-received response lost, in seconds?
count 💨 The number of ICMP packets to send in sequence.
ICMP 💨 ICMP (Internet Control Message Protocol) is an error-reporting protocol that network devices such as routers use to generate error messages to the source IP address when network problems prevent the delivery of IP packets.
RTT 💨 (Round-trip Time) Measure (in milliseconds) of the latency of a network — that is, the time between initiating a network request and receiving a response.
🌟 pythonping
pythonping is a simple way to ping in Python. With it, you can send ICMP Probes to remote devices like you would do from the terminal.
You can simply grab it by pip install pythonping
Create a new file and we start writing some code.
from pythonping import ping response_list = ping('216.58.223.78', size=40, count=5) print(response_list) With this ping, we sent 5 ICMP packets with a payload of 40 bytes to Google.
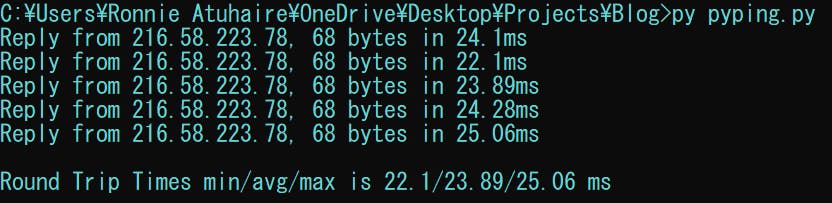
To see our average RTT, we can print the rtt_avg_ms from the response_list object.
print(response_list.rtt_avg_ms) We could also ping a bunch of sites using a for loop;
target_hosts = ['nytimes.com', 'github.com', 'google.com', 'reddit.com', 'hashnode.com', 'producthunt.com'] def ping_all(targets): for target in targets: print(ping(target, size=40, count=2)) ping_all(target_hosts) I will be writing how to identify hosts on a network and ping them using python subprocess and ipaddress modules in the another article in order to keep this short.
🌟 Conclusion
Once again, hope you learned something today from my little closet.
Please consider subscribing or following me for related content, especially about Tech, Python & General Programming.
You can show extra love by buying me a coffee to support this free content and I am also open to partnerships, technical writing roles, collaborations and Python-related training or roles.

📢 You can also follow me on Twitter : ♥ ♥ Waiting for you! 🙂