- Detect and read QR codes with OpenCV in Python
- cv2.QRCodeDetector
- Detect and read QR codes from an image
- Detect and read QR codes from camera video
- OpenCV QR Code Scanner ( C++ and Python )
- QR Code Scanner in OpenCV
- C++ Code
- Python Code
- Output
- Terminal Output
- Comparison
- Speed
- Robustness
- Features
- References
- Subscribe & Download Code
- Python OpenCV: Detecting and Decoding a QRCode
- Introduction
- The Code
- Testing the code
Detect and read QR codes with OpenCV in Python
This article describes how to detect and read QR codes with OpenCV in Python.
- cv2.QRCodeDetector
- Detect and read QR codes from an image
- Detect and read QR codes from camera video
See the following article on how to create a QR code.
See the following article on how to detect and read barcodes instead of QR codes.
You can also use ZBar (pyzbar). Although not thoroughly verified, ZBar seems to have better detection accuracy.
The version of OpenCV used in the sample code is 4.6.0 .
import cv2 print(cv2.__version__) # 4.6.0 cv2.QRCodeDetector
The cv2.QRCodeDetector class is used to detect and read QR codes.
In version 4.3 , detectAndDecodeMulti() was added to detect and decode multiple QR codes at once.
Although detect() to only detect and decode() to decode based on the detected coordinates are also provided, they are not mentioned here.
Detect and read QR codes from an image
The following image is used as an example.
The text stored in each QR Code is, from left to right, QR Code One , QR Code Two , and QR Code Three . The rightmost QR Code is masked with a white square in the center to make it difficult to read.
img = cv2.imread('data/src/qrcode.png') 
Create an instance of cv2.QRCodeDetector and execute detectAndDecodeMulti() . Note that the result may differ depending on the version and environment.
qcd = cv2.QRCodeDetector() retval, decoded_info, points, straight_qrcode = qcd.detectAndDecodeMulti(img) retval is True if a QR code is detected and False if none is detected.
decoded_info is a tuple whose elements are strings stored in QR codes. If it can be detected but not decoded, it is an empty string » .
print(decoded_info) # ('QR Code Two', '', 'QR Code One') points is a numpy.ndarray representing the coordinates of the four corners of the detected QR Code.
print(type(points)) # print(points) # [[[290.9108 106.20954 ] # [472.8162 0.8958926] # [578.5836 184.1002 ] # [396.0495 287.81277 ]] # # [[620. 40. ] # [829. 40. ] # [829. 249. ] # [620. 249. ]] # # [[ 40. 40. ] # [249. 40. ] # [249. 249. ] # [ 40. 249. ]]] print(points.shape) # (3, 4, 2) straight_qrcode is a tuple whose elements are numpy.ndarray . The numpy.ndarray is a binary value of 0 and 255 representing the black and white of each cell of the QR code.
print(points.shape) # (3, 4, 2) print(type(straight_qrcode)) # print(type(straight_qrcode[0])) # print(straight_qrcode[0].shape) # (21, 21) Draw frames for the detected QR code and superimpose the decoded text.
img = cv2.polylines(img, points.astype(int), True, (0, 255, 0), 3) for s, p in zip(decoded_info, points): img = cv2.putText(img, s, p[0].astype(int), cv2.FONT_HERSHEY_SIMPLEX, 1, (0, 0, 255), 2, cv2.LINE_AA) cv2.imwrite('data/dst/qrcode_opencv.jpg', img) 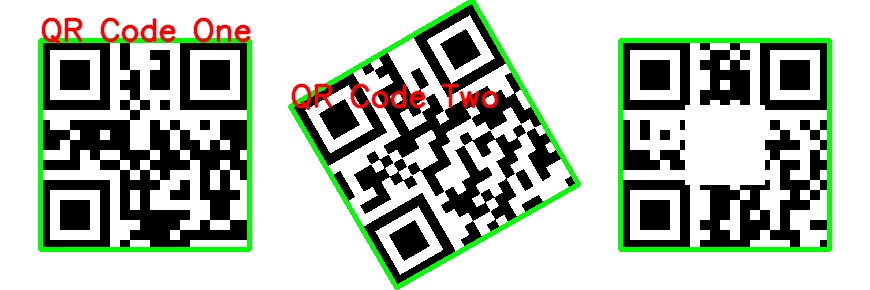
Detect and read QR codes from camera video
The following is a sample code that detects and reads barcodes from real-time camera video.
See the following article for more information on the handling of videos in OpenCV.
Press q on the keyboard to exit.
import cv2 camera_id = 0 delay = 1 window_name = 'OpenCV QR Code' qcd = cv2.QRCodeDetector() cap = cv2.VideoCapture(camera_id) while True: ret, frame = cap.read() if ret: ret_qr, decoded_info, points, _ = qcd.detectAndDecodeMulti(frame) if ret_qr: for s, p in zip(decoded_info, points): if s: print(s) color = (0, 255, 0) else: color = (0, 0, 255) frame = cv2.polylines(frame, [p.astype(int)], True, color, 8) cv2.imshow(window_name, frame) if cv2.waitKey(delay) & 0xFF == ord('q'): break cv2.destroyWindow(window_name) If a QR code can be detected but not decoded, a red frame is displayed; if it can be decoded, a green frame is displayed. If you want to display the decoded string, please refer to the still image example above.
In an actual application, the while loop would be terminated by break when the decoded_info string is obtained, and the application would move on to operation using the string.
OpenCV QR Code Scanner ( C++ and Python )

Recently, OpenCV 4.0 was released with many improvements and new features. One of them is the QR code scanner. We had already written about Bar Code and QR code scanner in a previous post, which uses an external library – ZBar. So, we wanted to check how the OpenCV scanner works and if it is better than the Zbar one. In this post, we will see how to use this new QR code scanner from OpenCV. We will also compare it with the ZBar based scanner in case you want to chose which one to use.
You will need OpenCV 3.4.4 or 4.0.0 and above to run the code. In case you want to upgrade, Please refer to the posts:
OpenCV 3.4.4 on Windows / Ubuntu ,
OpenCV 4.0.0 on Windows / Ubuntu
QR Code Scanner in OpenCV
If you want to get more details on What exactly is a QR Code, I would suggest you visit the Wikipedia. Let’s just dive into the code for QR Code Detection. Please download the code from the link below. We have also provided code for comparing ZBar and OpenCV QR Code Detector in the download section.
Download Code To easily follow along this tutorial, please download code by clicking on the button below. It’s FREE!
C++ Code
First include the required header files
#include #include #include #include #include using namespace cv; using namespace std;
Utility function to display the box around the detected QR Code
void display(Mat &im, Mat &bbox) < int n = bbox.rows; for(int i = 0 ; i < n ; i++) < line(im, Point2i(bbox.at(i,0),bbox.at(i,1)), Point2i(bbox.at((i+1) % n,0), bbox.at((i+1) % n,1)), Scalar(255,0,0), 3); > imshow("Result", im); > In the main funcion, we first read the image. Then, we instantiate a QRCodeDetector Object and use the detectAndDecode method to find the data and the location of the QR Code. Finally, we display the results.
int main(int argc, char* argv[]) < // Read image Mat inputImage; if(argc>1) inputImage = imread(argv[1]); else inputImage = imread(«qrcode-learnopencv.jpg»); QRCodeDetector qrDecoder = QRCodeDetector::QRCodeDetector(); Mat bbox, rectifiedImage; std::string data = qrDecoder.detectAndDecode(inputImage, bbox, rectifiedImage); if(data.length()>0) < cout else cout
Python Code
import cv2 import numpy as np import sys import time
Next, we read the input image, you can specify your own image from the command line
if len(sys.argv)>1: inputImage = cv2.imread(sys.argv[1]) else: inputImage = cv2.imread("qrcode-learnopencv.jpg") Utility function to display the box around the QR Code
# Display barcode and QR code location def display(im, bbox): n = len(bbox) for j in range(n): cv2.line(im, tuple(bbox[j][0]), tuple(bbox[ (j+1) % n][0]), (255,0,0), 3) # Display results cv2.imshow("Results", im) Create a QRCodeDetector Object and detect the code and its location using the detectAndDecode method.
qrDecoder = cv2.QRCodeDetector() # Detect and decode the qrcode data,bbox,rectifiedImage = qrDecoder.detectAndDecode(inputImage) if len(data)>0: print("Decoded Data : <>".format(data)) display(inputImage, bbox) rectifiedImage = np.uint8(rectifiedImage); cv2.imshow("Rectified QRCode", rectifiedImage); else: print("QR Code not detected") cv2.imshow("Results", inputImage) cv2.waitKey(0) cv2.destroyAllWindows() Output
The decoded data is shown on the Terminal and a bounding box is drawn around the detected QR Code.
Terminal Output
Time Taken for Detect and Decode : 0.044 seconds Decoded Data : https://learnopencv.com
Comparison
Now, let us compare the two implementations on the following grounds. Surprisingly, ZBar based scanner outperforms OpenCV’s QR Code in all aspects.
Speed
The ZBar library is almost twice as fast as the OpenCV QR code detector.
Robustness
The ZBar library produces more robust results as compared to OpenCV on the following factors as shown in the above video :
- ZBar is better or comparable at various rotation
- ZBar is better at different image sizes as seen from the different zoom levels in the video
- ZBar is better at handling perspective distortions ( when the image is not upright w.r.t the camera.
Features
The ZBar library provides support for Bar codes as well, which is not yet there in OpenCV.
Overall, we can say that QR Code is launched recently in OpenCV and it might get better in future releases. Till then, if you want to use Bar code or QR Code in your application, stick with ZBar.
References
Subscribe & Download Code
If you liked this article and would like to download code (C++ and Python) and example images used in this post, please click here. Alternately, sign up to receive a free Computer Vision Resource Guide. In our newsletter, we share OpenCV tutorials and examples written in C++/Python, and Computer Vision and Machine Learning algorithms and news.
Python OpenCV: Detecting and Decoding a QRCode
In this tutorial we will learn how to detect and decode a QR Code on an image, using Python and OpenCV.
Introduction
In this tutorial we will learn how to detect and decode a QR Code on an image, using Python and OpenCV.
This tutorial was tested with version 4.0.0 of OpenCV and version 3.7.2 of Python.
The Code
We will start by importing the cv2 module.
After that we will read an image with a QR code from the file system, so we can later decode it.
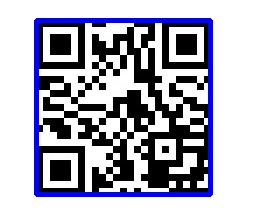
You can use this online tool to generate a QR code with a text of your choice. In my case, the QR Code I’ll generate will contain the text “TechTutorialsX!“.
I’ve downloaded the generated QR Code and added some text above in an image editor, just to add some more content to the image. You can check below in figure 1 the image used in the test.

After that we will read the image with a call to the imread function from the cv2 module. As input we need to pass the path to the file, as a string.
image = cv2.imread('C:/Users/N/Desktop/testQRCode.png') After that we will create an object of class QRCodeDetector, which we will use for detecting and decoding the QR Code.
qrCodeDetector = cv2.QRCodeDetector()
Followed by that we will call the detectAndDecode method on this object, passing as input the image where we want to detect the QR Code.
This method returns a tuple of values, by the following order:
- Decoded text [1]. It is an empty string if the QR Code is not found.
- Output array of vertices of the found QR code. It will be empty if not found [1].
- Optional output image containing the rectified and binarized QR Code [1]. We won’t make use of it in this tutorial.
decodedText, points, _ = qrCodeDetector.detectAndDecode(image)
Note that the _ is a simple convention for ignoring the third returned value which, as we have mentioned before, we won’t use.
Since there might be cases where there is no QR Code in the image, we will do a check on the returned points. If there are no points, it means no QR Code was not found in the image.
if points is not None: # QR Code detected handling code else: print("QR code not detected") Assuming that a QR Code was detected, we will then draw lines delimiting it, using the array of vertices returned by the detectAndDecode method.
We will simply get the length of the array and iterate by each vertex, connecting it to the one immediately after. Note that the last vertex from the array should connect with the first, to close the shape around the QR Code.
We can draw a line in an image by calling the line function from the cv2 module. You can check in more detail how to do it here.
In short, as already mentioned, we call the line function passing the following inputs:
- image: the image on which we will draw the line.
- point 1: first point of the line. It is specified as a tuple with the x and y coordinates.
- point 2: second point of the line. It is specified as a tuple with the x and y coordinates.
- color: color of the line. This is defined as a tuple with the 3 colors in the BGR format. We will set it to blue.
- thickness: thickness of the line, specified in pixels. We will set it to 5 px.
Note that, when passing the points from the vertices array, we need to convert them to tuples.
nrOfPoints = len(points) for i in range(nrOfPoints): nextPointIndex = (i+1) % nrOfPoints cv2.line(image, tuple(points[i][0]), tuple(points[nextPointIndex][0]), (255,0,0), 5)
After this we will print the decoded text from the QR Code and then display the image. The image should now show the QR Code with blue lines around its shape.
print(decodedText) cv2.imshow("Image", image) cv2.waitKey(0) cv2.destroyAllWindows() The final code can be seen below.
import cv2 image = cv2.imread('C:/Users/N/Desktop/testQRCode.png') qrCodeDetector = cv2.QRCodeDetector() decodedText, points, _ = qrCodeDetector.detectAndDecode(image) if points is not None: nrOfPoints = len(points) for i in range(nrOfPoints): nextPointIndex = (i+1) % nrOfPoints cv2.line(image, tuple(points[i][0]), tuple(points[nextPointIndex][0]), (255,0,0), 5) print(decodedText) cv2.imshow("Image", image) cv2.waitKey(0) cv2.destroyAllWindows() else: print("QR code not detected") Testing the code
To test the code, simply run it with a tool of your choice. I’m using IDLE, a Python IDE.
You should obtain a result similar to figure 2. As can be seen, the blue lines are drown around the QR Code shape and the text encoded on it was printed to the Python prompt.